
Android EditText使用
前言
對於android的開發人員來說,EditText應該已經很熟悉了.算的上是基礎中的基礎了.這裡來講講除了其本使用外的一些其它的使用方式
顯示錯誤資訊
對於前端使用者來說,校驗使用者的輸入是一項基本的工作.這裡當用戶的輸入現預期不符時,就需提示使用者輸入有錯.這裡方式有很多種.比如彈對話方塊的,有彈Toast的.以上方式雖然可啟到提示使用者的效果,但是使用者體驗欠佳.這裡介紹一下EditText自帶的錯誤提示方式吧.
先上一張效果圖.
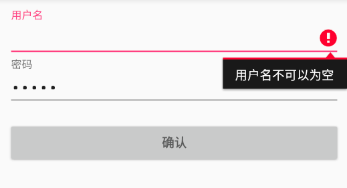
可以看到當用戶名為空點選確認時,會提示使用者名稱不可以為空.同時焦點會自動跳轉到該輸入框.這個使用者的體驗也很好,可以立刻知道是哪輸入出現錯誤.
下面上程式碼.
@Override
public void onClick(View view) {
if (view.getId() == R.id.confirm) {
String nameStr = name.getText().toString();
if (Tools.notNull(nameStr) == false) {
name.setError(getResources().getString(R.string.name_null_error));
//以下程式碼用於重新獲取焦點 Android EditText 與鍵盤互動
Android EditText 的幾個屬性中,有三個是與鍵盤互動的.分別是android:imeActionId,android:imeActionLabel,及android:imeOptions,下面就三個屬性進行學習一下
android:imeOptions
在使用輸入法時,鍵盤的右下角般都是回車,但是有的時候,確會變成前往,search等.這裡是怎麼實現的呢,其實也很簡單,使用的就是imeOptions,支援的引數有16個,只這隻列舉常用的幾個
| 引數 | 鍵盤顯示 | 對應常量 | 預設效果 |
|---|---|---|---|
| actionUnspecified | 未指定 | EditorInfo.IME_ACTION_UNSPECIFIED | 跳到一下個輸入框 |
| actionNone | 沒有動作 | EditorInfo.IME_ACTION_NONE | 跳到一下個輸入框 |
| actionGo | 去往 | EditorInfo.IME_ACTION_GO | 跳到一下個輸入框 |
| actionSearch | 搜尋 | EditorInfo.IME_ACTION_SEARCH | 跳到一下個輸入框 |
| actionSend | 傳送 | EditorInfo.IME_ACTION_SEND | 跳到一下個輸入框 |
| actionNext | 下一個 | EditorInfo.IME_ACTION_NEXT | 跳到一下個輸入框 |
| actionDone | 完成 | EditorInfo.IME_ACTION_DONE | 鍵盤推出 |
不過以上引數不同的輸入法可能會有不同的相應.比如actionDone,有的顯示完成,有的顯示明是一個對勾的icon
由於大部分imeOptions的預設效果都只是跳到下一個輸入框或者退出,不能實現一些特定的操作.需要在程式碼寫一定的邏輯來實現更好的效果.
 name.setOnEditorActionListener(new TextView.OnEditorActionListener() {
            @Override
            public boolean onEditorAction(TextView textView, int actionId, KeyEvent keyEvent) {
                if (actionId == EditorInfo.IME_ACTION_DONE) {
                    LogUtil.debug("完成按鈕被按下了");
                    return true;
                }
                return false;
            }
        });
android:imeActionLabel and imeActionId
imeActionLable和imeActionId需要配套使用,這裡放在一起介紹.
先來看看android:imeActionLabel
使用此屬性可以控制右下確按鈕的文字顯示,比如使用如下程式碼
    <EditText
        android:id="@+id/name"
        android:layout_width="match_parent"
        android:layout_height="wrap_content"
        android:hint="@string/user_name"
        android:imeOptions="actionSend"
        android:imeActionLabel="使用者名稱"
        android:imeActionId="1024"
        android:inputType="text"
        android:maxLines="1" />
效果如下
由於按鈕大小的限制,這裡建議android:imeActionLabel設定的字元數不要超過3個
但是由於配置android:imeActionLabel後,actionOption的值將被重寫成actionUnspecified,這時在程式碼裡獲取的actionId的值將永遠是0,為了能區別使用者是否點選的回車鍵,需要再設定一個android:imeActionId屬性.一般設成大於10就不會與現在的衝突.所以需要對程式碼進行一下修改
    name.setOnEditorActionListener(new TextView.OnEditorActionListener() {
            @Override
            public boolean onEditorAction(TextView textView, int actionId, KeyEvent keyEvent) {
                if (actionId == 1024) {
                    LogUtil.debug("測試按鈕被按下了");
                    return true;
                }
                return false;
            }
        });
TextInputLayout
現在來介紹一下TextInputLayout,這個控制元件並不是用來輸入的,而是配合EditText來使用的,可以使EditText擁有更好的顯示效果,下面先看一下效果
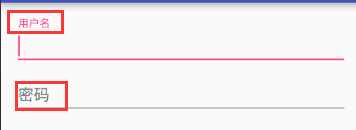
注意圈起來的位置,當這個EditText獲取到焦點時,裡面的提示資訊是自動的浮動到上面,且還有一定的動畫效裡,使用起來會給使用者更好的體驗.這裡看一下程式碼
 <android.support.design.widget.TextInputLayout
            android:layout_width="match_parent"
            android:layout_height="wrap_content">

            <EditText
                android:id="@+id/name"
                android:layout_width="match_parent"
                android:layout_height="wrap_content"
                android:hint="@string/user_name"
                android:imeActionId="1024"
                android:imeActionLabel="測試"
                android:inputType="text"
                android:maxLines="1" />

        </android.support.design.widget.TextInputLayout>

        <android.support.design.widget.TextInputLayout
            android:layout_width="match_parent"
            android:layout_height="wrap_content">

            <EditText
                android:id="@+id/password"
                android:layout_width="match_parent"
                android:layout_height="wrap_content"
                android:hint="@string/password"
                android:imeActionId="@+id/login"
                android:imeActionLabel="結束"
                android:inputType="textPassword"
                android:maxLines="1" />

        </android.support.design.widget.TextInputLayout>
其中浮動的內容為EditText的hint屬性.對於前端人員也省去了畫Lable的時間.
結語
關於EditText的其它用法就先介紹到這裡.如有更好的其它方式使用方式,請留言.