負載均衡之-haproxy
老規矩,先介紹?複製一段?
1)HAProxy提供高可用性、負載均衡以及基於TCP和HTTP應用的代理,支援虛擬主機,它是免費、快速並且可靠的一種解決方案。
2)HAProxy特別適用於那些負載特大的web站點,這些站點通常又需要會話保持或七層處理。
3)HAProxy執行在當前的硬體上,完全可以支援數以萬計的併發連線。並且它的執行模式使得它可以很簡單安全的整合進您當前的架構中, 同時可以保護你的web伺服器不被暴露到網路上。
4)HAProxy實現了一種事件驅動, 單一程序模型,此模型支援非常大的併發連線數。多程序或多執行緒模型受記憶體限制 、系統排程器限制以及無處不在的鎖限制,很少能處理數千併發連線。事件驅動模型因為在有更好的資源和時間管理的使用者空間(User-Space) 實現所有這些任務,所以沒有這些問題。此模型的弊端是,在多核系統上,這些程式通常擴充套件性較差。這就是為什麼他們必須進行優化以 使每個CPU時間片(Cycle)做更多的工作。
--------------------- 原文:
安裝haproxy
推薦直接yum安裝吧:
yum install -y haproxy
haproxy的配置檔案在/etc/haproxy/下面!
haproxy配置檔案引數,在http://www.ywnds.com/?p=6749 部落格中有詳細的說明,這裡只說明haproxy的用法以及涉及到的引數說明!
首先來測試負載均衡:
兩臺後端伺服器ip為:10.0.102.204和10.0.102.214,是nginx伺服器!
10.0.102.179作為排程器,使用的是haproxy!
yum安裝完成之後,在配置檔案中加入如下引數,也可以修改原配置檔案!
frontend webserver bind *:80 default_backend web_test backend web_test balance roundrobin server app1 10.0.102.204:80 check server app2 10.0.102.214:80 check
#frontend定義了一些監聽的套接字,bind監聽套接字的埠,*表示監聽所有的ip,default_backend定義了real server伺服器組
#backend:指定後端伺服器組,與前面的frontend對應,balance表示使用的排程演算法,server指定的是後面真實伺服器的地
測試如下:
[[email protected] ~]# curl 10.0.102.179
The host ip is 10.0.102.204
[[email protected] ~]# curl 10.0.102.179
The hosname is test3
使用listen命令
上面的配置可以使用一個listen配置,同時還可以加上權重:
listen  webserver
    bind   *:80
    stats  enable          #啟用haproxy自帶的介面監控
    balance     roundrobin
    server  app1 10.0.102.204:80  check weight 2
    server  app2 10.0.102.214:80  check weight 1
訪問測試:
[[email protected] ~]# curl 10.0.102.179
The host ip is 10.0.102.204
[[email protected] ~]# curl 10.0.102.179
The host ip is 10.0.102.204
[[email protected] ~]# curl 10.0.102.179
The hosname is test3
[[email protected] ~]# curl 10.0.102.179
The host ip is 10.0.102.204
[[email protected] ~]# curl 10.0.102.179
The host ip is 10.0.102.204
[[email protected] ~]# curl 10.0.102.179
The hosname is test3
[[email protected] ~]#
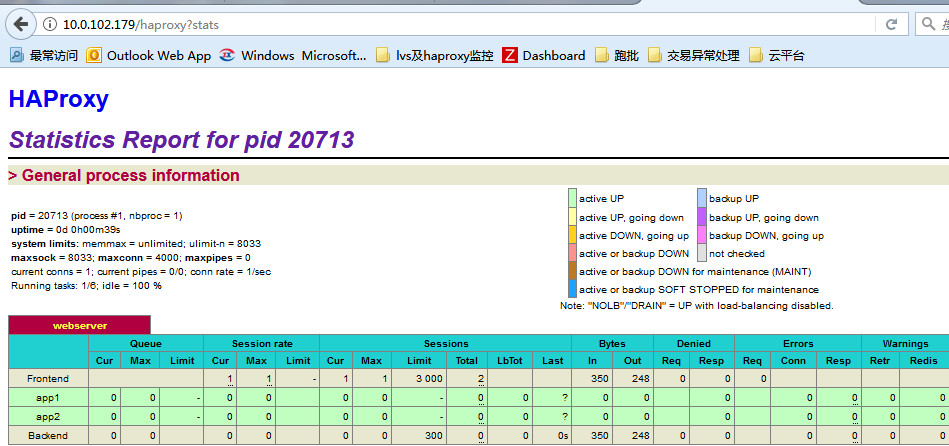
訪問其web介面:
url的格式如下:
http://10.0.102.179/haproxy?stats

這個介面的資訊統計還是蠻全面的!
訪問這個介面的時候,介面上顯示了haproxy的版本號,我們可以設定不顯示版本號,並且還可以加上使用者認證!
配置如下:
listen  webserver
    bind   *:80
    stats  enable
    stats  hide-version          #隱藏版本資訊
    stats  realm FUCK            #顯示提示資訊
    stats  auth admin:123456     #認證的使用者名稱和密碼
    balance     roundrobin
    server  app1 10.0.102.204:80  check weight 2
    server  app2 10.0.102.214:80  check weight 1
再次訪問url時候,會出現如下提示:

輸入正確的使用者名稱和密碼之後,會進入到監控介面,可以看到監控介面中haproxy的版本資訊已經消失!

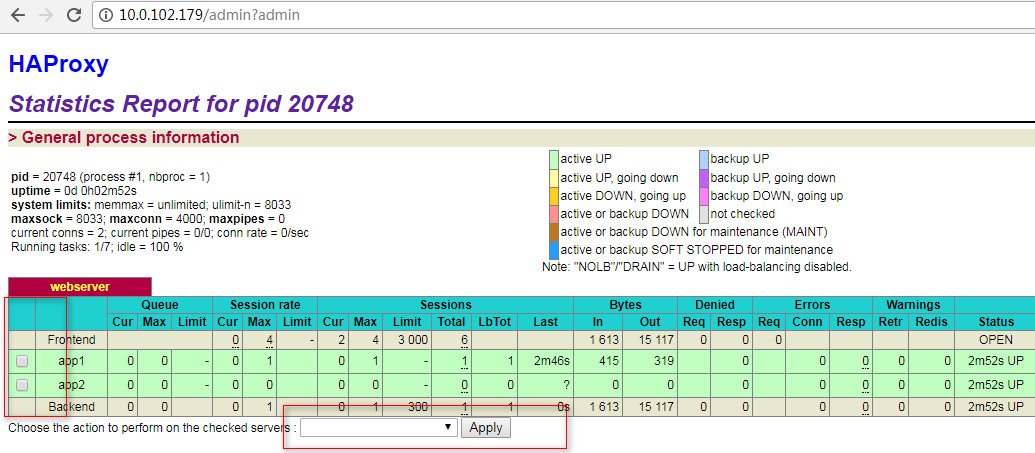
相比較於lvs和keepalived,haproxy的web介面已經很讓人驚奇了!我們還可以在web介面進行一些操作,只需要開啟管理員的視窗即可!
listen  webserver
    bind   *:80
    stats  enable
    stats  hide-version
    stats  realm FUCK
    stats  auth admin:123456
    stats  admin if TRUE
    stats  uri /admin?admin

    balance     roundrobin
    server  app1 10.0.102.204:80  check weight 2
    server  app2 10.0.102.214:80  check weight 1
開啟如下的url:
http://10.0.102.179/admin?admin
輸入使用者名稱和密碼之後

上面的監聽都是監聽同一埠,可以藉助於listen和frontend設定監聽不同的埠!
我們把其中的一個後端伺服器的埠改為監聽8080埠!
[[email protected] sbin]# netstat -lntp
Active Internet connections (only servers)
Proto Recv-Q Send-Q Local Address               Foreign Address             State       PID/Program name
tcp        0      0 0.0.0.0:22                  0.0.0.0:*                   LISTEN      1028/sshd
tcp        0      0 0.0.0.0:8080                0.0.0.0:*                   LISTEN      1293/nginx
tcp        0      0 :::22                       :::*                        LISTEN      1028/sshd
[[email protected] sbin]#
修改haproxy的配置檔案如下:
listen  webserver
    bind   *:80
    balance     roundrobin
    server  app1 10.0.102.214:80  check weight 2

    stats  enable
    stats  hide-version
    stats  realm FUCK
    stats  auth admin:123456
    stats  admin if TRUE
    stats  uri /admin?admin

frontend  test
    bind   *:8080
    default_backend  back_srv
    backend  back_srv
    balance roundrobin
    server  app2 10.0.102.204:8080  check weight 1
然後重新haproxy,測試結果如下:
[[email protected] ~]# curl 10.0.102.179
The hosname is test3
[[email protected] ~]# curl 10.0.102.179:8080
The host ip is 10.0.102.204
上面說明了haproxy的一些簡單應用,但是haproxy都是單機的,接下來我們測試haproxy+keepalived的應用!
使用haproxy做負載均衡,使用keepalived做高可用!
keeplaived配置引數詳解,很詳細的地址: https://blog.csdn.net/mofiu/article/details/76644012
在這裡我們引入了一個vrrp_script引數:
作用:新增一個週期性執行的指令碼。指令碼的退出狀態碼會被呼叫它的所有的VRRP Instance記錄。
注意:至少有一個VRRP例項呼叫它並且優先順序不能為0.優先順序範圍是1-254.
vrrp_script <SCRIPT_NAME> {
          ...
    }

選項說明:
scrip "/path/to/somewhere":指定要執行的指令碼的路徑。
interval <INTEGER>:指定指令碼執行的間隔。單位是秒。預設為1s。
timeout <INTEGER>:指定在多少秒後,指令碼被認為執行失敗。
weight <-254 --- 254>:調整優先順序。預設為2.
rise <INTEGER>:執行成功多少次才認為是成功。
fall <INTEGER>:執行失敗多少次才認為失敗。
user <USERNAME> [GROUPNAME]:執行指令碼的使用者和組。
init_fail:假設指令碼初始狀態是失敗狀態。

解釋:
weight:
1. 如果指令碼執行成功(退出狀態碼為0),weight大於0,則priority增加。
2. 如果指令碼執行失敗(退出狀態碼為非0),weight小於0,則priority減少。
3. 其他情況下,priority不變。
做為master的配置檔案如下:
! Configuration File for keepalived

vrrp_script check_haproxy {
    script "/root/check_haproxy_status.sh"
    interval 3
    weight -5
}


vrrp_instance VI_1 {
    state MASTER
    interface eth0
    virtual_router_id 62
    priority 91
    advert_int 1
    authentication {
        auth_type PASS
        auth_pass 1111
    }

    track_script {

        check_haproxy
    }
    virtual_ipaddress {
        10.0.102.110 dev eth0
    }
}
從的配置檔案與主基本相似,需要更改的是state的狀態和權重值!需要保證兩臺主備的virtual_router_id數值是一樣的!
然後是新增檢測指令碼檔案:
cat check_haproxy_status.sh
#!/bin/bash
if [ $(ps -C haproxy --no-header | wc -l) -eq 0 ];then
        service haproxy start
fi
sleep 2
if [ $(ps -C haproxy --no-header | wc -l) -eq 0 ];then
        service keepalived stop
fi
然後分別在master和backup上啟動keepalived!
測試VIP如下:
[[email protected] sbin]# curl 10.0.102.110
The hosname is test3
[[email protected] sbin]# curl 10.0.102.110
The host ip is 10.0.102.204
[[email protected] sbin]# curl 10.0.102.110
The hosname is test3
[[email protected] sbin]# curl 10.0.102.110
The hosname is test3
[[email protected] sbin]# curl 10.0.102.110
The host ip is 10.0.102.204
我們可以在主上模擬,停掉haproxy的服務,觀察VIP的漂移情況,只有在主上的keepalived服務停掉之後,VIP才會發生漂移!
在線上環境中有一個問題,好像是bug吧!就是keepalived執行長時間之後,會忽然停掉,不知道什麼原因造成。在這裡使用了自己寫的shell指令碼,對keepalived進行監控。
在master上配置檔案,監控指令碼,如下:

[[email protected] log]# cat /etc/keepalived/keepalived.conf
! Configuration File for keepalived

vrrp_script check_haproxy {
    script "/root/check_haproxy_status.sh"
    interval 3
    weight -5
}


vrrp_instance VI_1 {
    state MASTER
    interface eth0
    virtual_router_id 110
    priority 91
    nopreempt
    advert_int 1
    authentication {
        auth_type PASS
        auth_pass 1111
    }

    track_script {

        check_haproxy
    }
    virtual_ipaddress {
        10.0.102.110 dev eth0
    }
}

[[email protected] log]#
cat /etc/keepalived/keepalived.conf
監控指令碼如下:

[[email protected] log]# cat /root/moniter_keepalived.sh
#!/bin/bash
#
#
VIP=10.0.102.110
MASTER=10.0.102.179
BACKUP=10.8.102.221
CONF=/etc/keepalived/keepalived.conf
NodeRole=`grep -i "state" /etc/keepalived/keepalived.conf  | awk '{print $2}'`

check_Vip() {
   ping -c 1 -w 3 $VIP &> /dev/null && return  0  ||  return 1
}

restart_Server() {
   if [ $NodeRole == "MASTER" ];then
      ping -c 1 -w 3 $BACKUP &> /dev/null
      if [ $? -eq 0 ];then
         ssh -l root $BACKUP "/etc/init.d/keepalived stop"
         sleep 2
         /etc/init.d/keepalived restart
         echo `date +%Y-%m-%d_%H:%M` "NodeRole--MASTER: if"
         check_Vip && ssh -l root $BACKUP "/etc/init.d/keepalived start"
      else
         /etc/init.d/keepalived restart
         echo `date +%Y-%m-%d_%H:%M` "NodeRole-Master: else"
      fi
   elif [ $NodeRole == "BACKUP" ];then
      ping -c 1 -w 3 $MASTER &> /dev/null
      if [ $? -eq 0 ];then
         /etc/init.d/keepalived stop
         ssh -l root $MASTER  "/etc/init.d/keepalived restart"
         check_Vip && /etc/init.d/keepalived start
          echo  $(date +%F_%H-%M-%S) "NodeRole-BACKUP: if"
      else
         /etc/init.d/keepalived restart
         echo  $(date +%F_%H-%M-%S) "NodeRole-Backup: else"

      fi
   fi
}

while true;do
   check_Vip
   if [ $? -eq 1 ];then
      restart_Server
   else
      echo "ok"
   fi
   sleep 3
done
cat /root/moniter_keepalived.sh
監控指令碼加上可執行許可權,然後放到後臺執行!
nohup /root/moniter_keepalived.sh > /var/log/nohup.log 2>&1 &
在backup上配置檔案如下:

[[email protected] ~]# cat /etc/keepalived/keepalived.conf
! Configuration File for keepalived

vrrp_script check_haproxy {
    script "/root/check_haproxy_status.sh"
    interval 3
    weight -5
}


vrrp_instance VI_1 {
    state BACKUP
    interface eth0
    virtual_router_id 110
    priority 80
    advert_int 1
    authentication {
        auth_type PASS
        auth_pass 1111
    }

    track_script {

        check_haproxy
    }
    virtual_ipaddress {
        10.0.102.110 dev eth0
    }
}
cat /etc/keepalived/keepalived.conf
監控指令碼如下:

[[email protected] ~]# cat moniter_keepalived.sh
#!/bin/bash
#
#
VIP=10.0.102.110
MASTER=10.0.102.179
BACKUP=10.0.102.221
CONF=/etc/keepalived/keepalived.conf
NodeRole=`grep -i "state" /etc/keepalived/keepalived.conf  | awk '{print $2}'`

check_Vip() {
   ping -c 1 -w 3 $VIP &> /dev/null && return  0  ||  return 1
}

restart_Server() {
   if [ $NodeRole == "MASTER" ];then
      ping -c 1 -w 3 $BACKUP &> /dev/null
      if [ $? -eq 0 ];then
         ssh -l root $BACKUP "/etc/init.d/keepalived stop"
         sleep 2
         /etc/init.d/keepalived restart
         echo `date +%Y-%m-%d_%H:%M` "NodeRole--MASTER: if"
         check_Vip && ssh -l root $BACKUP "/etc/init.d/keepalived start"
      else
         /etc/init.d/keepalived restart
         echo `date +%Y-%m-%d_%H:%M` "NodeRole-Master: else"
      fi
   elif [ $NodeRole == "BACKUP" ];then
      ping -c 1 -w 3 $MASTER &> /dev/null
      if [ $? -eq 0 ];then
         /etc/init.d/keepalived stop
         ssh -l root $MASTER  "/etc/init.d/keepalived restart"
         check_Vip && /etc/init.d/keepalived start
          echo  $(date +%F_%H-%M-%S) "NodeRole-BACKUP: if"
      else
         /etc/init.d/keepalived restart
         echo  $(date +%F_%H-%M-%S) "NodeRole-Backup: else"

      fi
   fi
}


check_Vip
if [ $? -eq 1 ];then
   restart_Server
fi
cat /root/moniter_keepalived.sh
把此監控指令碼加入可執行計劃!
[[email protected] ~]# crontab -l
*/1 * * * * sh /root/moniter_keepalived.sh
當主和備的keepalived都宕機時,主的keepalived就會重新啟動!

