
高可用Redis(六):瑞士軍刀之bitmap,HyperLoglog和GEO
1.bitmap點陣圖
1.1 bitmap點陣圖的概念
首先來看一個例子,字串big,
字母b的ASCII碼為98,轉換成二進位制為 01100010
字母i的ASCII碼為105,轉換成二進位制為 01101001
字母g的ASCII碼為103,轉換成二進位制為 01100111如果在Redis中,設定一個key,其值為big,此時可以get到big這個值,也可以獲取到 big的ASCII碼每一個位對應的值,也就是0或1
例如:
127.0.0.1:6379> set hello big
OK
127.0.0.1:6379> getbit hello 0      # b的二進位制形式的第1位,即為0
(integer) 0
127.0.0.1:6379> getbit hello 1      # b的二進位制形式的第2位,即為1
(integer) 1
big長度為3個位元組,對應的長度為24位,使用getbit命令可以獲取到big對應的位的對應的值
所以Redis是可以直接對位進行操作的
1.2 bitmap的常用命令
1.2.1 setbit命令
setbit key offset vlaue 給點陣圖指定索引設定值例子:
127.0.0.1:6379> set hello big       # 設定鍵值對,key為'hello',value為'big'
OK
127.0.0.1:6379> setbit hello 7 1    # 把hello二進位制形式的第8位設定為1,之前的ASCII碼為98,現在改為99,即把b改為c
(integer) 0                         # 返回的是之前這個位上的值
127.0.0.1:6379> get hello           # 修改之後,獲取'hello'的值,為'cig'
"cig"
上面big的長度只有24位,如果使用setbit命令時,指定的位大於目標的長度時
127.0.0.1:6379> setbit hello 50 1
(integer) 0
127.0.0.1:6379> get hello
"cig\x00\x00\x00 "
從第25開始到第49位,中間用0來填充,第50位才會被設定為1
1.2.2 getbit命令
getbit key offset 獲取點陣圖指定索引的值例子:
127.0.0.1:6379> getbit hello 25
(integer) 0
127.0.0.1:6379> getbit hello 49
(integer) 0
127.0.0.1:6379> getbit hello 50
(integer) 1
1.2.3 bitcount命令
bitcount key [start end] 獲取點陣圖指定範圍(start到end,單位為位元組,如果不指定就是獲取全部)位值為1的個數例子:
127.0.0.1:6379> bitcount hello
(integer) 14
127.0.0.1:6379> bitcount hello 0 23
(integer) 14
1.2.4 bitop命令
bitop op dtstkey key [key...]       做多個bitmap的and(交集),or(並集),not(非),xor(異或)操作並將結果儲存在destkey中
bitpos key targetBit [start] [end]  計算點陣圖指定範圍(start到end,單位為位元組,如果不指定就是獲取全部)第一個偏移量對應的值等於targetBit的位置
1.3 bitmap點陣圖應用
如果一個網站有1億使用者,假如user_id用的是整型,長度為32位,每天有5千萬獨立使用者訪問,如何判斷是哪5千萬使用者訪問了網站
1.3.1 方式一:用set來儲存
使用set來儲存資料執行一天需要佔用的記憶體為
32bit * 50000000 = (4 * 50000000) / 1024 /1024 MB,約為200MB執行一個月需要佔用的記憶體為6G,執行一年佔用的記憶體為72G
30 * 200 = 6G1.3.2 方式二:使用bitmap的方式
如果user_id訪問網站,則在user_id的索引上設定為1,沒有訪問網站的user_id,其索引設定為0,此種方式執行一天佔用的記憶體為
1 * 100000000 = 100000000 / 1014 /1024/ 8MB,約為12.5MB執行一個月佔用的記憶體為375MB,一年佔用的記憶體容量為4.5G
由此可見,使用bitmap可以節省大量的記憶體資源
1.4 bitmap使用經驗
bitmap是string型別,單個值最大可以使用的記憶體容量為512MB
setbit時是設定每個value的偏移量,可以有較大耗時
bitmap不是絕對好,用在合適的場景最好
2.HyperLoglog
2.1 HyperLoglog簡介
基於HyperLogLog演算法,極小空間完成獨立數量統計
2.2 常用命令
pfadd key element [element...]                  向hyperloglog新增元素
pfcount key [key...]                            計算hyperloglog的獨立總數
prmerge destkey sourcekey [sourcekey...]        合併多個hyperloglog
例子:
127.0.0.1:6379> pfadd unique_ids1 'uuid_1' 'uuid_2' 'uuid_3' 'uuid_4'       # 向unique_ids1中新增4個元素
(integer) 1
127.0.0.1:6379> pfcount unique_ids1         # 檢視unique_ids1中元素的個數
(integer) 4
127.0.0.1:6379> pfadd unique_ids1 'uuid_1' 'uuid_2' 'uuid_3' 'uuid_10'      # 再次向unique_ids1中新增4個元素
(integer) 1
127.0.0.1:6379> pfcount unique_ids1         # 由於兩次新增的value有重複,所以unique_ids1中只有5個元素
(integer) 5
127.0.0.1:6379> pfadd unique_ids2 'uuid_1' 'uuid_2' 'uuid_3' 'uuid_4'       # 向unique_ids2中新增4個元素
(integer) 1
127.0.0.1:6379> pfcount unique_ids2         # 檢視unique_ids2中元素的個數
(integer) 4
127.0.0.1:6379> pfadd unique_ids2 'uuid_4' 'uuid_5' 'uuid_6' 'uuid_7'       # 再次向unique_ids2中新增4個元素
(integer) 1
127.0.0.1:6379> pfcount unique_ids2         # 再次檢視unique_ids2中元素的個數,由於兩次新增的元素中有一個重複,所以有7個元素
(integer) 7
127.0.0.1:6379> pfmerge unique_ids1 unique_ids2     # 合併unique_ids1和unique_ids2
OK
127.0.0.1:6379> pfcount unique_ids1         # unique_ids1和unique_ids2中有重複元素,所以合併後的hyperloglog中只有8個元素
(integer) 8
2.3 HyperLoglog記憶體消耗(百萬獨立使用者)
例子:
127.0.0.1:6379> flushall            # 清空Redis中所有的key和value
OK
127.0.0.1:6379> info                # 檢視Redis佔用的記憶體量
...省略
# Memory
used_memory:833528
used_memory_human:813.99K           # 此時Redis中沒有任何鍵值對,佔用814k記憶體
used_memory_rss:5926912
used_memory_rss_human:5.65M
used_memory_peak:924056
used_memory_peak_human:902.40K
total_system_memory:1023938560
total_system_memory_human:976.50M
used_memory_lua:37888
used_memory_lua_human:37.00K
maxmemory:0
maxmemory_human:0B
maxmemory_policy:noeviction
mem_fragmentation_ratio:7.11
mem_allocator:jemalloc-3.6.0
...省略
執行如下python程式碼:
import redis
import time

client = redis.StrictRedis(host='192.168.81.101',port=6379)
key = 'unique'
start_time = time.time()

for i in range(1000000):
    client.pfadd(key,i)
等待python程式碼執行完成,再次檢視Redis佔用的記憶體數
127.0.0.1:6379> info
...省略
# Memory
used_memory:849992
used_memory_human:830.07K
used_memory_rss:5939200
used_memory_rss_human:5.66M
used_memory_peak:924056
used_memory_peak_human:902.40K
total_system_memory:1023938560
total_system_memory_human:976.50M
used_memory_lua:37888
used_memory_lua_human:37.00K
maxmemory:0
maxmemory_human:0B
maxmemory_policy:noeviction
mem_fragmentation_ratio:6.99
mem_allocator:jemalloc-3.6.0
...省略
可以看到,使用hyperloglog向redis中存入100萬條資料,需佔用的記憶體為
830.07K - 813.99K約為16k佔用的記憶體很少。
當然天下沒有免費的午餐,hyperloglog也有非常明顯的侷限性
首先,hyperloglog有一定的錯誤率,在使用hyperloglog進行資料統計的過程中,hyperloglog給出的資料不一定是對的
按照維基百科的說法,使用hyperloglog處理10億條資料,佔用1.5Kb記憶體時,錯誤率為2%
其次,沒法從hyperloglog中取出單條資料,這很容易理解,使用16KB的記憶體儲存100萬條資料,此時還想把100萬條資料取出來,顯然是不可能的
2.4 HyperLoglog注意事項
使用hyperloglog進行資料統計時,需要考慮三個因素:
1.是否需要很少的記憶體去解決問題,
2.是否能容忍錯誤
3.是否需要單條資料
3.GEO
3.1 GEO簡介
GEO即地址資訊定位 可以用來儲存經緯度,計算兩地距離,範圍計算等
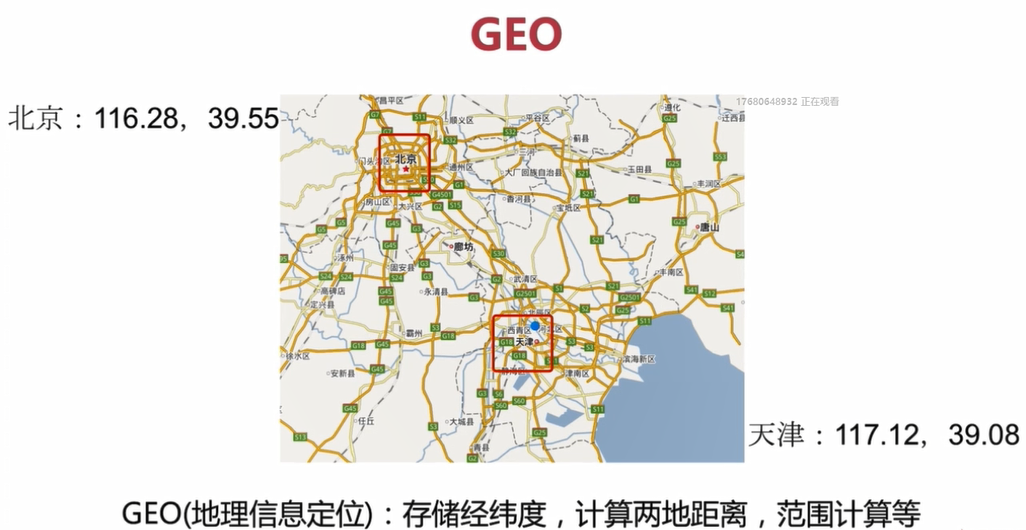
如上圖中,計算北京到天津兩地之間的距離
3.2 GEO常用命令
3.2.1 geoadd命令
geoadd key longitude latitude member [longitude latitude member...] 增加地理位置資訊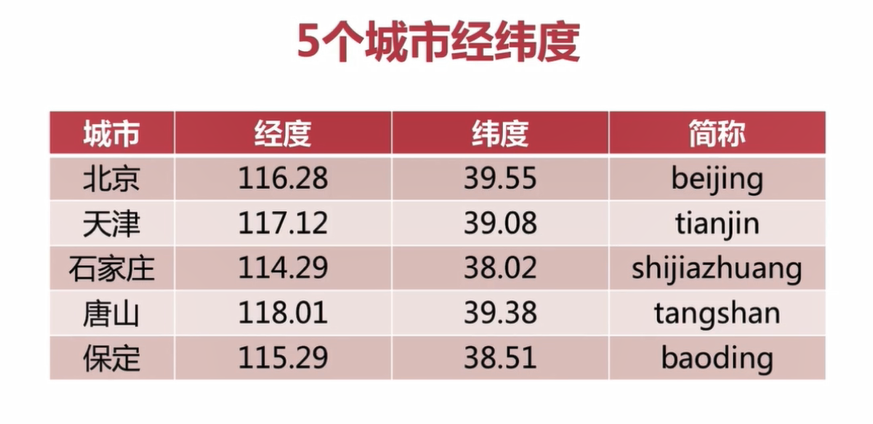
如上圖是5個城市經緯度相關資料
127.0.0.1:6379> geoadd cities:locations 116.28 39.55 beijing                # 新增北京的經緯度
(integer) 1
127.0.0.1:6379> geoadd cities:locations 117.12 39.08 tianjin 114.29 38.02 shijiazhuang    # 新增天津和石家莊的經緯度
(integer) 2
127.0.0.1:6379> geoadd cities:locations 118.01 39.38 tangshan 115.29 38.51 baoding         # 新增唐山和保定的經緯度
(integer) 2
3.2.2 geppos命令
geopos key member [member...] 獲取地理位置資訊例子:
127.0.0.1:6379> geopos cities:locations tianjin     # 獲取天津的地址位置資訊
1) 1) "117.12000042200088501"
   2) "39.0800000535766543"
3.2.3 geodist命令
geodist key member1 member2 [unit] 獲取兩個地理位置的距離,unit:m(米),km(千米),mi(英里),ft(尺)例子:
127.0.0.1:6379> geodist cities:locations tianjin beijing km
"89.2061"
127.0.0.1:6379> geodist cities:locations tianjin baoding km
"170.8360"
3.2.4 georadius命令和georadiusbymember命令
georedius key longitude latitude radiusm|km|ft|mi [withcoord] [withdist] [withhash] [COUNT count] [asc|desc] [store key][storedist key]
georadiusbymember key member radiusm|km|ft|mi [withcoord] [withdist] [withhash] [COUNT count] [asc|desc] [store key][storedist key]
獲取指定位置範圍內的地理位置資訊集合
    withcoord:返回結果中包含經緯度
    withdist:返回結果中包含距離中心節點位置
    withhash:返回結果中包含geohash
    COUNT count:指定返回結果的數量
    asc|desc:返回結果按照距離中心節點的距離做升序或者降序
    store key:將返回結果的地理位置資訊儲存到指定鍵
    storedist key:將返回結果距離中心節點的距離儲存到指定鍵
例子:
127.0.0.1:6379> georadiusbymember cities:locations beijing 150 km   # 獲取距離北京150km範圍內的城市
1) "beijing"
2) "tianjin"
3) "tangshan"
4) "baoding"
3.3 GEO相關說明
Redis的GEO功能是從3.2版本新增
geo功能基於zset實現
geo沒有刪除命令
3.3.1 使用zrem命令來進行geo的刪除操作
命令:
zrem key member例子:
127.0.0.1:6379> georadiusbymember cities:locations beijing 150 km
1) "beijing"
2) "tianjin"
3) "tangshan"
4) "baoding"
127.0.0.1:6379> zrem cities:locations baoding
(integer) 1
127.0.0.1:6379> georadiusbymember cities:locations beijing 150 km
1) "beijing"
2) "tianjin"
3) "tangshan"
3.4 GEO的應用場景
微信搖一搖