
Shiro的原理及Web搭建
shiro(java安全框架)
以下都是綜合之前的人加上自己的一些小總結
Apache Shiro是一個強大且易用的Java安全框架,執行身份驗證、授權、密碼學和會話管理。使用Shiro的易於理解的API,您可以快速、輕鬆地獲得任何應用程式,從最小的移動應用程式到最大的網路和企業應用程式。
Shiro 主要分為來個部分就是認證和授權,在個人感覺來看就是查詢資料庫做相應的判斷而已,Shiro只是一個框架而已,其中的內容需要自己的去構建,前後是自己的,中間是Shiro幫我們去搭建和配置好的
個人認為需要看一下其中的一些原始碼,更有幫助的深入的去了解Shiro的原理。
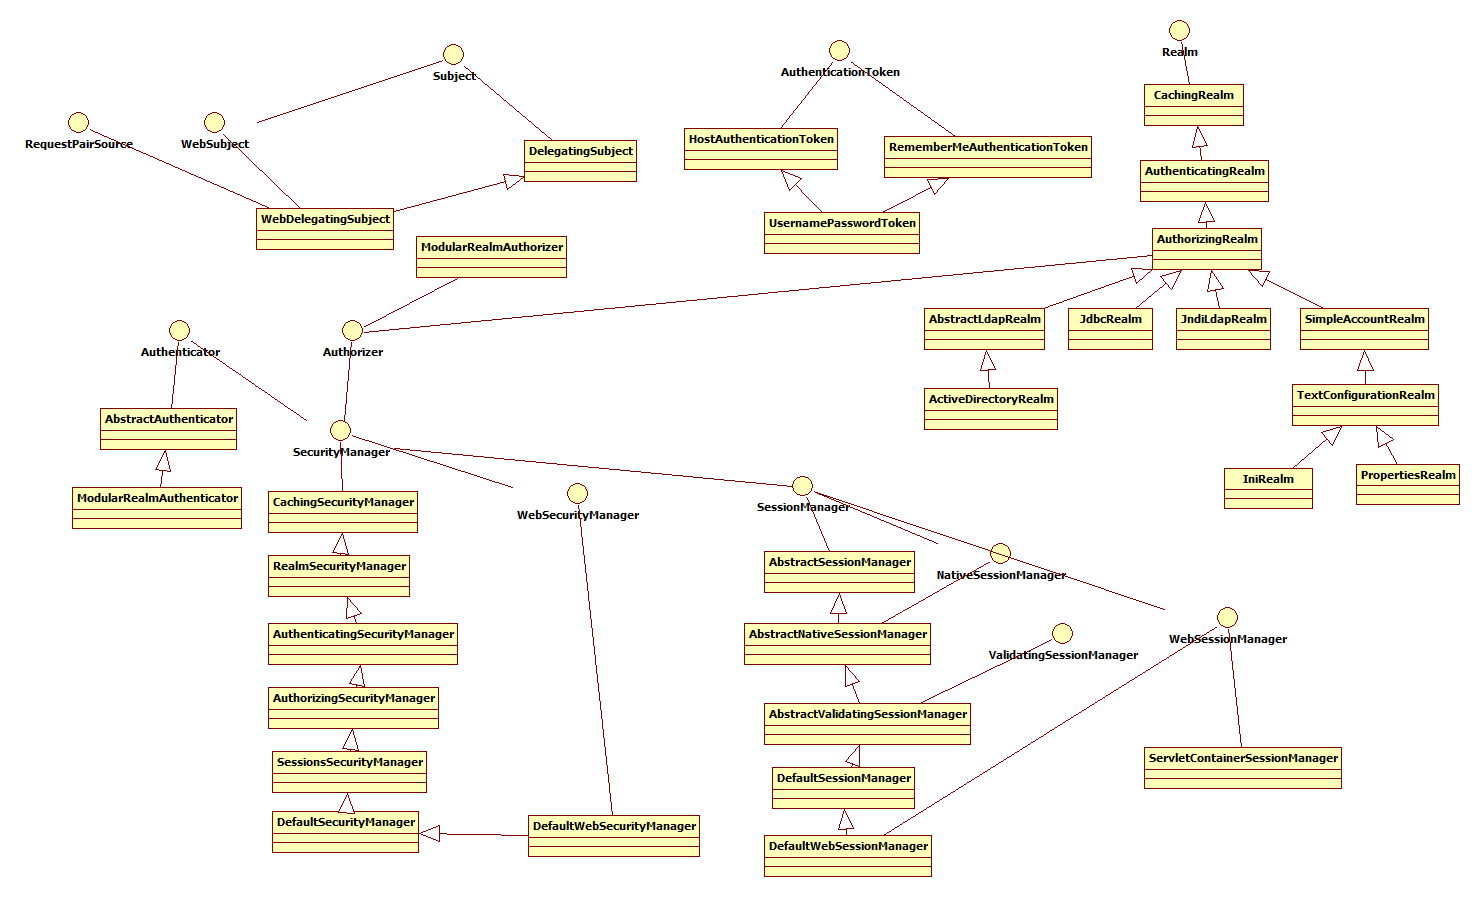
Shiro的主要框架圖:

方法類的走向:
對一些其中的方法的簡單說明:
Subject
Subject即主體,外部應用與subject進行互動,subject記錄了當前操作使用者,將使用者的概念理解為當前操作的主體,可能是一個通過瀏覽器請求的使用者,也可能是一個執行的程式。 Subject在shiro中是一個介面,介面中定義了很多認證授相關的方法,外部程式通過subject進行認證授,而subject是通過SecurityManager安全管理器進行認證授權
SecurityManager
SecurityManager即安全管理器,對全部的subject進行安全管理,它是shiro的核心,負責對所有的subject進行安全管理。通過SecurityManager可以完成subject的認證、授權等,實質上SecurityManager是通過Authenticator進行認證,通過Authorizer進行授權,通過SessionManager進行會話管理等。
SecurityManager是一個介面,繼承了Authenticator, Authorizer, SessionManager這三個介面。
Authenticator
Authenticator即認證器,對使用者身份進行認證,Authenticator是一個介面,shiro提供ModularRealmAuthenticator實現類,通過ModularRealmAuthenticator基本上可以滿足大多數需求,也可以自定義認證器。
Authorizer
Authorizer即授權器,使用者通過認證器認證通過,在訪問功能時需要通過授權器判斷使用者是否有此功能的操作許可權。
realm
Realm即領域,相當於datasource資料來源,securityManager進行安全認證需要通過Realm獲取使用者許可權資料,比如:如果使用者身份資料在資料庫那麼realm就需要從資料庫獲取使用者身份資訊。
注意:不要把realm理解成只是從資料來源取資料,在realm中還有認證授權校驗的相關的程式碼。
sessionManager
sessionManager即會話管理,shiro框架定義了一套會話管理,它不依賴web容器的session,所以shiro可以使用在非web應用上,也可以將分散式應用的會話集中在一點管理,此特性可使它實現單點登入。
SessionDAO
SessionDAO即會話dao,是對session會話操作的一套介面,比如要將session儲存到資料庫,可以通過jdbc將會話儲存到資料庫。
CacheManager
CacheManager即快取管理,將使用者許可權資料儲存在快取,這樣可以提高效能。
Cryptography
Cryptography即密碼管理,shiro提供了一套加密/解密的元件,方便開發。比如提供常用的雜湊、加/解密等功能。
shiro認證與授權的在Web中實現
第一步:新增jar包

 <!-- shiro -->
    <dependency>
      <groupId>org.apache.shiro</groupId>
      <artifactId>shiro-core</artifactId>
      <version>1.4.0</version>
    </dependency>
    <dependency>
      <groupId>org.apache.shiro</groupId>
      <artifactId>shiro-spring</artifactId>
      <version>1.4.0</version>
    </dependency>
第二步:配置web.xml
  <!-- shiro 過濾器 start -->
  <filter>
    <filter-name>shiroFilter</filter-name>
    <filter-class>org.springframework.web.filter.DelegatingFilterProxy</filter-class>
    <!-- 設定true由servlet容器控制filter的生命週期 -->
    <init-param>
      <param-name>targetFilterLifecycle</param-name>
      <param-value>true</param-value>
    </init-param>
  </filter>
  <filter-mapping>
    <filter-name>shiroFilter</filter-name>
    <url-pattern>/*</url-pattern>
  </filter-mapping>
  <!-- shiro 過濾器 end -->
第三步:自定義Realm 繼承AuthorizingRealm 重寫 AuthorizationInfo(授權) 和 AuthenticationInfo(認證)
以下只是簡單的測試
以下都是根據個人的設定和需求改變的。現在資料是死的,運用的時候需要從資料庫中得到
/**
 * @author zhouguanglin
 * @date 2018/2/26 14:05
 */
public class CustomRealm extends AuthorizingRealm {
    /**
     * 授權
     * @param principalCollection
     * @return
     */
    @Override
    protected AuthorizationInfo doGetAuthorizationInfo(PrincipalCollection principalCollection) {
        String userName = (String) principalCollection.getPrimaryPrincipal();
        List<String> permissionList=new ArrayList<String>();
        permissionList.add("user:add");
        permissionList.add("user:delete");
        if (userName.equals("zhou")) {
            permissionList.add("user:query");
        }
        SimpleAuthorizationInfo info=new SimpleAuthorizationInfo();
        info.addStringPermissions(permissionList);
        info.addRole("admin");
        return info;
    }
    /**
     * 認證
     * @param authenticationToken
     * @return
     * @throws AuthenticationException
     */
    @Override
    protected AuthenticationInfo doGetAuthenticationInfo(AuthenticationToken authenticationToken) throws AuthenticationException {
        String userName = (String) authenticationToken.getPrincipal();
        if ("".equals(userName)) {
            return  null;
        }
        SimpleAuthenticationInfo info = new SimpleAuthenticationInfo(userName,"123456",this.getName());
        return info;
    }
}
第四步:配置spring-shiro.xml
這裡面都是按照自己的需求去配置的
<?xml version="1.0" encoding="UTF-8"?>
<beans xmlns="http://www.springframework.org/schema/beans"
       xmlns:xsi="http://www.w3.org/2001/XMLSchema-instance"
       xsi:schemaLocation="http://www.springframework.org/schema/beans http://www.springframework.org/schema/beans/spring-beans.xsd">
    <!--開啟shiro的註解-->
    <bean id="advisorAutoProxyCreator" class="org.springframework.aop.framework.autoproxy.DefaultAdvisorAutoProxyCreator">
        <property name="proxyTargetClass" value="true"></property>
    </bean>
    <bean class="org.apache.shiro.spring.security.interceptor.AuthorizationAttributeSourceAdvisor"/>
    <!--注入自定義的Realm-->
    <bean id="customRealm" class="com.test.realm.CustomRealm"></bean>
    <bean id="securityManager" class="org.apache.shiro.web.mgt.DefaultWebSecurityManager">
        <property name="realm" ref="customRealm"></property>
    </bean>

    <!--配置ShiroFilter-->
    <bean id="shiroFilter" class="org.apache.shiro.spring.web.ShiroFilterFactoryBean">
        <property name="securityManager" ref="securityManager"></property>
        <!--登入頁面-->
        <property name="loginUrl" value="/login.jsp"></property>
        <!--登入成功頁面-->
        <property name="successUrl" value="/index.jsp"/>
        <property name="filters">
            <map>
                <!--退出過濾器-->
                <entry key="logout" value-ref="logoutFilter" />
            </map>
        </property>
        <!--URL的攔截-->
        <property name="filterChainDefinitions" >
            <value>
                /share = authc
                /logout = logout
            </value>
        </property>

    </bean>
    <!--自定義退出LogoutFilter-->
    <bean id="logoutFilter" class="com.test.filter.SystemLogoutFilter">
        <property name="redirectUrl" value="/login"/>
    </bean>
</beans>
一些屬性的意義:
securityManager: 這個屬性是必須的。
loginUrl: 沒有登入的使用者請求需要登入的頁面時自動跳轉到登入頁面,不是必須的屬性,不輸入地址的話會自動尋找專案web專案的根目錄下的”/login.jsp”頁面。
successUrl: 登入成功預設跳轉頁面,不配置則跳轉至”/”。如果登陸前點選的一個需要登入的頁面,則在登入自動跳轉到那個需要登入的頁面。不跳轉到此。
unauthorizedUrl: 沒有許可權預設跳轉的頁面。
Shiro中預設的過濾器:
在spring中直接引入<import resource="spring-shiro.xml"></import>
第五步:在spring-mvc.xml中配置許可權的控制 異常的跳轉
 <!-- 未認證或未授權時跳轉必須在springmvc裡面配,spring-shiro裡的shirofilter配不生效 -->
    <bean   class="org.springframework.web.servlet.handler.SimpleMappingExceptionResolver">
        <property name="exceptionMappings">
            <props>
                <!--表示捕獲的異常 -->
                <prop key="org.apache.shiro.authz.UnauthorizedException">
                    <!--捕獲該異常時跳轉的路徑 -->
                    /403
                </prop>
                <!--表示捕獲的異常 -->
                <prop key="org.apache.shiro.authz.UnauthenticatedException">
                    <!--捕獲該異常時跳轉的路徑 -->
                    /403
                </prop>
            </props>
        </property>
    </bean>
403是錯誤頁面
第六步:在controller中測試使用的驗證登入
    @RequestMapping(value = "/login", method = RequestMethod.POST)
    public String login(String userName, String passwd, Model model) {
        Subject subject = SecurityUtils.getSubject();
        UsernamePasswordToken token = new UsernamePasswordToken(userName, passwd);
        try {
            subject.login(token);
        } catch (UnknownAccountException e) {
            e.printStackTrace();
            model.addAttribute("userName", "使用者名稱錯誤!");
            return "login";
        } catch (IncorrectCredentialsException e) {
            e.printStackTrace();
            model.addAttribute("passwd", "密碼錯誤");
            return "login";
        }
        return "index";
    }
之後的都是HTML頁面的跳轉
有關HTML中的一些shiro設定:
在使用Shiro標籤庫前,首先需要在JSP引入shiro標籤:
<%@ taglib prefix="shiro" uri="http://shiro.apache.org/tags" %>
1、介紹Shiro的標籤guest標籤 :驗證當前使用者是否為“訪客”,即未認證(包含未記住)的使用者。
|
1 2 3 4 5 |
|
2、user標籤 :認證通過或已記住的使用者。
|
1 2 3 4 5 |
|
3、authenticated標籤 :已認證通過的使用者。不包含已記住的使用者,這是與user標籤的區別所在。
|
1 2 3 4 5 |
|
4、notAuthenticated標籤 :未認證通過使用者,與authenticated標籤相對應。與guest標籤的區別是,該標籤包含已記住使用者。
|
1 2 3 4 5 |
|
5、principal 標籤 :輸出當前使用者資訊,通常為登入帳號資訊。
|
1 |
|
6、hasRole標籤 :驗證當前使用者是否屬於該角色。
|
1 2 3 4 5 |
|
7、lacksRole標籤 :與hasRole標籤邏輯相反,當用戶不屬於該角色時驗證通過。
|
1 2 3 4 5 |
|
8、hasAnyRole標籤 :驗證當前使用者是否屬於以下任意一個角色。
|
1 2 3 4 5 |
|
9、hasPermission標籤 :驗證當前使用者是否擁有指定許可權。
|
1 2 3 4 5 |
|
10、lacksPermission標籤 :與hasPermission標籤邏輯相反,當前使用者沒有制定許可權時,驗證通過。
|
1 2 3 4 5 |
|
參考文章 :
http://www.cnblogs.com/yangang2013/p/5716928.html
https://www.cnblogs.com/jifeng/p/4500410.html