android通過JNI用C/C++建立本地檔案
阿新 • • 發佈:2018-12-15
通過jni在本地建立檔案
1.在android studio建立基本的jni工程,並且在APP介面成功顯示"Hello from C++"
不會的可以看android studio使用jni
2.在native-lib.cpp檔案中建立檔案
為了方便,我們直接在stringFromJNI函式中建立檔案
#include <jni.h>
#include <string>
#include <stdio.h>
#include <android/log.h>
//方便用日誌檢視

#define LOG_D(...)  __android_log_print(ANDROID_LOG_DEBUG, "jni", __VA_ARGS__)
//使用巨集來呼叫日誌庫

extern "C" JNIEXPORT jstring JNICALL
Java_com_example_clientfile_MainActivity_stringFromJNI(
        JNIEnv *env,
        jobject /* this */) {
    std::string hello = "Hello from C++";

    FILE* file = NULL;
    file = fopen("/data/data/com.example.clientfile/hello.txt","a");    //建立檔案
    if(file == NULL){        //容錯
        LOG_D("檔案建立失敗%s","222");
    }
    fwrite("1111",3,1,file);            //往檔案中寫檔案

    fclose(file);                    //關閉檔案
    return env->NewStringUTF(hello.c_str());
}
其中非常需要注意的一點是建立檔案的位置,必須是"/data/data/[project name]/test.txt",否則無法建立。
3.檢視是否生成了該檔案
點選View->Tool->Windows->Device File Explorer

在彈出的對話方塊中選擇data->data->[你的專案名稱]

沒有我們想要建立的hello.txt檔案

我們在我們的專案明上右擊,選擇Synchronize

出現了hello.txt

同時我們來看一下該檔案的路徑

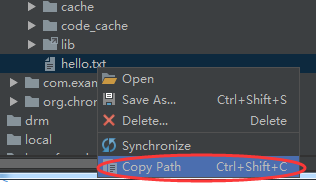
在檔名上右擊,選擇Copy Path,然後隨便找一個地方貼上
結果是 /data/data/com.example.clientfile/hello.txt
所以,我們在該APP內建立的檔案只能在這個目錄先,當然我們也可以在專案名下先建立目錄,在新建的目錄下建立檔案也可以。
最後開啟hello.txt檔案,看內容是否生成,右擊選擇open

顯示111

至此,在android內使用jni建立本地檔案已成功。
