
idea中spring boot +mybatis整合
LZ今天自己搭建了下Spring boot+Mybatis,比原來的Spring+SpringMVC+Mybatis簡單好多。其實只用Spring boot也可以開發,但是對於多表多條件分頁查詢,Spring boot就有點力不從心了,所以LZ把Mybatis整合進去,不得不說,現在的框架搭建真的是方便。話不多說,進入正題。
一、java web開發環境搭建
二、Spring boot搭建
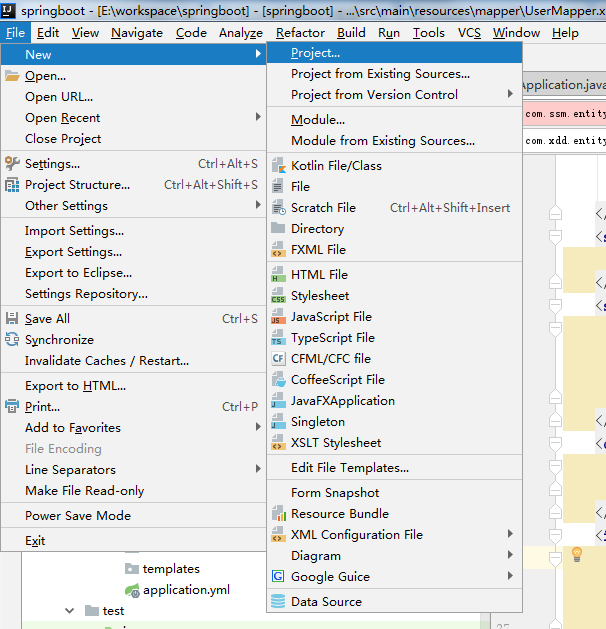
1、Intellij idea選單欄File->new->project。
2、選擇左側欄中spring initializr,右側選擇jdk版本,以及預設的Service URL,點選next。

/3、然後填寫專案的Group、Artifact等資訊,helloworld階段選預設就可以了,點選next。

4、左側點選Web,中間一側選擇Web,然後左側選擇SQL,中間一側選擇JPA、Mybatis、MYSQL(LZ資料庫用的是mysql,大家可以選擇其他DB),點選next。

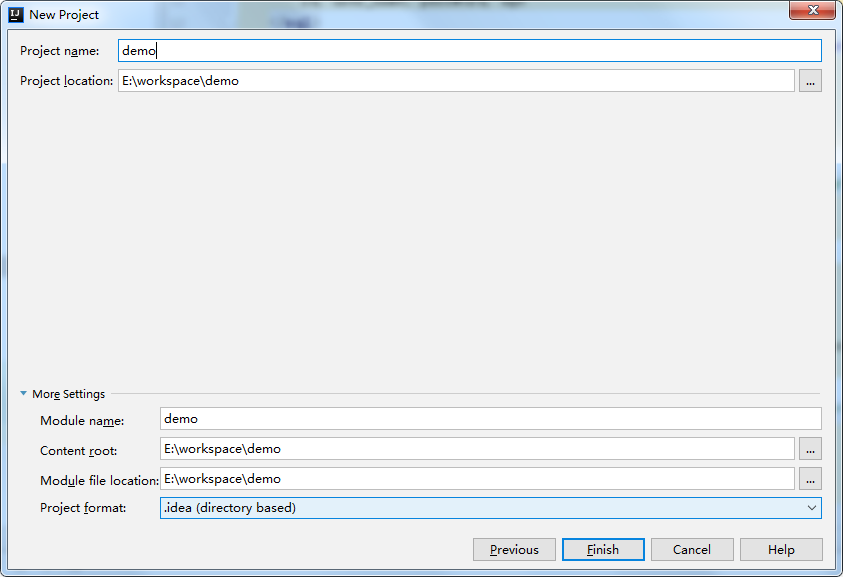
5、填寫Project name 等資訊,然後點選Finish。
至此,一個maven web專案就建立好了,目錄結構如下:
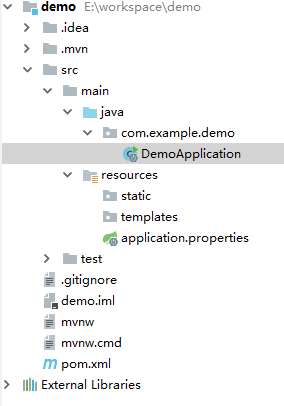
這樣,Spring boot就搭建好了,pom.xml裡已經有了Spring boot的jar包,包括我們的mysql資料連線的jar包。Spring boot內建了類似tomcat這樣的中介軟體,所以,只要執行DemoApplication中的main方法就可以啟動專案了。我們測試一下。
在src/main/java下新建目錄com/demo/entity/User。

package com.demo.entity;

public class User {
    private String name;

    public String getName() {
        return name;
    }

    public void setName(String name) {
        this.name = name;
    }
}
相同目錄下新建com/demo/controller/TestBootController。
package com.demo.controller;

import com.demo.entity.User;
import org.springframework.boot.autoconfigure.EnableAutoConfiguration;
import org.springframework.web.bind.annotation.RequestMapping;
import org.springframework.web.bind.annotation.RestController;

@RestController
@EnableAutoConfiguration
@RequestMapping("/testboot")
public class TestBootController {
    @RequestMapping("getuser")
    public User getUser() {
        User user = new User();
        user.setName("test");
        return user;
    }
}
spring boot啟動DemoAplication是需要掃描它下面的Controller等類的,所以將DemoApplication移動到com/demo目錄下。還有就是Spring boot啟動預設是要載入資料來源的,所以我們在src/main/resources下新建application.yml:
#預設使用配置
spring:
  profiles:
    active: dev

#公共配置與profiles選擇無關
mybatis:
  typeAliasesPackage: com.xdd.entity
  mapperLocations: classpath:mapper/*.xml


---

#開發配置
spring:
  profiles: dev

  datasource:
    url: jdbc:mysql://localhost:3306/test
    username: root
    password: root
    driver-class-name: com.mysql.jdbc.Driver
或者將pom.xml中載入資料來源的jar包先註釋掉也可以。
/*<dependency>
   <groupId>org.mybatis.spring.boot</groupId>
   <artifactId>mybatis-spring-boot-starter</artifactId>
   <version>1.3.0</version>
</dependency>*/
最終的目錄結構如下,

啟動DemoApplication的main方法,訪問http://localhost:8080/testboot/getuser即可。

三、整合Mybatis
1、整合druid,使用連線池。pom.xml中新增:
<dependency>
    <groupId>com.alibaba</groupId>
    <artifactId>druid</artifactId>
    <version>1.1.0</version>
</dependency>
最終的pom.xml檔案:
<?xml version="1.0" encoding="UTF-8"?>
<project xmlns="http://maven.apache.org/POM/4.0.0" xmlns:xsi="http://www.w3.org/2001/XMLSchema-instance"
    xsi:schemaLocation="http://maven.apache.org/POM/4.0.0 http://maven.apache.org/xsd/maven-4.0.0.xsd">
    <modelVersion>4.0.0</modelVersion>

    <groupId>com.arm</groupId>
    <artifactId>demo</artifactId>
    <version>0.0.1-SNAPSHOT</version>
    <packaging>jar</packaging>

    <name>demo</name>
    <description>Demo project for Spring Boot</description>

    <parent>
        <groupId>org.springframework.boot</groupId>
        <artifactId>spring-boot-starter-parent</artifactId>
        <version>1.5.8.RELEASE</version>
        <relativePath/> <!-- lookup parent from repository -->
    </parent>

    <properties>
        <project.build.sourceEncoding>UTF-8</project.build.sourceEncoding>
        <project.reporting.outputEncoding>UTF-8</project.reporting.outputEncoding>
        <java.version>1.8</java.version>
    </properties>

    <dependencies>
        <dependency>
            <groupId>org.springframework.boot</groupId>
            <artifactId>spring-boot-starter-data-jpa</artifactId>
        </dependency>
        <dependency>
            <groupId>org.mybatis.spring.boot</groupId>
            <artifactId>mybatis-spring-boot-starter</artifactId>
            <version>1.3.1</version>
        </dependency>
        <dependency>
            <groupId>org.springframework.boot</groupId>
            <artifactId>spring-boot-starter-web</artifactId>
        </dependency>

        <dependency>
            <groupId>mysql</groupId>
            <artifactId>mysql-connector-java</artifactId>
            <scope>runtime</scope>
        </dependency>
        <dependency>
            <groupId>org.springframework.boot</groupId>
            <artifactId>spring-boot-starter-test</artifactId>
            <scope>test</scope>
        </dependency>


        <dependency>
            <groupId>com.alibaba</groupId>
            <artifactId>druid</artifactId>
            <version>1.1.0</version>
        </dependency>

    </dependencies>

    <build>
        <plugins>
            <plugin>
                <groupId>org.springframework.boot</groupId>
                <artifactId>spring-boot-maven-plugin</artifactId>
            </plugin>
        </plugins>
    </build>


</project>
在application.yml中新增資料來源、Mybatis的實體和配置檔案位置。
#預設使用配置
spring:
  profiles:
    active: dev

#公共配置與profiles選擇無關 mapperLocations指的路徑是src/main/resources
mybatis:
  typeAliasesPackage: com.xdd.entity
  mapperLocations: classpath:mapper/*.xml


---

#開發配置
spring:
  profiles: dev

  datasource:
    url: jdbc:mysql://localhost:3306/test
    username: root
    password: root
    driver-class-name: com.mysql.jdbc.Driver
    # 使用druid資料來源
    type: com.alibaba.druid.pool.DruidDataSource
就這樣就整合完成了!我們測試一下。
import com.xdd.entity.User;
import org.springframework.stereotype.Component;

public interface UserDao {
    int deleteByPrimaryKey(Integer id);

    int insert(User record);

    int insertSelective(User record);

    User selectByPrimaryKey(Integer id);

    int updateByPrimaryKeySelective(User record);

    int updateByPrimaryKey(User record);
}
UserMapper.xml
<?xml version="1.0" encoding="UTF-8" ?>
<!DOCTYPE mapper PUBLIC "-//mybatis.org//DTD Mapper 3.0//EN" "http://mybatis.org/dtd/mybatis-3-mapper.dtd" >
<mapper namespace="com.xdd.dao.UserDao" >
    <resultMap id="BaseResultMap" type="com.xdd.entity.User" >
        <id column="id" property="id" jdbcType="INTEGER" />
        <result column="user_name" property="userName" jdbcType="VARCHAR" />
        <result column="password" property="password" jdbcType="VARCHAR" />
        <result column="age" property="age" jdbcType="INTEGER" />
    </resultMap>
    <sql id="Base_Column_List" >
        id, user_name, password, age
    </sql>
    <select id="selectByPrimaryKey" resultMap="BaseResultMap" parameterType="java.lang.Integer" >
        select
        <include refid="Base_Column_List" />
        from user_t
        where id = #{id,jdbcType=INTEGER}
    </select>
    <delete id="deleteByPrimaryKey" parameterType="java.lang.Integer" >
        delete from user_t
        where id = #{id,jdbcType=INTEGER}
    </delete>
    <insert id="insert" parameterType="com.xdd.entity.User" >
        insert into user_t (id, user_name, password,
        age)
        values (#{id,jdbcType=INTEGER}, #{userName,jdbcType=VARCHAR}, #{password,jdbcType=VARCHAR},
        #{age,jdbcType=INTEGER})
    </insert>
    <insert id="insertSelective" parameterType="com.xdd.entity.User" >
        insert into user_t
        <trim prefix="(" suffix=")" suffixOverrides="," >
            <if test="id != null" >
                id,
            </if>
            <if test="userName != null" >
                user_name,
            </if>
            <if test="password != null" >
                password,
            </if>
            <if test="age != null" >
                age,
            </if>
        </trim>
        <trim prefix="values (" suffix=")" suffixOverrides="," >
            <if test="id != null" >
                #{id,jdbcType=INTEGER},
            </if>
            <if test="userName != null" >
                #{userName,jdbcType=VARCHAR},
            </if>
            <if test="password != null" >
                #{password,jdbcType=VARCHAR},
            </if>
            <if test="age != null" >
                #{age,jdbcType=INTEGER},
            </if>
        </trim>
    </insert>
    <update id="updateByPrimaryKeySelective" parameterType="com.xdd.entity.User" >
        update user_t
        <set >
            <if test="userName != null" >
                user_name = #{userName,jdbcType=VARCHAR},
            </if>
            <if test="password != null" >
                password = #{password,jdbcType=VARCHAR},
            </if>
            <if test="age != null" >
                age = #{age,jdbcType=INTEGER},
            </if>
        </set>
        where id = #{id,jdbcType=INTEGER}
    </update>
    <update id="updateByPrimaryKey" parameterType="com.xdd.entity.User" >
        update user_t
        set user_name = #{userName,jdbcType=VARCHAR},
        password = #{password,jdbcType=VARCHAR},
        age = #{age,jdbcType=INTEGER}
        where id = #{id,jdbcType=INTEGER}
    </update>
</mapper>
public class User {
    private Integer id;

    private String userName;

    private String password;

    private Integer age;

    public Integer getId() {
        return id;
    }

    public void setId(Integer id) {
        this.id = id;
    }

    public String getUserName() {
        return userName;
    }

    public void setUserName(String userName) {
        this.userName = userName == null ? null : userName.trim();
    }

    public String getPassword() {
        return password;
    }

    public void setPassword(String password) {
        this.password = password == null ? null : password.trim();
    }

    public Integer getAge() {
        return age;
    }

    public void setAge(Integer age) {
        this.age = age;
    }
}
最後將DemoApplication.java修改一下,讓其掃描dao層介面。
import org.mybatis.spring.annotation.MapperScan;
import org.springframework.boot.SpringApplication;
import org.springframework.boot.autoconfigure.SpringBootApplication;
import org.springframework.boot.web.support.SpringBootServletInitializer;

@SpringBootApplication
@MapperScan("com.xdd.dao")
public class DemoApplication extends SpringBootServletInitializer{
    public static void main(String[] args) {
        SpringApplication.run(DemoApplication.class,args);
    }
}
自己新增controller和service
import java.util.List;
import java.util.Map;

public interface UserService {
    public User getUserById(int userId);

    boolean addUser(User record);

}
import org.springframework.beans.factory.annotation.Autowired;
import org.springframework.stereotype.Service;

import javax.annotation.Resource;
import java.util.List;
import java.util.Map;

@Service("userService")
public class UserServiceImpl implements UserService {

    @Resource
    private UserDao userDao;


    public User getUserById(int userId) {
        return userDao.selectByPrimaryKey(userId);
    }

    public boolean addUser(User record){
        boolean result = false;
        try {
            userDao.insertSelective(record);
            result = true;
        } catch (Exception e) {
            e.printStackTrace();
        }

        return result;
    }

}
@Controller
@RequestMapping("/user")
public class UserController {
    @Resource
    private UserService userService;

    @RequestMapping("/showUser")
    @ResponseBody
    public User toIndex(HttpServletRequest request, Model model){
        int userId = Integer.parseInt(request.getParameter("id"));
        User user = this.userService.getUserById(userId);
        return user;
    }

}
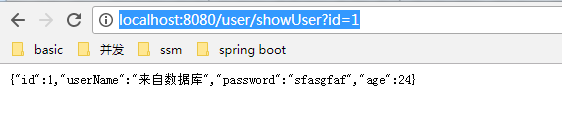
瀏覽器訪問http://localhost:8080/user/showUser?id=1
以前找別人的教程的時候總是嫌棄人家寫的不詳細,真的自己寫的時候發現很多細節我也詳細介紹不到,比如yml檔案使用,比如資料庫,看來還是要求別人容易,要求自己難。