
Vue+koa2開發一款全棧小程式(9.圖書詳情頁)
1.獲取圖書詳情
1.修改server/controllers/bookdetail.js為
const {mysql}=require('../qcloud')
module.exports=async(ctx)=>{
const {id}=ctx.request.query
const detail=await mysql('books')
.select('books.*','csessioninfo.user_info')
.join('csessioninfo','books.openid','csessioninfo.open_id')
.where(
2.在mydemo/src/components/BookInfo.vue


<template> <divView Codeclass="bookinfo"> <div class="thumb"> <img class="back" :src="info.image" mode="aspectFull"> <img class="img" :src="info.image" mode="aspectFit"> <div class="info"> <div class="title"> {{info.title}} </div> <div class="author"> {{info.author}} </div> </div> </div> <div class="detail"> <img :src="userinfo.image" class="avatar" mode="aspectFit"> {{userinfo.name}} <div class="right text-primary"> {{info.rate}}分<Rate :value='info.rate'></Rate> </div> </div> <div class="detail"> {{info.publisher}} <div class="right"> {{info.price}} </div> </div> </div> </template> <script> import Rate from '@/components/Rate' export default { components:{ Rate }, props:['info'], computed:{ userinfo(){ return this.info.user_info||{} } } } </script> <style lang="scss"> .bookinfo{ font-size: 14px; .right{ float: right; } .detail{ padding: 5px 10px; .avatar{ width: 20px; height: 20px; border-radius: 50%; vertical-align: middle; } } .thumb{ width: 750rpx; height: 500rpx; overflow: hidden; position: relative; .back{ filter: blur(15px); width: 100%; } .img{ position: absolute; width: 100%; height: 300rpx; left: 0; top:30rpx; } .info{ color: white; position:absolute; width: 100%; left: 0; top: 330rpx; text-align: center; .title{ font-size: 20px; } .author{ font-size: 14px; } } } } </style>
3.在src/pages/detail/index.vue中,加入程式碼,才可以有分享轉發功能
    onShareAppMessage: (res) => {
        if (res.from === 'button') {
            console.log("來自頁面內轉發按鈕");
            console.log(res.target);
            }
        else {
            console.log("來自右上角轉發選單")
        }
        return {
            // title: '',
            // path: '/pages/share/share?id=123',
            // imageUrl: "/images/1.jpg",
            success: (res) => {
            console.log("轉發成功", res);
            },
            fail: (res) => {
            console.log("轉發失敗", res);
            }
        }
    }
index.vue
<template>
<div>

    <BookInfo :info='info'></BookInfo>
</div>
</template>
<script>

import {get} from '@/until'

import BookInfo from '@/components/BookInfo'

export default {
    components:{
        BookInfo
    },

    data(){
        return{
            bookid:'',
            info:{}
        }
    },

    methods:{
        async getDetail(){
            const info=await get('/weapp/bookdetail',{id:this.bookid})
            wx.setNavigationBarTitle({title:info.data.title})
            this.info=info.data
        }
    },

    mounted(){
        this.bookid=this.$root.$mp.query.id //this.$root.$mp.query獲取跳轉連結傳過來的物件集合
        this.getDetail()
    },

    onShareAppMessage: (res) => {
        if (res.from === 'button') {
            console.log("來自頁面內轉發按鈕");
            console.log(res.target);
            }
        else {
            console.log("來自右上角轉發選單")
        }
        return {
            // title: '',
            // path: '/pages/share/share?id=123',
            // imageUrl: "/images/1.jpg",
            success: (res) => {
            console.log("轉發成功", res);
            },
            fail: (res) => {
            console.log("轉發失敗", res);
            }
        }
    }


}
</script>
<style>

</style>
View Code
2.圖書tags和簡介顯示
1.在server/controllers/bookdetail.js中修改程式碼,增添返回tag和簡介的程式碼
const {mysql}=require('../qcloud')

module.exports=async(ctx)=>{
    const {id}=ctx.request.query
    const detail=await mysql('books')
                        .select('books.*','csessioninfo.user_info')
                        .join('csessioninfo','books.openid','csessioninfo.open_id')
                        .where('id',id)
                        .first()
    const info=JSON.parse(detail.user_info)
    ctx.state.data=Object.assign({},detail,{
        tags:detail.tags.split(','),
        summary:detail.summary.split('\n'),
        user_info:{
            name:info.nickName,
            image:info.avatarUrl
        }
    })

}
View Code
2.在mydemo/src/components/BookInfo.vue
<template>
    <div class="bookinfo">
        <div class="thumb">
            <img class="back"
                :src="info.image"
                mode="aspectFull">
            <img class="img"
            :src="info.image"
            mode="aspectFit">
            <div class="info">
                <div class="title">
                    {{info.title}}
                </div>
                <div class="author">
                    {{info.author}}
                </div>
            </div>
        </div>
        <div class="detail">
            <img :src="userinfo.image" class="avatar" mode="aspectFit">
            {{userinfo.name}}
            <div class="right text-primary">
                {{info.rate}}分<Rate :value='info.rate'></Rate>
            </div>
        </div>
        <div class="detail">
            {{info.publisher}}
            <div class="right">
                {{info.price}}
            </div>
        </div>
        <div class="tags">
            <div class="badge" :key="tag" v-for="tag in info.tags">{{tag}}</div>
        </div>
        <div class="summary">
            <p :key="i" v-for="(sum,i) in info.summary">{{sum}}</p>
        </div>
    </div>
</template>
<script>
import Rate from '@/components/Rate'
export default {
    components:{
        Rate
    },

    props:['info'],

    computed:{
        userinfo(){
            return this.info.user_info||{}
        }
    }

}
</script>
<style lang="scss">
.bookinfo{
    font-size: 14px;
    .right{
        float: right;
    }
    .detail{
        padding: 5px 10px;
        .avatar{
            width: 20px;
            height: 20px;
            border-radius: 50%;
            vertical-align: middle;
        }
    }
    .thumb{
        width: 750rpx;
        height: 500rpx;
        overflow: hidden;
        position: relative;
        .back{
            filter: blur(15px);
            width: 100%;
        }
        .img{
            position: absolute;
            width: 100%;
            height: 300rpx;
            left: 0;
            top:30rpx;
        }
        .info{
            color: white;
            position:absolute;
            width: 100%;
            left: 0;
            top: 330rpx;
            text-align: center;
            .title{
                font-size: 20px;
            }
            .author{
                font-size: 14px;
            }
        }
    }
    .badge{
        display: inline-block;
        margin:5px;
        padding: 5px;
        border-radius: 10px;
        border:1px #EA5A49 solid;
        color: #EA5A49;
    }
    .summary{
        padding: 0 15px;
        margin-top: 10px;
        p{
            text-indent: 2em;
            font-size: 14px;
            margin-top: 5px;
        }
    }
}

</style>
View Code
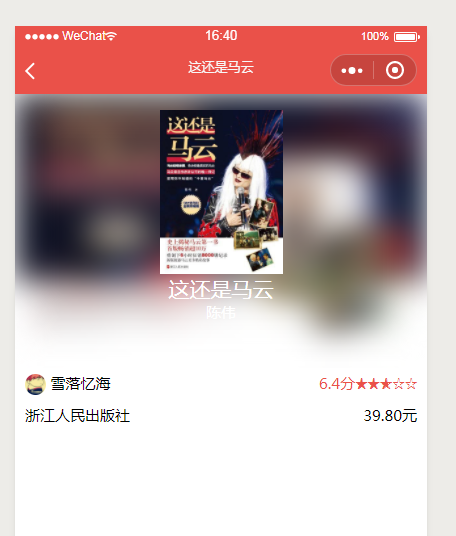
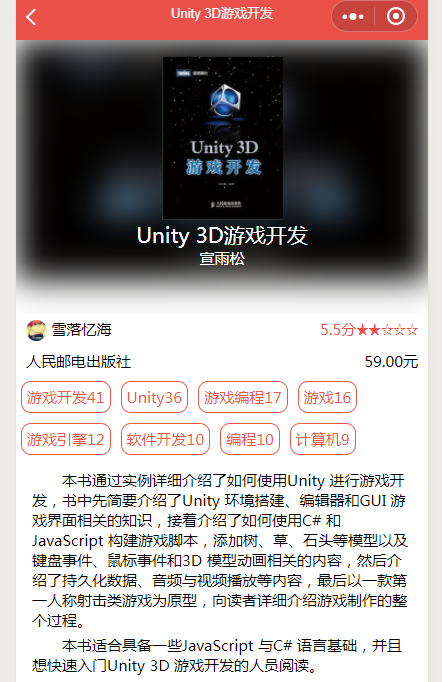
效果圖
3.獲取手機型號、地理位置,使用者評論功能
1.評論框和獲取使用者手機型號,在src/pages/detail/index.vue中
<template> <div> <BookInfo :info='info'></BookInfo> <div class="comment"> <textarea v-model="comment" class="textarea" :maxlength="100" placeholder="請輸入圖書短評"></textarea> <div class="location"> 地理位置: <switch color='#EA5A49' :checked='location' @change="getGeo"></switch> <span class="text-primary">{{location}}</span> </div> <div class="phone"> 手機型號: <switch color='#EA5A49' :checked='phone' @change="getPhone"></switch> <span class="text-primary">{{phone}}</span> </div> </div> </div> </template> <script> import {get} from '@/until' import BookInfo from '@/components/BookInfo' export default { components:{ BookInfo }, data(){ return{ bookid:'', info:{}, comment:'', location:'', phone:'' } }, methods:{ async getDetail(){ const info=await get('/weapp/bookdetail',{id:this.bookid}) wx.setNavigationBarTitle({title:info.data.title}) this.info=info.data }, getGeo(){}, getPhone(e){ if(e.target.value){ const phoneInfo=wx.getSystemInfoSync() console.log(phoneInfo) this.phone=phoneInfo.model }else{ // 沒選中 this.phone='' } } }, mounted(){ this.bookid=this.$root.$mp.query.id //this.$root.$mp.query獲取跳轉連結傳過來的物件集合 this.getDetail() }, onShareAppMessage: (res) => { if (res.from === 'button') { console.log("來自頁面內轉發按鈕"); console.log(res.target); } else { console.log("來自右上角轉發選單") } return { // title: '', // path: '/pages/share/share?id=123', // imageUrl: "/images/1.jpg", success: (res) => { console.log("轉發成功", res); }, fail: (res) => { console.log("轉發失敗", res); } } } } </script> <style lang='scss'> .comment{ margin-top: 10px; .textarea{ width: 730rpx; height: 200rpx; background相關推薦
Vue+koa2開發一款全棧小程式(9.圖書詳情頁)
1.獲取圖書詳情 1.修改server/controllers/bookdetail.js為 const {mysql}=require('../qcloud') module.exports=async(ctx)=>{ const {id}=ctx.request.query co
Vue+koa2開發一款全棧小程式(7.圖書錄入功能)
1.圖書錄入功能 1.獲取圖書資訊 1.在mydemo/src/until.js中封裝工具函式post和get // 工具函式 import config from './config' // http get工具函式 獲取資料 export function get (url,data)
Vue+koa2開發一款全棧小程式(5.服務端環境搭建和專案初始化)
1.微信公眾平臺小程式關聯騰訊雲 騰訊雲的開發環境是給免費的一個後臺,但是隻能夠用於開發,如果用於生產是需要花錢的,我們先用開發環境吧 1.用小程式開發郵箱賬號登入微信公眾平臺 2.【設定】→【開發者工具】→第一次是git管理,開啟騰訊雲關聯 3.會一路跳轉到騰訊雲的【開通開發環境】的流程要走 1.已經完成
Vue+koa2開發一款全棧小程式(服務端環境搭建和專案初始化)
1.微信公眾平臺小程式關聯騰訊雲 騰訊雲的開發環境是給免費的一個後臺,但是隻能夠用於開發,如果用於生產是需要花錢的,我們先用開發環境吧 1.用小程式開發郵箱賬號登入微信公眾平臺 2.【設定】→【開發者工具】→第一次是git管理,開啟騰訊雲關聯 3.會一路跳轉到騰
Vue+koa2開發一款全棧小程序(1.課程介紹+2.ES6入門)
... index 定義變量 打包 npm tps 管理系統 中心 概述 1.課程介紹 1.課程概述 1.做什麽? Vue+koa2開發一款全棧小程序 2.哪些功能? 個人中心、圖書列表、圖書詳情、圖書評論、個人評論列表 3.技術棧 小程序、Vue.js、koa2、koa-
Vue+koa2開發一款全棧小程序(5.服務端環境搭建和項目初始化)
net pro 腳手架 column 小程序 ans msg 角點 import 1.微信公眾平臺小程序關聯騰訊雲 騰訊雲的開發環境是給免費的一個後臺,但是只能夠用於開發,如果用於生產是需要花錢的,我們先用開發環境吧 1.用小程序開發郵箱賬號登錄微信公眾平臺 2.【設置】→
如何全棧開發一款團購小程式應用
> 筆者關注雲開發已經很久了,最近動手將之前做的一款團購小程式重構並遷移到了雲開發上,同時將原始碼開源,歡迎感興趣的朋友一起交流。 ## 技術選型 **小程式** - 底層框架: [Taro 3.0 (React)](https://taro-docs.jd.com/taro/docs/READM
零基礎開發一款微信小程式商城
一個朋友問我能不能幫忙做個商城?我一個完整網頁都寫不出的 Android 開發者,我該怎麼拒絕呢?好吧,看在小程式這麼火的形勢下,我還是答應了!找了個開源專案,差不多花了三天時間搞定。本場 Chat 主要是講一個開源的微信小程式商城的安裝執行除錯及資料修改,包括前臺和後臺的開
如何零基礎開發一款微信小程式外掛?
前不久,微信釋放了一個重磅新能力:微信小程式外掛功能。有了它,小程式開發者就可以通過這個功能,強化自身小程式能力;小程式服務提供商也可以用它,為開發者、使用者提供強大的小程式功能支援,進一步拓展小程式能力。如何從零開發一個外掛呢?今天,小豬CMS就來手把手,教你如何從零開
從零開發一款自己的小程式UI元件庫(二)
寫在前面:從零開發一款自己的小程式UI元件庫(一) 上節我們講到初始化元件庫模板、模板檔案概述、模板上傳npm以及npm包檔案下載至本地並運用到專案。這節我們繼續,內容主要有基礎UI元件庫的搭建(button元件的例項)以及如何在本地使用npm link除錯npm包專案。 本節所用到的物料:mineui-
一款優雅的小程式拖拽排序元件實現
前言 最近po主寫小程式過程中遇到一個拖拽排序需求. 上網一頓搜尋未果, 遂自行實現. 這次就不上效果圖了, 直接掃碼感受吧. 靈感 首先由於並沒有啥現成的小程式案例給我參考. 所以有點無從下手, 那就找個h5的拖拽實現參考參考. 於是在jquery外掛網看了幾個拖拽排序實現後基本確定了思路. 大概就是用
原創|我是如何從零學習開發一款跨平臺桌面軟體的(Markdown編輯器)
原始衝動 最近一直在學習 Electron 開發桌面應用程式,目的是想做一個桌面編輯器,雖然一直在使用Typora這款神器,但無奈Typora太過國際化,在國內水土不服,無法滿足我的一些需求。 比如實現本地圖片上傳到雲端(mac版可以藉助iPic),無法幫我把本地圖片和文章一起釋出到部落格園、CSDN、Seg
我想開發一款小程序,怎樣才能快速上手並上線?
reac 原生 數據 web前端開發 業務開發 2017年 簡單 技術分享 lan 歡迎大家前往騰訊雲+社區,獲取更多騰訊海量技術實踐幹貨哦~ 2017 年 1 月 9 日,微信正式發布了小程序應用。之後,我們陸續收到了一些開發者留言和反饋。這裏面,問最多的就是: 我是做
開發工具:全棧開發工具彙總(一)——彙總
本文中將各類開發過程中需要使用的工具進行彙總,後面會有詳細介紹 一、前端 AxureRP:原型圖設計工具 JetBrains WebStorm:網頁編輯工具 EditPlus:網頁編輯工具 HBuilder:輕量級網頁編輯工具 ace_admin:ac
利用Python3開發一款小工具 (介面背後的程式碼)
介面設計參照上一篇部落格(https://blog.csdn.net/hitguolu/article/details/82620681), 1、介面中的控制元件 2、如何給一個控制元件新增事件響應 3、介面的約束 4、訊號
如何成為一名全棧開發工程師
我曾經有一個夢想是要成為一名全棧開發工程師,因為我認為一個程式設計師無所不精無所不能是一件很牛逼的事情。 同時當一個程式設計師無所不精的時候,不僅僅自己可以開一家公司自己接活幹,同時即便不辦一家公司,在一家公司好歹可以吃香的喝辣的。 抱著這個理想目標,於是在那段時間我時而學Docker,時而學Nginx,
使用LeanCloud快速開發一款小程式
前言 開發小程式離不開後臺資料,對於獨立開發者來說,既要寫前端,又要寫後端,工作量就會驟然增大。微信提供的雲開發無疑是給獨立開發者提供了很大的便利,但是由於其資料庫不支援聯表查詢,對於某些場景就不是那麼的友好了。當然,市面上有很多的BaaS服務提供商,大都類似,今天我們就用其中的一個LeanCloud來講解
開發一款簡單的百度小程式(由微信小程式遷移過來)
開發一款簡單的百度小程式(由微信小程式遷移過來) 百度小程式剛出兩個月不久,上個週末閒來無事,看了一下百度小程式的文件,百度下程式的文件跟微信的差不了多少,就是一些api和語法會有一點差別,基本上能寫微信小程式的都能很快學會百度小程式!不過百度小程式的開發者工具真的沒有微信的好。我寫
從技術角度談如何開發一款微信聯網小遊戲
微信自從有了 “跳一跳” 後微信小遊戲就開始迅速火爆起來,為跟上這股潮流,相信很多開發者都想探一探微信小遊戲是如何開發的。下面我就從技術的角度說說一下微信小遊戲如何開發的。 附:本文適合有開發經驗的人,關於如何建立微信小遊戲賬號和使用微信小遊戲開發工具就不再贅述,不瞭解
利用Python3開發一款小工具(引言)
該部落格會詳細講解利用Python製作一款小工具的過程,後續文件將圍繞以下兩個方面: 環境安裝 分解開發 本文只是一個引言,將小工具的需求進行描述: ##背景 目前筆者所在專案的程式碼編譯及測試用例檢查,都是執行在兩個Linux伺服器中,而程式碼工程一般是