
快速入門 WePY 小程式
一、WePY介紹
WePY 是 騰訊 參考了Vue 等框架對原生小程式進行再次封裝的框架,更貼近於 MVVM 架構模式, 並支援ES6/7的一些新特性。
二、WePY 使用
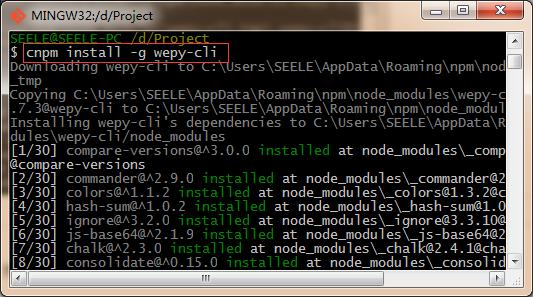
1、WePY的安裝或更新都通過npm進行:
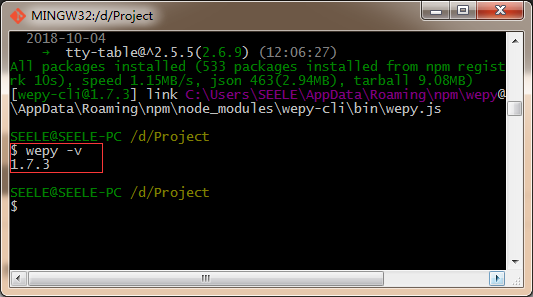
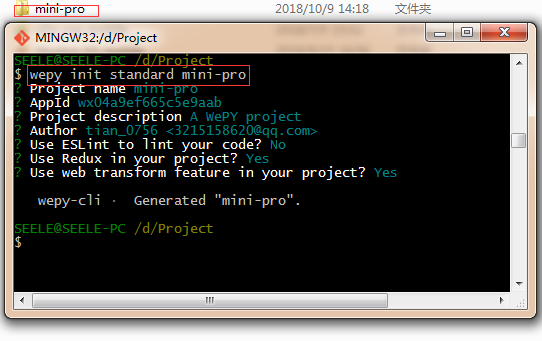
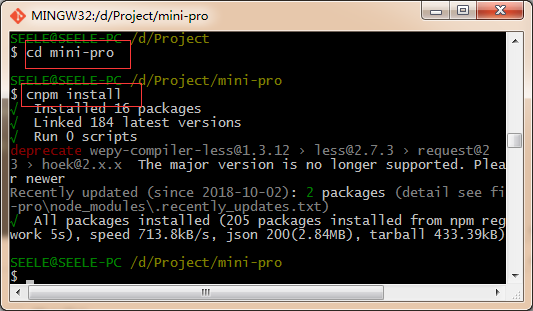
npm install -g wepy-cli  //全域性安裝或更新WePY命令列工具(wepy腳手架): wepy-cli
wepy -v //檢視wepy-cli版本
wepy init standard <projectName> //新建wepy小程式專案,1.7.0之前的版本使用:wepy new myproject
wepy list //檢視專案模板
cd <projectName> //切換至專案目錄
npm  install //安裝依賴
wepy build --watch //開啟實時編譯
git base here:
(1)全域性安裝或更新 wepy-cli:
(2)檢視 wepy-cli 版本:
(3)建立 wepy 小程式專案:
(4)切換至專案目錄,安裝依賴:
(5)開啟實時編譯

2、程式碼高亮WebStorm/PhpStorm(其他工具參見:wepy官網程式碼高亮)
(1)開啟Settings,搜尋Plugins,搜尋Vue.js外掛並安裝。
(2) 開啟Settings,搜尋File Types,找到Vue.js Template,在Registered Patterns新增*.wpy,即可高亮。
3、程式碼優化
(1)程式碼規範
- wepy標籤和原生一樣
- 自定義元件命名應避開:原生元件名(
input、button、view、repeat等)、WePY的輔助標籤<repeat> - 變數/方法名儘量使用駝峰式命名,避免使用
$開頭($開頭的識別符號是WePY內建屬性/方法,可在js中以this.的方式直接使用,具體請參考API文件) - app、pages、components檔名的字尾為
.wpy,外鏈的檔案可以是其它字尾。 具體請參考wpy檔案說明。 - 支援ES6/7的一些新特性,框架在ES6(ECMAScript 6)下開發(預設使用babel編譯),因此也需要使用ES6開發小程式,ES6中有大量的語法糖可以讓我們的程式碼更加簡潔高效。
- wepy繼承了wx物件的方法,建議在wepy框架開發中不要用到wx物件的方法,雖然執行時效果是一樣,但是打包時會cli報錯(wepy中沒有wx物件)wepy中元件中使用的是class,vue中使用的的是物件。
(2)資料繫結
小程式頁面渲染層和JS邏輯層分開的,setData操作實際就是JS邏輯層與頁面渲染層之間的通訊,在同一次執行週期內多次執行setData操作時,通訊的次數是一次還是多次取決於API本身的設計。WePY使用髒資料檢查對setData進行封裝,在函式執行週期結束時執行髒資料檢查,一來可以不用關心頁面多次setData是否會有效能上的問題,二來可以更加簡潔去修改資料實現繫結,不用重複去寫setData方法。
//原生小程式
this.setData({title: 'this is title'});//通過Page提供的setData方法來繫結資料

//wepy
this.title = 'this is title';


//wepy 在非同步函式中更新資料的時候,必須手動呼叫$apply方法,才會觸發髒資料檢查流程的執行
setTimeout(() => {
    this.title = 'this is title';
    this.$apply();
}, 3000)


//保留setData方法,但不建議使用setData執行繫結,修復傳入undefined的bug,並且修改入參支援:
this.setData(target, value)
this.setData(object)
(3)事件繫結以及傳參優化
<view @tap="click"></view> // 原 bindtap="click"(省略了.default字尾 )繫結小程式冒泡型事件
<view @tap.stop="click"></view> // 原catchtap="click" 繫結小程式捕獲型事件,如catchtap
<view @tap.capture="click"></view> // 原 capture-bind:tap="click"
<view @tap.capture.stop="click"></view> // 原 capture-catch:tap="click"
<!--事件傳參-->
<view @tap="click({{index}})"></view> // 原bindtap="click" data-index={{index}}(4)框架預設對小程式提供的API全都進行了 Promise 處理,甚至可以直接使用async/await等新特性進行開發,同時修復了一些原生API的缺陷(如:wx.request的併發問題等)
// 原生程式碼:

wx.request({
    url: 'xxx',
    success: function (data) {
        console.log(data);
    }
});

// WePY 使用方式, 需要開啟 Promise 支援,參考開發規範章節
wepy.request('xxxx').then((d) => console.log(d));

// async/await 的使用方式, 需要開啟 Promise 和 async/await 支援,參考 WIKI
async function request () {
   let d = await wepy.request('xxxxx');
   console.log(d);
}
(5)computed 計算屬性computed計算屬性(型別: { [key: string]: Function }),是一個有返回值的函式,可直接被當作繫結資料來使用,類似於data屬性。需要注意的是,只要是元件中有任何資料發生了改變,那麼所有計算屬性就都會被重新計算。
  data = {
      a: 1
  }

  // 計算屬性aPlus,在指令碼中可通過this.aPlus來引用,在模板中可通過{{ aPlus }}來插值
  computed = {
      aPlus () {
          return this.a + 1
      }
  }
(6)watcher 監聽器
通過監聽器watcher(型別: { [key: string]: Function })能夠監聽到任何屬性的更新。監聽器適用於當屬性改變時需要進行某些額外處理的情形。
  data = {
      num: 1
  }

  // 監聽器函式名必須跟需要被監聽的data物件中的屬性num同名,
  // 其引數中的newValue為屬性改變後的新值,oldValue為改變前的舊值
  watch = {
      num (newValue, oldValue) {
          console.log(`num value: ${oldValue} -> ${newValue}`)
      }
  }

  // 每當被監聽的屬性num改變一次,對應的同名監聽器函式num()就被自動呼叫執行一次
  onLoad () {
      setInterval(() => {
          this.num++;
          this.$apply();
      }, 1000)
  }
WePY 從1.7.x 版本開始支援 wxs 語法,但語法與原生 wxs 稍有出入
①wxs是基於原生的wxs去實現的,只是通過編譯把現在的語法編譯為原生語法
②wxs必須是外鏈檔案。並且字尾為.wxs
③wxs引入後只能在template中使用,不能在script中使用
/**
project
└── src
    ├── wxs
    |   └── mywxs.wxs      wxs 檔案
    ├── pages
    |   └── index.wpy      頁面
    └──app.wpy
**/

// mywxs.wxs

module.exports = {
  text: 'This is from wxs',
  filter: function (num) {
    return num.toFixed(2);
  }
};

// index.wpy

<template>
  <text>{{m1.text}}</text>
  <text>{{m1.filter(num)}}</text>
</template>

<script>
  import wepy from 'wepy';
  import mywxs from '../wxs/mywxs.wxs';

  export default class Index extends wepy.page {

    data = {
      num: 10
    };

    wxs = {
      m1: mywxs
    }

  };
</script>
(8)interceptor 攔截器
可以使用WePY提供的全域性攔截器對原生API的請求進行攔截。具體方法是配置API的config、fail、success、complete回撥函式。參考示例:
import wepy from 'wepy';

export default class extends wepy.app {
    constructor () {
        // this is not allowed before super()
        super();
        // 攔截request請求
        this.intercept('request', {
            // 發出請求時的回撥函式
            config (p) {
                // 對所有request請求中的OBJECT引數物件統一附加時間戳屬性
                p.timestamp = +new Date();
                console.log('config request: ', p);
                // 必須返回OBJECT引數物件,否則無法傳送請求到服務端
                return p;
            },

            // 請求成功後的回撥函式
            success (p) {
                // 可以在這裡對收到的響應資料物件進行加工處理
                console.log('request success: ', p);
                // 必須返回響應資料物件,否則後續無法對響應資料進行處理
                return p;
            },

            //請求失敗後的回撥函式
            fail (p) {
                console.log('request fail: ', p);
                // 必須返回響應資料物件,否則後續無法對響應資料進行處理
                return p;
            },

            // 請求完成時的回撥函式(請求成功或失敗都會被執行)
            complete (p) {
                console.log('request complete: ', p);
            }
        });
    }
}
三、WePY專案的目錄結構
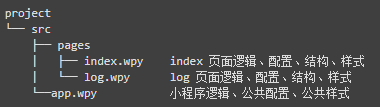
dist目錄為WePY通過build指令生成的目錄,除額外增加的npm目錄外,其目錄結構與原生小程式的目錄結構類似。

原生小程式:app(app.js、app.json、app.wxss),page(page.js、page.json、page.wxml、page.wxss),檔案必須同名。WePY中則使用了單檔案模式:app.wpy,page.wpy。
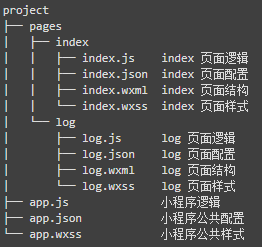 ==>
==> 
一個.wpy檔案可分為三大部分,各自對應於一個標籤:
- 指令碼
<script>部分,又可分為兩個部分:
邏輯部分,除了config物件之外的部分,對應於原生的.js檔案
配置部分,即config物件,對應於原生的.json檔案
-
結構
<template>部分,對應於原生的.wxml檔案 -
樣式
<style>部分,對應於原生的.wxss檔案
<!--lang決定了其程式碼編譯過程,src決定是否外聯程式碼,存在src屬性且有效時,會忽略內聯程式碼-->
<style lang="less" src="page1.less"></style>//lang值:css(預設)、less、scss、stylus、postcss
<template lang="wxml" src="page1.wxml"></template>//lang值:wxml(預設)、xml、pug(原jade)。入口檔案app.wpy不需要template,所以編譯時會被忽略。
<script></script>//lang值:babel(預設、TypeScript
1、src資料夾
(1)components元件:
元件例項繼承自wepy.component類,除了不需要config配置以及頁面特有的一些生命週期函式之外,其屬性與頁面屬性大致相同:
import wepy from 'wepy';

export default class MyComponent extends wepy.component {
    props = {}//接收父元件傳來的引數
    customData = {}  // 自定義資料
    customFunction () {}  //自定義方法
    onLoad () {}  // 在Page和Component共用的生命週期函式
    data = {};  // 頁面所需資料均需在這裡宣告,可用於模板資料繫結
    components = {};  // 宣告頁面中所引用的元件,或宣告元件中所引用的子元件
    mixins = [];  // 宣告頁面所引用的Mixin例項
    computed = {};  // 宣告計算屬性(詳見後文介紹)
    watch = {};  // 宣告資料watcher(詳見後文介紹)
    methods = {};  // 宣告頁面wxml中標籤的事件處理函式。注意,此處只用於宣告頁面wxml中標籤的bind、catch事件,自定義方法需以自定義方法的方式宣告
    events = {};  // WePY元件事件處理函式物件,存放響應元件之間通過$broadcast、$emit、$invoke所傳遞的事件的函式
}
/** 與page不同的是component不存在:
    onShow () {}  // 只在Page中存在的頁面生命週期函式
    config = {};  // 只在Page例項中存在的配置資料,對應於原生的page.json檔案,類似於app.wpy中的config
    onReady() {}  //  只在Page中存在的頁面生命週期函式
**/原生小程式支援js模組化,但彼此獨立,業務程式碼與互動事件仍需在頁面處理。無法實現元件化的鬆耦合與複用(如,模板A中繫結一個bindtap="myclick",模板B中同樣繫結一樣bindtap="myclick",那麼就會影響同一個頁面事件、資料)
WePY元件的所有業務與功能在元件本身實現,元件與元件之間彼此隔離(上述例子在WePY的元件化開發過程中,A元件只會影響到A所繫結的myclick,B也如此)
// 原生程式碼:

<!-- item.wxml -->
<template name="item">
  <text>{{text}}</text>
</template>

<!-- index.wxml -->
<import src="item.wxml"/>
<template is="item" data="{{text: 'forbar'}}"/>

<!-- index.js -->
var item = require('item.js')


// WePY
<!-- /components/item.wpy -->
 <text>{{text}}</text>

<!-- index.wpy -->
<template>
    <com></com>
</template>
<script>
    import wepy from 'wepy';
    import Item from '../components/item';
    export default class Index extends wepy.page {
        components = { com: Item }
    }
</script>
ps,在 1.7.2-alpha4 的實驗版本中提供了對原生元件的支援
①引用元件
頁面可以引入元件,而元件還可以引入子元件
/**
project
└── src
    ├── components
    |   └── child.wpy
    ├── pages
    |   ├── index.wpy    index 頁面配置、結構、樣式、邏輯
    |   └── log.wpy      log 頁面配置、結構、樣式、邏輯
    └──app.wpy           小程式配置項(全域性公共配置、公共樣式、宣告鉤子等)
**/

// index.wpy

<template>
    <!-- 以`<script>`指令碼部分中所宣告的元件ID為名命名自定義標籤,從而在`<template>`模板部分中插入元件 -->
   <view class="child1">
        <child></child>
    </view>

    <view class="child2">
<!--注意:WePY中,在父元件template模板部分插入駝峰式命名的子元件標籤時,不能將駝峰式命名轉換成短橫杆式命名(比如將childCom轉換成child-com,這與Vue中不一致)-->
        <anotherchild></anotherchild>
    </view>
</template>

<script>
    import wepy from 'wepy';
    //引入元件檔案
    import Child from '../components/child';

    export default class Index extends wepy.component {
        //宣告元件,分配元件id為child,需要注意的是,WePY中的元件都是靜態元件,是以元件ID作為唯一標識的,每一個ID都對應一個元件例項,當頁面引入兩個相同ID的元件時,這兩個元件共用同一個例項與資料,當其中一個元件資料變化時,另外一個也會一起變化。
        components = {
            //為兩個相同元件的不同例項分配不同的元件ID,從而避免資料同步變化的問題
            child: Child,
            anotherchild: Child
        };
    }
</script>②迴圈渲染元件(1.4.6新增)
WePY 1.x 版本中,迴圈渲染WePY元件時(類似於通過wx:for迴圈渲染原生的wxml標籤),必須使用WePY定義的輔助標籤<repeat>
WePY元件是靜態編譯元件(在編譯階段編譯進頁面),每個元件都是唯一的一個例項,目前只提供簡單的 repeat 支援(不支援在 repeat 的元件中去使用 props, computed, watch 等),因此如下:
<!-- 錯誤使用 --->
// list.wpy
<view>{{test.name}}</view>

// index.wpy
<repeat for="{{mylist}}">
   <List :test.sync="item"></List>
</repeat>

<!-- 推薦用法 --->
// list.wpy
<repeat for="{{mylist}}">
    <view>{{item.name}}</view>
</repeat>

// index.wpy
<List :mylist.sync="mylist"></List>
③props 傳值
props傳值在WePY中屬於父子元件之間傳值的一種機制,包括靜態傳值與動態傳值。
靜態傳值為父元件向子元件傳遞常量資料,因此只能傳遞String字串型別。
動態傳值是指父元件向子元件傳遞動態資料內容,父子元件資料完全獨立互不干擾。但可以通過使用.sync修飾符來達到父元件資料繫結至子元件的效果,也可以通過設定子元件props的twoWay: true來達到子元件資料繫結至父元件的效果。如果既使用.sync修飾符,同時子元件props中新增的twoWay: true時,就可以實現資料的雙向繫結。
// parent.wpy

<!--在父元件template模板部分所插入的子元件標籤中,使用:prop屬性(等價於Vue中的v-bind:prop屬性)來進行動態傳值-->
<child :title="parentTitle" :syncTitle.sync="parentTitle" :twoWayTitle="parentTitle"></child>
<!--通過使用.sync修飾符來達到父元件資料繫結至子元件的效果-->
<script>
data = {
    parentTitle: 'p-title'
};
</script>

// child.wpy

<script>
props = {
    // 靜態傳值
    title: String,

    // 父向子單向動態傳值
    syncTitle: {
        type: String,
        default: 'null'
    },
   // 雙向繫結
    twoWayTitle: {
        type: String,
        default: 'nothing',
        twoWay: true//twoWay: true(預設false)來達到子元件資料繫結至父元件的效果,如果同時使用.sync修飾符,就可以實現雙向繫結
    }
};

onLoad () {
    console.log(this.title); // p-title
    console.log(this.syncTitle); // p-title
    console.log(this.twoWayTitle); // p-title

    this.title = 'c-title';
    console.log(this.$parent.parentTitle); // p-title.
    this.twoWayTitle = 'two-way-title';
    this.$apply();
    console.log(this.$parent.parentTitle); // two-way-title.  --- twoWay為true時,子元件props中的屬性值改變時,會同時改變父元件對應的值
    this.$parent.parentTitle = 'p-title-changed';
    this.$parent.$apply();
    console.log(this.title); // 'c-title';
    console.log(this.syncTitle); // 'p-title-changed' --- 有.sync修飾符的props屬性值,當在父元件中改變時,會同時改變子元件對應的值。
}
</script>
④元件通訊與互動
wepy.component基類提供$broadcast、$emit、$invoke三個方法用於元件之間的通訊和互動:
$broadcast
$broadcast事件是由父元件發起,所有子元件都會收到此廣播事件,除非事件被手動取消。事件廣播的順序為廣度優先搜尋順序
$emit
$emit與$broadcast正好相反,元件發起事件後所有祖先元件會依次接收到$emit事件
//子元件:
this.$emit('some-event', 1, 2, 3, 4);

//父元件:
import wepy from 'wepy'

export default class Com extends wepy.component {
    components = {};

    data = {};

    methods = {};

    // events物件中所宣告的函式為用於監聽元件之間的通訊與互動事件的事件處理函式
    events = {
        'some-event': (p1, p2, p3, $event) => {
               console.log(`${this.$name} receive ${$event.name} from ${$event.source.$name}`);
        }
    };
    // Other properties
}
$invoke
$invoke是一個頁面/元件對另一個元件中的方法的直接呼叫,通過傳入元件路徑找到相應的元件,然後再呼叫其方法。
this.$invoke('ComA', 'someMethod', 'someArgs');//在頁面Page_Index中呼叫元件ComA的某個方法
this.$invoke('./../ComB/ComG', 'someMethod', 'someArgs');//在元件ComA中呼叫元件ComG的某個方法⑤元件自定義事件處理函式(.user事件字尾,1.4.8新增)
示例如下(注意,如果用了自定義事件,則events中對應的監聽函式不會再執行):
// index.wpy

<template>
    <child @childFn.user="parentFn"></child>
</template>

<script>
    import wepy from 'wepy'
    import Child from '../components/child'

    export default class Index extends wepy.page {
        components = {
            child: Child
        }

        methods = {
            parentFn (num, evt) {
                console.log('parent received emit event, number is: ' + num)
            }
        }
    }
</script>


// child.wpy

<template>
    <view @tap="tap">Click me</view>
</template>

<script>
    import wepy from 'wepy'

    export default class Child extends wepy.component {
        methods = {
            tap () {
                console.log('child is clicked')
                this.$emit('childFn', 100)
            }
        }
    }
</script>
⑥slot 元件內容分發插槽
WePY中的slot插槽作為內容分發標籤的空間佔位標籤,便於在父元件中通過對相當於擴充套件板卡的內容分發標籤的“插拔”,更為靈活、方便地對子元件進行內容分發。
注意,父元件中的標籤必須有slot屬性,且值為子元件中對應的slot名,這樣父元件內容分發標籤中的內容(即便沒有內容,子元件插槽中的預設內容也不會顯示出來,只有刪除了父元件中對應的內容分發標籤,才能顯示出來)會覆蓋掉子元件對應插槽中的預設內容
//首先在子元件template模板部分中宣告slot標籤作為內容插槽,同時必須在其name屬性中指定插槽名稱,還可設定預設的標籤內容
<view class="panel">
    <slot name="title">預設標題</slot>
    <slot name="content">預設內容</slot>
</view>

//然後在引入了該帶有插槽的子元件的父元件template模板部分中宣告用於“插拔”的內容分發標籤
<panel>
    <view slot="title">新的標題</view>
    <view slot="content">
        <text>新的內容</text>
    </view>
</panel>
eg:message-com.wpy:
<template>
<!-- 1.4.6新增:迴圈渲染時(類似於原生的wx:for),必須使用WePY定義的輔助標籤"<repeat>" -->
  <repeat for="{{messageList}}" index="index" item="message">
    <navigator url="/pages/topicDetail?topicId={{message.busiId}}">
      <view class="msgList">
        <!-- "<text selectable='true'>" 使文字可選-->
        <text selectable='true'>{{message.content}}</text>
        <view style="text-align: right;">
          <text style="color: rgb(202,202,202);">{{message.createTime}}</text>
        </view>
      </view>
    </navigator>
  </repeat>
</template>
<script>
  import wepy from 'wepy' //引入wepy

  export default class Message extends wepy.component {//建立元件例項
    props = {//接收父元件引數
      messageList: {// * 型別和預設值引數不能省略,元件會偶發性接收不到父元件傳遞的引數
        type: Array,
        default:[]
      }
    };
  }
</script>
<style scoped lang="less">

  .topicInfo text {
    font-size: 12px;
    color: #666;
  }

  .topicBottom view {
    margin-right: 15px;
  }

  .msgList {
    background-color: #fff;
    margin-top: 7px;
    padding: 10px 15px;
  }

</style>
message-page.wpy:
<template>
  <view wx:if="{{!messageList.length}}" class="noData">暫無訊息</view>
  <block wx:else>
    <message :messageList.sync="messageList"></message>
    <downLoad :show.sync="getListParam"></downLoad>
  </block>
</template>

<script>
  import wepy from 'wepy'
  import Message from '../components/message'
  import DownLoad from '../components/downLoad'
  import listMixin from '../mixins/list'
  import {connect} from 'wepy-redux'
  import {getMessageList} from '../store/actions'

  @connect({
    messageList(state) {
      return state.reducer.messageList;
    }
  }, {
    getMessageList
  })

  export default class MineMessages extends wepy.page {
    config = {
      navigationBarTitleText: '我的訊息'
    };
    components = {
      message: Message,
      downLoad: DownLoad
    };

    data = {};
    mixins = [listMixin];

    methods = {
      getList(params) {
        let listParam = {
          messageType: 4
        };
        if (wx.getStorageSync('userId')) {
          this.getMessageList(Object.assign(listParam, params));
        } else {
          wx.showToast({
            title: '您還沒有登入',
            icon: 'none'
          });
        }
      }
    };
  }
</script>
(2)mixins:Mixin 混合(公用的js)
混合可以將元件之間的可複用部分抽離,從而在元件中使用混合時,可以將混合的資料,事件以及方法注入到元件之中。混合分為兩種:
- 預設式混合(data、components、events、自定義方法),即元件未宣告的選項將混合物件中注入元件之中,元件已宣告的選項將不受影響
- 相容式混合(
methods響應事件、小程式頁面事件),即先響應元件本身響應事件,然後再響應混合物件中響應事件(Vue則相反,先執行mixin中的函式, 再執行元件本身的函式)
eg:listMixin.js:
import wepy from 'wepy'

export default class ListMixin extends wepy.mixin {//建立mixin例項
  config = {
    enablePullDownRefresh: true,//開啟下拉重新整理,預設是關閉的
    onReachBottomDistance: 10,//設定觸發下拉重新整理的底部距離
    backgroundColor: "#eab010"//設定背景色
  };
  data = {
    getListParam: {//獲取列表資料的通用引數
      hasMoreData: true,
      loading: false,
      noMore: false,
      page: 1,
      limit: 10,
    }
  };

  /**
   * 頁面相關事件處理函式--監聽使用者下拉動作(下拉重新整理)
   */
  onPullDownRefresh() {
    wx.showNavigationBarLoading(); //在標題欄中顯示載入
    this.data.getListParam.page = 1;//下拉重新整理時引數page=1
    this.methods.getList(this.data.getListParam);//呼叫元件中的獲取列表函式
    setTimeout(() => {
      wx.hideNavigationBarLoading(); //完成停止載入
      wx.stopPullDownRefresh(); //停止下拉重新整理
    }, 300)
  };

  /**
   * 頁面上拉觸底事件的處理函式(上拉載入)
   */
  onReachBottom() {
    if (this.data.getListParam.hasMoreData) {
      this.data.getListParam.page++;//每觸發一次page++
      this.data.getListParam.hasMoreData = false;//關閉可呼叫函式
      this.data.getListParam.loading = true;//顯示載入中...(自己寫的底部載入中樣式的元件)
      this.methods.getList(this.data.getListParam);//呼叫元件中的獲取列表函式
      setTimeout(() => {
        this.data.getListParam.loading = false;//關閉顯示載入中...(自己寫的底部載入中樣式的元件)
        this.$apply();//強制渲染
      }, 100);
    } else {
      this.data.getListParam.noMore = true;//顯示載入完成(自己寫的底部載入到底樣式的元件)
    }
  };

  onReady() {
    this.methods.getList(this.data.getListParam);//初始化請求頁面資料
  }

}使用時引入然後注入到元件例項(最好放在data屬性後,否則會偶發性報錯),eg:

(3)頁面page.wpy
Page頁面實際上繼承自Component元件,即Page也是元件。除擴充套件了頁面所特有的config配置以及特有的頁面生命週期函式之外,其它屬性和方法與Component一致:
import wepy from 'wepy';

export default class MyPage extends wepy.page {
    customData = {}  // 自定義資料

    customFunction () {}  //自定義方法

    onLoad () {}  // 在Page和Component共用的生命週期函式

    onUnload() {}  // 監聽頁面解除安裝

    onReady() {}  //  只在Page中存在的頁面生命週期函式

    onShow () {}  // 只在Page中存在的頁面生命週期函式,當小程式啟動,或從後臺進入前臺顯示

    onHide() {}  // 只在Page中存在的頁面生命週期函式,當小程式從前臺進入後臺

    config = {};  // 只在Page例項中存在的配置資料,對應於原生的page.json檔案,類似於app.wpy中的config

    data = {};  // 頁面所需資料均需在這裡宣告,可用於模板資料繫結

    components = {};  // 宣告頁面中所引用的元件,或宣告元件中所引用的子元件

    mixins = [];  // 宣告頁面所引用的Mixin例項

    computed = {};  // 宣告計算屬性(詳見後文介紹)

    watch = {};  // 宣告資料watcher(詳見後文介紹)

    methods = {};  // 宣告頁面wxml中標籤的事件處理函式。注意,此處只用於宣告頁面wxml中標籤的bind、catch事件,自定義方法需以自定義方法的方式宣告

    events = {};  // WePY元件事件處理函式物件,存放響應元件之間通過$broadcast、$emit、$invoke所傳遞的事件的函式

    onPullDownRefresh(){}  // 監聽使用者下拉動作

    onReachBottom(){}  // 頁面上拉觸底事件的處理函式

    onShareAppMessage(){}  // 使用者點選右上角分享

    onPageScroll(){}  // 頁面滾動

    onTabItemTap(){}  //  當前是 tab 頁時,點選 tab 時觸發
}
(4)狀態管理store(redux)
(5)app.wpy:小程式入口
app.wpy例項繼承自wepy.app類,包含:config配置物件(對應原生的app.json檔案,build編譯時會根據config屬性自動生成app.json檔案)、globalData全域性資料物件、自定義方法與屬性、小程式生命週期函式。
在Page頁面例項中,可以通過this.$parent來訪問App例項。
<script>
import wepy from 'wepy';
export default class extends wepy.app {
    config = {
        pages:[// pages定義當前小程式所有頁面路徑,讓微信客戶端知道當前你的小程式頁面定義在哪個目錄
            'pages/index',
            'pages/mine'
        ],
        window:{//window定義小程式所有頁面的頂部背景顏色,文字顏色定義等。
            "backgroundTextStyle": "light",
            "navigationBarBackgroundColor": "#fff",
            "navigationBarTitleText": "頂部標題",
            "navigationBarTextStyle": "black"
        },
        tabBar: {
            selectedColor: '#ea9100',//底部導航字型選中時的顏色
            list: [
                   {
                     pagePath: 'pages/index',//導航頁面路徑(必須在pages中定義)
                     text: '首頁',//導航名
                     iconPath: 'img/index.png',//未選中的導航icon
                     selectedIconPath: 'img/index1.png'//選中時的導航icon
                   },
                   {
                     pagePath: 'pages/mine',
                     text: '我的',
                     iconPath: 'img/mine.png',
                     selectedIconPath: 'img/mine1.png'
                    }
            ]
       },
    };
    onLaunch() {//初始化
        console.log(this);
    }

    onShow(){}//當小程式啟動,或從後臺進入前臺顯示
    onHide(){}//當小程式從前臺進入後臺
}
</script>

<style lang="less">
/** less **/
</style>
(6)index.template.html:web頁面的入口檔案
2、project.config.json小程式專案配置檔案
1.7.0 之後的版本會在根目錄包含project.config.json,使用微信開發者工具-->新增專案,專案目錄請選擇專案根目錄即可根據配置完成專案資訊自動配置。
1.7.0 之前生成的程式碼包可能不存在project.config.json檔案,建議手動建立該檔案後再新增專案。project.config.json檔案內容如下:
{
  "description": "project description",
  "setting": {
    "urlCheck": true,//對應不檢查安全域名選項,開啟。 如果已配置好安全域名則建議關閉
    "es6": false,//對應關閉ES6轉ES5選項,關閉。 重要:未關閉會執行報錯
    "postcss": false,//對應關閉上傳程式碼時樣式自動補全選項,關閉。 重要:某些情況下漏掉此項也會執行報錯
    "minified": false //對應關閉程式碼壓縮上傳選項,關閉。重要:開啟後,會導致真機computed, props.sync 等等屬性失效。(注:壓縮功能可使用WePY提供的build指令代替)
  },
  "compileType": "miniprogram",
  "appid": "touristappid",
  "projectname": "Project name",
  "miniprogramRoot": "./dist"
}
3、wepy.config.js
const path = require('path');
var prod = process.env.NODE_ENV === 'production';

module.exports = {
  /*wpyExt:預設值為'.wpy',IDE預設情況下不會對此檔案型別進行高亮處理
    除了進行前文程式碼高亮設定之外
    還可以直接將相關檔案的字尾名由.wpy修改為.vue,然後將此選項修改為.vue
  */
  wpyExt: '.wpy',
  eslint: false,
  cliLogs: !prod,
  build: {
    web: {
      htmlTemplate: path.join('src', 'index.template.html'),
      htmlOutput: path.join('web', 'index.html'),
      jsOutput: path.join('web', 'index.js')
    }
  },
  resolve: {
    alias: {
      counter: path.join(__dirname, 'src/components/counter'),
      '@': path.join(__dirname, 'src')
    },
    aliasFields: ['wepy', 'weapp'],
    modules: ['node_modules']
  },
  /** compilers為1.3.1版本之後的功能,如果需要使用其它語法,請先配置compilers,然後再安裝相應的compilers
     目前支援wepy-compiler-less, wepy-compiler-postcss,wepy-compiler-sass、wepy-compiler-babel、wepy-compiler-pug
     其他compiler持續開發中
   */
  compilers: {
    less: {
      compress: prod
    },
    /*sass: {
      outputStyle: 'compressed'
    },*/
    babel: {
      sourceMap: true,
      presets: [
        'env'
      ],
      /*
       plugins為1.1.6版本之後的功能
       目前支援js壓縮wepy-plugin-ugliyjs、圖片壓縮wepy-plugin-imagemin
       其他plugin持續開發中
      */
      plugins: [
        'transform-class-properties',
        'transform-decorators-legacy',
        'transform-object-rest-spread',
        'transform-export-extensions',
      ]
    }
  },
  plugins: {},
/*在使用的地方先引入import wepy from 'wepy'; 然後wepy.$appConfig.屬性名。eg:wepy.$appConfig.baseUrl*/
  appConfig: {
    baseUrl:process.env.NODE_ENV === 'production'? 'https://api.a.com/' : 'https://api.a.com/dev/',
    noPromiseAPI: ['createSelectorQuery']
  }
}

if (prod) {

  // 壓縮sass
  module.exports.compilers['less'] = {outputStyle: 'compressed'}

  // 壓縮js
  module.exports.plugins = {
    uglifyjs: {
      filter: /\.js$/,
      config: {}
    },
    imagemin: {
      filter: /\.(jpg|png|jpeg)$/,
      config: {
        jpg: {
          quality: 80
        },
        png: {
          quality: 80
        }
      }
    }
  }
}