Android二維碼功能實現,在程式內嵌入ZXing專案
最近二維碼真是越來越火了,隨便電視上、網路上、商場裡,到處都是二維碼。而內嵌二維碼掃描功能的軟體也越來越多,QQ、微信、UC瀏覽器等等應用都可以對著二維碼掃一掃,感覺我們自己的應用裡不加上二維碼掃描功能,都跟不上時代潮流了。所以今天我就將帶著大家一起,在我們自己的程式里加入二維碼掃描的功能。
不過,二維碼功能如果真要做起來還是非常複雜的,從零開始實現不太現實,比較好的做法就是藉助現有的開源專案。目前在二維碼這一領域名氣最大的開源專案就是ZXing了(Zebra Crossing),它提供了多個平臺的二維碼掃描解決方案,開源專案地址是 https://code.google.com/p/zxing/ 。
雖說網上已經有現成的開源專案了,不過關於ZXing的文件和教程好像還比較少,因此還是有不少朋友並不知道在專案中該如何引入ZXing的,這裡我就帶著大家一步步地實現,相信每個人在看完本篇文章後都可以在自己的專案中實現二維碼掃描功能。
首先,我們需要下載ZXing專案所依賴的Jar包的原始碼。
下載地址是 http://repo1.maven.org/maven2/com/google/zxing/core/2.2/core-2.2-sources.jar 。
然後我們再來下載ZXing專案,下載地址是 https://zxing.googlecode.com/files/ZXing-2.2.zip 。
建議使用迅雷下載,因為Google Code和Maven的訪問在國內不穩定,經常出現斷聯的情況,使用迅雷可以保證檔案的完整性。
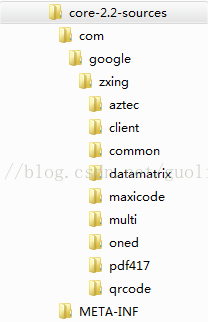
另外,經過我的測試,在ZXing專案中直接匯入core-2.2的Jar包是無法正常執行的,所以我們只能通過將core-2.2的原始碼加入到ZXing專案中來實現。下載好以上兩個檔案後,先解壓core-2.2-sources.jar檔案,解壓之後的目錄結構如下圖所示:
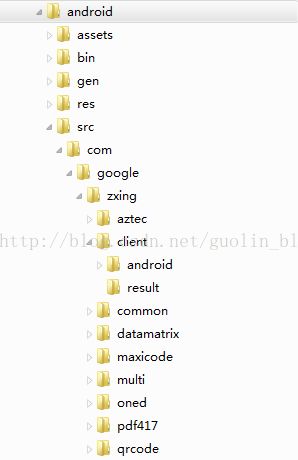
然後解壓ZXing-2.2這個壓縮包,裡面可以看到各種平臺下的ZXing專案原始碼,我們進入到android資料夾的src目錄下,將core-2.2-sources中的原始碼拷貝進來。拷貝之後android資料夾下的目錄結構如下圖所示:
這樣準備工作已經完成了,現在我們新建一個Android專案ScannerTest,專案使用Android 4.0的API。
然後將上圖中src目錄下的所有檔案全部複製,貼上到我們ScannerTest專案的src目錄下,完成後目錄結構如下圖所示:

拷貝完了程式碼,現在該拷貝資源了,展開ZXing專案android資料夾下的res目錄,將drawable資料夾、layout資料夾、menu資料夾、raw資料夾、values資料夾以及xml資料夾中的內容都拷貝到ScannerTest專案的res目錄下,注意有衝突的部分要小心解決,比如兩個values資料夾中都有string.xml檔案,要將它們的內容進行合併,不能只是簡單地覆蓋。
然後我們還需要將AndroidManifest中的內容進行合併,注意ZXing Android專案下的AndroidManifest在宣告Activity時用的都是簡寫,而現在由於專案包名變了,再使用簡寫會出現找不到活動的情況,因此所有的簡寫都要改成完整類名,例如.CaptureActivity要改成com.google.zxing.client.android.CaptureActivity。另外ZXing Android專案下的主活動是CaptureActivity,這裡我們需要將主活動的宣告刪除掉,因為ScannerTest專案中主活動是MainActivity。合併後的AndroidManifest中的程式碼如下所示:
<?xml version="1.0" encoding="utf-8"?>
<manifest xmlns:android="http://schemas.android.com/apk/res/android"    package="com.example.scannertest"
android:versionCode="1"
android:versionName="1.0" >
<uses-permission android:name="android.permission.CAMERA" />
   <uses-permission android:name="android.permission.INTERNET" />
  <uses-permission android:name="android.permission.VIBRATE" />
   <uses-permission android:name="android.permission.FLASHLIGHT" />
 <uses-permission android:name="android.permission.READ_CONTACTS" />
  <uses-permission android:name="com.android.browser.permission.READ_HISTORY_BOOKMARKS" />
  <uses-permission android:name="android.permission.WRITE_EXTERNAL_STORAGE" />
   <uses-permission android:name="android.permission.CHANGE_WIFI_STATE" />
  <uses-permission android:name="android.permission.ACCESS_WIFI_STATE" />
   <uses-sdk        android:minSdkVersion="14"        android:targetSdkVersion="17" />     <uses-feature        android:name="android.hardware.camera"
 android:required="false" />
<uses-feature
  android:name="android.hardware.camera.front"
   android:required="false" />
 <uses-feature
 android:name="android.hardware.camera.autofocus"
   android:required="false" />
 <uses-feature
 android:name="android.hardware.camera.flash"
   android:required="false" />    <uses-feature android:name="android.hardware.screen.landscape" />
   <uses-feature
  android:name="android.hardware.wifi"
     android:required="false" />
  <uses-feature android:name="android.hardware.touchscreen" />     <supports-screens
  android:anyDensity="true"
     android:largeScreens="true"
      android:normalScreens="true"        android:smallScreens="true"        android:xlargeScreens="true" />
  <application
  android:allowBackup="true"
      android:icon="@drawable/ic_launcher"
    android:label="@string/app_name"
     android:theme="@style/AppTheme" >
     <activity
     android:name="com.example.scannertest.MainActivity"            android:label="@string/app_name" >
       <intent-filter>
  <action android:name="android.intent.action.MAIN" />
              <category android:name="android.intent.category.LAUNCHER" />            </intent-filter>
  </activity>
  <activity            android:name="com.google.zxing.client.android.CaptureActivity"            android:clearTaskOnLaunch="true"            android:configChanges="orientation|keyboardHidden"            android:screenOrientation="landscape"            android:stateNotNeeded="true"            android:theme="@android:style/Theme.NoTitleBar.Fullscreen"            android:windowSoftInputMode="stateAlwaysHidden" >
     <intent-filter>
  <action android:name="com.google.zxing.client.android.SCAN" />
        <category android:name="android.intent.category.DEFAULT" />
          </intent-filter>            <intent-filter>
      <action android:name="android.intent.action.VIEW" />
             <category android:name="android.intent.category.DEFAULT" />                <category android:name="android.intent.category.BROWSABLE" />                <data                    android:host="zxing.appspot.com"
           android:path="/scan"
    android:scheme="http" />
 </intent-filter>
          <intent-filter>                <action android:name="android.intent.action.VIEW" />
        <category android:name="android.intent.category.DEFAULT" />                <category android:name="android.intent.category.BROWSABLE" />                <data                    android:host="www.google.com"                    android:path="/m/products/scan"                    android:scheme="http" />            </intent-filter>            <intent-filter>
   <action android:name="android.intent.action.VIEW" />
        <category android:name="android.intent.category.DEFAULT" />
        <category android:name="android.intent.category.BROWSABLE" />                <data                    android:host="www.google.co.uk"                    android:path="/m/products/scan"                    android:scheme="http" />            </intent-filter>            <intent-filter>                <action android:name="android.intent.action.VIEW" />                <category android:name="android.intent.category.DEFAULT" />
    <category android:name="android.intent.category.BROWSABLE" />                <data                    android:host="scan"                    android:path="/"                    android:scheme="zxing" />
      </intent-filter>        </activity>        <activity            android:name="com.google.zxing.client.android.PreferencesActivity"            android:label="@string/preferences_name"            android:stateNotNeeded="true" >        </activity>        <activity            android:name="com.google.zxing.client.android.encode.EncodeActivity"            android:stateNotNeeded="true" >            <intent-filter>
      <action android:name="com.google.zxing.client.android.ENCODE" />
      <category android:name="android.intent.category.DEFAULT" />
    </intent-filter>            <intent-filter>                <action android:name="android.intent.action.SEND" />                <category android:name="android.intent.category.DEFAULT" />
           <data android:mimeType="text/x-vcard" />
   </intent-filter>            <intent-filter>                <action android:name="android.intent.action.SEND" />                <category android:name="android.intent.category.DEFAULT" />
              <data android:mimeType="text/plain" />
    </intent-filter>        </activity>        <activity            android:name="com.google.zxing.client.android.book.SearchBookContentsActivity"            android:configChanges="orientation|keyboardHidden"            android:label="@string/sbc_name"            android:screenOrientation="landscape"            android:stateNotNeeded="true" >            <intent-filter>                <action android:name="com.google.zxing.client.android.SEARCH_BOOK_CONTENTS" />                <category android:name="android.intent.category.DEFAULT" />            </intent-filter>        </activity>        <activity            android:name="com.google.zxing.client.android.share.ShareActivity"            android:screenOrientation="user"            android:stateNotNeeded="true"            android:theme="@android:style/Theme.Light" >            <intent-filter>                <action android:name="com.google.zxing.client.android.SHARE" />                <category android:name="android.intent.category.DEFAULT" />            </intent-filter>        </activity>        <activity            android:name="com.google.zxing.client.android.history.HistoryActivity"            android:label="@string/history_title"            android:stateNotNeeded="true" >            <intent-filter>                <action android:name="android.intent.action.VIEW" />                <category android:name="android.intent.category.DEFAULT" />            </intent-filter>        </activity>        <activity            android:name="com.google.zxing.client.android.share.BookmarkPickerActivity"            android:label="@string/bookmark_picker_name"            android:stateNotNeeded="true" >            <intent-filter>                <action android:name="android.intent.action.PICK" />                <category android:name="android.intent.category.DEFAULT" />            </intent-filter>        </activity>        <activity            android:name="com.google.zxing.client.android.share.AppPickerActivity"            android:configChanges="orientation"            android:label="@string/app_picker_name"            android:stateNotNeeded="true" >            <intent-filter>                <action android:name="android.intent.action.PICK" />                <category android:name="android.intent.category.DEFAULT" />            </intent-filter>        </activity>        <activity            android:name="com.google.zxing.client.android.HelpActivity"            android:screenOrientation="user" >            <intent-filter>                <action android:name="android.intent.action.VIEW" />                <category android:name="android.intent.category.DEFAULT" />            </intent-filter>        </activity>    </application> </manifest>
完成到這一步之後,你會發現專案中還是有很多的錯誤。不用擔心,剩下的錯誤全部都是由於找不到R檔案所造成的。這是因為ZXing專案中所引用的R檔案都是com.google.zxing.client.android包下的R,而現在我們拷貝到ScannerTest專案之後,應該引用com.example.scannertest包下的R檔案。我們需要將有錯誤的檔案一個個地修改過來,雖然工作量不少,但都是傻瓜式操作,只要大家有耐心,就一定可以完成。
現在ScannerTest專案中應該已經沒有任何錯誤了,然後我們還需要對ZXing的程式碼進行稍微的定製。
開啟CaptureActivity,這個類就是用於掃描二維碼的最主要的一個類,其中有一個handleDecode()方法,當二維碼掃描完成之後會把結果回撥到這個方法中,我們現在不想使用預設的處理方式,於是修改handleDecode()中的程式碼,如下所示:
public void handleDecode(Result rawResult, Bitmap barcode, float scaleFactor) {
String result = rawResult.getText();
	if (!TextUtils.isEmpty(result)) {
	Intent intent = new Intent();
intent.putExtra("scan_result", rawResult.getText());
	setResult(RESULT_OK, intent);	} else {
	setResult(RESULT_CANCELED);	}
finish();}
這裡我們將掃描出來的結果藉助Intent進行返回。
然後開啟或新建activity_main.xml檔案做為ScannerTest專案的主佈局,在其中新增如下程式碼:
<LinearLayout xmlns:android="http://schemas.android.com/apk/res/android"    android:layout_width="match_parent"
  android:layout_height="match_parent"
 android:orientation="vertical" >
<Button
  android:id="@+id/scan_button"
   android:layout_width="match_parent"
      android:layout_height="wrap_content"
      android:text="掃一掃" />
<TextView
 android:id="@+id/scan_result"
 android:layout_width="wrap_content"
   android:layout_height="wrap_content" />
</LinearLayout>
這個佈局檔案很簡單,一個按鈕用於開啟二維碼掃描功能,一個TextView用於顯示掃描結果。
最後開啟或新建MainActivity做為ScannerTest專案的主Activity,程式碼如下所示:
public class MainActivity extends Activity {
	public static final int SCAN_CODE = 1;
	@Override
protected void onCreate(Bundle savedInstanceState) {
super.onCreate(savedInstanceState);
setContentView(R.layout.activity_main);
Button button = (Button) findViewById(R.id.scan_button);		button.setOnClickListener(new OnClickListener() {
		@Override
public void onClick(View v) {
	Intent intent = new Intent(MainActivity.this, CaptureActivity.class);				startActivityForResult(intent, SCAN_CODE);			}		});
}
@Override
protected void onActivityResult(int requestCode, int resultCode, Intent data) {		switch (requestCode) {
	case SCAN_CODE:
TextView scanResult = (TextView) findViewById(R.id.scan_result);			if (resultCode == RESULT_OK) {
	String result = data.getStringExtra("scan_result");				scanResult.setText(result);
	} else if (resultCode == RESULT_CANCELED) {				scanResult.setText("掃描出錯");
	}
break;
default:

break;		}	} }
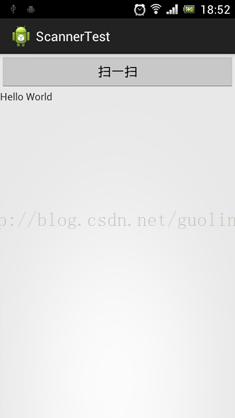
這個類也很簡單,點選按鈕時,我們通過startActivityForResult()方法啟動CaptureActivity,開始執行二維碼掃描,掃描的結果將回調到onActivityResult()方法中,然後在這個方法中取出掃描的結果,並展示在TextView上。這樣我們所有的編碼工作就已經完成了,可以嘗試
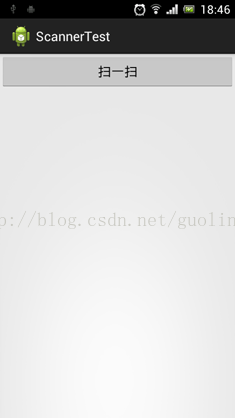
執行一下了。首先看到程式的主介面如下圖所示:
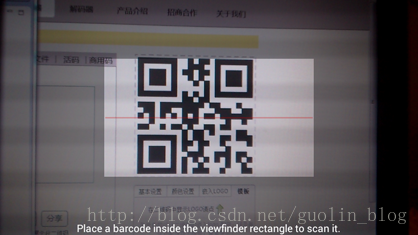
點選掃一掃後可以進行二維碼掃描,見下圖:
掃描完成後會將結果返回到主介面,如下圖所示: