
Spring原始碼解析之標籤的解析下篇
正文
上篇文章我們介紹了Spring預設標籤的解析,本文我們來分析一下Spring自定義標籤的解析。上篇文章我們瞭解到Spring的預設標籤目前有4個(import、alias、bean、beans),也就是說除了這4個標籤以外的標籤都是自定義標籤(當然這裡所說的標籤不包括那些以子標籤形式存在的如property、value等標籤),如我們熟知的事務標籤:
<tx:annotation-driven/>
註解掃描標籤:
<context:component-scan/>
等都屬於自定義標籤,下面就讓我們來分析一下這些自定義標籤是如何解析的,承接上篇文章中自定義標籤解析的分支:
public BeanDefinition parseCustomElement(Element ele) {
    /*解析自定義元素*/
    return parseCustomElement(ele, null);
}
public BeanDefinition parseCustomElement(Element ele, BeanDefinition containingBd) {
    //獲取名稱空間
    String namespaceUri = getNamespaceURI(ele);
    /*根據名稱空間獲取NamespaceHandler*/
    NamespaceHandler handler = this.readerContext.getNamespaceHandlerResolver().resolve(namespaceUri);
    if (handler == null) {
        error("Unable to locate Spring NamespaceHandler for XML schema namespace [" + namespaceUri + "]", ele);
        return null;
    }
    /*解析自定義標籤*/
    return handler.parse(ele, new ParserContext(this.readerContext, this, containingBd));
}
public NamespaceHandler resolve(String namespaceUri) {
    /*獲取所有已經配置的handler對映*/
    Map<String, Object> handlerMappings = getHandlerMappings();
    //根據名稱空間找到對應的對映
    Object handlerOrClassName = handlerMappings.get(namespaceUri);
    if (handlerOrClassName == null) {
        return null;
    }
    else if (handlerOrClassName instanceof NamespaceHandler) {
        //如果已經例項化過,直接返回
        return (NamespaceHandler) handlerOrClassName;
    }
    else {
        String className = (String) handlerOrClassName;
        try {
            //反射載入類
            Class<?> handlerClass = ClassUtils.forName(className, this.classLoader);
            if (!NamespaceHandler.class.isAssignableFrom(handlerClass)) {
                throw new FatalBeanException("Class [" + className + "] for namespace [" + namespaceUri +
                        "] does not implement the [" + NamespaceHandler.class.getName() + "] interface");
            }
            //例項化物件
            NamespaceHandler namespaceHandler = (NamespaceHandler) BeanUtils.instantiateClass(handlerClass);
            namespaceHandler.init(); //呼叫init方法
            //放入快取
            handlerMappings.put(namespaceUri, namespaceHandler);
            return namespaceHandler;
        }
        catch (ClassNotFoundException ex) {
            throw new FatalBeanException("NamespaceHandler class [" + className + "] for namespace [" +
                    namespaceUri + "] not found", ex);
        }
        catch (LinkageError err) {
            throw new FatalBeanException("Invalid NamespaceHandler class [" + className + "] for namespace [" +
                    namespaceUri + "]: problem with handler class file or dependent class", err);
        }
    }
}
private Map<String, Object> getHandlerMappings() {
    if (this.handlerMappings == null) {
        synchronized (this) {
            if (this.handlerMappings == null) {
                try {
                    //載入配置
                    Properties mappings =
                            PropertiesLoaderUtils.loadAllProperties(this.handlerMappingsLocation, this.classLoader);
                    if (logger.isDebugEnabled()) {
                        logger.debug("Loaded NamespaceHandler mappings: " + mappings);
                    }
                    Map<String, Object> handlerMappings = new ConcurrentHashMap<String, Object>(mappings.size());
                    //放入快取
                    CollectionUtils.mergePropertiesIntoMap(mappings, handlerMappings);
                    this.handlerMappings = handlerMappings;
                }
                catch (IOException ex) {
                    throw new IllegalStateException(
                            "Unable to load NamespaceHandler mappings from location [" + this.handlerMappingsLocation + "]", ex);
                }
            }
        }
    }
    return this.handlerMappings;
}
這裡就是載入配置檔案到記憶體中,而this.handlerMappingsLocation在呼叫構造方法初始化時被賦值為META-INF/Spring.handlers,我們來看一下Spring事務自定義標籤對應這裡的配置,鎖定spring-tx包下的META-INF/Spring.handlers:
http\://www.springframework.org/schema/tx=org.springframework.transaction.config.TxNamespaceHandler
所以在解析Spring事務自定義標籤時就會找到TxNamespaceHandler並呼叫其init方法:
public void init() {
    registerBeanDefinitionParser("advice", new TxAdviceBeanDefinitionParser());
    registerBeanDefinitionParser("annotation-driven", new AnnotationDrivenBeanDefinitionParser());
    registerBeanDefinitionParser("jta-transaction-manager", new JtaTransactionManagerBeanDefinitionParser());
}
init方法就是註冊對應三個標籤的解析器,這裡用Spring事務標籤舉例,其他自定義標籤大同小異。下面就是解析過程:
public BeanDefinition parse(Element element, ParserContext parserContext) {
    /*尋找解析器進行解析*/
    return findParserForElement(element, parserContext).parse(element, parserContext);
}
private BeanDefinitionParser findParserForElement(Element element, ParserContext parserContext) {
    //以<tx:annotation-driven/>為例,這裡的localName就是annotation-driven
    String localName = parserContext.getDelegate().getLocalName(element);
    //根據localName獲取解析器,上面註冊過annotation-driven的解析器
    BeanDefinitionParser parser = this.parsers.get(localName);
    if (parser == null) {
        parserContext.getReaderContext().fatal(
                "Cannot locate BeanDefinitionParser for element [" + localName + "]", element);
    }
    return parser;
}
獲取到BeanDefinitionParser後,呼叫其parse方法進行解析,解析的過程就是根據開發者需求的不同自行實現了,整體來說就是解析配置到註冊BeanDefinition的過程。到這裡自定義標籤的解析就完成了,上篇文章開始的refresh方法我們只分析了前兩步,下面我們來看後續的步驟:
protected void prepareBeanFactory(ConfigurableListableBeanFactory beanFactory) {
    beanFactory.setBeanClassLoader(getClassLoader());
    //設定SPEL表示式處理器,在bean初始化填充屬性時會用到
    beanFactory.setBeanExpressionResolver(new StandardBeanExpressionResolver(beanFactory.getBeanClassLoader()));
    //新增屬性編輯器註冊器
    beanFactory.addPropertyEditorRegistrar(new ResourceEditorRegistrar(this, getEnvironment()));
    //新增Aware介面的BeanPostProcessor
    beanFactory.addBeanPostProcessor(new ApplicationContextAwareProcessor(this));
    //設定幾個忽略自動裝配的介面
    beanFactory.ignoreDependencyInterface(EnvironmentAware.class);
    beanFactory.ignoreDependencyInterface(EmbeddedValueResolverAware.class);
    beanFactory.ignoreDependencyInterface(ResourceLoaderAware.class);
    beanFactory.ignoreDependencyInterface(ApplicationEventPublisherAware.class);
    beanFactory.ignoreDependencyInterface(MessageSourceAware.class);
    beanFactory.ignoreDependencyInterface(ApplicationContextAware.class);
    //註冊幾個自動裝配的介面
    beanFactory.registerResolvableDependency(BeanFactory.class, beanFactory);
    beanFactory.registerResolvableDependency(ResourceLoader.class, this);
    beanFactory.registerResolvableDependency(ApplicationEventPublisher.class, this);
    beanFactory.registerResolvableDependency(ApplicationContext.class, this);
    //新增用於發現ApplicationListener的BeanPostProcessor
    beanFactory.addBeanPostProcessor(new ApplicationListenerDetector(this));
    //增加對靜態AOP的支援
    if (beanFactory.containsBean(LOAD_TIME_WEAVER_BEAN_NAME)) {
        beanFactory.addBeanPostProcessor(new LoadTimeWeaverAwareProcessor(beanFactory));
        beanFactory.setTempClassLoader(new ContextTypeMatchClassLoader(beanFactory.getBeanClassLoader()));
    }
    //新增幾個預設的系統環境bean
    if (!beanFactory.containsLocalBean(ENVIRONMENT_BEAN_NAME)) {
        beanFactory.registerSingleton(ENVIRONMENT_BEAN_NAME, getEnvironment());
    }
    if (!beanFactory.containsLocalBean(SYSTEM_PROPERTIES_BEAN_NAME)) {
        beanFactory.registerSingleton(SYSTEM_PROPERTIES_BEAN_NAME, getEnvironment().getSystemProperties());
    }
    if (!beanFactory.containsLocalBean(SYSTEM_ENVIRONMENT_BEAN_NAME)) {
        beanFactory.registerSingleton(SYSTEM_ENVIRONMENT_BEAN_NAME, getEnvironment().getSystemEnvironment());
    }
}
這裡提到了屬性編輯器和自動裝配的概念,這些我們會在bean建立的文章中進行講解,這裡先留一個懸念。簡單介紹一下方法中註冊的ApplicationContextAwareProcessor,它實現了BeanPostProcessor,Spring會保證所有bean在例項化的時候都會呼叫其postProcessAfterInitialization方法,我們可以使用這個方法包裝和改變bean,我們來看一下這個方法:
public Object postProcessBeforeInitialization(final Object bean, String beanName) throws BeansException {
    AccessControlContext acc = null;
    if (System.getSecurityManager() != null &&
            (bean instanceof EnvironmentAware || bean instanceof EmbeddedValueResolverAware ||
                    bean instanceof ResourceLoaderAware || bean instanceof ApplicationEventPublisherAware ||
                    bean instanceof MessageSourceAware || bean instanceof ApplicationContextAware)) {
        acc = this.applicationContext.getBeanFactory().getAccessControlContext();
    }
    if (acc != null) {
        AccessController.doPrivileged(new PrivilegedAction<Object>() {
            @Override
            public Object run() {
                invokeAwareInterfaces(bean); /*呼叫Aware介面*/
                return null;
            }
        }, acc);
    }
    else {
        invokeAwareInterfaces(bean); /*呼叫Aware介面*/
    }
    return bean;
}
private void invokeAwareInterfaces(Object bean) {
    if (bean instanceof Aware) {
        if (bean instanceof EnvironmentAware) {
            ((EnvironmentAware) bean).setEnvironment(this.applicationContext.getEnvironment());
        }
        if (bean instanceof EmbeddedValueResolverAware) {
            ((EmbeddedValueResolverAware) bean).setEmbeddedValueResolver(this.embeddedValueResolver);
        }
        if (bean instanceof ResourceLoaderAware) {
            ((ResourceLoaderAware) bean).setResourceLoader(this.applicationContext);
        }
        if (bean instanceof ApplicationEventPublisherAware) {
            ((ApplicationEventPublisherAware) bean).setApplicationEventPublisher(this.applicationContext);
        }
        if (bean instanceof MessageSourceAware) {
            ((MessageSourceAware) bean).setMessageSource(this.applicationContext);
        }
        if (bean instanceof ApplicationContextAware) {
            ((ApplicationContextAware) bean).setApplicationContext(this.applicationContext);
        }
    }
}
當我們的bean實現了某個Aware介面,這裡就會呼叫相關的set方法為我們的bean設定相關資源。下一步的postProcessBeanFactory預設為空實現,留給子類擴充套件做BeanFactory初始化後的後置處理。接下來就是呼叫所有註冊的BeanFactoryPostProcessor的相關方法,我們以一個例子來說明一下BeanFactoryPostProcessor的用法,我們在使用Spring整合Mybatis的時候會配置一個類MapperScannerConfigurer,用來掃描我們工程中定義的所有Mapper介面,我們來看一下它的層次結構: 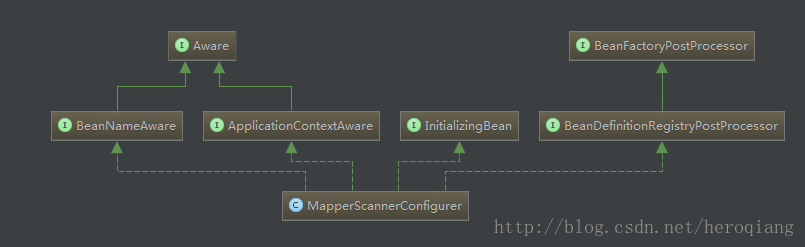
protected void invokeBeanFactoryPostProcessors(ConfigurableListableBeanFactory beanFactory) {
    /*呼叫註冊的所有BeanFactoryPostProcessor的相關方法*/
    PostProcessorRegistrationDelegate.invokeBeanFactoryPostProcessors(beanFactory, getBeanFactoryPostProcessors());
    //再次確認是否需要增加對靜態AOP的支援,這段邏輯在prepareBeanFactory方法中已經執行過,這裡因為有可能有新的BeanDefinition註冊,所以需要再次確認
    if (beanFactory.getTempClassLoader() == null && beanFactory.containsBean(LOAD_TIME_WEAVER_BEAN_NAME)) {
        beanFactory.addBeanPostProcessor(new LoadTimeWeaverAwareProcessor(beanFactory));
        beanFactory.setTempClassLoader(new ContextTypeMatchClassLoader(beanFactory.getBeanClassLoader()));
    }
}
public static void invokeBeanFactoryPostProcessors(
        ConfigurableListableBeanFactory beanFactory, List<BeanFactoryPostProcessor> beanFactoryPostProcessors) {
    Set<String> processedBeans = new HashSet<String>();
    if (beanFactory instanceof BeanDefinitionRegistry) {
        BeanDefinitionRegistry registry = (BeanDefinitionRegistry) beanFactory;
        List<BeanFactoryPostProcessor> regularPostProcessors = new LinkedList<BeanFactoryPostProcessor>();
        List<BeanDefinitionRegistryPostProcessor> registryPostProcessors =
                new LinkedList<BeanDefinitionRegistryPostProcessor>();
        for (BeanFactoryPostProcessor postProcessor : beanFactoryPostProcessors) {
            //首先呼叫BeanDefinitionRegistryPostProcessor
            if (postProcessor instanceof BeanDefinitionRegistryPostProcessor) {
                BeanDefinitionRegistryPostProcessor registryPostProcessor =
                        (BeanDefinitionRegistryPostProcessor) postProcessor;
                        //執行postProcessBeanDefinitionRegistry方法
                registryPostProcessor.postProcessBeanDefinitionRegistry(registry);
                registryPostProcessors.add(registryPostProcessor);
            }
            else {
                regularPostProcessors.add(postProcessor);
            }
        }
        //從所有註冊的BeanDefinition中獲取BeanDefinitionRegistryPostProcessor
        String[] postProcessorNames =
                beanFactory.getBeanNamesForType(BeanDefinitionRegistryPostProcessor.class, true, false);
        List<BeanDefinitionRegistryPostProcessor> priorityOrderedPostProcessors = new ArrayList<BeanDefinitionRegistryPostProcessor>();
        for (String ppName : postProcessorNames) {
            //首先執行實現PriorityOrdered介面的BeanDefinitionRegistryPostProcessor
            if (beanFactory.isTypeMatch(ppName, PriorityOrdered.class)) {
                priorityOrderedPostProcessors.add(beanFactory.getBean(ppName, BeanDefinitionRegistryPostProcessor.class));
                processedBeans.add(ppName);
            }
        }
        sortPostProcessors(beanFactory, priorityOrderedPostProcessors); //排序
        registryPostProcessors.addAll(priorityOrderedPostProcessors);
        invokeBeanDefinitionRegistryPostProcessors(priorityOrderedPostProcessors, registry); //執行postProcessBeanDefinitionRegistry方法
        postProcessorNames = beanFactory.getBeanNamesForType(BeanDefinitionRegistryPostProcessor.class, true, false);
        List<BeanDefinitionRegistryPostProcessor> orderedPostProcessors = new ArrayList<BeanDefinitionRegistryPostProcessor>();
        for (String ppName : postProcessorNames) {
            //接下來執行實現Ordered介面的BeanDefinitionRegistryPostProcessor
            if (!processedBeans.contains(ppName) && beanFactory.isTypeMatch(ppName, Ordered.class)) {
                orderedPostProcessors.add(beanFactory.getBean(ppName, BeanDefinitionRegistryPostProcessor.class));
                processedBeans.add(ppName);
            }
        }
        sortPostProcessors(beanFactory, orderedPostProcessors); //排序
        registryPostProcessors.addAll(orderedPostProcessors);
        invokeBeanDefinitionRegistryPostProcessors(orderedPostProcessors, registry); //執行
        boolean reiterate = true;
        while (reiterate) {
            reiterate = false;
            postProcessorNames = beanFactory.getBeanNamesForType(BeanDefinitionRegistryPostProcessor.class, true, false);
            for (String ppName : postProcessorNames) {
                //執行剩餘的BeanDefinitionRegistryPostProcessor
                if (!processedBeans.contains(ppName)) {
                    BeanDefinitionRegistryPostProcessor pp = beanFactory.getBean(ppName, BeanDefinitionRegistryPostProcessor.class);
                    registryPostProcessors.add(pp);
                    processedBeans.add(ppName);
                    pp.postProcessBeanDefinitionRegistry(registry);
                    reiterate = true;
                }
            }
        }
        //BeanDefinitionRegistryPostProcessor繼承了BeanFactoryPostProcessor,執行完postProcessBeanDefinitionRegistry方法之後還要執行postProcessBeanFactory方法
        invokeBeanFactoryPostProcessors(registryPostProcessors, beanFactory);
        invokeBeanFactoryPostProcessors(regularPostProcessors, beanFactory);
    }
    else {
        invokeBeanFactoryPostProcessors(beanFactoryPostProcessors, beanFactory);
    }
    String[] postProcessorNames =
            beanFactory.getBeanNamesForType(BeanFactoryPostProcessor.class, true, false);
            //剩餘的BeanFactoryPostProcessor同樣按照實現PriorityOrdered --> 實現Ordered --> 其他的順序執行
    List<BeanFactoryPostProcessor> priorityOrderedPostProcessors = new ArrayList<BeanFactoryPostProcessor>();
    List<String> orderedPostProcessorNames = new ArrayList<String>();
    List<String> nonOrderedPostProcessorNames = new ArrayList<String>();
    for (String ppName : postProcessorNames) {
        //上面已經將所有的BeanDefinitionRegistryPostProcessor都執行完了,這裡要將它們排除掉,執行剩餘的BeanFactoryPostProcessor
        if (processedBeans.contains(ppName)) {
        }
        else if (beanFactory.isTypeMatch(ppName, PriorityOrdered.class)) {
            priorityOrderedPostProcessors.add(beanFactory.getBean(ppName, BeanFactoryPostProcessor.class));
        }
        else if (beanFactory.isTypeMatch(ppName, Ordered.class)) {
            orderedPostProcessorNames.add(ppName);
        }
        else {
            nonOrderedPostProcessorNames.add(ppName);
        }
    }
    sortPostProcessors(beanFactory, priorityOrderedPostProcessors);
    invokeBeanFactoryPostProcessors(priorityOrderedPostProcessors, beanFactory);
    List<BeanFactoryPostProcessor> orderedPostProcessors = new ArrayList<BeanFactoryPostProcessor>();
    for (String postProcessorName : orderedPostProcessorNames) {
        orderedPostProcessors.add(beanFactory.getBean(postProcessorName, BeanFactoryPostProcessor.class));
    }
    sortPostProcessors(beanFactory, orderedPostProcessors);
    invokeBeanFactoryPostProcessors(orderedPostProcessors, beanFactory);
    List<BeanFactoryPostProcessor> nonOrderedPostProcessors = new ArrayList<BeanFactoryPostProcessor>();
    for (String postProcessorName : nonOrderedPostProcessorNames) {
        nonOrderedPostProcessors.add(beanFactory.getBean(postProcessorName, BeanFactoryPostProcessor.class));
    }
    invokeBeanFactoryPostProcessors(nonOrderedPostProcessors, beanFactory);
    beanFactory.clearMetadataCache();
}
下一步是註冊BeanPostProcessor:
protected void registerBeanPostProcessors(ConfigurableListableBeanFactory beanFactory) {
    /*註冊BeanPostProcessor*/
    PostProcessorRegistrationDelegate.registerBeanPostProcessors(beanFactory, this);
}
public static void registerBeanPostProcessors(
        ConfigurableListableBeanFactory beanFactory, AbstractApplicationContext applicationContext) {
        //獲取所有BeanPostProcessor的beanName
    String[] postProcessorNames = beanFactory.getBeanNamesForType(BeanPostProcessor.class, true, false);
    int beanProcessorTargetCount = beanFactory.getBeanPostProcessorCount() + 1 + postProcessorNames.length;
    //註冊BeanPostProcessorChecker的作用是在BeanPostProcessor初始化期間有bean被建立了就會列印日誌
    beanFactory.addBeanPostProcessor(new BeanPostProcessorChecker(beanFactory, beanProcessorTargetCount));
    //和上面BeanFactoryPostProcessor執行的過程非常相似,同樣是按照PriorityOrdered --> Ordered --> 其他的順序進行註冊,區別是這裡最後加了MergedBeanDefinitionPostProcessor型別的BeanPostProcessor的註冊,並且這裡不會執行相關方法,BeanPostProcessor的相關方法在bean建立時才會執行。這裡看起來有重複註冊的問題,不過beanFactory.addBeanPostProcessor是先移除在新增,所以不會重複
    List<BeanPostProcessor> priorityOrderedPostProcessors = new ArrayList<BeanPostProcessor>();
    List<BeanPostProcessor> internalPostProcessors = new ArrayList<BeanPostProcessor>();
    List<String> orderedPostProcessorNames = new ArrayList<String>();
    List<String> nonOrderedPostProcessorNames = new ArrayList<String>();
    for (String ppName : postProcessorNames) {
        if (beanFactory.isTypeMatch(ppName, PriorityOrdered.class)) {
            BeanPostProcessor pp = beanFactory.getBean(ppName, BeanPostProcessor.class);
            priorityOrderedPostProcessors.add(pp);
            if (pp instanceof MergedBeanDefinitionPostProcessor) {
                internalPostProcessors.add(pp);
            }
        }
        else if (beanFactory.isTypeMatch(ppName, Ordered.class)) {
            orderedPostProcessorNames.add(ppName);
        }
        else {
            nonOrderedPostProcessorNames.add(ppName);
        }
    }
    sortPostProcessors(beanFactory, priorityOrderedPostProcessors);
    registerBeanPostProcessors(beanFactory, priorityOrderedPostProcessors);
    List<BeanPostProcessor> orderedPostProcessors = new ArrayList<BeanPostProcessor>();
    for (String ppName : orderedPostProcessorNames) {
        BeanPostProcessor pp = beanFactory.getBean(ppName, BeanPostProcessor.class);
        orderedPostProcessors.add(pp);
        if (pp instanceof MergedBeanDefinitionPostProcessor) {
            internalPostProcessors.add(pp);
        }
    }
    sortPostProcessors(beanFactory, orderedPostProcessors);
    registerBeanPostProcessors(beanFactory, orderedPostProcessors);
    List<BeanPostProcessor> nonOrderedPostProcessors = new ArrayList<BeanPostProcessor>();
    for (String ppName : nonOrderedPostProcessorNames) {
        BeanPostProcessor pp = beanFactory.getBean(ppName, BeanPostProcessor.class);
        nonOrderedPostProcessors.add(pp);
        if (pp instanceof MergedBeanDefinitionPostProcessor) {
            internalPostProcessors.add(pp);
        }
    }
    registerBeanPostProcessors(beanFactory, nonOrderedPostProcessors);
    sortPostProcessors(beanFactory, internalPostProcessors);
    registerBeanPostProcessors(beanFactory, internalPostProcessors);
    beanFactory.addBeanPostProcessor(new ApplicationListenerDetector(applicationContext));
}
public void addBeanPostProcessor(BeanPostProcessor beanPostProcessor) {
    Assert.notNull(beanPostProcessor, "BeanPostProcessor must not be null");
    this.beanPostProcessors.remove(beanPostProcessor); //先移除
    this.beanPostProcessors.add(beanPostProcessor); //再新增
    if (beanPostProcessor instanceof InstantiationAwareBeanPostProcessor) {
        this.hasInstantiationAwareBeanPostProcessors = true;
    }
    if (beanPostProcessor instanceof DestructionAwareBeanPostProcessor) {
        this.hasDestructionAwareBeanPostProcessors = true;
    }
}
下一步是初始化MessageSource,用於國際化處理,關於Spring的國際化處理,有興趣的讀者可以查閱相關資料進行學習,這裡就不做描述了。接下來我們來看應用事件廣播器的初始化:
protected void initApplicationEventMulticaster() {
    ConfigurableListableBeanFactory beanFactory = getBeanFactory();
    //使用者自定義事件廣播器
    if (beanFactory.containsLocalBean(APPLICATION_EVENT_MULTICASTER_BEAN_NAME)) {
        this.applicationEventMulticaster =
                beanFactory.getBean(APPLICATION_EVENT_MULTICASTER_BEAN_NAME, ApplicationEventMulticaster.class);
        if (logger.isDebugEnabled()) {
            logger.debug("Using ApplicationEventMulticaster [" + this.applicationEventMulticaster + "]");
        }
    }
    else { /*預設事件廣播器*/
        this.applicationEventMulticaster = new SimpleApplicationEventMulticaster(beanFactory);
        beanFactory.registerSingleton(APPLICATION_EVENT_MULTICASTER_BEAN_NAME, this.applicationEventMulticaster);
        if (logger.isDebugEnabled()) {
            logger.debug("Unable to locate ApplicationEventMulticaster with name '" +
                    APPLICATION_EVENT_MULTICASTER_BEAN_NAME +
                    "': using default [" + this.applicationEventMulticaster + "]");
        }
    }
}
我們以預設事件廣播器SimpleApplicationEventMulticaster為例看一下它是如何廣播事件的:
public void multicastEvent(final ApplicationEvent event, ResolvableType eventType) {
    ResolvableType type = (eventType != null ? eventType : resolveDefaultEventType(event));
    for (final ApplicationListener<?> listener : getApplicationListeners(event, type)) {
        Executor executor = getTaskExecutor();
        if (executor != null) {
            executor.execute(new Runnable() {
                @Override
                public void run() {
                    /*通知監聽器*/
                    invokeListener(listener, event);
                }
            });
        }
        else {
            /*通知監聽器*/
            invokeListener(listener, event);
        }
    }
}
protected void invokeListener(ApplicationListener listener, ApplicationEvent event) {
    ErrorHandler errorHandler = getErrorHandler();
    if (errorHandler != null) {
        try {
            //將應用事件通知監聽器
            listener.onApplicationEvent(event);
        }
        catch (Throwable err) {
            errorHandler.handleError(err);
        }
    }
    else {
        try {
            //將應用事件通知監聽器
            listener.onApplicationEvent(event);
        }
        catch (ClassCastException ex) {
            String msg = ex.getMessage();
            if (msg == null || msg.startsWith(event.getClass().getName())) {
                Log logger = LogFactory.getLog(getClass());
                if (logger.isDebugEnabled()) {
                    logger.debug("Non-matching event type for listener: " + listener, ex);
                }
            }
            else {
                throw ex;
            }
        }
    }
}
很簡單,通知監聽器就是呼叫所有監聽器的onApplicationEvent方法將事件傳入,由監聽器自己決定是否處理當前事件,這是一個典型的觀察者模式的實現。而接下來就是監聽器的註冊:
protected void registerListeners() {
    //編碼方式的監聽器註冊
    for (ApplicationListener<?> listener : getApplicationListeners()) {
        getApplicationEventMulticaster().addApplicationListener(listener);
    }
    //配置方式的監聽器註冊
    String[] listenerBeanNames = getBeanNamesForType(ApplicationListener.class, true, false);
    for (String listenerBeanName : listenerBeanNames) {
        getApplicationEventMulticaster().addApplicationListenerBean(listenerBeanName);
    }
    //將提前釋出的應用事件通知給所有監聽器
    Set<ApplicationEvent> earlyEventsToProcess = this.earlyApplicationEvents;
    this.earlyApplicationEvents = null;
    if (earlyEventsToProcess != null) {
        for (ApplicationEvent earlyEvent : earlyEventsToProcess) {
            getApplicationEventMulticaster().multicastEvent(earlyEvent);
        }
    }
}
接下來是初始化所有非lazy-init的bean:
protected void finishBeanFactoryInitialization(ConfigurableListableBeanFactory beanFactory) {
    //初始化型別轉換器
    if (beanFactory.containsBean(CONVERSION_SERVICE_BEAN_NAME) &&
            beanFactory.isTypeMatch(CONVERSION_SERVICE_BEAN_NAME, ConversionService.class)) {
        beanFactory.setConversionService(
                beanFactory.getBean(CONVERSION_SERVICE_BEAN_NAME, ConversionService.class));
    }
    //如果沒有配置value處理器(例如PropertyPlaceholderConfigurer)則註冊一個預設的value處理器,主要用於處理註解的value
    if (!beanFactory.hasEmbeddedValueResolver()) {
        beanFactory.addEmbeddedValueResolver(new StringValueResolver() {
            @Override
            public String resolveStringValue(String strVal) {
                return getEnvironment().resolvePlaceholders(strVal);
            }
        });
    }
    //初始化實現LoadTimeWeaverAware的bean
    String[] weaverAwareNames = beanFactory.getBeanNamesForType(LoadTimeWeaverAware.class, false, false);
    for (String weaverAwareName : weaverAwareNames) {
        getBean(weaverAwareName);
    }
    beanFactory.setTempClassLoader(null);
    //凍結BeanDefinition,到這裡BeanDefinition就不能再修改了,下面就要初始化了
    beanFactory.freezeConfiguration();
    /*初始化非lazy-init的單例bean*/
    beanFactory.preInstantiateSingletons();
}
這裡提到的型別轉換器我們可以通過配置ConversionServiceFactoryBean來註冊我們自定義的型別轉換器,就是在這裡初始化的。
public void preInstantiateSingletons() throws BeansException {
    if (this.logger.isDebugEnabled()) {
        this.logger.debug("Pre-instantiating singletons in " + this);
    }
    //獲取所有beanName
    List<String> beanNames = new ArrayList<String>(this.beanDefinitionNames);
    for (String beanName : beanNames) {
        RootBeanDefinition bd = getMergedLocalBeanDefinition(beanName);
        //非abstract、非lazy-init的單例bean
        if (!bd.isAbstract() && bd.isSingleton() && !bd.isLazyInit()) {
            //FactoryBean的處理
            if (isFactoryBean(beanName)) {
                final FactoryBean<?> factory = (FactoryBean<?>) getBean(FACTORY_BEAN_PREFIX + beanName);
                boolean isEagerInit;
                if (System.getSecurityManager() != null && factory instanceof SmartFactoryBean) {
                    isEagerInit = AccessController.doPrivileged(new PrivilegedAction<Boolean>() {
                        @Override
                        public Boolean run() {
                            return ((SmartFactoryBean<?>) factory).isEagerInit();
                        }
                    }, getAccessControlContext());
                }
                else {
                    isEagerInit = (factory instanceof SmartFactoryBean &&
                            ((SmartFactoryBean<?>) factory).isEagerInit());
                }
                if (isEagerInit) {
                    getBean(beanName); //初始化
                }
            }
            else { //普通bean初始化
                getBean(beanName);
            }
        }
    }
    //呼叫所有初始化的後的回撥,Spring4.1的新特性,我們的bean實現了SmartInitializingSingleton後,會在初始化後呼叫實現的afterSingletonsInstantiated方法,我們可以在裡面定義一些bean初始化後需要的邏輯
    for (String beanName : beanNames) {
        Object singletonInstance = getSingleton(beanName);
        if (singletonInstance instanceof SmartInitializingSingleton) {
            final SmartInitializingSingleton smartSingleton = (SmartInitializingSingleton) singletonInstance;
            if (System.getSecurityManager() != null) {
                AccessController.doPrivileged(new PrivilegedAction<Object>() {
                    @Override
                    public Object run() {
                        smartSingleton.afterSingletonsInstantiated();
                        return null;
                    }
                }, getAccessControlContext());
            }
            else {
                smartSingleton.afterSingletonsInstantiated();
            }
        }
    }
}
bean初始化的過程我們會在後續的文章中進行詳細闡述,下面就是最後一步啦:
protected void finishRefresh() {
    /*初始化LifecycleProcessor(生命週期處理器)*/
    initLifecycleProcessor();
    /*呼叫onRefresh*/
    getLifecycleProcessor().onRefresh();
    //傳送Spring上下文初始化完成事件
    publishEvent(new ContextRefreshedEvent(this));
    //註冊MBean
    LiveBeansView.registerApplicationContext(this);
}
protected void initLifecycleProcessor() {
    ConfigurableListableBeanFactory beanFactory = getBeanFactory();
    //使用者自定義LifecycleProcessor
    if (beanFactory.containsLocalBean(LIFECYCLE_PROCESSOR_BEAN_NAME)) {
        this.lifecycleProcessor =
                beanFactory.getBean(LIFECYCLE_PROCESSOR_BEAN_NAME, LifecycleProcessor.class);
        if (logger.isDebugEnabled()) {
            logger.debug("Using LifecycleProcessor [" + this.lifecycleProcessor + "]");
        }
    }
    else { /*預設LifecycleProcessor*/
        DefaultLifecycleProcessor defaultProcessor = new DefaultLifecycleProcessor();
        defaultProcessor.setBeanFactory(beanFactory);
        this.lifecycleProcessor = defaultProcessor;
        beanFactory.registerSingleton(LIFECYCLE_PROCESSOR_BEAN_NAME, this.lifecycleProcessor);
        if (logger.isDebugEnabled()) {
            logger.debug("Unable to locate LifecycleProcessor with name '" +
                    LIFECYCLE_PROCESSOR_BEAN_NAME +
                    "': using default [" + this.lifecycleProcessor + "]");
        }
    }
}
註冊完LifecycleProcessor接著會呼叫它的onRefresh方法,我們以預設的DefaultLifecycleProcessor為例分析一下它的作用:
public void onRefresh() {
    /*實現了Lifecycle的bean處理*/
    startBeans(true);
    this.running = true;
}
private void startBeans(boolean autoStartupOnly) {
    Map<String, Lifecycle> lifecycleBeans = getLifecycleBeans();
    Map<Integer, LifecycleGroup> phases = new HashMap<Integer, LifecycleGroup>();
    for (Map.Entry<String, ? extends Lifecycle> entry : lifecycleBeans.entrySet()) {
        Lifecycle bean = entry.getValue();
        if (!autoStartupOnly || (bean instanceof SmartLifecycle && ((SmartLifecycle) bean).isAutoStartup())) {
            int phase = getPhase(bean);
            LifecycleGroup group = phases.get(phase);
            if (group == null) {
                group = new LifecycleGroup(phase, this.timeoutPerShutdownPhase, lifecycleBeans, autoStartupOnly);
                phases.put(phase, group);
            }
            group.add(entry.getKey(), bean);
        }
    }
    if (!phases.isEmpty()) {
        List<Integer> keys = new ArrayList<Integer>(phases.keySet());
        Collections.sort(keys);
        for (Integer key : keys) {
            phases.get(key).start();
        }
    }
}
實現了Lifecycle介面的bean,Spring會保證在啟動時呼叫其start方法,在Spring關閉時呼叫其stop方法。到這裡,整個Spring容器就初始化完成了。
架構視訊學習
分享一些架構學習的視訊資料,想要的可以自己去領取。
當然還有更多,這邊就不一一列舉了,你如果覺得你能全部吃下,也不擋著你要到更多。
歡迎加入Java高階架構學習交流群:939420159 本群提供免費的學習指導 架構資料 以及免費的解答 不懂得問題都可以在本群提出來 之後還會有職業生涯規劃以及面試指導 進群修改群備註:開發年限-地區-經驗 方便架構師解答問題 免費領取架構師全套視訊!!!!!!!!