Spring Cloud建立服務提供者跟消費者並使用負載均衡
Eureka是一個很好的註冊中心,接下來建立服務提供者以及消費者的工程,並通過Eureka註冊中心進行伺服器註冊。如果不知道怎麼建立註冊中心的請參考另外一篇文章【Spring Cloud 入門程式,整合Eureka】 完成註冊工程的建立
1、建立一個Spring-Cloud-Provider的服務提供者工程,在yml檔案中加入:
server:
  host: localhost
  port: 8762
spring:
  application:
    name: provider-service
eurekaServer:
  host: localhost  #註冊中心的地址
  port: 8000       #註冊中心服務端的埠號
  user: martin     #註冊中心安全校驗使用者名稱
  password: 123456 #註冊中心安全校驗密碼
eureka:
  client:
    register-with-eureka: true #將此專案註冊到Eureka服務
    service-url:
      defaultZone: http://${eurekaServer.user}:${eurekaServer.password}@${eurekaServer.host}:${eurekaServer.port}/eureka
2、然後再在SpringCloudProviderApplication啟動類中增加一個註解:@EnableEurekaClient標示此專案是Eureka客戶端。
3、測試服務提供者的服務是否已經註冊到Eureka註冊中心,首先先啟動spring-cloud-eurake註冊中心,再啟動Spring-Cloud-Provider專案。
idea如何啟動多例項工程:
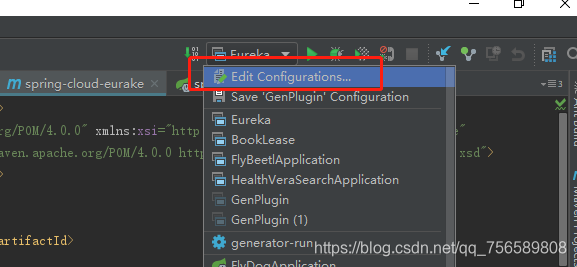
點選Application再點選新增專案:


發現啟動服務提供者程式時報錯:

com.netflix.discovery.shared.transport.TransportException: Cannot execute request on any known server
因為2.0預設開啟了csrf,如果我們現在直接啟動Eureka服務的話客戶端是註冊不上的,所以需要把csrf關閉。
在Eureka註冊中心的工程中新建WebSecurityConfigurer類:
package com.person.common;

import org.springframework.security.config.annotation.web.builders.HttpSecurity;
import org.springframework.security.config.annotation.web.configuration.EnableWebSecurity;
import org.springframework.security.config.annotation.web.configuration.WebSecurityConfigurerAdapter;

/**
 * @author: Martin
 * @Date: 2018/10/29
 * @Description:
 * @Modify By:
 */
@EnableWebSecurity
public class WebSecurityConfigurer extends WebSecurityConfigurerAdapter {
    @Override
    protected void configure(HttpSecurity http) throws Exception {
        http.csrf().disable();
        super.configure(http);
    }
}
然後重新啟動註冊中心以及服務提供者這兩個工程(注意先後順序,先啟註冊中心再起服務),訪問127.0.0.1:8761,可以看到服務已經註冊到了註冊中心。

這個時候你發現Eureka 的首頁面出現了一段紅色的話,第一感覺是不是報錯,有錯誤了(程式設計師日常啟動專案或者做需求一看到報紅就很慌(心裡xxxxxxxx)),莫慌,其實這段話並不是程式出錯了,因為我們在配置註冊中心的時候設定了
enable-self-preservation: true 開啟了自我保護的機制。
4、Eureka的自我保護模式
如果在Eureka Server的首頁看到以下這段提示,則說明Eureka已經進入了保護模式。
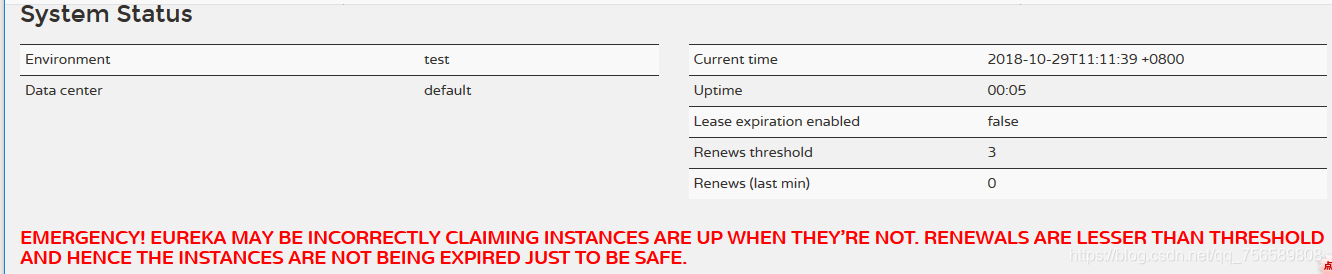
保護模式主要用於一組客戶端和Eureka Server之間存在網路分割槽場景下的保護。一旦進入保護模式,Eureka Server將會嘗試保護其服務登錄檔中的資訊,不再刪除服務登錄檔中的資料(也就是不會登出任何微服務)。
5、接下來為了測試負載均衡,建立多一個跟Spring-Cloud-Provider一模一樣的專案工程作為第二個服務的提供者。命名為Spring-Cloud-Provider2
注意只修改port埠就行,其他的不要修改(這裡我用的是8763埠)

然後啟動Spring-Cloud-Provider2工程,在Eureka 的註冊介面能看到出現了以下截圖的資訊:

下面建立一個Spring-Cloud-Customer的消費者工程
在yml中加入:
server:
  host: localhost
  port: 8744
spring:
  application:
    name: customer-service
eurekaServer:
  host: localhost  #註冊中心的地址
  port: 8000       #註冊中心服務端的埠號
  user: martin     #註冊中心安全校驗使用者名稱
  password: 123456 #註冊中心安全校驗密碼
eureka:
  client:
    register-with-eureka: true #將此專案註冊到Eureka服務
    service-url:
      defaultZone: http://${eurekaServer.user}:${eurekaServer.password}@${eurekaServer.host}:${eurekaServer.port}/eureka
建立這三個類:

AvoidLoanbalanced :
package com.person.customer.config;

import com.netflix.loadbalancer.IRule;
import com.netflix.loadbalancer.RoundRobinRule;
import org.springframework.context.annotation.Bean;
import org.springframework.context.annotation.Configuration;

/**
 * 功能描述: 避免包掃描的類
 *
 * @author Martin
 * @version V1.0
 * @date 2018/10/29
 */

@Configuration
@ExcludeFromComponentScan
public class AvoidLoanbalanced {
    @Bean
    public IRule ribbonRule() {
        /**輪訓*/
        return new RoundRobinRule();
        // return new WeightedResponseTimeRule();    //加權權重
        //return new RetryRule();                    //帶有重試機制的輪訓
        //return new RandomRule();                   //隨機
        //return new TestRule();                     //自定義規則
    }
}
ExcludeFromComponentScan :
package com.person.customer.config;
//避免包掃描的註解
public @interface ExcludeFromComponentScan {
}
LoadBalanced :
package com.person.customer.config;

import com.netflix.loadbalancer.IRule;
import com.netflix.loadbalancer.RoundRobinRule;
import org.springframework.context.annotation.Bean;
import org.springframework.context.annotation.Configuration;

/**
 * 功能描述: 負載均衡策略
 *
 * @author Martin
 * @version V1.0
 * @date 2018/10/29
 */
@Configuration
public class LoadBalanced {
    @Bean
    public IRule ribbonRule() {
        /**輪訓*/
        return new RoundRobinRule();
        // return new WeightedResponseTimeRule();    //加權權重
        //return new RetryRule();                    //帶有重試機制的輪訓
        //return new RandomRule();                   //隨機
        //return new TestRule();                     //自定義規則
    }
}
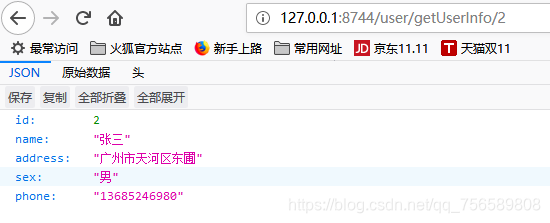
發現獲取的資料有時使用者的姓名為張三,有時為李四。