
LNMP一體化部署
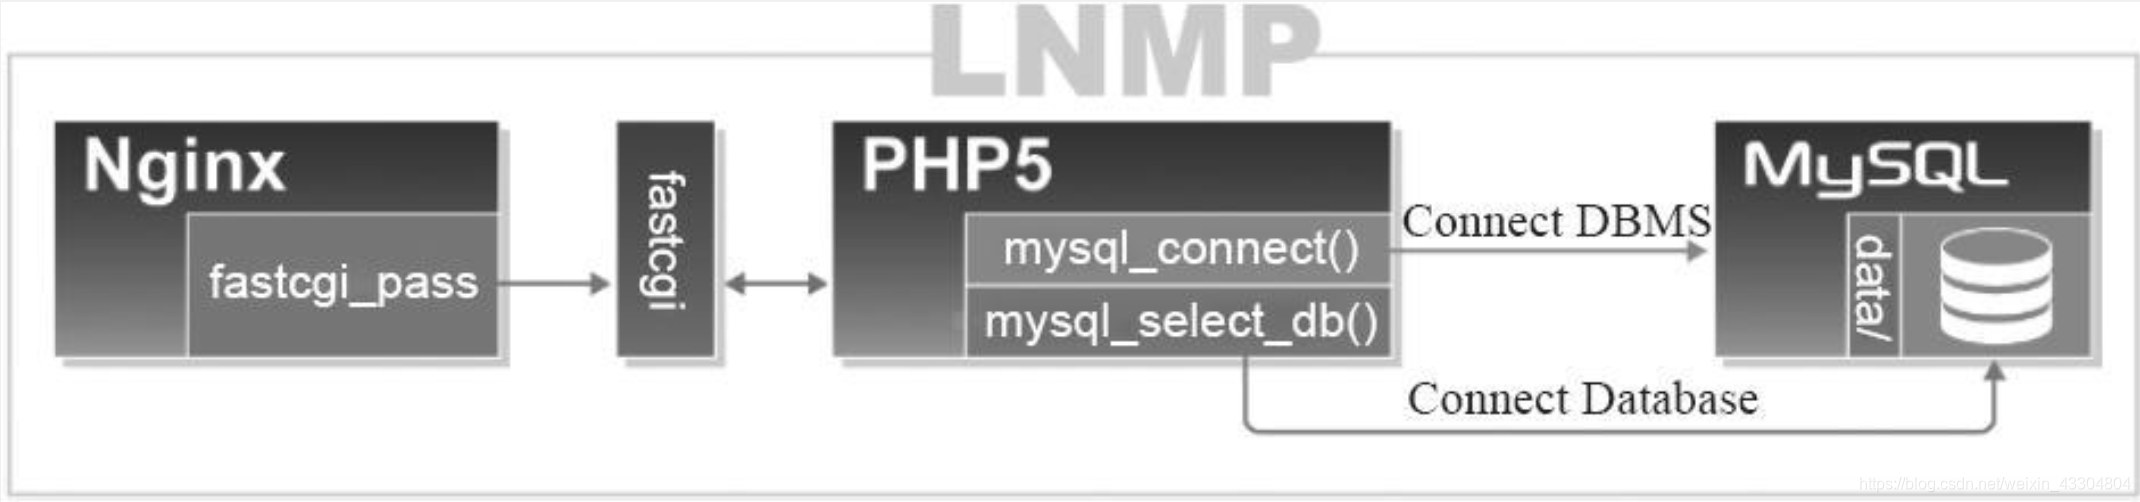
LNMP組合工作流程
在LNMP組合工作時,首先是使用者通過瀏覽器輸入域名請求Nginx Web服務,如果請求是靜態資源,則由Nginx解析返回給使用者;如果是動態請求(.php結尾),那麼Nginx就會把它通過FastCGI介面(快速介面規則,生產常用方法)傳送FastCGI資料包給PHP引擎服務(FastCGI程序php-fpm)進行解析,如果這個動態請求要讀取資料庫資料,那麼PHP就會繼續向後請求MySQL資料庫,以讀取需要的資料,並最終通過Nginx服務把獲取的資料返回給使用者,這就是LNMP環境的基本請求順序流程。這個請求流程是企業使用LNMP環境的常用流程。
使用者通過瀏覽器將請求發到nginx
(1)若請求為靜態請求,location/{
(靜態)
root html;
index index.html index.htm;
}
nginx就會去網頁目錄根據URL的URI部分取得網頁,並將網頁返回給使用者。(磁碟IO讀寫),圖片、視訊在儲存(NFS)中(程式碼不放在儲存中),此時NFS需要掛載Nginx
(2) 若請求為動態請求,location ~* .(php|php5)${
(動態)
root html;
index index.php index.html index.htm;
fastcgi_pass 127.0.0.1:9000
}
nginx就會將使用者的請求轉換為fastcgi格式的資料包推給fastcgi的服務端php-fpm(一個socket程序,埠為9000,加快了PHP解析速度),PHP啟用JS程式碼
動態網頁由實體檔案index.php(放在記憶體中),通過php語言到資料庫取得資料,並寫回index.php檔案,再打包給使用者(程式碼不放在儲存中)
-
分離式部署中,NGINX伺服器和PHP伺服器上網頁、程式碼必須兩者都有,否則會觸發404
-
nginx和Apache一樣,若沒有PHP支援,都處理不了所謂的動態請求,他們自身其實都只能出路靜態,只是Apache轉發動態資料包的速度快,但是隻是單個包速度,Apache併發低。
-
讀取網頁時無需掛載儲存NFS,但是動態(如上傳圖片)需要掛載儲存NFS
-
fastcgi快速介面有兩端:
(1)作為客戶端的fastcgi_pass(Nginx安裝包包含)
(2)作為服務端的php-fpm(PHP安裝包包含),一個socket程序,監聽9000埠
http資料的結構很鬆散,格式要求不夠嚴謹,所以http協議的資料包特點:比較小,解析速度快,但是網路傳輸快
fastcgi資料包格式非常嚴謹,PHP解析速度非常快,但是越嚴謹的資料包越大,所以fsatcgi資料包大小 要絕對大於http資料包 -
優化:往往與nginx的記憶體和php的記憶體效能有關
-
PHP解析器:php.ini
php.ini解析php語言用於向MySQL傳送SQL語句,MySQL返回資料後轉換成靜態頁面,寫回到磁碟,形成偽靜態檔案(需要設定有效期)
LNMP的部署方式:
(1)全都部署在一臺伺服器上
(2)全都不部署在一臺伺服器上(N+P+M)
(3)只分離MySQL(NP+M)
部署LNMP
將nginx和PHP的程式使用者設為同一個
- 安裝nginx
[[email protected] ~]# tar xf nginx-1.10.2.tar.gz -C /usr/src/
[[email protected] ~]# cd /usr/src/nginx-1.10.2/
[[email protected] ~]# mount /dev/sr0 /media/cdrom
[[email protected] nginx-1.10.2]# yum -y install pcre-devel openssl-devel
[[email protected] nginx-1.10.2]# useradd -s /sbin/nologin -M www
[[email protected] nginx-1.10.2]# ./configure --user=www --group=www --prefix=/usr/local/nginx --with-http_stub_status_module --with-http_ssl_module
[[email protected] nginx-1.10.2]# make && make install
[[email protected] nginx-1.10.2]# ln -s /usr/local/nginx/sbin/* /usr/local/sbin/
[[email protected] conf]# cd /usr/local/nginx/conf/
[[email protected] conf]# egrep -v "#|^$" nginx.conf.default > nginx.conf
[[email protected] conf]# vim nginx.conf
worker_processes  1;
events {
    worker_connections  1024;
}
http {
    include       mime.types;
    default_type  application/octet-stream;
    sendfile        on;
    keepalive_timeout  65;
    server {
        listen       80;
        server_name  localhost;
        location / {
            root   html;
            index  index.html index.htm;
        }
    }
}

# nginx編譯完畢
- 安裝MySQL(PHP需要MySQL的支援環境)
[[email protected] ~]# tar xf mysql-5.5.32-linux2.6-x86_64.tar.gz -C /usr/local/
# 建立mysql程式使用者
[[email protected] ~]# useradd -s /sbin/nologin -M mysql
[[email protected] mysql-5.5.32-linux2.6-x86_64]# echo "192.168.214.163 LNMP" >> /etc/hosts
[[email protected] mysql-5.5.32-linux2.6-x86_64]# ln -s /usr/local/mysql-5.5.32-linux2.6-x86_64/ /usr/local/mysql
# 初始化MySQL配置檔案my.conf
[[email protected] ~]# cd /usr/local/mysql-5.5.32-linux2.6-x86_64/
[[email protected] mysql-5.5.32-linux2.6-x86_64]# /bin/cp support-files/my-small.cnf  /etc/my.cnf
# 初始化mysql
[[email protected] mysql]# chown -R mysql.mysql /usr/local/mysql
[[email protected] mysql]# yum -y install libaio
[[email protected] mysql]# /usr/local/mysql/scripts/mysql_install_db --basedir=/usr/local/mysql --datadir=/usr/local/mysql/data/ --user=mysql
Installing MySQL system tables...
OK
Filling help tables...
OK

To start mysqld at boot time you have to copy
support-files/mysql.server to the right place for your system

PLEASE REMEMBER TO SET A PASSWORD FOR THE MySQL root USER !
To do so, start the server, then issue the following commands:

/usr/local/mysql/bin/mysqladmin -u root password 'new-password'
/usr/local/mysql/bin/mysqladmin -u root -h localhost.localdomain password 'new-password'

Alternatively you can run:
/usr/local/mysql/bin/mysql_secure_installation

which will also give you the option of removing the test
databases and anonymous user created by default.  This is
strongly recommended for production servers.

See the manual for more instructions.

You can start the MySQL daemon with:
cd /usr/local/mysql ; /usr/local/mysql/bin/mysqld_safe &

You can test the MySQL daemon with mysql-test-run.pl
cd /usr/local/mysql/mysql-test ; perl mysql-test-run.pl

Please report any problems with the /usr/local/mysql/scripts/mysqlbug script!
初始化故障排錯集錦
錯誤示例1:
usr/local/mysql/bin/mysqld: error while loading shared libraries: libaio.so.1: cannot open shared ob

#錯誤原因是沒有libaio函式庫的支援。需要
yum -y install libaio
錯誤示例2:
WARNING:The host'mysql'could not be looked up with resolveip

#需要修改主機名解析,使其和uname -n一樣,修改後的結果如下:
[[email protected] ~] # grep `uname -n` /etc/hosts
錯誤示例3:
ERROR:1004Can't create file '/tmp/#sql300e_1_o.frm'(errno:13)
#原因是/tmp目錄的許可權有問題。
解決辦法為處理/tmp目錄,如下:
[[email protected] ~]# ls -ld /tmp
drwxrwxrwt. 3 root root 4096 Jul 14 07:56 /tmp
[[email protected] ~]# chmod -R 1777 /tmp/
此故障必須解除,否則,後面會出現登陸不了資料庫等問題。
3. 配置並啟動MySQL資料庫
[[email protected] mysql]# cp support-files/mysql.server /etc/init.d/mysqld
[[email protected] mysql]# chmod +x /etc/init.d/mysqld
[[email protected] mysql]# /etc/init.d/mysqld start
Starting MySQL.. SUCCESS!
[[email protected] mysql]# netstat -antup | grep mysql
tcp        0      0 0.0.0.0:3306                0.0.0.0:*                   LISTEN      4688/mysqld
# 設定MySQL開機自啟動
[[email protected] mysql]# chkconfig --add mysqld
[[email protected] mysql]# chkconfig mysqld on
[[email protected] mysql]# chkconfig --list mysqld
mysqld         	0:off	1:off	2:on	3:on	4:on	5:on	6:off
[[email protected] mysql]# ln -s /usr/local/mysql/bin/* /usr/local/bin/
[[email protected] mysql]# which mysqladmin
/usr/local/bin/mysqladmin
[[email protected] mysql]# mysqladmin -uroot password '123456'
[[email protected] mysql]# mysql -uroot -p123456
Welcome to the MySQL monitor.  Commands end with ; or \g.
Your MySQL connection id is 2
Server version: 5.5.32 MySQL Community Server (GPL)

Copyright (c) 2000, 2013, Oracle and/or its affiliates. All rights reserved.

Oracle is a registered trademark of Oracle Corporation and/or its
affiliates. Other names may be trademarks of their respective
owners.

Type 'help;' or '\h' for help. Type '\c' to clear the current input statement.

mysql> exit
Bye
- PHP(fastcgi方式)服務的安裝和準備(PHP需要MySQL的支援環境)
[[email protected] mysql]# yum -y install zlib-devel libxml2-devel libjpeg-devel libjpeg-turbo-devel libiconv-devel
[[email protected] mysql]# yum -y install freetype-devel libpng-devel gd libcurl-devel libxslt-devel
[[email protected] ~]# rpm -qa zlib-devel libxml2-devel libjpeg-devel libjpeg-turbo-devel libiconv-devel
zlib-devel-1.2.3-29.el6.x86_64
libxml2-devel-2.7.6-14.el6.x86_64
libjpeg-turbo-devel-1.2.1-1.el6.x86_64
#這裡僅缺少libiconv-devel包
[[email protected] ~]# rpm -qa freetype-devel libpng-devel gd libcurl-devel libxslt-devel
freetype-devel-2.3.11-14.el6_3.1.x86_64
libpng-devel-1.2.49-1.el6_2.x86_64
libcurl-devel-7.19.7-37.el6_4.x86_64
libxslt-devel-1.1.26-2.el6_3.1.x86_64
gd-2.0.35-11.el6.x86_64
[[email protected] ~]# tar xf libiconv-1.14.tar.gz -C /usr/src/
[[email protected] ~]# cd /usr/src/libiconv-1.14/
[[email protected] libiconv-1.14]# ./configure --prefix=/usr/local/libiconv && make && make install

 [[email protected] ~]# rpm -ivh mhash-0.9.9.9-3.el6.x86_64.rpm
warning: mhash-0.9.9.9-3.el6.x86_64.rpm: Header V3 RSA/SHA256 Signature, key ID 0608b895: NOKEY
Preparing...                ########################################### [100%]
   1:mhash                  ########################################### [100%]
[[email protected] ~]# rpm -ivh libmcrypt-2.5.8-9.el6.x86_64.rpm
warning: libmcrypt-2.5.8-9.el6.x86_64.rpm: Header V3 RSA/SHA256 Signature, key ID 0608b895: NOKEY
Preparing...                ########################################### [100%]
   1:libmcrypt              ########################################### [100%]
[[email protected] ~]# rpm -ivh libmcrypt-devel-2.5.8-9.el6.x86_64.rpm
warning: libmcrypt-devel-2.5.8-9.el6.x86_64.rpm: Header V3 RSA/SHA256 Signature, key ID 0608b895: NOKEY
Preparing...                ########################################### [100%]
   1:libmcrypt-devel        ########################################### [100%]
[[email protected] ~]# rpm -ivh mcrypt-2.6.8-10.el6.x86_64.rpm
warning: mcrypt-2.6.8-10.el6.x86_64.rpm: Header V3 RSA/SHA256 Signature, key ID 0608b895: NOKEY
Preparing...                ########################################### [100%]
   1:mcrypt                 ########################################### [100%]
- 開始安裝PHP(fastcgi方式)服務
(1)解壓配置PHP
[[email protected] ~]# tar xf php-5.3.28.tar.gz -C /usr/src/
[[email protected] ~]# cd /usr/src/php-5.3.28/
[[email protected] php-5.3.28]# ./configure \
> --prefix=/usr/local/php5.3.28 \
> --with-mysql=/usr/local/mysql \
> --with-iconv-dir=/usr/local/libiconv \
> --with-freetype-dir \
> --with-jpeg-dir \
> --with-png-dir \
> --with-zlib \
> --with-libxml-dir=/usr \
> --enable-xml \
> --disable-rpath \
> --enable-safe-mode \
> --enable-bcmath \
> --enable-shmop \
> --enable-sysvsem \
> --enable-inline-optimization \
> --with-curl \
> --with-curlwrappers \
> --enable-mbregex \
> --enable-fpm \
> --enable-mbstring \
> --with-mcrypt \
> --with-gd \
> --enable-gd-native-ttf \
> --with-openssl \
> --with-mhash \
> --enable-pcntl \
> --enable-sockets \
> --with-xmlrpc \
> --enable-zip \
> --enable-soap \
> --enable-short-tags \
> --enable-zend-multibyte \
> --enable-static \
> --with-xsl \
> --with-fpm-user=www \
> --with-fpm-group=www \
> --enable-ftp
+--------------------------------------------------------------------+
| License:                                                           |
| This software is subject to the PHP License, available in this     |
| distribution in the file LICENSE.  By continuing this installation |
| process, you are bound by the terms of this license agreement.     |
| If you do not agree with the terms of this license, you must abort |
| the installation process at this point.                            |
+--------------------------------------------------------------------+

Thank you for using PHP.
對於上面命令,部分引數說明如下:
(1)–prefix=/usr/local/php5.2.28
表示指定PHP的安裝路徑為/usr/local/php5.3.28
(2)–with-mysql=/usr/local/mysql
表示需要指定MySQL的安裝路徑,安裝PHP需要的MySQL相關內容。當然,如果沒有MySQL軟體包,也可以不單獨安裝,這樣的情況可使用–with-mysql=mysqlnd替代–with-mysql=/usr/local/mysql,因為PHP軟體裡已經自帶了連線MySQL的客戶端工具。
(3)–with-fpm-user=www
nginx表示指定PHP-FPM程序管理的使用者為www,此處最好和Nginx服務使用者統一
(4)–with-fpm-group=www
表示指定PHP-FPM程序管理的組為www,此處最好與Nginx服務使用者組統一。
(5)–enable-fpm
表示啟用PHP-FPM方式服務,即以FastCGIF方式執行PHP服務。
(2)編譯安裝PHP
[[email protected] php-5.3.28]# ln -s /usr/local/mysql/lib/libmysqlclient.so.18 /usr/lib64/
[[email protected] php-5.3.28]# touch ext/phar/phar.phar
[[email protected] php-5.3.28]# make
[[email protected] php-5.3.28]# make install
[[email protected] php-5.3.28]#  ln -s /usr/local/php5.3.28/ /usr/local/php
[[email protected] php-5.3.28]# cd /usr/local/php
[[email protected] php]# cd /usr/src/php-5.3.28/
[[email protected] php-5.3.28]# ls php.ini*
php.ini-development  php.ini-production
[[email protected] php-5.3.28]# cp php.ini-production /usr/local/php/lib/php.ini
[[email protected] php-5.3.28]# cd /usr/local/php/etc/
[[email protected] etc]# ls
pear.conf  php-fpm.conf.default
[[email protected] etc]# cp php-fpm.conf.default php-fpm.conf
[[email protected] etc]#  /usr/local/php/sbin/php-fpm
[[email protected] etc]# netstat -antup | grep 9000
tcp        0      0 127.0.0.1:9000              0.0.0.0:*                   LISTEN      129604/php-fpm
[[email protected] etc]# vim php-fpm.conf
151 listen = 127.0.0.1:9000  #若設為分散式部署,需要將IP地址改為對方IP地址
- 配置nginx支援PHP程式請求訪問
[[email protected] etc]# cd /usr/local/nginx/conf/
[[email protected] conf]# cp nginx.conf nginx.conf.bak
[[email protected] conf]# vim nginx.conf
worker_processes 1;
error_log logs/error.log;
events {
worker_connections 1024;
}
http {
include mime.types;
default_type application/octet-stream;
sendfile on;
keepalive_timeout 65;
server {
listen 80;
server_name blog.yunjisuan.com;
location / {
root html/blog;
index index.html index.htm;
}
location ~ .*\.(php|php5)?$ {
root html/blog;
fastcgi_pass 127.0.0.1:9000;
fastcgi_index index.php;
include fastcgi.conf;
}
}
}
# 啟動nginx
[[email protected] nginx]# cd html/
[[email protected] html]# ls
50x.html index.html
[[email protected] html]# mkdir blog
[[email protected] html]# ls
50x.html blog index.html
[[email protected] html]# echo "`hostname -I` blog.yunjisuan.com" > blog/index.html
[[email protected] blog]# vim /etc/hosts
127.0.0.1 localhost localhost.localdomain localhost4 localhost4.localdomain4
::1 localhost localhost.localdomain localhost6 localhost6.localdomain6
192.168.214.163 LNMP blog.yunjisuan.com
[[email protected] html]# /usr/local/nginx/sbin/nginx
[[email protected] html]# netstat -antup | grep 80
tcp 0 0 0.0.0.0:80 0.0.0.0:* LISTEN 129672/nginx
tcp 0 0 0.0.0.0:22 0.0.0.0:* LISTEN 1380/sshd
tcp 0 0 :::22 :::* LISTEN 1380/sshd
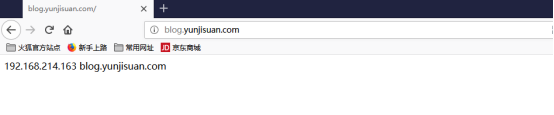
[[email protected] blog]# curl blog.yunjisuan.com
192.168.214.163 blog.yunjisuan.com
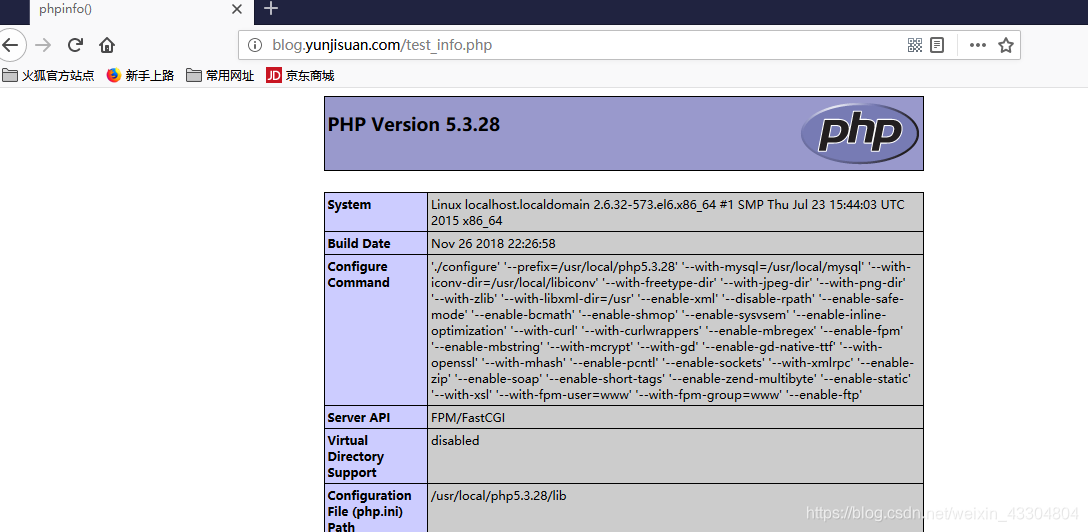
[[email protected] blog]# vim test_info.php
<?php phpinfo(); ?>
#本機/我的電腦/磁碟C/Windows/system32/drivers/etc/hosts
192.168.214.163 blog.yunjisuan.com
到瀏覽器檢視靜態網頁內容
到瀏覽器檢視動態網頁內容
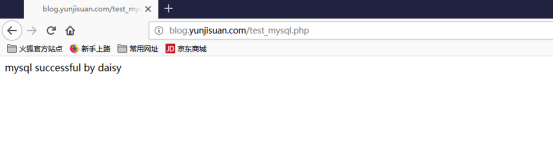
檢查MySQL與PHP的連線是否成功
[[email protected] blog]# vim test_mysql.php
<?php
        //$link_id=mysql_connect('主機名','使用者','密碼');
        $link_id=mysql_connect('localhost','root','123456');
        if($link_id){
                echo "mysql successful by daisy\n";
        }else{
                echo mysql_error();
        }
?>
[[email protected] blog]# ln -s /usr/local/php/bin/* /usr/local/bin/
[[email protected] blog]# ls
index.html  test_info.php  test_mysql.php
[[email protected] blog]# php test_mysql.php    #啟用php指令碼
mysql successful by daisy
[[email protected] blog]#
通過瀏覽器檢視測試mysql的php指令碼
FastCGI介紹
- CGI
CGI的全稱為“通用閘道器介面”(Common Gateway Interface),為HTTP伺服器與其他機器上的程式服務通訊交流的一種工具,CGI程式須執行在網路伺服器上。
傳統CGI介面方式的主要缺點是效能較差,因為每次HTTP伺服器遇到動態程式時都需要重新啟動解析器來執行解析,之後結果才會被返回給HTTP伺服器。這在處理高併發訪問時幾乎是不可用的,因此就誕生了FastCGI。另外,傳統的CGI介面方式安全性也很差,故而現在已經很少被使用了。 - FastCGI
FastCGI是一個可伸縮的,高速地在HTTP伺服器和動態指令碼語言間通訊的介面(在Linux下,FastCGI介面即為socket,這個socket可以是檔案socket,也可以是IP socket),主要優點是把動態語言和HTTP伺服器分離出來。多數流行的HTTP伺服器都支援FastCGI,包括Apache,Nginx和Lighttpd等。
同時,FastCGI也被許多指令碼語言所支援,例如當前比較流程的指令碼語言PHP。FastCGI介面採用的是C/S架構,它可以將HTTP伺服器和指令碼解析伺服器分開,同時還能在指令碼解析伺服器上啟動一個或多個指令碼來解析守護程序。當HTTP伺服器遇到動態程式時,可以將其直接交付給FastCGI程序來執行,然後將得到的結果返回給瀏覽器。這種方式可以讓HTTP伺服器專一地處理靜態請求,或者將動態指令碼伺服器的結果返回給客戶端,這在很大程度上提高了整個應用系統的效能。
FastCGI的重要特點如下:
HTTP伺服器和動態指令碼語言間通訊的介面或工具。
可把動態語言解析和HTTP伺服器分離開。
Nginx,Apache,Lighttpd,以及多數動態語言都支援FastCGI。
FastCGI介面方式採用C/S結構,分為客戶端(HTTP伺服器)和伺服器端(動態語言解析伺服器)
PHP動態語言伺服器端可以啟動多個FastCGI的守護程序(例如php-fpm(fcgi process mangement))
HTTP伺服器通過(例如Nginx fastcgi_pass)FastCGI客戶端和動態語言FastCGI伺服器端通訊(例如php-fpm) - Nginx FastCGI的執行原理
Nginx不支援對外部動態程式的直接呼叫或者解析,所有的外部程式(包括PHP)必須通過FastCGI介面來呼叫。FastCGI介面在Linux下是socket,為了呼叫CGI程式,還需要一個FastCGI的wrapper(可以理解為用於啟動另一個程式的程式),這個wrappper繫結在某個固定的socket上,如埠或檔案socket。當Nginx將CGI請求傳送給這個socket的時候,通過FastCGI介面,wrapper接收到請求,然後派生出一個新的執行緒,這個執行緒呼叫直譯器或外部程式處理指令碼來讀取返回的資料;接著,wrapper再將返回的資料通過FastCGI介面,沿著固定的socket傳遞給Nginx;最後,Nginx將返回的資料傳送給客戶端,這就是Nginx+FastCGI的整個運作過程。
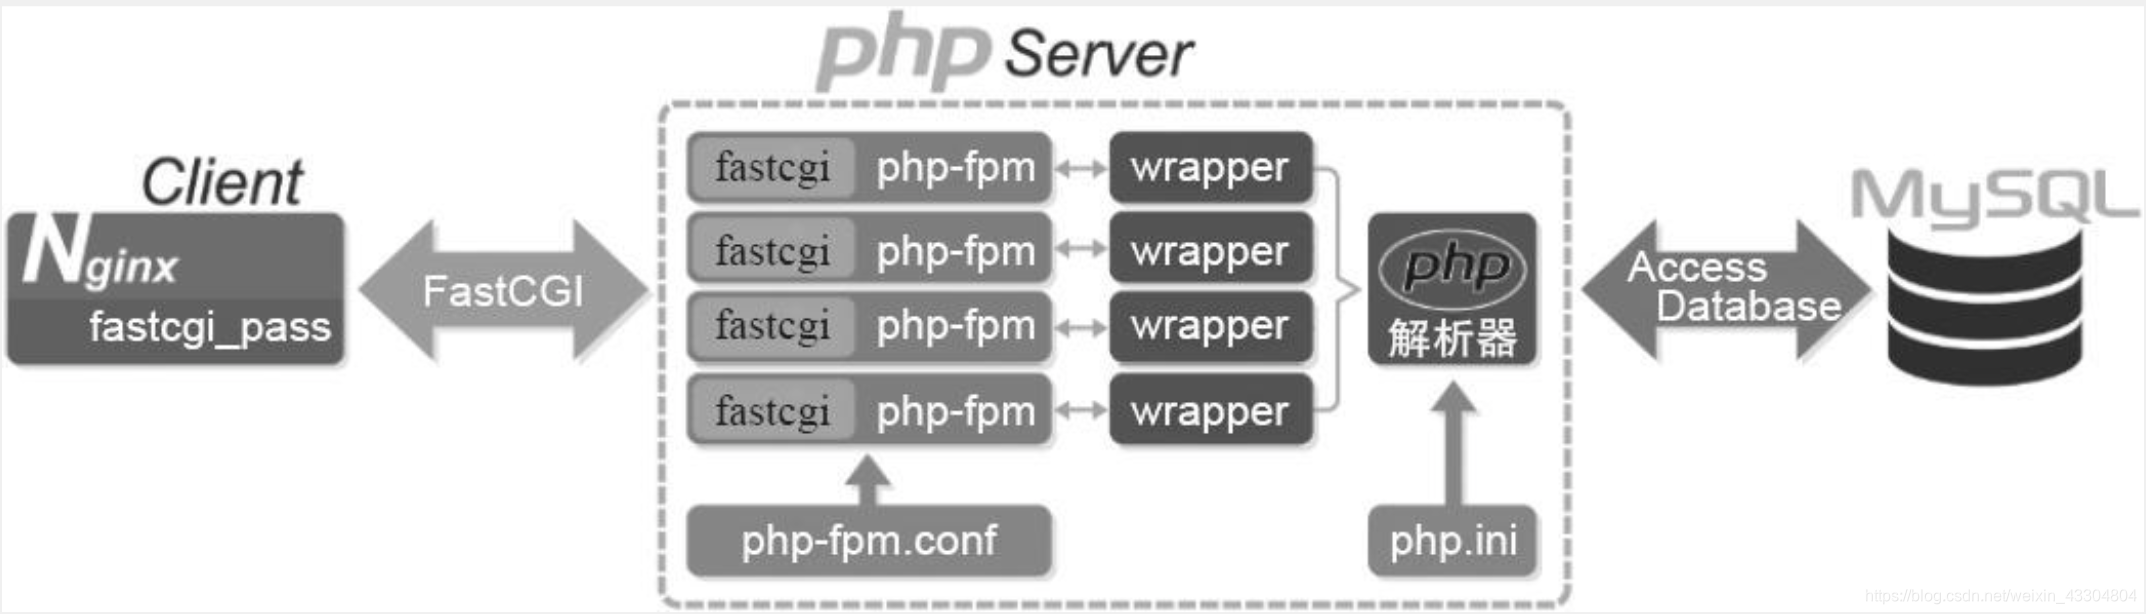
FastCGI的主要優點是把動態語言和HTTP伺服器分離開來,使Nginx專門處理靜態請求及向後轉發的動態請求,而PHP/PHP-FPM伺服器則專門解析PHP動態請求。
WordPress部落格程式的搭建準備
- MySQL資料庫配置準備
[[email protected] ~]# mysql -uroot -p123456
Welcome to the MySQL monitor.  Commands end with ; or \g.
Your MySQL connection id is 8
Server version: 5.5.32 MySQL Community Server (GPL)

Copyright (c) 2000, 2013, Oracle and/or its affiliates. All rights reserved.

Oracle is a registered trademark of Oracle Corporation and/or its
affiliates. Other names may be trademarks of their respective
owners.

Type 'help;' or '\h' for help. Type '\c' to clear the current input statement.

mysql> create database wordpress;
Query OK, 1 row affected (0.00 sec)
mysql> grant all on wordpress.* to [email protected]'localhost' identified by '123456';
Query OK, 0 rows affected (0.01 sec)

mysql> flush privileges;
Query OK, 0 rows affected (0.01 sec)

mysql> exit
Bye
- Nginx及PHP環境配置準備
[[email protected] ~]# vim /usr/local/nginx/conf/nginx.conf
worker_processes  1;
error_log logs/error.log;
events {
    worker_connections  1024;
}
http {
    include       mime.types;
    default_type  application/octet-stream;
    sendfile        on;
    keepalive_timeout  65;
    server {
        listen       80;
        server_name  blog.yunjisuan.com;
        location / {
            root   html/blog;
            index  index.php index.html index.htm;   #在靜態網頁出新增一個動態首頁檔案,用於域名跳轉
        }
        location ~ .*\.(php|php5)?$ {
                root html/blog;
                fastcgi_pass 127.0.0.1:9000;
                fastcgi_index index.php;
                include fastcgi.conf;
        }
    }
}
[[email protected] ~]# /usr/local/nginx/sbin/nginx -s reload
# 獲取WordPress部落格程式
[[email protected] ~]# tar xf wordpress-4.7.4-zh_CN.tar.gz
[[email protected] ~]# cd /usr/local/nginx/html/blog/
[[email protected] blog]# rm -rf *
[[email protected] blog]# ls
[[email protected] blog]# mv ~/wordpress .
[[email protected] blog]# ls
wordpress
[[email protected] blog]# /bin/mv wordpress/* .
[[email protected] blog]# ls
index.php        wp-admin              wp-cron.php        wp-mail.php
license.txt      wp-blog-header.php    wp-includes        wp-settings.php
readme.html      wp-comments-post.php  wp-links-opml.php  wp-signup.php
wordpress        wp-config-sample.php  wp-load.php        wp-trackback.php
wp-activate.php  wp-content            wp-login.php       xmlrpc.php
[[email protected] blog]# rm -rf wordpress/
[[email protected] blog]# ls
index.php        wp-blog-header.php    wp-includes        wp-settings.php
license.txt      wp-comments-post.php  wp-links-opml.php  wp-signup.php
readme.html      wp-config-sample.php  wp-load.php        wp-trackback.php
wp-activate.php  wp-content            wp-login.php       xmlrpc.php
wp-admin         wp-cron.php           wp-mail.php
[[email protected] blog]# ll
total 188
-rw-r--r--.  1 nobody 65534   418 Sep 25  2013 index.php
-rw-r--r--.  1 nobody 65534 19935 Jan  3  2017 license.txt
-rw-r--r--.  1 nobody 65534  6956 Apr 23  2017 readme.html
-rw-r--r--.  1 nobody 65534  5447 Sep 28  2016 wp-activate.php
drwxr-xr-x.  9 nobody 65534  4096 Apr 23  2017 wp-admin
-rw-r--r--.  1 nobody 65534   364 Dec 19  2015 wp-blog-header.php
-rw-r--r--.  1 nobody 65534  1627 Aug 29  2016 wp-comments-post.php
-rw-r--r--.  1 nobody 65534  2930 Apr 23  2017 wp-config-sample.php
drwxr-xr-x.  5 nobody 65534  4096 Apr 23  2017 wp-content
-rw-r--r--.  1 nobody 65534  3286 May 25  2015 wp-cron.php
drwxr-xr-x. 18 nobody 65534 12288 Apr 23  2017 wp-includes
-rw-r--r--.  1 nobody 65534  2422 Nov 21  2016 wp-links-opml.php
-rw-r--r--.  1 nobody 65534  3301 Oct 25  2016 wp-load.php
-rw-r--r--.  1 nobody 65534 33939 Nov 21  2016 wp-login.php
-rw-r--r--.  1 nobody 65534  8048 Jan 11  2017 wp-mail.php
-rw-r--r--.  1 nobody 65534 16255 Apr  7  2017 wp-settings.php
-rw-r--r--.  1 nobody 65534 29896 Oct 19  2016 wp-signup.php
-rw-r--r--.  1 nobody 65534  4513 Oct 15  2016 wp-trackback.php
-rw-r--r--.  1 nobody 65534  3065 Sep  1  2016 xmlrpc.php
[[email protected]st blog]# chown -R www.www /usr/local/nginx/html/blog
[[email protected] blog]# ll
total 188
-rw-r--r--.  1 www www   418 Sep 25  2013 index.php
-rw-r--r--.  1 www www 19935 Jan  3  2017 license.txt
-rw-r--r--.  1 www www  6956 Apr 23  2017 readme.html
-rw-r--r--.  1 www www  5447 Sep 28  2016 wp-activate.php
drwxr-xr-x.  9 www www  4096 Apr 23  2017 wp-admin
-rw-r--r--.  1 www www   364 Dec 19  2015 wp-blog-header.php
-rw-r--r--.  1 www www  1627 Aug 29  2016 wp-comments-post.php
-rw-r--r--.  1 www www  2930 Apr 23  2017 wp-config-sample.php
drwxr-xr-x.  5 www www  4096 Apr 23  2017 wp-content
-rw-r--r--.  1 www www  3286 May 25  2015 wp-cron.php
drwxr-xr-x. 18 www www 12288 Apr 23  2017 wp-includes
-rw-r--r--.  1 www www  2422 Nov 21  2016 wp-links-opml.php
-rw-r--r--.  1 www www  3301 Oct 25  2016 wp-load.php
-rw-r--r--.  1 www www 33939 Nov 21  2016 wp-login.php
-rw-r--r--.  1 www www  8048 Jan 11  2017 wp-mail.php
-rw-r--r--.  1 www www 16255 Apr  7  2017 wp-settings.php
-rw-r--r--.  1 www www 29896 Oct 19  2016 wp-signup.php
-rw-r--r--.  1 www www  4513 Oct 15  2016 wp-trackback.php
-rw-r--r--.  1 www www  3065 Sep  1  2016 xmlrpc.php
- 安裝blog部落格程式
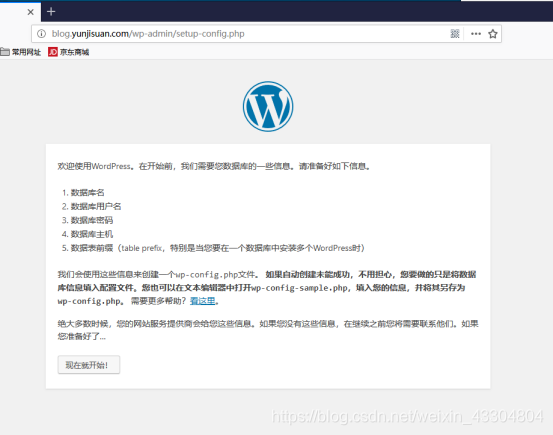
(1)開啟瀏覽器輸入blog.yunjisuan.com(提前做好hosts或DNS解析),回車
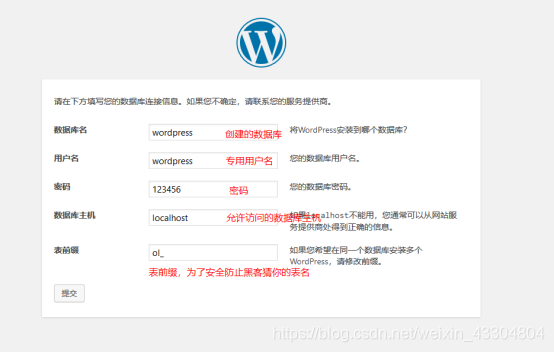
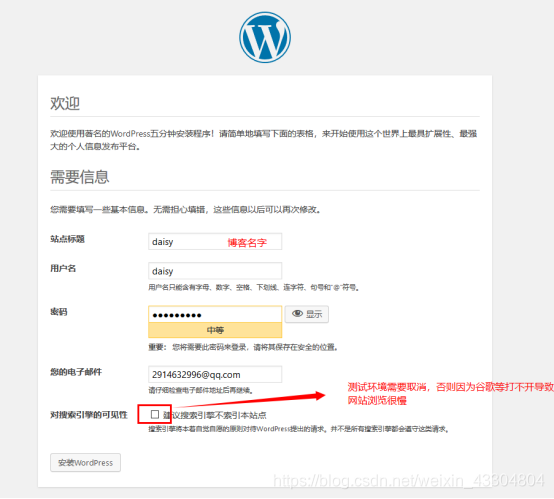
(2)仔細閱讀頁面的文字資訊後,單擊“現在就開始”按鈕繼續,然後在出現的頁面表單上填寫相應的內容
(3)在頁面表單裡填好內容後,單擊結尾的“提交”按鈕繼續
(4)出現上圖就表示可以安裝了,單擊“進行安裝”按鈕繼續
(5)根據介面提示設定blog站點的資訊後,單擊“安裝WordPress”按鈕繼續。
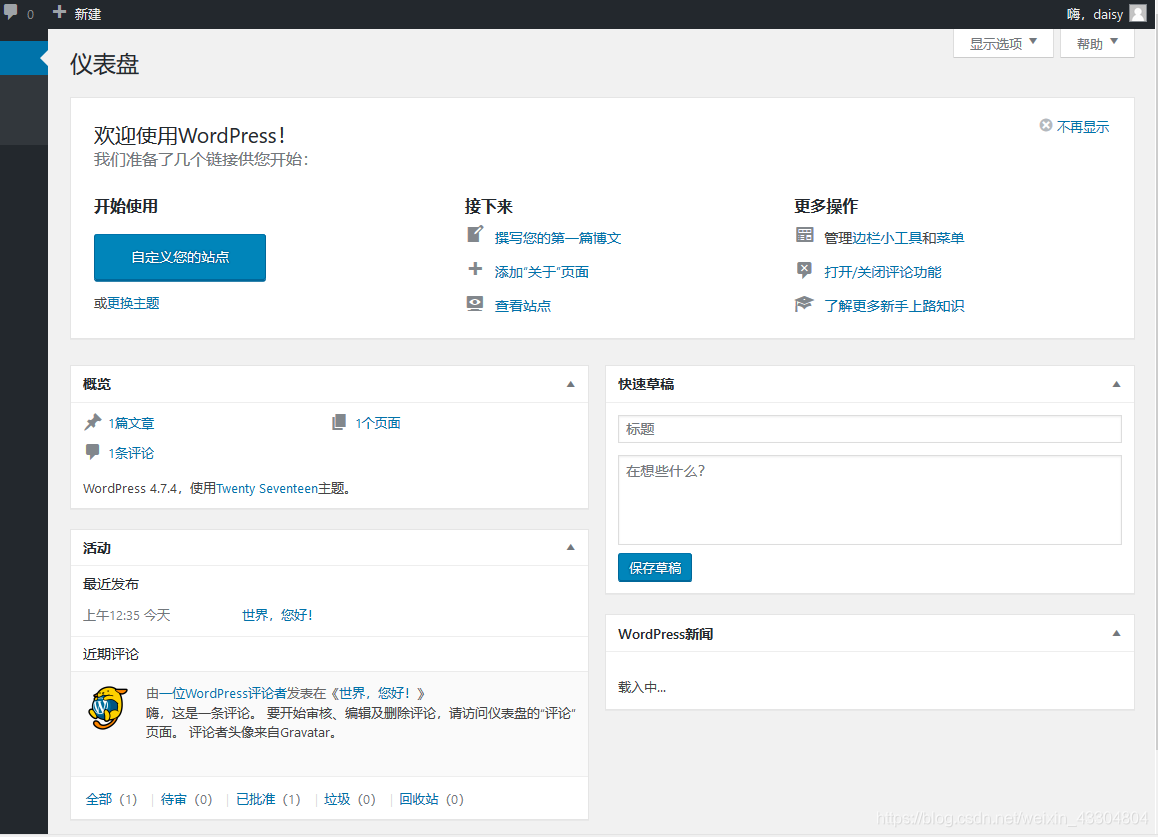
出現下圖所示的資訊就表明已經成功安裝了WordPress部落格。
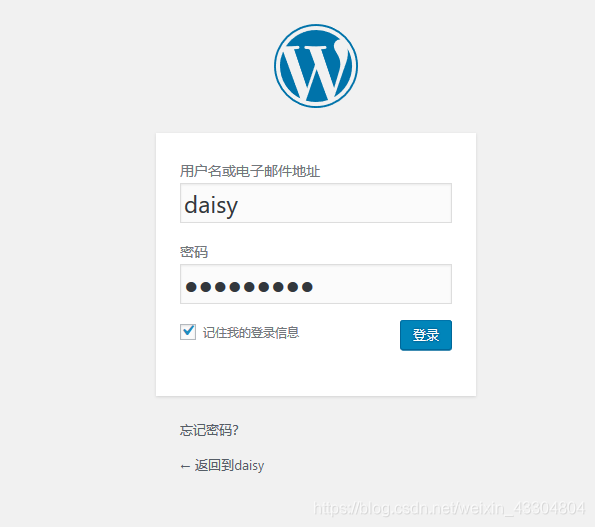
(6)後臺登入
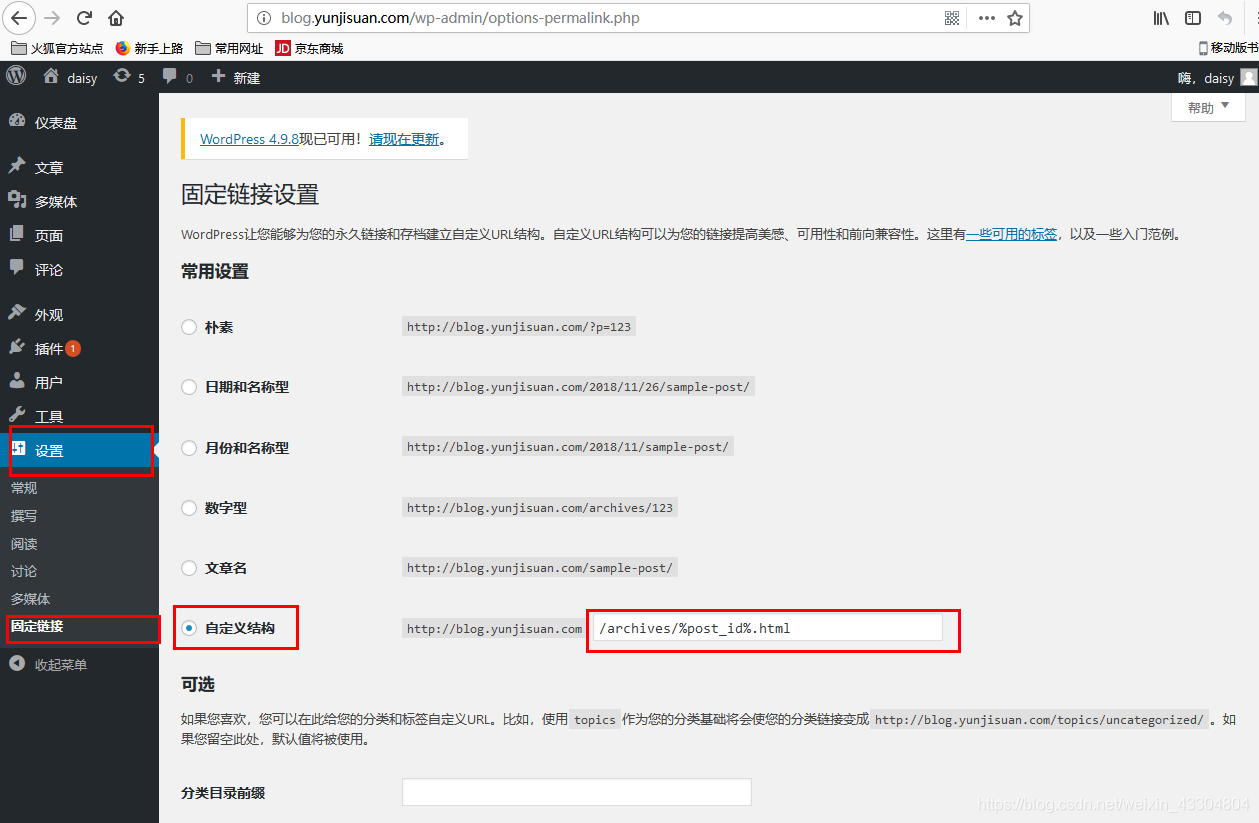
- 實現WordPress部落格程式URL靜態化
實現此功能時,首先要在WordPress後臺依次單擊設定—>固定連結—>自定義結構,然後輸入下面的程式碼,並儲存更改。


/archives/%post_id%.html
#說明:%post_id%是資料庫對應博文內容的唯一ID,例如423
接著,在Nginx配置檔案的server容器中新增下面的程式碼:
[[email protected] blog]# vim /usr/local/nginx/conf/nginx.conf
worker_processes  1;
error_log logs/error.log;
events {
    worker_connections  1024;
}
http {
    include       mime.types;
    default_type  application/octet-stream;
    sendfile        on;
    keepalive_timeout  65;
    server {
        listen       80;
        server_name  blog.yunjisuan.com;
        location / {
            root   html/blog;
            index  index.php index.html index.htm;
                if (-f $request_filename/index.html){     #如果使用者的請求的檔名是index.html,就會重寫:以任意開頭,將$1重寫成index.html靜態字尾
                rewrite (.*) $1/index.html break;
                }
                if (-f $request_filename/index.php){
                rewrite (.*) $1/index.php;
                }
                if (!-f $request_filename){
                 rewrite (.*) /index.php;
                }
        }
        location ~ .*\.(php|php5)?$ {
                root html/blog;
                fastcgi_pass 127.0.0.1:9000;
                fastcgi_index index.php;
                include fastcgi.conf;
        }
    }
}
[[email protected] blog]# /usr/local/nginx/sbin/nginx -s reload
使用者瀏覽器的圖片解析
使用者通過PC上網,當輸入blog.yunjisuan.com時,PC機向Web伺服器發起請求;訪問瀏覽器首頁index.html,web瀏覽器讀取index.html檔案的內容,發給使用者瀏覽器;使用者瀏覽器開始解析,解析到文字時,文字就會出現在瀏覽器上;解析到圖片時,使用者瀏覽器將圖片的地址讀取出來,再次向Web伺服器發起請求,Web伺服器收到請求後,將圖片讀取出來再次發給使用者瀏覽器,使用者瀏覽器再把返還的內容顯示到瀏覽器的頁面上,此時圖片就解析出來了。
上傳圖片時,圖片存在儲存裡(掛載儲存NFS),再把圖片放在儲存裡的位置寫到資料庫裡;
設計上傳時,網頁目錄html由兩個子目錄:static(讀的)和upload(上傳的),NFS儲存既要掛載在static目錄上,還要掛載在upload目錄上;靜態網頁讀取時經過static目錄,php動態網頁讀取時也要經過static目錄,但是,PHP還要經過upload目錄;PHP經過upload目錄後,圖片上傳進upload後,還要將圖片的具體位置寫入MySQL資料庫;這樣,在下次訪問index.php,SQL語句直接到MySQL中查詢。
PHP有兩個作用:
(1)讀動態網頁(讀取時可以不掛載儲存NFS,直接從MySQL裡把URL讀出來反饋給使用者,使用者瀏覽器解析的圖片會再發次請求,找static讀取圖片)
(2)上傳資料,向伺服器寫入資料
[[email protected] ~]# vim /usr/local/nginx/conf/nginx.conf
   server {
        listen  80;
        server_name  xxx.yunjisuan.com;
        location / {
                root html/xxx;
                index index.html index.htm;
                }

        }
[[email protected] ~]# cd /usr/local/nginx/html/
[[email protected] html]# mkdir xxx
[[email protected] html]#  vim xxx/index.html
welcome
[[email protected] html]# chown -R www.www xxx/
[[email protected] html]# /usr/local/nginx/sbin/nginx -s reload
[[email protected] html]# vim /etc/hosts
127.0.0.1   localhost localhost.localdomain localhost4 localhost4.localdomain4
::1         localhost localhost.localdomain localhost6 localhost6.localdomain6
192.168.214.163 LNMP blog.yunjisuan.com xxx.yunjisuan.com
[[email protected] html]# curl xxx.yunjisuan.com
welcome
兩種表達方式
[[email protected] html]# mv 111.jpg xxx/
[[email protected] html]# ls xxx/
111.jpg  index.html
[[email protected] html]# cd xxx
[[email protected] xxx]# echo "welcome" > index.html
[[email protected] xxx]# vim index.html
welcome
<img src="http://192.168.214.163/111.jpg" />