
基於Arduino的音樂動感節奏燈
1、音樂動感節奏燈是個什麼東西?
前段時間聽音樂覺得無聊,便想著音樂光聽也沒意思啊,能不能 “看見” 音樂呢?於是谷歌了一番,發現還真有人做了將音樂視覺化的東西,那就是音樂節奏燈。說的簡單點就是LED燈光顏色亮度等隨著音樂的節奏而發生變化,看了下他們的實現方法有很多,不過大都比較複雜,而且燈只能夠做節奏燈也比較浪費,於是我便動手做了一個既可以當作普通檯燈使用,又可以隨著音樂而閃爍的動感節奏燈,一舉兩得。
2、做這個東西需要準備哪些材料?
工欲善其事,必先利其器。那麼做這樣一個音樂動感節奏等需要準備哪些材料呢?
- Arduino UNO 開發板
- 聲音感測器(最好買Arduino專用的)
- BLE藍芽4.0模組
- WS2812B彩色燈帶
- 燈罩
- 3D列印底座
- 電源線和杜邦線若干
以上材料可以在淘寶買到,燈罩和3D列印的底座可以按照自己的實際需求來進行自己選擇,為了防止打廣告的嫌疑我就不放購買連結了,可以自行設計列印~
3、做這個東西需該怎麼做?
準備好上述的材料之後,我們就可以開始進行燈的製作啦~,節奏燈的主要結構如下圖:
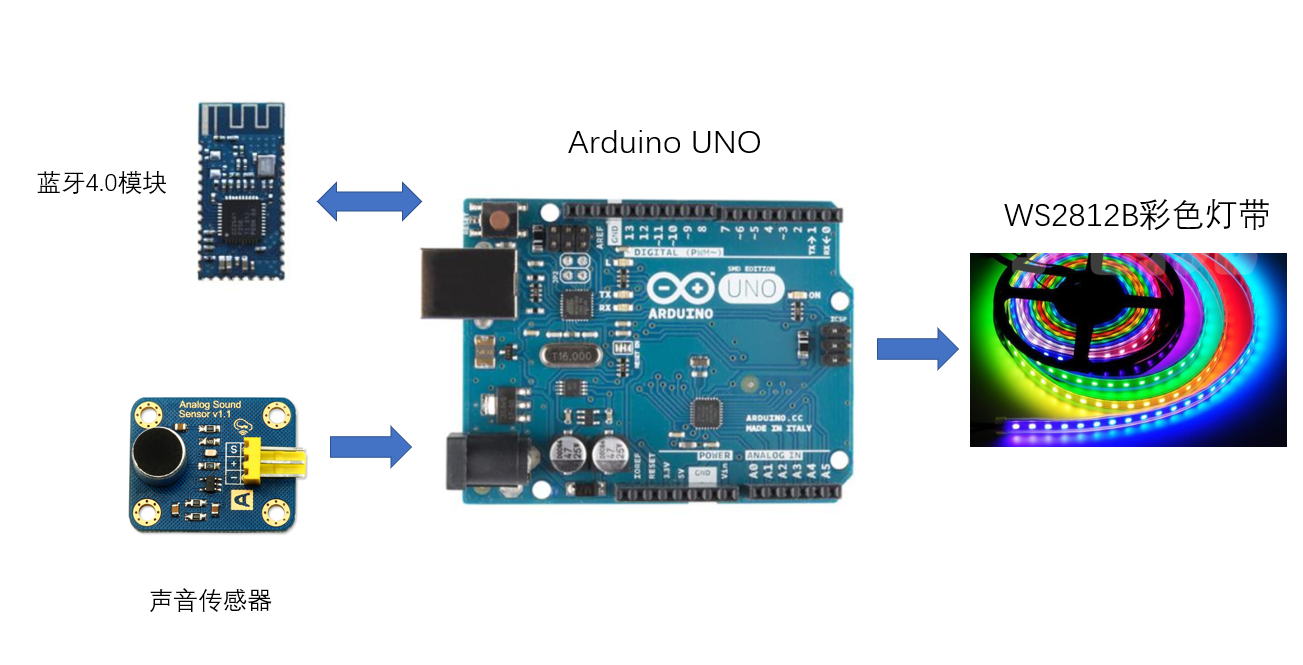
我們使用Arduino UNO作為主要的計算和處理模組,藍芽4.0模組和手機進行通訊,利用手機APP來選擇模式(後續會講),在節奏燈的模式下,通過聲音感測器來採集聲音,通過得到的聲音來控制燈帶的顏色和閃爍,在彩色燈的模式下,利用手機來控制燈的顏色,理論上的有160萬可調顏色。接下來介紹下詳細的步驟。
3.1 安裝開發環境
Arduino UNO 開發的環境為Arduino IDE,軟體下載地址為 https://www.arduino.cn/thread-5838-1-1.html ,預設安裝為最新版即可。安裝完IDE之後還需要安裝第三方的庫。
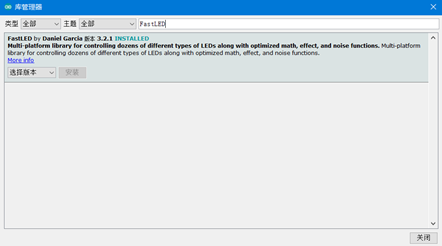
1) WS2812B的庫 FastLED, 選擇 專案->載入庫->管理庫,然後在輸入欄輸入FastLED,選擇最新的版本安裝,FastLED庫的更多使用方法可以參考 http://www.taichi-maker.com/homepage/reference-index/arduino-library-index/fastled-library/
2) 物聯網開發平臺庫 Blinker, 在Blinker 官網https://doc.blinker.app 頁面下載最新的Blinker庫,然後:
Window:將下載好的blinker庫解壓到 我的電腦>文件>Arduino>libraries 資料夾中
Mac OS:將下載好的blinker庫解壓到 文稿>Arduino>libraries 資料夾中
可以在檔案->示例 檢視庫是否安裝成功。
3.2 連線線路
具體的線路圖由於時間原因沒有畫,所以直接按照後續的程式碼可以找到每個模組的連線方式,當然這些連線方式都可以自定義,然後在程式碼內做簡單修改即可。需要注意的是藍芽模組採用軟串列埠連線,即RX,TX連線在ARDUINO UNO的2 和 3 號腳,而不是0和1 號腳,這個在BLINKER的網站上會說明,如果你程式碼燒錄不了,查查是不是這個原因。
3.3 程式碼編寫
  1 #define BLINKER_PRINT Serial
  2 #define BLINKER_BLE
  3
  4 #include <FastLED.h>
  5 #include <Blinker.h>
  6
  7 /** BASIC CONFIGURATION  **/
  8
  9 //The amount of LEDs in the setup
 10 #define NUM_LEDS 100
 11 //The pin that controls the LEDs
 12 #define LED_PIN 6
 13 //The pin that we read sensor values form
 14 #define ANALOG_READ 0
 15
 16 //Confirmed microphone low value, and max value
 17 #define MIC_LOW 0.0
 18 #define MIC_HIGH 300.0
 19 /** Other macros */
 20 //How many previous sensor values effects the operating average?
 21 #define AVGLEN 5
 22 //How many previous sensor values decides if we are on a peak/HIGH (e.g. in a song)
 23 #define LONG_SECTOR 20
 24
 25 //Mneumonics
 26 #define HIGH 3
 27 #define NORMAL 2
 28
 29 //How long do we keep the "current average" sound, before restarting the measuring
 30 #define CYCLES 30 * 1000
 31
 32
 33 float fscale( float originalMin, float originalMax, float newBegin, float newEnd, float inputValue, float curve);
 34 void insert(int val, int *avgs, int len);
 35 int compute_average(int *avgs, int len);
 36 void visualize_music();
 37
 38 //How many LEDs to we display
 39 int curshow = NUM_LEDS;
 40
 41 /*Not really used yet. Thought to be able to switch between sound reactive
 42 mode, and general gradient pulsing/static color*/
 43 int mode = 0;
 44
 45 //Showing different colors based on the mode.
 46 int songmode = NORMAL;
 47
 48 //Average sound measurement the last CYCLES
 49 unsigned long song_avg;
 50
 51 //The amount of iterations since the song_avg was reset
 52 int iter = 0;
 53
 54 //The speed the LEDs fade to black if not relit
 55 float fade_scale = 1.2;
 56
 57 //Led array
 58 CRGB leds[NUM_LEDS];
 59
 60 /*Short sound avg used to "normalize" the input values.
 61 We use the short average instead of using the sensor input directly */
 62 int avgs[AVGLEN] = {-1};
 63
 64 //Longer sound avg
 65 int long_avg[LONG_SECTOR] = {-1};
 66
 67
 68 // LED Model 1/Music LED 2/Color LED
 69 int LED_Model = 2;
 70
 71 //Keeping track how often, and how long times we hit a certain mode
 72 struct time_keeping {
 73   unsigned long times_start;
 74   short times;
 75 };
 76
 77 //How much to increment or decrement each color every cycle
 78 struct color {
 79   int r;
 80   int g;
 81   int b;
 82 };
 83
 84 struct time_keeping high;
 85 struct color Color;
 86 // when you use the MusicLED as a Color LED
 87 CRGB LEDColor(0,0,0);
 88 uint8_t Bright = 255;
 89
 90 // declare the button
 91 BlinkerRGB RGB1("RGBKey");
 92 BlinkerButton Button1("switch");
 93
 94
 95 // rgb1_callback
 96 void rgb1_callback(uint8_t r_value, uint8_t g_value, uint8_t b_value, uint8_t bright_value)
 97 {
 98   // change the color of strip by your set on Blinker
 99       LEDColor.r = r_value;
100       LEDColor.g = g_value;
101       LEDColor.b = b_value;
102       Bright = bright_value;
103       fill_solid(leds,NUM_LEDS,LEDColor);
104
105   FastLED.show();
106 }
107
108 void button1_callback(const String & state) {
109   if(LED_Model == 1)
110   {
111     LEDColor.r = 255;
112     LEDColor.g = 255;
113     LEDColor.b = 255;
114     Bright = 0;
115     fill_solid(leds,NUM_LEDS,LEDColor);
116     BLINKER_LOG2("strip_state: ","OFF");
117     LED_Model = 2;
118   }
119   else if(LED_Model == 2)
120   {
121     LED_Model = 1;
122   }
123   FastLED.show();
124 }
125
126
127 void setup() {
128   Serial.begin(9600);
129   //Set all lights to make sure all are working as expected
130   FastLED.addLeds<NEOPIXEL, LED_PIN>(leds, NUM_LEDS);
131   for (int i = 0; i < NUM_LEDS; i++)
132     leds[i] = CRGB(0, 0, 255);
133   FastLED.show();
134   delay(1000);
135
136   //bootstrap average with some low values
137   for (int i = 0; i < AVGLEN; i++) {
138     insert(250, avgs, AVGLEN);
139   }
140
141   //Initial values
142   high.times = 0;
143   high.times_start = millis();
144   Color.r = 0;
145   Color.g = 0;
146   Color.b = 1;
147
148     Blinker.begin();
149     //attach the RGB1 SlidersRGB
150     RGB1.attach(rgb1_callback);
151     Button1.attach(button1_callback);
152 }
153
154 /*With this we can change the mode if we want to implement a general
155 lamp feature, with for instance general pulsing. Maybe if the
156 sound is low for a while? */
157 void loop() {
158   Blinker.run();
159
160   if(LED_Model == 1)
161     visualize_music();
162
163   delay(1);       // delay in between reads for stability
164 }
165
166
167 /**Funtion to check if the lamp should either enter a HIGH mode,
168 or revert to NORMAL if already in HIGH. If the sensors report values
169 that are higher than 1.1 times the average values, and this has happened
170 more than 30 times the last few milliseconds, it will enter HIGH mode.
171 TODO: Not very well written, remove hardcoded values, and make it more
172 reusable and configurable.  */
173 void check_high(int avg) {
174   if (avg > (song_avg/iter * 1.1))  {
175     if (high.times != 0) {
176       if (millis() - high.times_start > 200.0) {
177         high.times = 0;
178         songmode = NORMAL;
179       } else {
180         high.times_start = millis();
181         high.times++;
182       }
183     } else {
184       high.times++;
185       high.times_start = millis();
186
187     }
188   }
189   if (high.times > 30 && millis() - high.times_start < 50.0)
190     songmode = HIGH;
191   else if (millis() - high.times_start > 200) {
192     high.times = 0;
193     songmode = NORMAL;
194   }
195 }
196
197 //Main function for visualizing the sounds in the lamp
198 void visualize_music() {
199   int sensor_value, mapped, avg, longavg;
200
201   //Actual sensor value
202   sensor_value = analogRead(ANALOG_READ);
203   Serial.println(sensor_value);
204
205   //If 0, discard immediately. Probably not right and save CPU.
206   if (sensor_value == 0)
207     return;
208
209   //Discard readings that deviates too much from the past avg.
210   mapped = (float)fscale(MIC_LOW, MIC_HIGH, MIC_LOW, (float)MIC_HIGH, (float)sensor_value, 2.0);
211   avg = compute_average(avgs, AVGLEN);
212
213   if (((avg - mapped) > avg*0.8)) //|| ((avg - mapped) < -avg*0.8))
214     return;
215
216   //Insert new avg. values
217   insert(mapped, avgs, AVGLEN);
218   insert(avg, long_avg, LONG_SECTOR);
219
220   //Compute the "song average" sensor value
221   song_avg += avg;
222   iter++;
223   if (iter > CYCLES) {
224     song_avg = song_avg / iter;
225     iter = 1;
226   }
227
228   longavg = compute_average(long_avg, LONG_SECTOR);
229
230   //Check if we enter HIGH mode
231   check_high(longavg);
232
233   if (songmode == HIGH) {
234     fade_scale = 3;
235     Color.r = 5;
236     Color.g = 3;
237     Color.b = -1;
238   }
239   else if (songmode == NORMAL) {
240     fade_scale = 2;
241     Color.r = -1;
242     Color.b = 2;
243     Color.g = 1;
244   }
245
246   //Decides how many of the LEDs will be lit
247   curshow = fscale(MIC_LOW, MIC_HIGH, 0.0, (float)NUM_LEDS, (float)avg, -1);
248
249   /*Set the different leds. Control for too high and too low values.
250           Fun thing to try: Dont account for overflow in one direction,
251     some interesting light effects appear! */
252   for (int i = 0; i < NUM_LEDS; i++)
253     //The leds we want to show
254     if (i < curshow) {
255       if (leds[i].r + Color.r > 255)
256         leds[i].r = 255;
257       else if (leds[i].r + Color.r < 0)
258         leds[i].r = 0;
259       else
260         leds[i].r = leds[i].r + Color.r;
261
262       if (leds[i].g + Color.g > 255)
263         leds[i].g = 255;
264       else if (leds[i].g + Color.g < 0)
265         leds[i].g = 0;
266       else
267         leds[i].g = leds[i].g + Color.g;
268
269       if (leds[i].b + Color.b > 255)
270         leds[i].b = 255;
271       else if (leds[i].b + Color.b < 0)
272         leds[i].b = 0;
273       else
274         leds[i].b = leds[i].b + Color.b;
275
276     //All the other LEDs begin their fading journey to eventual total darkness
277     } else {
278       leds[i] = CRGB(leds[i].r/fade_scale, leds[i].g/fade_scale, leds[i].b/fade_scale);
279     }
280   FastLED.show();
281 }
282 //Compute average of a int array, given the starting pointer and the length
283 int compute_average(int *avgs, int len) {
284   int sum = 0;
285   for (int i = 0; i < len; i++)
286     sum += avgs[i];
287
288   return (int)(sum / len);
289
290 }
291
292 //Insert a value into an array, and shift it down removing
293 //the first value if array already full
294 void insert(int val, int *avgs, int len) {
295   for (int i = 0; i < len; i++) {
296     if (avgs[i] == -1) {
297       avgs[i] = val;
298       return;
299     }
300   }
301
302   for (int i = 1; i < len; i++) {
303     avgs[i - 1] = avgs[i];
304   }
305   avgs[len - 1] = val;
306 }
307
308 //Function imported from the arduino website.
309 //Basically map, but with a curve on the scale (can be non-uniform).
310 float fscale( float originalMin, float originalMax, float newBegin, float
311     newEnd, float inputValue, float curve){
312
313   float OriginalRange = 0;
314   float NewRange = 0;
315   float zeroRefCurVal = 0;
316   float normalizedCurVal = 0;
317   float rangedValue = 0;
318   boolean invFlag = 0;
319
320
321   // condition curve parameter
322   // limit range
323
324   if (curve > 10) curve = 10;
325   if (curve < -10) curve = -10;
326
327   curve = (curve * -.1) ; // - invert and scale - this seems more intuitive - postive numbers give more weight to high end on output
328   curve = pow(10, curve); // convert linear scale into lograthimic exponent for other pow function
329
330   // Check for out of range inputValues
331   if (inputValue < originalMin) {
332     inputValue = originalMin;
333   }
334   if (inputValue > originalMax) {
335     inputValue = originalMax;
336   }
337
338   // Zero Refference the values
339   OriginalRange = originalMax - originalMin;
340
341   if (newEnd > newBegin){
342     NewRange = newEnd - newBegin;
343   }
344   else
345   {
346     NewRange = newBegin - newEnd;
347     invFlag = 1;
348   }
349
350   zeroRefCurVal = inputValue - originalMin;
351   normalizedCurVal  =  zeroRefCurVal / OriginalRange;   // normalize to 0 - 1 float
352
353   // Check for originalMin > originalMax  - the math for all other cases i.e. negative numbers seems to work out fine
354   if (originalMin > originalMax ) {
355     return 0;
356   }
357
358   if (invFlag == 0){
359     rangedValue =  (pow(normalizedCurVal, curve) * NewRange) + newBegin;
360
361   }
362   else     // invert the ranges
363   {
364     rangedValue =  newBegin - (pow(normalizedCurVal, curve) * NewRange);
365   }
366
367   return rangedValue;
368 }
上述程式碼編譯無誤後上傳到Arduino UNO即可。
3.4 下載並使用Blinker軟體連線
Blinker軟體的安裝包可以在官網上找到:

安裝好之後註冊賬號,登陸,在主頁面右上角選擇-->新增裝置-->Arduino-->藍芽接入,然後會自動發現我們的藍芽,連線上之後,如圖。

上面表示是否已經連線,現在表示已連線。然後新增上面的兩個元件,編輯元件引數如下:
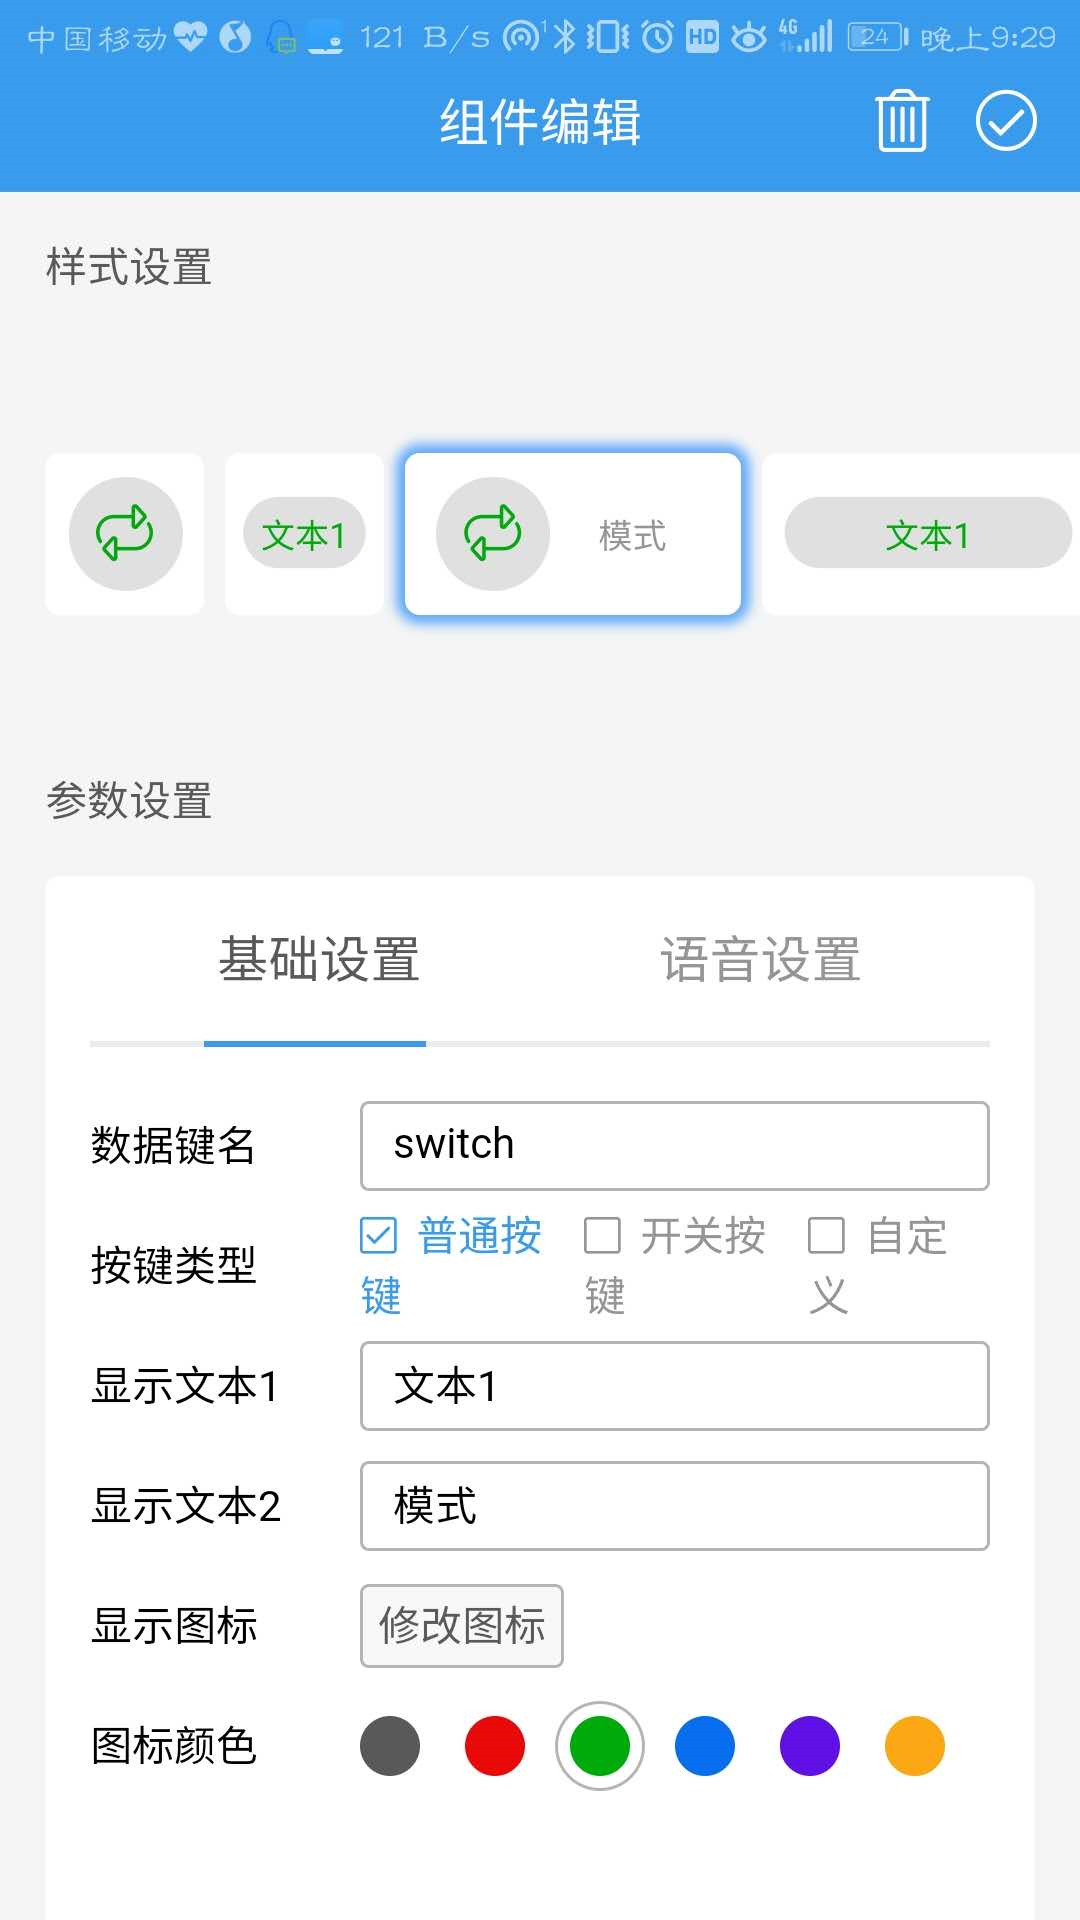

完成之後便可以通過RGB滑條來控制顏色,通過模式按鈕來控制燈的模式。
3.5 燈的組裝
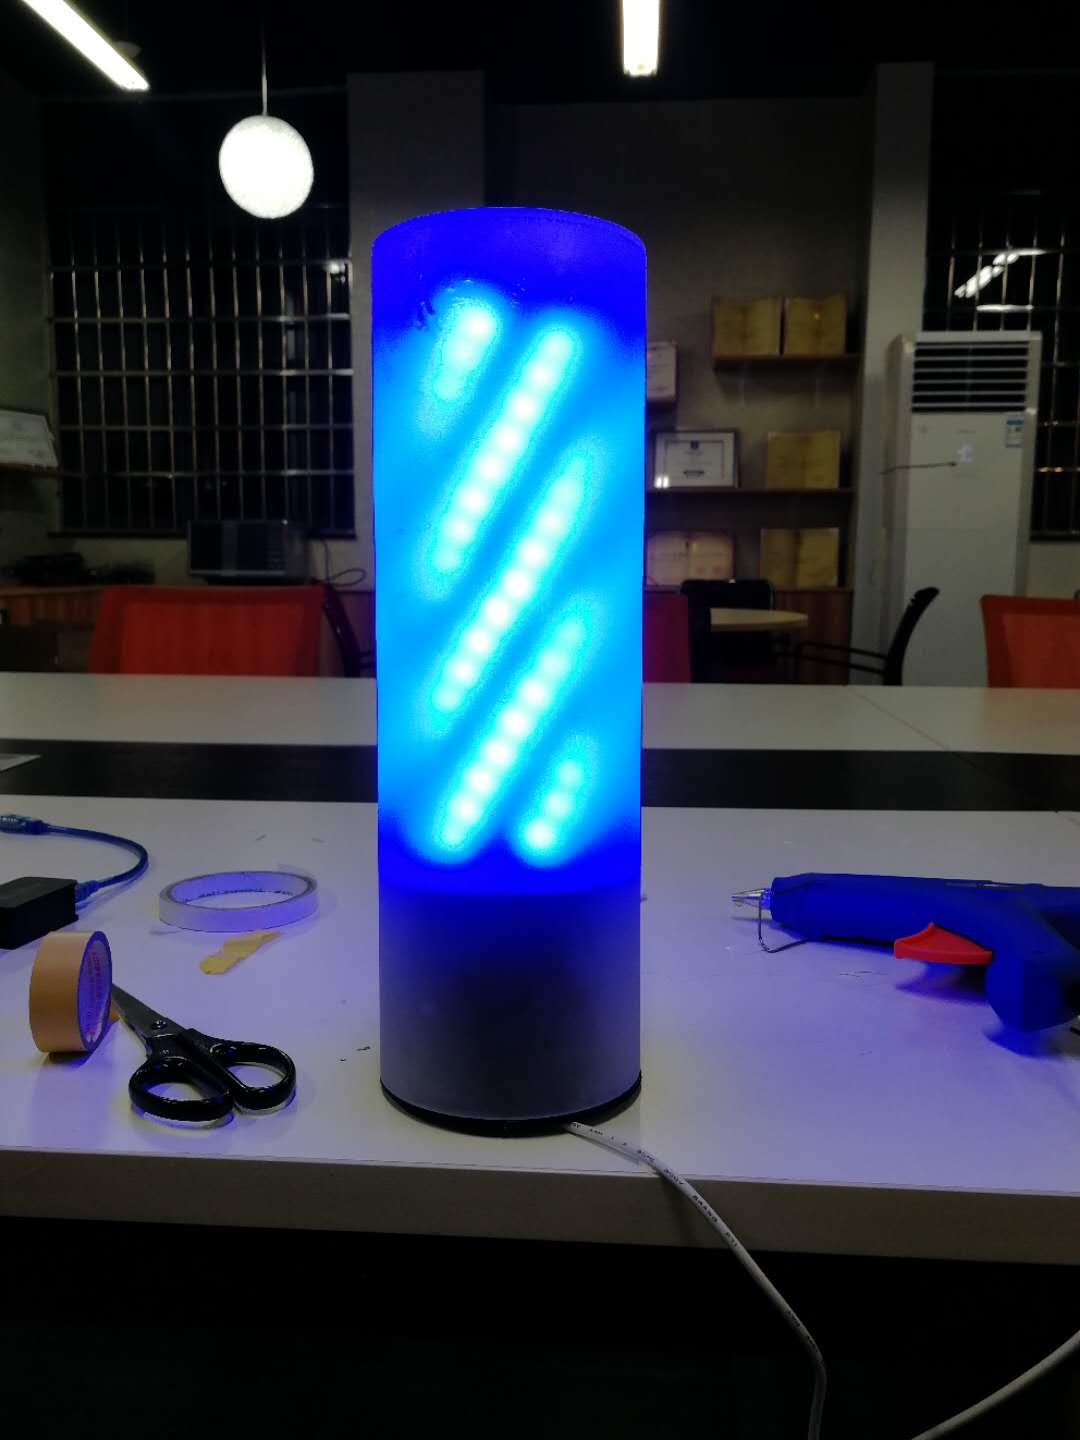
我是自己在網上買的燈罩,然後根據自己的需求3D列印的底座,大家可以發揮自己的想象力來創作出不一樣的外觀~
然後來一波安裝完成的照片:
最後更新一波實測視訊(由於不能同時錄影和控制,所以只放了節奏燈效果):
地址:https://www.bilibili.com/video/av38471827/