
Redis 客戶端之Lettuce配置使用(基於Spring Boot 2.x)
阿新 • • 發佈:2018-12-19
開發環境:使用Intellij IDEA + Maven + Spring Boot 2.x + JDK 8
Spring Boot 從 2.0版本開始,將預設的Redis客戶端Jedis替換問Lettuce,下面描述Lettuce的配置使用。
1.在專案的pom.xml檔案下,引入Redis在Spring Boot 下的相關Jar包依賴。
    properties>
        <redisson.version>3.8.2</redisson.version>
    </properties>

    <dependencies>
        <dependency>
            <groupId>org.springframework.boot</groupId>
            <artifactId>spring-boot-starter</artifactId>
        </dependency>
        <dependency>
            <groupId>org.springframework.boot</groupId>
            <artifactId>spring-boot-starter-test</artifactId>
            <scope>test</scope>
        </dependency>
        <dependency>
            <groupId>org.springframework.boot</groupId>
            <artifactId>spring-boot-starter-data-redis</artifactId>
        </dependency>
        <dependency>
            <groupId>org.apache.commons</groupId>
            <artifactId>commons-pool2</artifactId>
        </dependency>
    </dependencies>
2.在專案的resources目錄下,在application.yml檔案裡新增lettuce的配置引數。
#Redis配置
spring:
  redis:
    database: 6  #Redis索引0~15,預設為0
    host: 127.0.0.1
    port: 6379
    password:  #密碼(預設為空)
    lettuce: # 這裡標明使用lettuce配置
      pool:
        max-active: 8   #連線池最大連線數(使用負值表示沒有限制)
        max-wait: -1ms  #連線池最大阻塞等待時間(使用負值表示沒有限制)
        max-idle: 5     #連線池中的最大空閒連線
        min-idle: 0     #連線池中的最小空閒連線
    timeout: 10000ms    #連線超時時間(毫秒)
3.新增Redisson的配置引數讀取類RedisConfig
package com.dbfor.redis.config;

import org.springframework.cache.annotation.CachingConfigurerSupport;
import org.springframework.cache.annotation.EnableCaching;
import org.springframework.context.annotation.Bean;
import org.springframework.context.annotation.Configuration;
import org.springframework.data.redis.connection.lettuce.LettuceConnectionFactory;
import org.springframework.data.redis.core.RedisTemplate;
import org.springframework.data.redis.serializer.GenericJackson2JsonRedisSerializer;
import org.springframework.data.redis.serializer.StringRedisSerializer;


@Configuration
@EnableCaching
public class RedisConfig extends CachingConfigurerSupport {

    /**
     * RedisTemplate配置
     * @param connectionFactory
     * @return
     */
    @Bean
    public RedisTemplate<String, Object> redisTemplate(LettuceConnectionFactory connectionFactory) {
        // 配置redisTemplate
        RedisTemplate<String, Object> redisTemplate = new RedisTemplate<>();
        redisTemplate.setConnectionFactory(connectionFactory);
        redisTemplate.setKeySerializer(new StringRedisSerializer());//key序列化
        redisTemplate.setValueSerializer(new GenericJackson2JsonRedisSerializer());//value序列化
        redisTemplate.afterPropertiesSet();
        return redisTemplate;
    }

}
4.構建Spring Boot的啟動類RedisApplication
package com.dbfor.redis;

import org.springframework.boot.SpringApplication;
import org.springframework.boot.autoconfigure.SpringBootApplication;

@SpringBootApplication
public class RedisApplication {

    public static void main(String[] args) {
        SpringApplication.run(RedisApplication.class);
    }
}
5.編寫測試類RedisTest
package com.dbfor.redis;

import org.junit.Test;
import org.junit.runner.RunWith;
import org.springframework.beans.factory.annotation.Autowired;
import org.springframework.boot.test.context.SpringBootTest;
import org.springframework.data.redis.core.RedisTemplate;
import org.springframework.stereotype.Component;
import org.springframework.test.context.junit4.SpringRunner;

@SpringBootTest
@RunWith(SpringRunner.class)
@Component
public class RedisTest {

    @Autowired
    private RedisTemplate redisTemplate;

    @Test
    public void set() {
        redisTemplate.opsForValue().set("test:set1", "testValue1");
        redisTemplate.opsForSet().add("test:set2", "asdf");
        redisTemplate.opsForHash().put("hash1", "name1", "lms1");
        redisTemplate.opsForHash().put("hash1", "name2", "lms2");
        redisTemplate.opsForHash().put("hash1", "name3", "lms3");
        System.out.println(redisTemplate.opsForValue().get("test:set"));
        System.out.println(redisTemplate.opsForHash().get("hash1", "name1"));
    }
}
6.在Redis上檢視執行結果
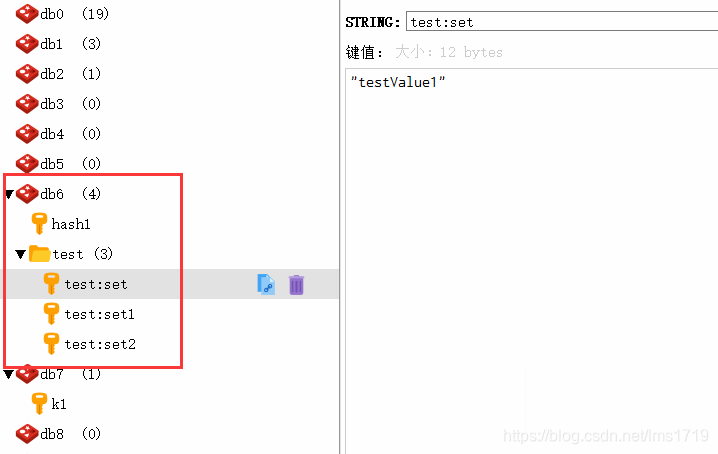
從上圖可以看到,Lettuce配置操作資料庫成功!