最簡單的基於FFMPEG的音訊編碼器(PCM編碼為AAC
本文介紹一個最簡單的基於FFMPEG的音訊編碼器。該編碼器實現了PCM音訊取樣資料編碼為AAC的壓縮編碼資料。編碼器程式碼十分簡單,但是每一行程式碼都很重要。通過看本編碼器的原始碼,可以瞭解FFMPEG音訊編碼的流程。
本程式使用最新版的類庫(編譯時間為2014.5.6),開發平臺為VC2010。所有的配置都已經做好,只需要執行就可以了。
流程(2014.9.29更新)
下面附一張使用FFmpeg編碼音訊的流程圖。使用該流程,不僅可以編碼AAC的音訊,而且可以編碼MP3,MP2等等各種FFmpeg支援的音訊。圖中藍色背景的函式是實際輸出資料的函式。淺綠色的函式是音訊編碼的函式。
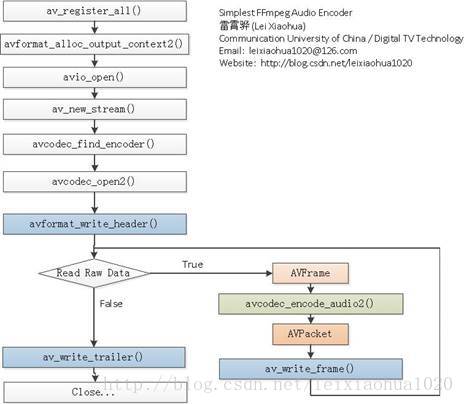
簡單介紹一下流程中各個函式的意義:
av_register_all():註冊FFmpeg所有編解碼器。
avformat_alloc_output_context2():初始化輸出碼流的AVFormatContext。
avio_open():開啟輸出檔案。
av_new_stream():建立輸出碼流的AVStream。
avcodec_find_encoder():查詢編碼器。
avcodec_open2():開啟編碼器。
avformat_write_header():寫檔案頭(對於某些沒有檔案頭的封裝格式,不需要此函式。比如說MPEG2TS)。
avcodec_encode_audio2():編碼音訊。即將AVFrame(儲存PCM取樣資料)編碼為AVPacket(儲存AAC,MP3等格式的碼流資料)。
av_write_frame():將編碼後的視訊碼流寫入檔案。
av_write_trailer():寫檔案尾(對於某些沒有檔案頭的封裝格式,不需要此函式。比如說MPEG2TS)。
程式碼
/** *最簡單的基於FFmpeg的音訊編碼器 *Simplest FFmpeg Audio Encoder * *雷霄驊 Lei Xiaohua *[email protected] *中國傳媒大學/數字電視技術 *Communication University of China / Digital TV Technology *http://blog.csdn.net/leixiaohua1020 * *本程式實現了音訊PCM取樣資料編碼為壓縮碼流(MP3,WMA,AAC等)。 *是最簡單的FFmpeg音訊編碼方面的教程。 *通過學習本例子可以瞭解FFmpeg的編碼流程。 *This software encode PCM data to AAC bitstream. *It's the simplest audio encoding software based on FFmpeg. *Suitable for beginner of FFmpeg */ #include <stdio.h>#define __STDC_CONSTANT_MACROS#ifdef _WIN32//Windowsextern "C"{#include "libavcodec/avcodec.h"#include "libavformat/avformat.h"};#else//Linux...#ifdef __cplusplusextern "C"{#endif#include <libavcodec/avcodec.h>#include <libavformat/avformat.h>#ifdef __cplusplus};#endif#endifint flush_encoder(AVFormatContext *fmt_ctx,unsigned int stream_index){ int ret; int got_frame; AVPacket enc_pkt; if (!(fmt_ctx->streams[stream_index]->codec->codec->capabilities & CODEC_CAP_DELAY)) return 0; while (1) { enc_pkt.data = NULL; enc_pkt.size = 0; av_init_packet(&enc_pkt); ret = avcodec_encode_audio2 (fmt_ctx->streams[stream_index]->codec, &enc_pkt, NULL, &got_frame); av_frame_free(NULL); if (ret < 0) break; if (!got_frame){ ret=0; break; } printf("Flush Encoder: Succeed to encode 1 frame!\tsize:%5d\n",enc_pkt.size); /* mux encoded frame */ ret = av_write_frame(fmt_ctx, &enc_pkt); if (ret < 0) break; } return ret;}int main(int argc, char* argv[]){ AVFormatContext* pFormatCtx; AVOutputFormat* fmt; AVStream* audio_st; AVCodecContext* pCodecCtx; AVCodec* pCodec; uint8_t* frame_buf; AVFrame* pFrame; AVPacket pkt; int got_frame=0; int ret=0; int size=0; FILE *in_file=NULL; //Raw PCM data int framenum=1000; //Audio frame number const char* out_file = "tdjm.aac"; //Output URL int i; in_file= fopen("tdjm.pcm", "rb"); av_register_all(); //Method 1. pFormatCtx = avformat_alloc_context(); fmt = av_guess_format(NULL, out_file, NULL); pFormatCtx->oformat = fmt; //Method 2. //avformat_alloc_output_context2(&pFormatCtx, NULL, NULL, out_file); //fmt = pFormatCtx->oformat; //Open output URL if (avio_open(&pFormatCtx->pb,out_file, AVIO_FLAG_READ_WRITE) < 0){ printf("Failed to open output file!\n"); return -1; } audio_st = avformat_new_stream(pFormatCtx, 0); if (audio_st==NULL){ return -1; } pCodecCtx = audio_st->codec; pCodecCtx->codec_id = fmt->audio_codec; pCodecCtx->codec_type = AVMEDIA_TYPE_AUDIO; pCodecCtx->sample_fmt = AV_SAMPLE_FMT_S16; pCodecCtx->sample_rate= 44100; pCodecCtx->channel_layout=AV_CH_LAYOUT_STEREO; pCodecCtx->channels = av_get_channel_layout_nb_channels(pCodecCtx->channel_layout); pCodecCtx->bit_rate = 64000; //Show some information av_dump_format(pFormatCtx, 0, out_file, 1); pCodec = avcodec_find_encoder(pCodecCtx->codec_id); if (!pCodec){ printf("Can not find encoder!\n"); return -1; } if (avcodec_open2(pCodecCtx, pCodec,NULL) < 0){ printf("Failed to open encoder!\n"); return -1; } pFrame = av_frame_alloc(); pFrame->nb_samples= pCodecCtx->frame_size; pFrame->format= pCodecCtx->sample_fmt; size = av_samples_get_buffer_size(NULL, pCodecCtx->channels,pCodecCtx->frame_size,pCodecCtx->sample_fmt, 1); frame_buf = (uint8_t *)av_malloc(size); avcodec_fill_audio_frame(pFrame, pCodecCtx->channels, pCodecCtx->sample_fmt,(const uint8_t*)frame_buf, size, 1); //Write Header avformat_write_header(pFormatCtx,NULL); av_new_packet(&pkt,size); for (i=0; i<framenum; i++){ //Read PCM if (fread(frame_buf, 1, size, in_file) <= 0){ printf("Failed to read raw data! \n"); return -1; }else if(feof(in_file)){ break; } pFrame->data[0] = frame_buf; //PCM Data pFrame->pts=i*100; got_frame=0; //Encode ret = avcodec_encode_audio2(pCodecCtx, &pkt,pFrame, &got_frame); if(ret < 0){ printf("Failed to encode!\n"); return -1; } if (got_frame==1){ printf("Succeed to encode 1 frame! \tsize:%5d\n",pkt.size); pkt.stream_index = audio_st->index; ret = av_write_frame(pFormatCtx, &pkt); av_free_packet(&pkt); } } //Flush Encoder ret = flush_encoder(pFormatCtx,0); if (ret < 0) { printf("Flushing encoder failed\n"); return -1; } //Write Trailer av_write_trailer(pFormatCtx); //Clean if (audio_st){ avcodec_close(audio_st->codec); av_free(pFrame); av_free(frame_buf); } avio_close(pFormatCtx->pb); avformat_free_context(pFormatCtx); fclose(in_file); return 0;}
結果
程式執行完成後,會將一個PCM取樣資料檔案(*.pcm)編碼為AAC碼流檔案(*.aac)。
下載
simplest ffmpeg audio encoder
專案主頁
CSDN工程下載地址:
PUDN工程下載地址:
更新-1.1 (2015.2.13)=========================================
這次考慮到了跨平臺的要求,調整了原始碼。經過這次調整之後,原始碼可以在以下平臺編譯通過:
VC++:開啟sln檔案即可編譯,無需配置。
cl.exe:開啟compile_cl.bat即可命令列下使用cl.exe進行編譯,注意可能需要按照VC的安裝路徑調整腳本里面的引數。編譯命令如下。
::VS2010 Environmentcall "D:\Program Files\Microsoft Visual Studio 10.0\VC\vcvarsall.bat"::[email protected] INCLUDE=include;%INCLUDE%::[email protected] LIB=lib;%LIB%::compile and linkcl simplest_ffmpeg_audio_encoder.cpp /link avcodec.lib avformat.lib avutil.lib ^avdevice.lib avfilter.lib postproc.lib swresample.lib swscale.lib /OPT:NOREF
MinGW:MinGW命令列下執行compile_mingw.sh即可使用MinGW的g++進行編譯。編譯命令如下。
g++ simplest_ffmpeg_audio_encoder.cpp -g -o simplest_ffmpeg_audio_encoder.exe \-I /usr/local/include -L /usr/local/lib -lavformat -lavcodec -lavutil
GCC:Linux或者MacOS命令列下執行compile_gcc.sh即可使用GCC進行編譯。編譯命令如下。
gcc simplest_ffmpeg_audio_encoder.cpp -g -o simplest_ffmpeg_audio_encoder.out \-I /usr/local/include -L /usr/local/lib -lavformat -lavcodec -lavutil
SourceForge上已經更新。