利用JDBC通過MySQL進行資料儲存查詢修改的簡易快遞管理系統
阿新 • • 發佈:2018-12-20
前言
作者是一個才學java的新手,水平比較低,見諒
而且這個小練習也是基於之前寫過的一個練習修改而來(將資料儲存獲取全部改為利用MySQL)
本文的程式碼想要正常執行需要安裝MySQL資料庫並配置好環境,
而且在專案中需要新增JDBC驅動包,如下圖:

以下是原始碼
1.連線資料庫
package DataBaseOperation;
/*
* 用於獲取資料庫連線
*/
import java.sql.*;
public class JDBCutil
{
private String Driver;//驅動
private String URL;//伺服器地址,資料庫名
private 2.對資料進行操作
package DataBaseOperation;

/*
 * 利用SQL語句對資料庫進行操作
 * 讀取,插入,刪除,更新
 */
import java.sql.*;
import java.text.SimpleDateFormat;
import java.util.ArrayList;
import java.util.Date;
import javax.swing.JOptionPane;

import Information.ExpressInformation;

public class SqlOperation
{
	private Connection connect;//與資料庫的連線
	private PreparedStatement pstmt;//預編譯SQL語句物件
	private ResultSet rs;//pstmt返回的表結果集(pstmt關閉該類也自動關閉
	private ArrayList<ExpressInformation> data;//用於存放讀取的資料集
	private JDBCutil util;//獲取連線類

	public SqlOperation()
	{
		this.util = new JDBCutil();
		this.connect = this.util.getConnection();
		this.data = new ArrayList<ExpressInformation>();
	}

	public ArrayList<ExpressInformation> getData()
	{
		return this.data;
	}

	//查詢讀取資料
	public void Load()
	{
		//查詢用的SQL語句
		String SelectSQL = "SELECT *" + "FROM information";

		try
		{
			this.pstmt = this.connect.prepareStatement(SelectSQL);//這個方法需要捕捉異常
			this.rs = this.pstmt.executeQuery();//執行查詢SQL語句,獲得表的結果集
			while(rs.next())
			{
				this.data.add(new ExpressInformation(rs.getString(1),rs.getInt(2),
						rs.getString(3),rs.getString(4),
						rs.getString(5),rs.getString(6)));//獲得每一列的資料(和類的建構函式引數順序對應)
			}
			this.rs.close();//立即釋放該物件的JDBC和資料庫資源
			this.pstmt.close();//同上
		}
		catch(SQLException e)
		{
			System.out.println("Data load error");
			e.printStackTrace();
		}
	}

	//插入新的訂單
	public void Insert(ExpressInformation order)
	{
		//插入用的SQL語句
		//初始化就需要設定的列(INSERT INTO後表名+列 ,要按順序對應,佔位符的數量也要相同,不然會產生越界錯誤
		String InsertSQL = "INSERT INTO information(id,kind,sender,addressee,SendDate,ReceiveDate)"
                        + "VALUES(?,?,?,?,?,?)";//?是佔位符,必須在執行前通過setXXX方法進行設定
		try
		{
			this.pstmt = this.connect.prepareStatement(InsertSQL);
			//對應資料庫中表的行的每一列,順序不能錯
			//這些setXXXX方法都是設定之前預編譯在pstmt中的SQL語句的佔位符
			this.pstmt.setString(1, order.getID());
			this.pstmt.setInt(2, order.getKind());
			this.pstmt.setString(3, order.getSender());
			this.pstmt.setString(4, order.getAddressee());
			this.pstmt.setString(5, order.getSendDate());
			this.pstmt.setString(6, order.getReceiveDate());

			this.pstmt.executeUpdate();//執行更新SQL語句,SQL更新語句是預編譯在其中的
			JOptionPane.showMessageDialog(null, "訂單建立成功");//如果上句出現異常,將會跳過這句執行catch的提示

			this.pstmt.close();
		}
		catch(SQLException e)
		{
			JOptionPane.showMessageDialog(null, "訂單已存在");
			e.printStackTrace();
		}
	}

	public void Delete(String d_id)
	{
		//刪除用的SQL語句,因為id用String型儲存,WHERE篩選記得用' '括住傳入的id變數
		String DeleteSQL = "DELETE FROM information "+ "WHERE id = ?";
		try
		{
			this.pstmt = this.connect.prepareStatement(DeleteSQL);
			this.pstmt.setString(1, d_id);
			this.pstmt.executeUpdate();
			this.pstmt.close();
		}
		catch(SQLException e)
		{
			e.printStackTrace();
		}
	}

	public void Updata(String u_id,String u_col)//修改訂單的訂單號和將要修改的列
	{
		SimpleDateFormat df = new SimpleDateFormat("yyyy-MM-dd");//設定日期格式
		String date = df.format(new Date());//獲取當前日期

		//更新資料用的SQL語句
		//該SQL語句: 選擇id為u_id(具體哪行看傳遞的引數)的行的u_col列(具體名稱看傳遞的引數)修改其資料
		String UpdataSQL = "UPDATE information SET "+ u_col+ "= ? WHERE id = ?";
		try
		{
			this.pstmt = this.connect.prepareStatement(UpdataSQL);
			this.pstmt.setString(1, date);
			this.pstmt.setString(2, u_id);
			this.pstmt.executeUpdate();
			JOptionPane.showMessageDialog(null, "訂單修改成功");//如果上句出現異常,將會跳過這句執行catch的提示
			this.pstmt.close();
		}
		catch(SQLException e)
		{
			e.printStackTrace();
		}

	}

	/*public static void main(String[] args)
	{
		SqlOperation s = new SqlOperation();
		ExpressInformation e;


		e = new ExpressInformation("37",2,"資訊","訂單","","");
		//s.Insert(e);
		s.Delete("37");
		//s.Updata("17","SendDate");
		s.Load();
		for(Iterator<ExpressInformation> it = s.getData().iterator();
				it.hasNext();)
		{
			e = it.next();
			System.out.println(e.getID());
			System.out.println(e.getAddressee());
			System.out.println(e.getSendDate());
		}
	}*/

}
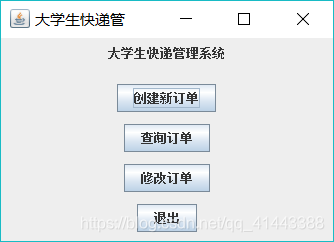
3.主選單介面

package System;

import java.awt.*;
import java.awt.event.ActionEvent;
import java.awt.event.ActionListener;
import javax.swing.*;
/*
 * 主選單介面,可以選擇讀取訂單,修改訂單,建立新訂單等
 */
@SuppressWarnings("serial")
public class MainMenu extends JFrame implements ActionListener
{
	JButton creat,query,modify,exit;//建立,查詢,修改,退出
	JLabel title;//用於寫標題的標籤
	JPanel jp1,jp2,jp3,jp4,jp5 = null;

	public MainMenu()
	{
		//容器初始化
		this.jp1 = new JPanel();
		this.jp2 = new JPanel();
		this.jp3 = new JPanel();
		this.jp4 = new JPanel();
		this.jp5 = new JPanel();

		//按鈕初始化
		this.creat = new JButton("建立新訂單");
		this.query = new JButton("查詢訂單");
		this.modify = new JButton("修改訂單");
		this.exit = new JButton("退出");

		//為按鈕新增監聽事件
		this.creat.addActionListener(this);
		this.query.addActionListener(this);
		this.modify.addActionListener(this);
		this.exit.addActionListener(this);

		//標籤初始化
		this.title = new JLabel("大學生快遞管理系統");

		//將元件裝入容器
		this.jp1.add(title);
		this.jp2.add(creat);
		this.jp3.add(query);
		this.jp4.add(modify);
		this.jp5.add(exit);

		//將所有容器裝入面板
		this.add(jp1);
	    this.add(jp2);
	    this.add(jp3);
	    this.add(jp4);
	    this.add(jp5);

	    //面板屬性設定
		this.setLayout(new GridLayout(5,1));
		this.setTitle("大學生快遞管理系統");
		this.setSize(350,250);
        this.setLocation(700, 200);
        this.setDefaultCloseOperation(JFrame.EXIT_ON_CLOSE);
        this.setVisible(true);
	}

	public void actionPerformed(ActionEvent e)
	{
		if(e.getActionCommand() == "建立新訂單")
		{
			this.dispose();
			CreatNewOrder creat_UI = new CreatNewOrder();//開啟建立訂單物件
		}
		else if(e.getActionCommand() == "查詢訂單")
		{
			this.dispose();
			QueryData query_UI = new QueryData();
		}
		else if(e.getActionCommand() == "修改訂單")
		{
			this.dispose();
			ModifyOrder modify_UI = new ModifyOrder();
		}
		else if(e.getActionCommand() == "退出")
		{
			this.dispose();
		}
	}


	public static void main(String[] args)
	{
		MainMenu test = new MainMenu();
		// TODO Auto-generated method stub

	}

}
4.建立訂單介面

新增的新訂單在資料庫中檢視

package System;

import Information.ExpressInformation;
import java.awt.GridLayout;
import java.awt.event.ActionEvent;
import java.awt.event.ActionListener;
import java.util.ArrayList;
import DataBaseOperation.*;

import javax.swing.*;

/*
 * 建立新訂單介面的GUI和建立新訂單的方法
 */
public class CreatNewOrder extends JFrame implements ActionListener
{
	JPanel jp1,jp2,jp3,jp4,jp5;//四個面板,用來放置標籤等元素
	JLabel id_l, sender_l, addressee_l;//標籤
	JTextField id_t, sender_t, addressee_t;//輸入快遞ID,寄送人,收件人資訊的文字框
	JRadioButton urgent, ordinary;//加急和普通件選項按鈕
	JButton clear, confirm, back;//清空文字框,確認,返回上一個頁面選項
	ButtonGroup bg; //按鈕群組,放置快遞類別按鈕

	public CreatNewOrder()
	{
		//面板初始化
		this.jp1 = new JPanel();
		this.jp2 = new JPanel();
		this.jp3 = new JPanel();
		this.jp4 = new JPanel();
		this.jp5 = new JPanel();

		//標籤建立
		this.id_l = new JLabel("快遞ID:");
		this.sender_l = new JLabel("寄件人姓名:");
		this.addressee_l = new JLabel("收件人姓名:");

		//建立文字輸入框
		this.id_t = new JTextField(20);
		this.sender_t = new JTextField(20);
		this.addressee_t = new JTextField(20);

		//快件分類選擇按鈕建立
		this.urgent = new JRadioButton("加急");
		this.ordinary = new JRadioButton("普通");

		this.bg = new ButtonGroup();
		this.bg.add(urgent);
		this.bg.add(ordinary);

		this.ordinary.setSelected(true);

		//建立操作按鈕
	    this.clear = new JButton("清空輸入內容");
	    this.confirm = new JButton("確認建立訂單");
	    this.back = new JButton("返回");

		//將各類元件加入面板
	    this.jp1.add(id_l);
	    this.jp1.add(id_t);

	    this.jp2.add(sender_l);
	    this.jp2.add(sender_t);

	    this.jp3.add(addressee_l);
	    this.jp3.add(addressee_t);

	    this.jp4.add(urgent);
	    this.jp4.add(ordinary);

	    this.jp5.add(clear);
	    this.jp5.add(confirm);
	    this.
