
Spring——筆記03
阿新 • • 發佈:2018-12-21
基於AspectJ的註解AOP操作
- 開啟AOP操作及類的配置
<!-- 開啟自動代理(aop操作的註解方式) -->
<aop:aspectj-autoproxy></aop:aspectj-autoproxy>

<!-- 建立物件 -->
<bean id="user" class="tqb.anno.test.User"></bean>
<bean id="myUser" class="tqb.anno.test.MyUser"></bean>
- 相關類
public class User { @Aspect
public class MyUser {
//切入點
@Before(value="execution(* tqb.anno.test.User.*(..))")
public void before(){
System.out.println("前置增強。。。。。。。。");
}
@AfterReturning(value="execution(* tqb.anno.test.User.*(..))")
public void after public class TestDemo {
@Test
public JdbcTemplate實現的crud操作
- 新增操作
public class InsertDemo {
	@Test
	public void insert(){
		DriverManagerDataSource dataSource = new DriverManagerDataSource();

		dataSource.setDriverClassName("com.mysql.jdbc.Driver");
		dataSource.setUrl("jdbc:mysql:///spring_03");
		dataSource.setUsername("root");
		dataSource.setPassword("");

		JdbcTemplate jdbcTemplate = new JdbcTemplate(dataSource);

		String sql = "insert into t_user value(?,?)";
		jdbcTemplate.update(sql,"zhangsan","123456");
	}
}
- 修改操作
public class UpdateDemo {
	@Test
	public void update(){
		DriverManagerDataSource dataSource = new DriverManagerDataSource();

		dataSource.setDriverClassName("com.mysql.jdbc.Driver");
		dataSource.setUrl("jdbc:mysql:///spring_03");
		dataSource.setUsername("root");
		dataSource.setPassword("123321tqb");

		JdbcTemplate jdbcTemplate = new JdbcTemplate(dataSource);

		String sql = "update t_user set password=? where username=?";
		jdbcTemplate.update(sql,"654321","zhangsan");
	}
}
- 刪除操作
public class DeleteDemo {
	@Test
	public void delete(){
		DriverManagerDataSource dataSource = new DriverManagerDataSource();

		dataSource.setDriverClassName("com.mysql.jdbc.Driver");
		dataSource.setUrl("jdbc:mysql:///spring_03");
		dataSource.setUsername("root");
		dataSource.setPassword("123321tqb");

		JdbcTemplate jdbcTemplate = new JdbcTemplate(dataSource);

		String sql = "delete from t_user where username=?";
		jdbcTemplate.update(sql,"zhangsan");
	}
}
-
查詢操作 注:查詢操作對於查出來的資料需要自己進行資料的封裝(大部分功能框架已實現,只需要實現RowMapper介面)
- 查詢具體的數值(如
select count(*) from t_user,這裡可直接採用Integer.class對資料進行封裝)
//返回具體的值 @Test public void update1(){ DriverManagerDataSource dataSource = new DriverManagerDataSource(); dataSource.setDriverClassName("com.mysql.jdbc.Driver"); dataSource.setUrl("jdbc:mysql:///spring_03"); dataSource.setUsername("root"); dataSource.setPassword("123321tqb"); JdbcTemplate jdbcTemplate = new JdbcTemplate(dataSource); String sql = "select count(*) from t_user"; Integer integer = jdbcTemplate.queryForObject(sql, Integer.class); System.out.println(integer); }- 返回一個物件(這裡需要實現RowMapper介面) 注:實現類MyRowMapper可以對單個物件(如:user)和List集合進行封裝,只不過查詢採用的方法不同,需要注意
public class MyRowMapper implements RowMapper<User>{

	@Override
	public User mapRow(ResultSet rs, int i) throws SQLException {
		String username = rs.getString("username");
		String password = rs.getString("password");

		User user = new User();
		user.setUsername(username);
		user.setPassword(password);

		return user;
	}
}
//返回物件 @Test public void update2(){ DriverManagerDataSource dataSource = new DriverManagerDataSource(); dataSource.setDriverClassName("com.mysql.jdbc.Driver"); dataSource.setUrl("jdbc:mysql:///spring_03"); dataSource.setUsername("root"); dataSource.setPassword("123321tqb"); JdbcTemplate jdbcTemplate = new JdbcTemplate(dataSource); String sql = "select * from t_user where username=?"; User user = jdbcTemplate.queryForObject(sql,new MyRowMapper(),"zhangsan"); System.out.println(user); }- 返回一個List集合
//返回list集合 @Test public void update3(){ DriverManagerDataSource dataSource = new DriverManagerDataSource(); dataSource.setDriverClassName("com.mysql.jdbc.Driver"); dataSource.setUrl("jdbc:mysql:///spring_03"); dataSource.setUsername("root"); dataSource.setPassword("123321tqb"); JdbcTemplate jdbcTemplate = new JdbcTemplate(dataSource); String sql = "select * from t_user"; List<User> list = jdbcTemplate.query(sql,new MyRowMapper()); System.out.println(list.get(0)); } - 查詢具體的數值(如
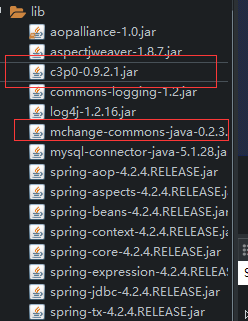
Spring配置c3p0連線池
- 匯入jar包(紅框)
- 配置xml檔案
	<!-- 配置c3p0連線池 -->
	<bean id="dataSource" class="com.mchange.v2.c3p0.ComboPooledDataSource">
		<property name="driverClass" value="com.mysql.jdbc.Driver"></property>
		<property name="jdbcUrl" value="jdbc:mysql:///spring_03"></property>
		<property name="user" value="root"></property>
		<property name="password" value=""></property>
	</bean>
DAO層使用JdbcTemplate
- xml配置(結合c3p0的配置)
<?xml version="1.0" encoding="UTF-8"?>
<beans xmlns="http://www.springframework.org/schema/beans"
    xmlns:xsi="http://www.w3.org/2001/XMLSchema-instance"
    xmlns:aop="http://www.springframework.org/schema/aop"
    xmlns:context="http://www.springframework.org/schema/context" xsi:schemaLocation="
        http://www.springframework.org/schema/beans http://www.springframework.org/schema/beans/spring-beans-4.3.xsd
        http://www.springframework.org/schema/context http://www.springframework.org/schema/context/spring-context.xsd
        http://www.springframework.org/schema/aop http://www.springframework.org/schema/aop/spring-aop.xsd">

	<!-- 配置c3p0連線池 -->
	<bean id="dataSource" class="com.mchange.v2.c3p0.ComboPooledDataSource">
		<property name="driverClass" value="com.mysql.jdbc.Driver"></property>
		<property name="jdbcUrl" value="jdbc:mysql:///spring_03"></property>
		<property name="user" value="root"></property>
		<property name="password" value=""></property>
	</bean>

	<bean id="userService" class="tqb.jdbc.test.c3p0.UserService">
		<property name="userDao" ref="userDao"></property>
	</bean>

	<bean id="userDao" class="tqb.jdbc.test.c3p0.UserDao">
		<property name="jdbcTemplate" ref="jdbcTemplate"></property>
	</bean>

	<bean id="jdbcTemplate" class="org.springframework.jdbc.core.JdbcTemplate">
		<property name="dataSource" ref="dataSource"></property>
	</bean>
</beans>
- 相關類
public class UserService {
	private UserDao userDao;

	public void setUserDao(UserDao userDao) {
		this.userDao = userDao;
	}

	public void add(){
		userDao.add();
	}
}
public class UserDao {

	private JdbcTemplate jdbcTemplate;

	public void setJdbcTemplate(JdbcTemplate jdbcTemplate) {
		this.jdbcTemplate = jdbcTemplate;
	}

	public void add() {
		String sql = "insert into t_user value(?,?)";
		int update = jdbcTemplate.update(sql,"lisi","111111");
		System.out.println(update);
	}
}
public class TestDemo {
	@Test
	public void test(){
		ApplicationContext context = new ClassPathXmlApplicationContext("applicationContext2.xml");
		UserService userService = (UserService) context.getBean("userService");
		userService.add();
	}
}
Spring的事務管理
- Spring事務的管理方式
- 程式設計式事務管理(不用)
- 宣告式事務管理
- xml配置實現
- 註解實現
- Spring事務管理的API
- 介面:PlatformTransactionManage:事務管理器
- 實現類:
- 使用Spring JDBC:DataSourceTransactionManage
- 使用Hibernate:HibernateTransactionManage
- 約束
<?xml version="1.0" encoding="UTF-8"?>
<beans xmlns="http://www.springframework.org/schema/beans"
        xmlns:xsi="http://www.w3.org/2001/XMLSchema-instance"
        xmlns:aop="http://www.springframework.org/schema/aop"
        xmlns:tx="http://www.springframework.org/schema/tx" xsi:schemaLocation="
        http://www.springframework.org/schema/beans http://www.springframework.org/schema/beans/spring-beans.xsd
        http://www.springframework.org/schema/tx http://www.springframework.org/schema/tx/spring-tx.xsd
        http://www.springframework.org/schema/aop http://www.springframework.org/schema/aop/spring-aop.xsd"> <!-- bean definitions here -->

</beans>
- 場景:轉賬服務(發生異常進行回滾,不修改資料)
- 配置檔案
<?xml version="1.0" encoding="UTF-8"?>
<beans xmlns="http://www.springframework.org/schema/beans"
	xmlns:xsi="http://www.w3.org/2001/XMLSchema-instance"
	xmlns:context="http://www.springframework.org/schema/context"
	xmlns:aop="http://www.springframework.org/schema/aop"
	xmlns:tx="http://www.springframework.org/schema/tx"
	xsi:schemaLocation="http://www.springframework.org/schema/beans
	http://www.springframework.org/schema/beans/spring-beans-4.3.xsd
	http://www.springframework.org/schema/context
	http://www.springframework.org/schema/context/spring-context.xsd
	http://www.springframework.org/schema/aop
	http://www.springframework.org/schema/aop/spring-aop.xsd
	http://www.springframework.org/schema/tx
	http://www.springframework.org/schema/tx/spring-tx.xsd">

	<!-- 配置c3p0連線池 -->
	<bean id="dataSource" class="com.mchange.v2.c3p0.ComboPooledDataSource">
		<property name="driverClass" value="com.mysql.jdbc.Driver"></property>
		<property name="jdbcUrl" value="jdbc:mysql:///spring_03"></property>
		<property name="user" value="root"></property>
		<property name="password" value=""></property>
	</bean>

	<bean id="userService" class="tqb.tx.test.UserService">
		<property name="userDao" ref="userDao"></property>
	</bean>

	<bean id="userDao" class="tqb.tx.test.UserDao">
		<property name="jdbcTemplate" ref="jdbcTemplate"></property>
	</bean>

	<bean id="jdbcTemplate" class="org.springframework.jdbc.core.	>
		<property name="dataSource" ref="dataSource"></property>
	</bean>

	<!-- 配置事務管理器 -->
	<bean id="transactionManager" class="org.springframework.jdbc.datasource.DataSourceTransactionManager">
		<!-- 注入dataSource -->
		<property name="dataSource" ref="dataSource"></property>
	</bean>

	<!-- 配置事務增強 -->
	<tx:advice id="adviceId" transaction-manager="transactionManager">
		<tx:attributes>
			<tx:method name="zhuanZhang"/><!-- zhuanZhang* -->
		</tx:attributes>
	</tx:advice>

	<aop:config