ubuntu搭建Gerrit程式碼稽核伺服器
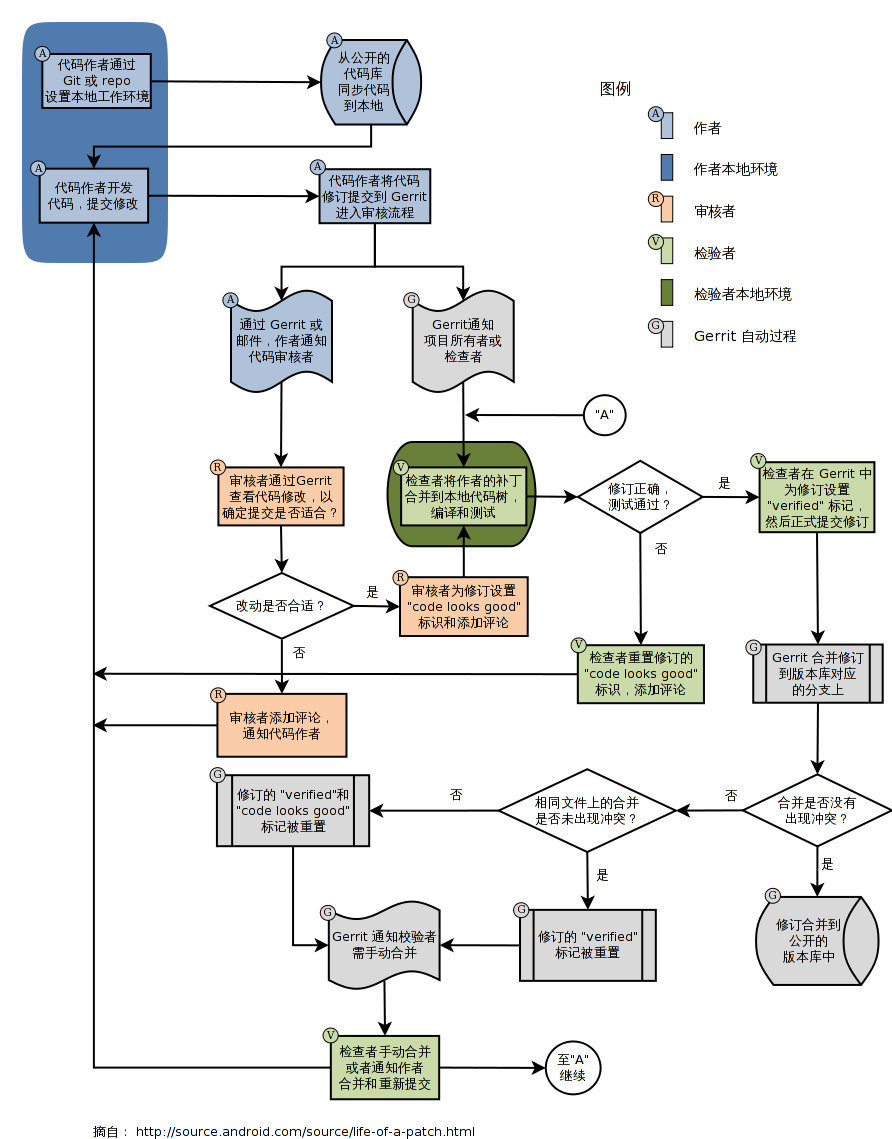
谷歌的 Android 開源專案在 Git 的使用上有兩個重要的創新,一個是為多版本庫協同而引入的 repo,另外一個重要的創新就是 Gerrit —— 程式碼稽核伺服器。Gerrit 為 git 引入的程式碼稽核是強制性的,就是說除非特別的授權設定,向 Git 版本庫的推送(Push)必須要經過 Gerrit 伺服器,修訂必須經過程式碼稽核的一套工作流之後,才可能經批准並納入正式程式碼庫中。
Gerrit工作原理和流程
首先貢獻者的程式碼通過 git 命令(或git review封裝)推送到 Gerrit 管理下的 Git 版本庫,推送的提交轉化為一個一個的程式碼稽核任務,稽核任務可以通過 refs/changes/下的引用訪問到。程式碼稽核者可以通過 Web 介面檢視稽核任務、程式碼變更,通過 Web 介面做出通過程式碼稽核或者打回等決定。
建立gerrit使用者
 sudo adduser gerrit
 #給使用者新增sudo許可權
 chmod u+w /etc/sudoers
 sudo vi /etc/sudoers
 #在root ALL=(ALL) ALL新增下面一行
 gerrit ALL=(ALL) ALL
 su gerrit
Gerrit安裝與配置
安裝Gerrit需要裝有最低1.6版本的JDK:
sudo apt-get install default-jre
sudo apt-get install git
安裝Gerrit
java -jar gerrit-2.11.war init -d review_site*** Git Repositories *** Location of Git repositories [git]: /home/gerrit/repositories *** SQL Database *** Database server type [h2]: postgresql Server hostname [localhost]: Server port [(postgresql default)]: Database name [reviewdb]: Database username [gerrit]: gerrit's password : confirm password : *** User Authentication *** Authentication method [OPENID/?]: http Get username from custom HTTP header [y/N]? SSO logout URL *** Review Labels *** Install Verified label [y/N]? y *** Email Delivery *** SMTP server hostname [localhost]: smtp.163.com SMTP server port [(default)]: 25 SMTP encryption [NONE/?]: SMTP username [gerrit]: your_name gerrit's password : confirm password : *** SSH Daemon *** Listen on address [*]: Listen on port [29418]: *** HTTP Daemon *** Behind reverse proxy [y/N]y Use SSL (https://) [y/N]? Listen on address [*]: Listen on port [8080]: 8081 Canonical URL [http://learnLinux:8081/]: http://localhost:8080 *** Plugins *** Installing plugins. Install plugin download-commands version v2.11 [y/N]? y Install plugin reviewnotes version v2.11 [y/N]? y Install plugin singleusergroup version v2.11 [y/N]? y Install plugin replication version v2.11 [y/N]? y Install plugin commit-message-length-validator version v2.11 [y/N]? y Initializing plugins.
- 59
Gerrit支援H2(內建) / MySQL / PostgreSQL資料庫,簡單使用預設資料庫H2,mysql和postgreSQL資料庫在認證人數比較多時選用.
Gerrit支援OpenID / HTTP / LDAP, 認證方式沒有選擇OpenId, 而是http, 因為這樣會使得gerrit對外部系統有依賴, 目前gerrit支援google和yahoo提供的openid.
選擇http需要反向代理支援, 這和http認證有關.
LDAP是輕量目錄訪問協議,英文全稱是Lightweight Directory Access Protocol,一般都簡稱為LDAP
配置檔案review_site/etc/gerrit.config,郵箱密碼存在review_site/etc/secure.config檔案中.
vi ./review_site/etc/gerrit.config
#將canonicalWebUrl修改為代理伺服器地址
[gerrit]
        basePath = /home/gerrit/repositories
        canonicalWebUrl = http://localhost:8090/
[database]
        type = postgresql
        hostname = localhost
        database = reviewdb
        username = gerrit
[index]
        type = LUCENE
[auth]
        type = HTTP
[sendemail]
        enable = true
        smtpServer = smtp.163.com
        smtpServerPort = 25
        smtpUser = [email protected]
        from = gerrit<[email protected]>
[sshd]
        listenAddress = *:29418
[httpd]
        listenUrl = proxy-http://*:8081/
[cache]
        directory = cache
vi etc/secure.config
[database]
password = your_password
[auth]
registerEmailPrivateKey = your_password
restTokenPrivateKey = your_password
[sendemail]
smtpPass = your_password配置nginx代理伺服器
nginx作為代理伺服器更加方便,在/etc/nginx/sites-enabled新增一個server模組
server {
     listen *:8090;
     server_name localhost;
     location / {
                auth_basic              "Welcomme to Gerrit Code Review Site";
                #確保passwd路徑正確
                auth_basic_user_file    /home/gerrit/review_site/etc/passwd;
                proxy_pass              http://localhost:8081;
                proxy_set_header        X-Forwarded-For $remote_addr;
                proxy_set_header        Host $host;
        }
        location /login/ {
                proxy_pass              http://localhost:8081;
                proxy_set_header        X-Forwarded-For $remote_addr;
                proxy_set_header        Host $host;
        }
   }
touch ./review_site/etc/passwd
#新增gerrit賬號
htpasswd -b ./review_site/etc/passwd yourname yourpassword
#重啟gerrit,賬號才會生效
./review_site/bin/gerrit.sh restart賬戶配置
第一次成功登入的使用者會被gerrit作為管理員使用者。登入後點擊右上角的”匿名懦夫”Anonymous Coward -> Settings來配置賬戶。 
新增SSH公鑰
要使用gerrit必須要提供使用者的公鑰。選擇頁面左側的SSH Public Keys為當前使用者新增公鑰。直接將公鑰貼上到Add SSH Public Key框內,然後點選add即可。
新增其他普通賬戶
如果採用http認證,那麼新增其他賬戶時,需要現新增http認證賬戶。用htpasswd建立的使用者時,並沒有往gerrit中新增賬號,只有當該使用者通過web登陸gerrit伺服器時,該賬號才會被新增進gerrit資料庫中。
為什麼不能Sign Out
也行你會發現用gerrit+HTTP認證,通過web登陸後,點選右上角的Sign Out無法登出。要麼是依然保持登陸的狀態,要麼就是直接出錯。
不要以為怎麼了,其實這是正常現象,以下這段話是從網上看到的:You are using HTTP Basic authentication. There is no way to tell abrowser to quit sending basic authentication credentials, to logout with basicauthentication is to close the Webbrowser.
SSH訪問
#預設使用.ssh/id_rsa.pub公鑰
ssh -p 29418 -i [email protected]

  ****    Welcome to Gerrit Code Review    ****

  Hi admin, you have successfully connected over SSH.

  Unfortunately, interactive shells are disabled.
  To clone a hosted Git repository, use:

  git clone ssh://[email protected]:29418/REPOSITORY_NAME.git

Connection to localhost closed.
git倉庫
新建一個gerritRepo倉庫,git clone http://127.0.0.1:8080/gerritRepo
在推送時
remote: Unauthorized
fatal: Authentication failed for 'http://[email protected]:8080/gerritRepo/'
改用ssh方式push
git remote remove origin
git remote add origin ssh://[email protected]:29418/gerritRepo
git push origin master
將commit提交到伺服器接受程式碼稽核。
remote: Branch refs/heads/master:
remote: You are not allowed to perform this operation.
remote: To push into this reference you need 'Push' rights.
remote: User: member
remote: Please read the documentation and contact an administrator
remote: if you feel the configuration is incorrect
remote: Processing changes: refs: 1, done
To ssh://[email protected]:29418/hello1
 ! [remote rejected] master -> master (prohibited by Gerrit)
error: 無法推送一些引用到 'ssh://[email protected]:29418/hello1'
這就是gerrit的精髓所在了。原因是gerrit不允許直接將本地修改同步到遠端倉庫。客戶機必須先push到遠端倉庫的refs/for/*分支上,等待稽核。這也是為什麼我們需要使用gerrit的原因。gerrit本身就是個程式碼稽核工具。
提交changes
gerrit專案分支許可權
#提交master分支
git push origin HEAD:refs/for/master
#提交所有分支
git push origin refs/heads/*:refs/for/*
#修改.git/config檔案,新增push時的引用
[remote "origin"]
        url = ssh://[email protected]:29418/hello1
        fetch = +refs/heads/*:refs/remotes/origin/*
        push = HEAD:refs/for/*
下載hook
再次推送到伺服器
remote: Processing changes: refs: 1, done
remote: ERROR: missing Change-Id in commit message footer
remote:
remote: Hint: To automatically insert Change-Id, install the hook:
remote:   gitdir=$(git rev-parse --git-dir); scp -p -P 29418 [email protected]:hooks/commit-msg ${gitdir}/hooks/
remote: And then amend the commit:
remote:   git commit --amend
remote:
To ssh://[email protected]:29418/hello1
 ! [remote rejected] master -> refs/for/master (missing Change-Id in commit message footer)
error: 無法推送一些引用到 'ssh://[email protected]:29418/gerritRepo'push時提示需要Change-Id在提交資訊中, 需要從gerrit server上下載一個指令碼
鉤子的目的是在提交資訊中自動建立 ‘Change-Id:’ 標籤
scp -p -P 29418 [email protected]:hooks/commit-msg gerritRepo/.git/hooks/
#修改上次提交記錄,或者再次提交修改
git commit --amend
remote: Processing changes: new: 1, refs: 1, done
remote:
remote: New Changes:
remote:   http://localhost:8081/2 vi README
remote:
To ssh://[email protected]:29418/gerritRepo
 * [new branch]      master -> refs/for/master
審查程式碼
配置專案許可權
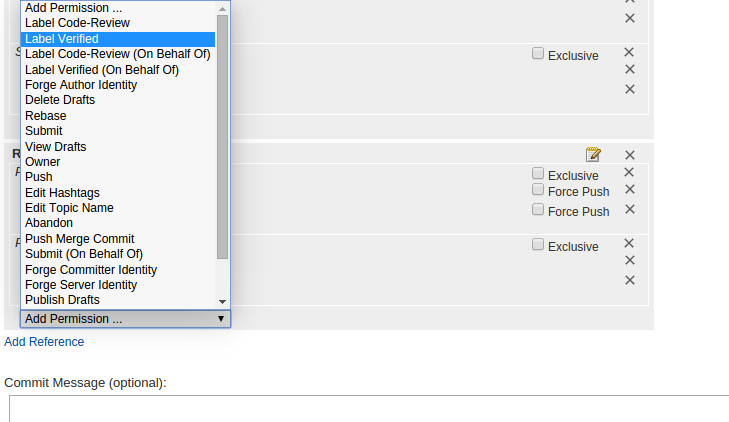

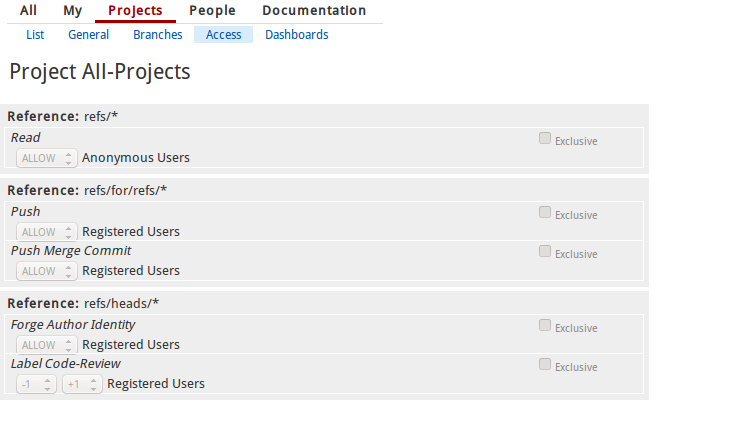
給refs/head/*分支Label Verified許可權新增使用者分組,這裡分配Administrators組.
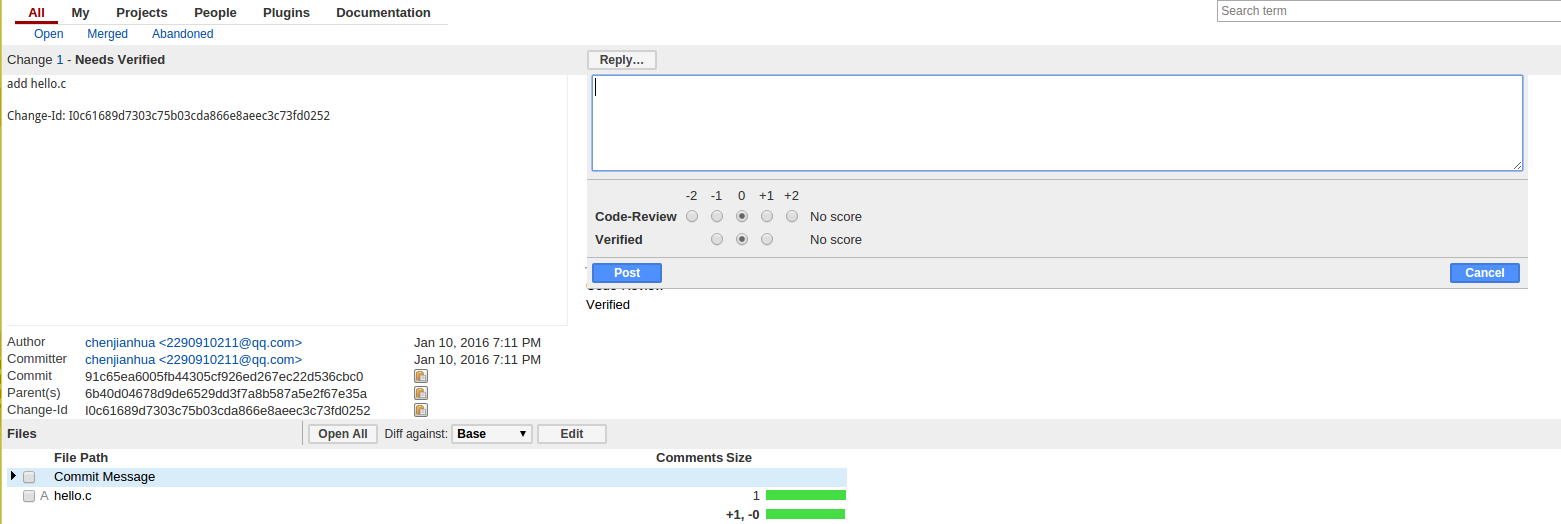
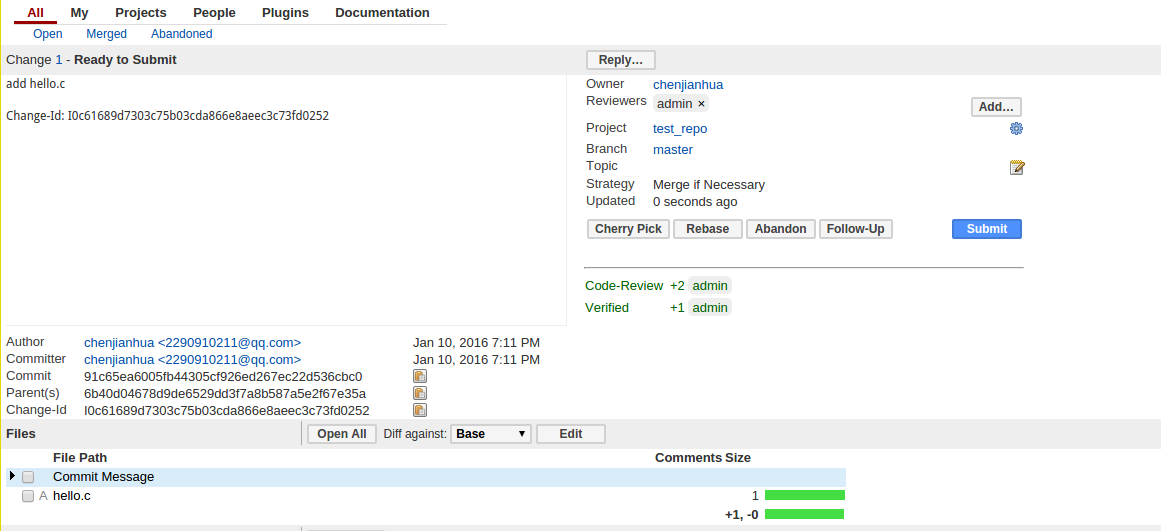
專案評審過程中,需要幾個條件,程式碼才能最終提交到分支
- Review >=+2
- Verify >=+1
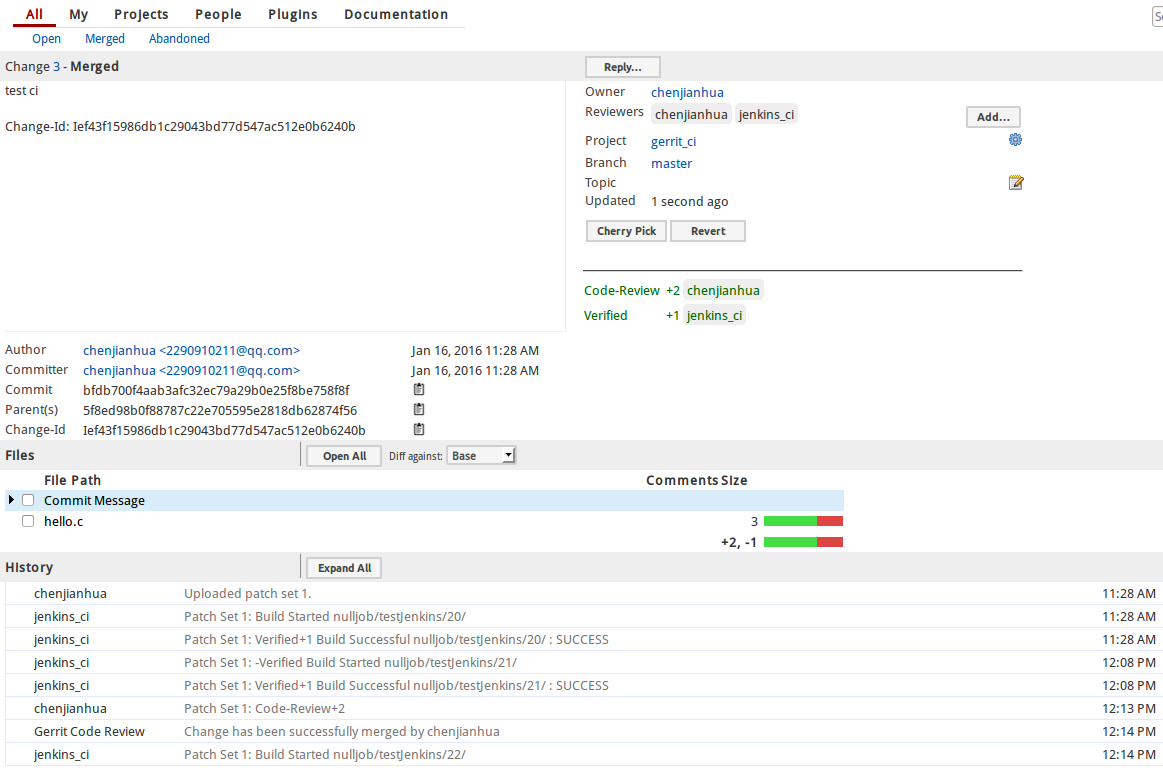
評審過程通常有三個人蔘與,程式碼提交,程式碼驗證(Verify),程式碼審查(Review). 通常由自動測試工具jenkins完成程式碼驗證(Verify).
Needs Verified , Needs Code-Review
驗證和審查通過後,顯示Ready to Submit狀態,現在就可以合併程式碼到head/*分支中
檢視合併結果
jenkins自動驗證
patch補丁集
開發者的程式碼需要先提交到refs/for/master分支上,變動的程式碼稱作補丁集,儲存在 refs/changes/* 名稱空間下.
git ls-remote
From ssh://[email protected]:29418/gerrit_ci
5f8ed98b0f88787c22e705595e2818db62874f56    HEAD
eeaef9da4ea27d7c23bfb5f9a2ed1b5357ebbba8    refs/changes/01/1/1
5f8ed98b0f88787c22e705595e2818db62874f56    refs/changes/02/2/1
bfdb700f4aab3afc32ec79a29b0e25f8be758f8f    refs/changes/03/3/1
5f8ed98b0f88787c22e705595e2818db62874f56    refs/heads/master
887107fcb25c48d1a1eb116ec466fc4f9b298a5c    refs/meta/config
21be8fce8a38d9437363128d214739c64bdd5710    refs/notes/review

#下載補丁
git fetch ssh://[email protected]:29418/gerrit_ci refs/changes/03/3/1
Draft草案
Topic主題
使用postgreSQL資料庫
安裝postgreSQL
sudo apt-get install postgresql
#次安裝後,會預設生成名為postgres的Linux系統使用者、資料庫和資料庫使用者(作為資料庫管理員),首先修改postgres資料庫使用者的密碼,然後增加Gerrit需要的資料庫
#切換到postgres使用者
sudo su postgres
#登入postgres資料庫
psql postgres
#修改postgres使用者登入密碼
ALTER USER postgres with PASSWORD 'password'
#輸入密碼
postgres=#
#輸入第二遍密碼
postgres=# \q

#建立gerrit使用者
CREATE USER gerrit WITH PASSWORD 'password';
#建立資料庫
CREATE DATABASE reviewdb OWNER gerrit;
#將reviewdb所有許可權賦予gerrit
GRANT ALL PRIVILEGES ON DATABASE reviewdb to gerrit;
#vi etc/gerrit.config
[database]
type = postgresql
hostname = localhost
database = reviewdb
username = gerrit
#vi etc/secure.config
[database]
password = password使用mysql資料庫
#連線資料庫
mysql -u root -p
#檢視幫助
help contents;
help Administration;
#建立gerrit使用者和reviewdb資料庫
CREATE USER 'git'@'localhost' IDENTIFIED BY 'git';
CREATE DATABASE reviewdb;
ALTER DATABASE reviewdb charset=latin1;
GRANT ALL ON reviewdb.* TO 'git'@'localhost';
FLUSH PRIVILEGES;
#檢視所有資料庫
SHOW DATABASES;
#檢視所有使用者
SELECT DISTINCT CONCAT('User: ''',user,'''@''',host,''';') AS query FROM mysql.user;
*** SQL Database
***
Database server type [h2]: mysql
Gerrit Code Review is not shipped with MySQL Connector/J 5.1.21
** This library is required for your configuration. **
Download and install it now [Y/n]? y
Downloading http://repo2.maven.org/maven2/mysql/mysql-connector-java/5.1.21/mysql-connector-java-5.1.21.jar ... OK
Checksum mysql-connector-java-5.1.21.jar OK
Server hostname [localhost]:
Server port [(mysql default)]: 3306
Database name [reviewdb]: reviewdb
Database username [gerrit]: gerrit
gerrit's password :
confirm password : 也可以將mysql-connector-Java-5.1.21.jar放入lib目錄下

