
struts2 個人隨筆
1.Struts 2及其優勢
Struts 2是一個MVC框架,以WebWork框架的設計思想為核心,吸收了Struts 1的部分優點
Struts 2擁有更加廣闊的前景,自身功能強大,還對其他框架下開發的程式提供很好的相容性
步驟1: 配置web.xml檔案

<filter>
    <filter-name>struts2</filter-name>
    <filter-class>org.apache.struts2.dispatcher.ng.filter.StrutsPrepareAndExecuteFilter</filter-class>
  </filter>
  <filter-mapping>
     <filter-name>struts2</filter-name>
     <!-- 攔截所有的action -->
     <url-pattern>/*</url-pattern>
 </filter-mapping>
步驟2:在src下建立名稱為struts.xml的配置檔案
<?xml version="1.0" encoding="UTF-8" ?>
<!DOCTYPE struts PUBLIC
    "-//Apache Software Foundation//DTD Struts Configuration 2.3//EN"
    "http://struts.apache.org/dtds/struts-2.3.dtd">

<struts>
    <!-- 配置檔案中只要新增以下配置,那麼以後修改配置檔案不用重啟tomcat -->
    <constant name="struts.devMode" value="true" />

    <package name="default" namespace="/" extends="struts-default">
        <!-- 第一個action的例子 -->
        <action name="helloWorld" class="cn.happy.action.HelloWorldAction">
            <result name="success">
               index.jsp
            </result>
        </action>
        <!-- 登陸的action -->
    </package>
    <!-- Add packages here -->

</struts>
步驟3:編寫HelloWorldAction
package cn.happy.action;

import com.opensymphony.xwork2.Action;

public class HelloWorldAction implements Action{
    private String name ;
    private String message;
    public String execute() throws Exception {
        setMessage("Hello"+getName());
        return "success";
    }
}
步驟4:建立index.jsp頁面
 <div>
        <h1>
            <!--顯示Struts Action中message的屬性內容-->
            <s:property value="message"/>
        </h1>
    </div>
    <div>
        <form action="helloWorld.action" method="post">
            請輸入您的姓名:
            <input name="name" type="text" />
            <input type="submit" value="提交" />
        </form>
    </div>
步驟5:通過瀏覽器訪問

點選提交後結果

2.struts配置檔案說明
<!-- 配置檔案中只要新增以下配置,那麼以後修改配置檔案不用重啟tomcat -->
<constant name="struts.devMode" value="true" />
一個警告的解決
問題描述:No configuration found for the specified action: 'login.action' in namespace: ''. Form action defaulting to 'action' attribute's literal value.
解析:
<s:form action="Login" method="post" namespace="/"> or <s:form action="/Login" method="post" >
3.登陸案例
步驟一:struts.xml檔案
 <!-- 登陸的action -->
        <action name="login" class="cn.happy.action.LoginAction">
           <result name="success">
               login/success.jsp
           </result>
           <result name="login">
               login/login.jsp
           </result>
        </action>
步驟二:LoginAction類的建立
package cn.happy.action;

import com.opensymphony.xwork2.Action;

public class LoginAction implements Action{
     private String username = "";
     private String password = "";
     public String execute() throws Exception {
        if (username.equals("1")&&password.equals("1")) {
            return SUCCESS;
        }else {
            return LOGIN;
        }

     }
}
步驟三:建立登陸介面
 <s:form name="form1" namespace="/" method="post" action="login">
       請輸入使用者名稱: <s:textfield name="username"></s:textfield> <br/>
        <s:textfield name="password"></s:textfield><br/>
        <s:submit value="登陸"></s:submit>
     </s:form>
步驟四:在瀏覽器中訪問


4.登陸案例強化:關於自動裝配問題
在開發中,通常會以JavaBean方式儲存資料。所以可以有如下寫法
Action類

Jsp頁面

在servlet中可以通過servlet API來獲取Session,在Struts中如何獲取Session呢?
解析:將使用者名稱放入session 兩種方案
1. 與Servlet API解耦的訪問方式
--->01.使用ActionContext類獲取ServletAPI物件對應的Map物件
--->02.Struts2向Action注入ServletAPI物件對應的Map物件
2. 與Servlet API耦合的訪問方式
解耦方式:
方案一: 對Servlet API進行封裝 ,藉助ActionContext
提供了三個Map物件訪問request、session、application作用域
通過ActionContext類獲取這三個Map物件
Object get("request")
Map getSession()
Map getApplication()
案例:登陸成功後,記錄使用者名稱到Session中,登陸失敗,跳會登陸頁面
步驟一:書寫Action

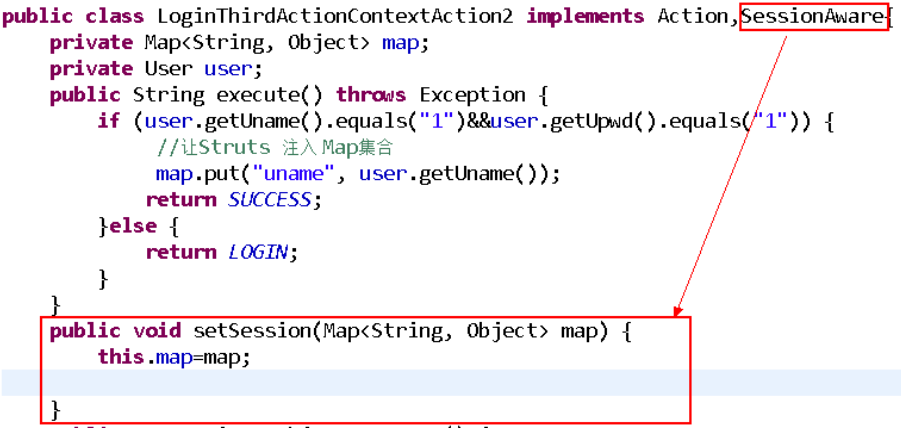
方案二:向Action中注入ServletAPI物件對應的Map物件
步驟一:書寫Action
耦合方式:
方式一:通過ActionContext的子類ServletActionContext實現

方式二:向Action例項注入Servlet API物件
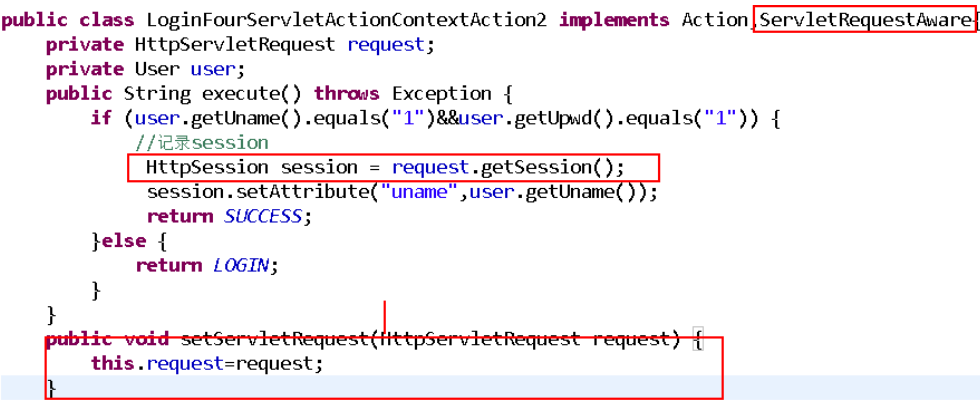
2.在Struts中如何儲存登陸使用者名稱 ,用Session機制
解析:在Servlet中如何獲取到Session物件?
----->request.getSession()
在Struts中如何獲取session物件
--->ActionContext類
在Struts中通過注入,核心介面 SessionAware: setSession(Map<String,Object> map);