
Spring Boot電商秒殺實戰 -- 1.基礎環境搭建
記錄學習總結
目標:
1.掌握Spring Boot環境搭建
2.掌握Lombok的整合使用
2.掌握Thymeleaf整合,Result結果封裝
3.掌握Mybatis+Druid整合
4.掌握Jedis整合+通用快取Key封裝
文章總體目錄
Spring Boot專案搭建
Spring Boot環境搭建
這裡使用 IDEA 來進行專案開發,提供了很方便了模板。


整合Lombok
1.選單欄File > Settings > Plugins > Browse repositories
2.搜尋 Lombok Plugin 安裝後,重啟IDEA即可生效

3.新增lombok依賴
        <!-- https://mvnrepository.com/artifact/org.projectlombok/lombok -->
        <dependency>
            <groupId>org.projectlombok</groupId>
            <artifactId>lombok</artifactId>
            <version>1.18.2</version>
            <optional>true</optional>
        </dependency>
4.編寫一個實體類 User,使用@Data註解(包含了set和get方法)
@Data
public class User {
    private int id;
    private String name;

}
其他的Lombok用法這裡不多說,大家可以自行查閱
整合Mybatis+Druid
1.在 pom.xml 新增依賴
<dependency>
    <groupId>mysql</groupId>
    <artifactId>mysql-connector-java</artifactId>
</dependency>

<dependency>
    <groupId>com.alibaba</groupId>
    <artifactId>druid</artifactId>
    <version>1.1.10</version>
</dependency>
2.在 application.properties 中新增相關配置
# mybatis
mybatis.type-aliases-package=com.chandler.seckill.domain
mybatis.configuration.map-underscore-to-camel-case=true
mybatis.configuration.default-fetch-size=100
mybatis.configuration.default-statement-timeout=3000
mybatis.mapperLocations = classpath:com/chandler/seckill/dao/*.xml
# druid
spring.datasource.url=jdbc:mysql://localhost:3306/seckill?useUnicode=true&characterEncoding=utf-8&allowMultiQueries=true&useSSL=false
spring.datasource.username=root
spring.datasource.password=root
spring.datasource.driver-class-name=com.mysql.jdbc.Driver
spring.datasource.type=com.alibaba.druid.pool.DruidDataSource
spring.datasource.filters=stat
spring.datasource.maxActive=2
spring.datasource.initialSize=1
spring.datasource.maxWait=60000
spring.datasource.minIdle=1
spring.datasource.timeBetweenEvictionRunsMillis=60000
spring.datasource.minEvictableIdleTimeMillis=300000
spring.datasource.validationQuery=select 'x'
spring.datasource.testWhileIdle=true
spring.datasource.testOnBorrow=false
spring.datasource.testOnReturn=false
spring.datasource.poolPreparedStatements=true
spring.datasource.maxOpenPreparedStatements=20
3.在DAO中新增相關注解
@Mapper
public interface UserDao {
    @Select("select * from user where id = #{id}")
    public User getById(@Param("id")int id);

    @Insert("insert into user(id,name) values(#{id},#{name})")
    public int insert(User user);
}
整合Thymeleaf
1.在 pom.xml 新增依賴
<dependency>
    <groupId>org.springframework.boot</groupId>
    <artifactId>spring-boot-starter-thymeleaf</artifactId>
</dependency>
2.在 application.properties 中新增相關配置
# thymeleaf
spring.thymeleaf.prefix=classpath:/templates/
spring.thymeleaf.suffix=.html
spring.thymeleaf.cache=false
spring.thymeleaf.servlet.content-type=text/html
spring.thymeleaf.enabled=true
spring.thymeleaf.encoding=UTF-8
spring.thymeleaf.mode=HTML5
整合Jedis
1.在 pom.xml 新增依賴
<dependency>
    <groupId>redis.clients</groupId>
    <artifactId>jedis</artifactId>
</dependency>
2.在 application.properties 中新增相關配置
#redis
redis.host=192.168.25.128
redis.port=6379
redis.timeout=3
redis.password=123456
redis.poolMaxTotal=10
redis.poolMaxIdle=10
redis.poolMaxWait=3
Result結果封裝
很多時候都是需要返回JSON物件,根據需求事先先封裝好一個結果物件,方便複用。
因為希望的返回結果形式為:
{
    code:0,
    msg:success,
    name:chandler
}
所有最終設計的Result結果類為:
@Data
public class Result<T> {

    private int code;
    private String msg;
    private T data;

    /**
     * 成功時的呼叫
     * @param data
     * @param <T>
     * @return
     */
    public static <T> Result<T> success(T data){
        return new Result<T>(data);
    }

    /**
     * 失敗時候的呼叫
     * @param cm
     * @param <T>
     * @return
     */
    public static <T> Result<T> error(CodeMsg cm){
        return new Result<T>(cm);
    }

    public Result(T data) {
        this.code = 0;
        this.msg = "success";
        this.data = data;
    }

    public Result(CodeMsg cm) {
        if (cm == null) {
            return;
        }
        this.code = cm.getCode();
        this.msg = cm.getMsg();
    }
}
@Data
@AllArgsConstructor
public class CodeMsg {

    private int code;
    private String msg;

    //通用異常

    public static CodeMsg SUCCESS = new CodeMsg(0,"success");
    public static CodeMsg SERVER_ERROR = new CodeMsg(500100,"服務端異常");

    //TODO其他異常

}
通用快取Key封裝
我們還需要建立一個 Redis 服務方便進行快取操作
先定義一個讀取application.properties檔案中 redis 配置的類
    @Component
    @Data
    @ConfigurationProperties(prefix = "redis")
    public class RedisConfig {
        private String host;
        private int port;
        private int timeout;//秒
        private String password;
        private int poolMaxTotal;
        private int poolMaxIdle;
        private int poolMaxWait;//秒

    }
有了配置檔案中的資訊我們在來建立一個工廠類,方便初始化 redis 連線池
    @Service
    public class RedisPoolFactory {

        @Autowired
        RedisConfig redisConfig;
        //註冊bean物件
        @Bean
        public JedisPool jedisPoolFactory(){
            JedisPoolConfig jedisPoolConfig = new JedisPoolConfig();
            jedisPoolConfig.setMaxIdle(redisConfig.getPoolMaxIdle());
            jedisPoolConfig.setMaxTotal(redisConfig.getPoolMaxTotal());
            jedisPoolConfig.setMaxWaitMillis(redisConfig.getPoolMaxWait());
            JedisPool jp = new JedisPool(jedisPoolConfig,redisConfig.getHost(),redisConfig.getPort(),redisConfig.getTimeout() * 1000,redisConfig.getPassword(),0);
            return jp;
        }
    }
為了方便我們在讀取 key 值的時候能夠顯示的讀取相關值且存入的key值 在不同模組間不同名重複和後期拓展,我們這裡稍微對讀取和儲存 key 值進行一點加工設計,實現了 KeyPrefix 介面和 BasePrefix 基礎抽象類,這樣其他模組的新增只需要繼承基礎抽象類即可。
- 介面擴充套件類
    public interface KeyPrefix {
        public int expireSeconds();
        public String getPrefix();
    }
- 基礎抽象類
    @AllArgsConstructor
    public abstract class BasePrefix implements KeyPrefix{
        private int expireSeconds;
        private String prefix;

        public BasePrefix(String prefix) {
            //0代表永不過期
            this(0,prefix);
        }

        @Override
        public int expireSeconds(){
            return expireSeconds;
        }

        @Override
        public String getPrefix() {
            String className = getClass().getSimpleName();
            return className+":"+prefix;
        }
    }
- 業務相關類
    public class OrderKey extends BasePrefix {
        public OrderKey(int expireSeconds, String prefix) {
            super(expireSeconds, prefix);
        }
    }


    public class UserKey extends BasePrefix {
        public UserKey(String prefix) {
            super(prefix);
        }
        public static UserKey getById = new UserKey("id");
        public static UserKey getByName = new UserKey("name");
    }
- 最後是比較關鍵的RedisService 服務類,快取相關操作都封裝在這個類中
@Service
    public class RedisService {

        @Autowired
        JedisPool jedisPool;

        /**
         * 獲取單個物件
         *
         * @param prefix
         * @param key
         * @param clazz
         * @param <T>
         * @return
         */
        public <T> T get(KeyPrefix prefix, String key, Class<T> clazz) {
            Jedis jedis = null;
            try {
                jedis = jedisPool.getResource();
                String realKey = prefix.getPrefix() + key;
                String str = jedis.get(realKey);
                T t = stringToBean(str, clazz);
                return t;
            } finally {
                returnToPool(jedis);
            }
        }

        /**
         * 設定物件
         * @param prefix
         * @param key
         * @param value
         * @param <T>
         * @return
         */
        public <T> boolean set(KeyPrefix prefix,String key,T value){
            Jedis jedis = null;
            try {
                jedis = jedisPool.getResource();
                String str = beanToString(value);
                if (str == null || str.length() <= 0) {
                    return false;
                }
                String realKey = prefix.getPrefix() + key;
                int seconds = prefix.expireSeconds();
                if (seconds <= 0){
                    jedis.set(realKey,str);
                } else {
                    jedis.setex(realKey,seconds,str);
                }
                return true;
            } finally {
                returnToPool(jedis);
            }
        }

        /**
         * 判斷 key 是否存在
         * @param prefix
         * @param key
         * @param <T>
         * @return
         */
        public <T> boolean exists(KeyPrefix prefix,String key){
            Jedis jedis = null;
            try {
                jedis = jedisPool.getResource();
                String realKey = prefix.getPrefix() + key;
                return jedis.exists(realKey);
            } finally {
                returnToPool(jedis);
            }
        }

        /**
         * 執行原子增加 key 值
         * @param prefix
         * @param key
         * @param <T>
         * @return
         */
        public <T> Long incr(KeyPrefix prefix,String key){
            Jedis jedis = null;
            try {
                jedis = jedisPool.getResource();
                String realKey = prefix.getPrefix() + key;
                return jedis.incr(realKey);
            } finally {
                returnToPool(jedis);
            }
        }

        /**
         * 減少 key 值
         * @param prefix
         * @param key
         * @param <T>
         * @return
         */
        public <T> Long decr(KeyPrefix prefix,String key){
            Jedis jedis = null;
            try {
                jedis = jedisPool.getResource();
                String realKey = prefix.getPrefix() + key;
                return jedis.decr(realKey);
            } finally {
                returnToPool(jedis);
            }
        }

        private <T> String beanToString(T value) {
            if (value == null) {
                return null;
            }
            Class<?> clazz = value.getClass();
            if (clazz == int.class || clazz == Integer.class){
                return ""+value;
            } else if (clazz == Long.class || clazz == long.class){
                return "" + value;
            } else if (clazz == String.class){
                return (String) value;
            } else {
                return JSON.toJSONString(value);
            }
        }

        private <T> T stringToBean(String str, Class<T> clazz) {
            if (str == null || str.length() <= 0 || clazz == null) {
                return null;
            }
            if (clazz == int.class || clazz == Integer.class) {
                return (T) Integer.valueOf(str);
            } else if (clazz == String.class) {
                return (T) str;
            } else if (clazz == Long.class || clazz == long.class) {
                return (T) Long.valueOf(str);
            } else {
                return JSON.toJavaObject(JSON.parseObject(str), clazz);
            }
        }

        private void returnToPool(Jedis jedis) {
            if (jedis != null) {
                jedis.close();
            }
        }
    }
測試驗證
環境都搭建配置之後測試是必不可少的環節,開始動手搞起來。
1.建立測試 TestController 類
@Controller
@RequestMapping("/test")
public class TestController {
@Autowired
UserService userService;
@Autowired
RedisService redisService;
@RequestMapping("/hello")
@ResponseBody
public Result<String> home(){
return Result.success("Hello world");
}
@RequestMapping("/error")
@ResponseBody
public Result<String> error(){
return Result.error(CodeMsg.SERVER_ERROR);
}
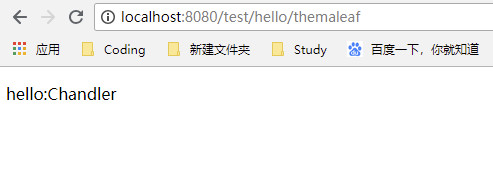
@RequestMapping("/hello/themaleaf")
public String themaleaf(Model model){
model.addAttribute("name","Chandler");
return "hello";
}
@RequestMapping("/db/get")
@ResponseBody
public Result<User> dbGet(){
User user = userService.getById(1);
return Result.success(user);
}
@RequestMapping("/redis/get")
@ResponseBody
public Result<User> redisGet(){
User user = redisService.get(UserKey.getById,""+1,User.class);
return Result.success(user);
}
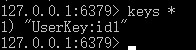
@RequestMapping("/redis/set")
@ResponseBody
public Result<Boolean> redisSet(){
User user =new User();
user.setId(1);
user.setName("Chandler");
redisService.set(UserKey.getById,""+1,user);
return Result.success(true);
}
}
2.測試Result類是否能夠返回我們需要的json格式


3.測試Themaleaf是否配置成功
4.測試User類是否正常

5.測試Redis配置是否成功


進入 Redis 中檢視
這樣大概的環境流程驗證OK,接下來就可以開始實現功能開發了~~