(轉)python 全棧開發,Day68(Django的路由控制)
昨日內容回顧

1 MVC和MTV MTV 路由控制層(分發哪一個路徑由哪一個檢視函式處理) V : views (邏輯處理) T : templates (存放html檔案) M : model (與資料庫打交道) 2 建立專案: django-admin startproject mysite mysite manage.py : 啟動檔案 互動檔案 mysite settings.py :配置檔案 urls.py :路由控制層(分發哪一個路徑由哪一個檢視函式處理) wsgi.py :socket 建立應用: python manage.py startapp app01 mysite manage.py : 啟動檔案 互動檔案 mysite settings.py :配置檔案 urls.py :路由控制層(分發哪一個路徑由哪一個檢視函式處理) wsgi.py :socket app01 views : 存放檢視函式檔案 models :資料庫打交道 app02 views : 存放檢視函式檔案 models :資料庫打交道View Code3 執行專案: python manage.py runserver 127.0.0.1 8800 4 示例1: 檢視時間 127.0.0.1 8800/timer/ from app01 import views from app02 import views as v2 (1)在urls.py設計路由 : path('timer/',views.timer), (2)在views.py設計檢視函式處理timer請求,響應一個HttpResponse(字串) 示例2: 位址列輸入url:127.0.0.1 8800/login/ 看到登陸頁面 (1)在urls.py設計路由 : path('login/',views.login), (2)在views.py設計檢視函式處理login請求(get), def login(request): render(request,"login.html") 響應一個HttpResponse(login.html) 示例3:點選submit按鈕,傳送post請求,url:127.0.0.1 8800/login/ def login(request): if request.method=="POST": user=request.POST.get("user") pwd=request.POST.get("pwd") if 1: return else: return... else: render(request,"login.html") 5 理解render(後端) 工作流程: return render(request,"login.html") return render(request, "app01/timer.html", {"t":ctime}) 1 按著settings-TEMPLATES-DIRS路徑找指定檔案 2 讀取檔案所有字串 3 渲染: 檢查字串中是否有{{變數}} , if 沒有找到: HttpResponse(檔案字串) else 找到 {{t}},用render第三個引數中的對應值進行相應替換(如果沒有找到對應值,{{t}}---空) HttpResponse(替換後的檔案字串) 6 配置檔案
最先進入的是路由控制層,然後一級級處理。
如果只有一個應用使用views。
如果有多個應用,使用別名。比如v2
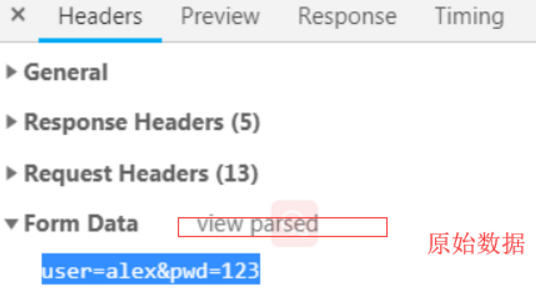
昨天提到的表單提交,使用控制檯檢視Form Data,資料展示是這樣的。
點選view source,顯示原始資料

顯示格式,是用&來區分一個變數。

在HTTP協議裡面,POST請求資料,是在請求體裡面的。裡面一堆字串,它最後的資料,是user=alex&pwd
那麼django的wsgi模組將請求資料提取出來,構成字典,方便檢視函式呼叫。比如:
user = request.POST.get('user')  # 獲取使用者名稱
pwd = request.POST.get('pwd')  # 獲取密碼
對於Django而言,一次請求必須返回一個HttpResponse(字串)例項物件
render的工作流程,在上面摺疊部分提到了。需要注意的是,html出現的{{t}},被替換成一個時間戳變數。這個過程是在django後端完成的,不是前端完成的。
因為瀏覽器它不認識{{}} 這種符號,它只認識html,css,js的程式碼。
關於settings.py裡面,關於靜態檔案配置
STATIC_URL = '/static/'

STATICFILES_DIRS = (
    os.path.join(BASE_DIR,"static"),
)
STATIC_URL和STATICFILES_DIRS 這2個引數,缺一不可。
django必須用別名,代指物理路徑。也就是STATIC_URL 代指STATICFILES_DIRS 路徑
不能直接用物理路徑引用,比如html引用jquery,程式碼如下:
<script src="../static/jquery.js"></script>
雖然這樣寫是用相對路徑引用的,但是不推薦這樣寫。
正確寫法:
<script src="/static/jquery.js"></script>
注意:上面的static,是別名,不是物理路徑。
它是用別名代指物理路徑的。
訪問statics裡面的靜態檔案,可以直接訪問的。它在django原始碼裡面定義好了
所以urls.py裡面不需要定義statics,就可以直接訪問。
訪問頁面時,它會渲染成完整的url,比如下面這樣。

一、Django的路由控制
URL配置(URLconf)就像Django 所支撐網站的目錄。它的本質是URL與要為該URL呼叫的檢視函式之間的對映表;你就是以這種方式告訴Django,對於客戶端發來的某個URL呼叫哪一段邏輯程式碼對應執行。
一般來說,一個路徑對應一個檢視函式。它並非一一對應!
多個路徑可以對應一個檢視函式,但是一個路徑,不能對應多個檢視函式。
簡單的路由配置
舉例1:
建立應用app01,新增一個路徑index,修改urls.py檔案

from django.contrib import admin
from django.urls import path
from app01 import views

urlpatterns = [
    path('admin/', admin.site.urls),
    path('index/', views.index),
]
View Code
新建index檢視函式,修改views.py檔案

from django.shortcuts import render,HttpResponse

# Create your views here.
def index(request):
    return HttpResponse("INDEX")
View Code
訪問首頁:
http://127.0.0.1:8000/index/
網頁效果如下:

訪問這種路徑http://127.0.0.1:8000/index/xiao ,網頁提示404錯誤。
在urls.py中新增re_path模組,它是為了相容django 1.0版本的路由寫法。使用正則匹配

from django.contrib import admin
from django.urls import path,re_path
from app01 import views

urlpatterns = [
    path('admin/', admin.site.urls),
    # path('index/', views.index),
    re_path('^index/$', views.index),  #效果同上
]
View Code
訪問http://127.0.0.1:8000/index/,效果同上。後面加別的字串,就會報404
再次修改urls.py,去除^和$

urlpatterns = [
    path('admin/', admin.site.urls),
    # path('index/', views.index),
    re_path('index/', views.index),
]
View Code
訪問http://127.0.0.1:8000/index/,是正常的。
訪問http://127.0.0.1:8000/index/xiao,也是正常的。what?這不科學!

那麼re_path實際上做了什麼事情呢?
看下面一段python程式碼

import re

result = re.search('index/','/index/xiao')
print(result)
View Code
執行輸出:
<_sre.SRE_Match object; span=(1, 7), match='index/'>
如果匹配不上,輸出None
其實re_path,相當於執行了re.search。那麼要完全匹配'index/',比如要^和$才行。
匹配之後,會呼叫index檢視函式,傳入引數request,比如:index(request)
所以檢視函式,必須加request
舉例2:
增加一個路徑

from django.contrib import admin
from django.urls import path,re_path
from app01 import views

urlpatterns = [
    path('admin/', admin.site.urls),
    # path('index/', views.index),
    re_path('^index/$', views.index),  # index(request)
    re_path(r'^articles/2003/$', views.special_year),
]
View Code
增加檢視函式special_year

def special_year(request):
    return HttpResponse("2003")
View Code
訪問url:http://127.0.0.1:8000/articles/2003/
網頁效果:

匹配年份,它是4位數字的,修改urls.py

urlpatterns = [
    path('admin/', admin.site.urls),
    # path('index/', views.index),
    re_path('^index/$', views.index),  # index(request)
    re_path(r'^articles/2003/$', views.special_year), # special_year(request)
    re_path(r'^articles/\d{4}/$', views.article_year), # article_year(request)
]
View Code
增加檢視函式article_year

def article_year(request):
    return HttpResponse("year")
View Code
訪問url:http://127.0.0.1:8000/articles/2005/
網頁效果:

訪問url:http://127.0.0.1:8000/articles/20/ 就會提示404,因為它不足4位
舉例3:
現在想要網頁根據路徑,動態顯示年份,怎麼做呢?
這個時候,需要用到正則分組。當re_path檢測到分組時,會將分組的值,傳給檢視函式。
注意:如果是無命名分組,它是位置引數。如果是有名分組,它是關鍵字傳參。
無命名分組

urlpatterns = [
    path('admin/', admin.site.urls),
    # path('index/', views.index),
    re_path('^index/$', views.index),  # index(request)
    re_path(r'^articles/2003/$', views.special_year), # special_year(request)
    re_path(r'^articles/(\d{4})/$', views.article_year), # article_year(request,分組匹配的值)
]
View Code
修改article_year檢視函式,它必須接收一個位置引數,否則報錯
下面程式碼的year是一個形參,叫什麼名字都無所謂。
叫abc都行,隨你喜歡

def article_year(request,year):
    return HttpResponse(year)
View Code
訪問url:http://127.0.0.1:8000/articles/2080/
網頁效果如下:

新增url,獲取月份,修改urls.py

urlpatterns = [
    path('admin/', admin.site.urls),
    # path('index/', views.index),
    re_path('^index/$', views.index),  # index(request)
    re_path(r'^articles/2003/$', views.special_year), # special_year(request)
    re_path(r'^articles/(\d{4})/$', views.article_year), # article_year(request,分組匹配的值)
    re_path(r'^articles/(\d{4})/(\d{2})/$', views.article_month), # article_month(request,value1,value2)
]
View Code
新增article_month檢視函式,它必須接收2個額外的引數,否則報錯

def article_month(request,year,month):
    return HttpResponse('{}-{}'.format(year,month))
View Code
訪問url:http://127.0.0.1:8000/articles/2080/10/
網頁效果如下:

注意:如果檢視函式用不到引數,正則部分不要加括號。
訪問url:http://127.0.0.1:8000
網頁提示404

這樣使用者體驗不好,怎麼辦呢?在index下面,加入以下的url規則
re_path('^$', views.index),
再次訪問頁面,輸出:

匹配年月日,新增一條規則。

urlpatterns = [
    path('admin/', admin.site.urls),
    path('index/', views.index),
    re_path('^$', views.index),
    re_path('^index/$', views.index),  # index(request)
    re_path(r'^articles/(\d{4})/$', views.article_year), # article_year(request,分組匹配的值)
    re_path(r'^articles/2003/$', views.special_year), # special_year(request)
    re_path(r'^articles/(\d{4})/(\d{2})/$', views.article_month), # article_month(request,value1,value2)
    re_path(r'^articles/(\d{4})/(\d{2})/(\d{2})/$', views.article_day), # article_month(request,value1,value2,value3)

]
View Code
新增article_day檢視函式,它必須接收3個額外的引數,否則報錯

def article_day(request,year,month,day):
    return HttpResponse('{}-{}-{}'.format(year,month,day))
View Code
訪問url:http://127.0.0.1:8000/articles/2080/10/12
網頁效果如下:

注意:上面的分組,不建議使用。它是無名分組,推薦使用有名分組。
如果檢視函式,引數位置變動了。那麼頁面訪問,就亂套了。
修改article_day檢視函式,引數的位置

def article_day(request,day,month,year):
    return HttpResponse('{}-{}-{}'.format(year,month,day))
View Code
再次訪問網頁,頁面輸出:

因為urls.py是按照順序傳參給檢視函式的。
舉例4:
看下面的幾個例子,就能方便理解了。

from django.urls import path,re_path

from app01 import views

urlpatterns = [
    re_path(r'^articles/2003/$', views.special_case_2003),
    re_path(r'^articles/([0-9]{4})/$', views.year_archive),
    re_path(r'^articles/([0-9]{4})/([0-9]{2})/$', views.month_archive),
    re_path(r'^articles/([0-9]{4})/([0-9]{2})/([0-9]+)/$', views.article_detail),
]
View Code
注意:
- 若要從URL 中捕獲一個值,只需要在它周圍放置一對圓括號。
- 不需要新增一個前導的反斜槓,因為每個URL 都有。例如,應該是
^articles而不是^/articles。 - 每個正則表示式前面的'r' 是可選的但是建議加上。它告訴Python 這個字串是“原始的” —— 字串中任何字元都不應該轉義
示例:

一些請求的例子:

/articles/2005/03/ 請求將匹配列表中的第三個模式。Django 將呼叫函式views.month_archive(request, '2005', '03')。
/articles/2005/3/ 不匹配任何URL 模式,因為列表中的第三個模式要求月份應該是兩個數字。
/articles/2003/ 將匹配列表中的第一個模式不是第二個,因為模式按順序匹配,第一個會首先測試是否匹配。請像這樣自由插入一些特殊的情況來探測匹配的次序。
/articles/2003 不匹配任何一個模式,因為每個模式要求URL 以一個反斜線結尾。
/articles/2003/03/03/ 將匹配最後一個模式。Django 將呼叫函式views.article_detail(request, '2003', '03', '03')。
View Code
有名分組
上面的示例使用簡單的、沒有命名的正則表示式組(通過圓括號)來捕獲URL 中的值並以位置 引數傳遞給檢視。在更高階的用法中,可以使用命名的正則表示式組來捕獲URL 中的值並以關鍵字 引數傳遞給檢視。
在Python 正則表示式中,命名正則表示式組的語法是(?P<name>pattern),其中name 是組的名稱,pattern 是要匹配的模式。
使用有名分組,可以解決上面,因為檢視函式,引數位置變動而導致頁面顯示混亂的情況。
修改url規則

urlpatterns = [
    path('admin/', admin.site.urls),
    path('index/', views.index),
    re_path('^$', views.index),
    re_path('^index/$', views.index),  # index(request)
    re_path(r'^articles/(\d{4})/$', views.article_year), # article_year(request,分組匹配的值)
    re_path(r'^articles/2003/$', views.special_year), # special_year(request)
    re_path(r'^articles/(\d{4})/(\d{2})/$', views.article_month), # article_month(request,value1,value2)
    # article_month(request,year=value1,month=value2,day=value3)
    re_path(r'^articles/(?P<year>\d{4})/(?P<month>\d{2})/(?P<day>\d{2})/$', views.article_day),

]
View Code
再次訪問頁面,顯示就不會混亂了。

如果檢視函式的變數名,更改了呢?

def article_day(request,d,month,year):
    return HttpResponse('{}-{}-{}'.format(year,month,d))
View Code
再次訪問頁面,報錯!

提示找不到關鍵字引數day
在講無命名分組的時候,提到檢視函式的形參名,可以隨便定義。但是有命名分組,名字必須一一對應。
關鍵字引數在於,先賦值,再傳參。所以檢視函式,必須一一對應才行。
下面是以上URLconf 使用命名組的重寫:

from django.urls import path,re_path

from app01 import views

urlpatterns = [
    re_path(r'^articles/2003/$', views.special_case_2003),
    re_path(r'^articles/(?P<year>[0-9]{4})/$', views.year_archive),
    re_path(r'^articles/(?P<year>[0-9]{4})/(?P<month>[0-9]{2})/$', views.month_archive),
    re_path(r'^articles/(?P<year>[0-9]{4})/(?P<month>[0-9]{2})/(?P<day>[0-9]{2})/$', views.article_detail),
]
View Code
這個實現與前面的示例完全相同,只有一個細微的差別:捕獲的值作為關鍵字引數而不是位置引數傳遞給檢視函式。例如:

/articles/2005/03/ 請求將呼叫views.month_archive(request, year='2005', month='03')函式,而不是views.month_archive(request, '2005', '03')。

 /articles/2003/03/03/ 請求將呼叫函式views.article_detail(request, year='2003', month='03', day='03')。
View Code
在實際應用中,這意味你的URLconf 會更加明晰且不容易產生引數順序問題的錯誤 —— 你可以在你的檢視函式定義中重新安排引數的順序。當然,這些好處是以簡潔為代價;
分發
1個Django 專案裡面有多個APP目錄,大家共有一個 url容易造成混淆。於是路由分發讓每個APP的擁有了自己單獨的url,方便以後的維護管理。
現在不想將所有的url放到一個py檔案裡面,需要根據應用名,來拆分。
看urls.py的說明

Including another URLconf
    1. Import the include() function: from django.urls import include, path
    2. Add a URL to urlpatterns:  path('blog/', include('blog.urls'))
View Code
意思就是:先匯入include方法,再新增URL模式的URL
在urls.py匯入include方法:
from django.urls import path,re_path,include
新增獨立的url檔案,在app01目錄下建立app01_urls.py,將urls.py相關的內容複製過去

from django.urls import path,re_path,include
from app01 import views
urlpatterns = [
    re_path(r'^articles/(\d{4})/$', views.article_year),  # article_year(request,分組匹配的值)
    re_path(r'^articles/2003/$', views.special_year),  # special_year(request)
    re_path(r'^articles/(\d{4})/(\d{2})/$', views.article_month),  # article_month(request,value1,value2)
    # article_month(request,year=value1,month=value2,day=value3)
    re_path(r'^articles/(?P<year>\d{4})/(?P<month>\d{2})/(?P<day>\d{2})/$', views.article_day),
]
View Code
修改urls.py,刪除多餘的程式碼
注意:app01後面,必須有斜槓,否則頁面無法訪問。

from django.contrib import admin
from django.urls import path,re_path,include
from app01 import views

urlpatterns = [
    path('admin/', admin.site.urls),
    path('index/', views.index),
    re_path('^$', views.index),
    re_path('^index/$', views.index),  # index(request)

    path('app01/', include('app01.app01_urls')),
]
View Code
訪問原來的url,提示404。

因為路由分發了,所以訪問時,必須加應用名。
訪問url:http://127.0.0.1:8000/app01/articles/2003/
頁面訪問正常。

再增加一個應用,也是可以的。比如:
path('app02/', include('app01.app02_urls')),
由於這裡只有一個應用,所以可以更改路由分發,將url訪問方式還原為之前的。

urlpatterns = [
    path('admin/', admin.site.urls),
    path('index/', views.index),
    re_path('^$', views.index),
    re_path('^index/$', views.index),  # index(request)

    re_path('^', include('app01.app01_urls')),
]
View Code
訪問原來的url: http://127.0.0.1:8000/articles/2003/
效果是一樣的。

反向解析
在使用Django 專案時,一個常見的需求是獲得URL 的最終形式,以用於嵌入到生成的內容中(檢視中和顯示給使用者的URL等)或者用於處理伺服器端的導航(重定向等)。人們強烈希望不要硬編碼這些URL(費力、不可擴充套件且容易產生錯誤)或者設計一種與URLconf 毫不相關的專門的URL 生成機制,因為這樣容易導致一定程度上產生過期的URL。
在需要URL 的地方,對於不同層級,Django 提供不同的工具用於URL 反查:
- 在模板中:使用url 模板標籤。
- 在Python 程式碼中:使用
from django.urls import reverse()函式
做一個登陸頁面
修改app01_urls.py,新增login路徑

urlpatterns = [
    re_path(r'^articles/(\d{4})/$', views.article_year),  # article_year(request,分組匹配的值)
    re_path(r'^articles/2003/$', views.special_year),  # special_year(request)
    re_path(r'^articles/(\d{4})/(\d{2})/$', views.article_month),  # article_month(request,value1,value2)
    # article_month(request,year=value1,month=value2,day=value3)
    re_path(r'^articles/(?P<year>\d{4})/(?P<month>\d{2})/(?P<day>\d{2})/$', views.article_day),

    path('login/', views.login),
]
View Code
修改views.py,增加login檢視函式

def login(request):
    return render(request,"login.html")
View Code
在mysite目錄下建立templates,注意:是有manage.py檔案的mysite目錄。
在templates目錄下建立檔案login.html

<!DOCTYPE html>
<html lang="en">
<head>
    <meta charset="UTF-8">
    <title>Title</title>

</head>
<body>
<form action="/login/" method="post">
    <lable>使用者名稱</lable><input type="text" name="user"/>
    <lable>使用者名稱</lable><input type="password" name="pwd"/>
    <input type="submit">
</form>

</body>
</html>
View Code
修改settings.py-->MIDDLEWARE-->關閉CSRF

MIDDLEWARE = [
    'django.middleware.security.SecurityMiddleware',
    'django.contrib.sessions.middleware.SessionMiddleware',
    'django.middleware.common.CommonMiddleware',
    # 'django.middleware.csrf.CsrfViewMiddleware',
    'django.contrib.auth.middleware.AuthenticationMiddleware',
    'django.contrib.messages.middleware.MessageMiddleware',
    'django.middleware.clickjacking.XFrameOptionsMiddleware',
]
View Code
修改settings.py-->TEMPLATES-->指定templates模板目錄

TEMPLATES = [
    {
        'BACKEND': 'django.template.backends.django.DjangoTemplates',
        'DIRS': [os.path.join(BASE_DIR, 'templates')],
        'APP_DIRS': True,
        'OPTIONS': {
            'context_processors': [
                'django.template.context_processors.debug',
                'django.template.context_processors.request',
                'django.contrib.auth.context_processors.auth',
                'django.contrib.messages.context_processors.messages',
            ],
        },
    },
]
View Code
訪問url:http://127.0.0.1:8000/login/
輸入表單資料,單擊提交。頁面還是會回到登陸頁面!至於登陸認證,下面會講到。稍安勿躁!

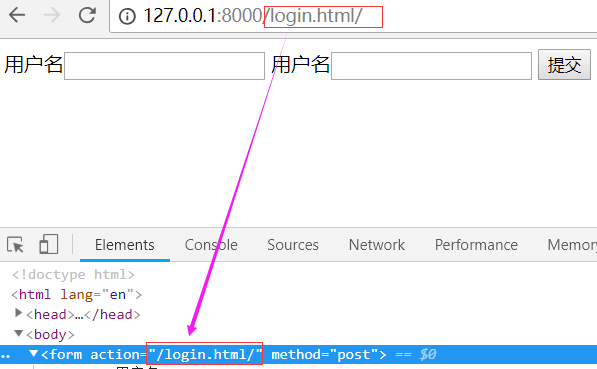
假設說,業務線的url要更改了,改為http://127.0.0.1:8000/login.html/
怎麼辦呢?修改修改app01_urls.py的login路徑
path('login.html/', views.login),
訪問新的url:http://127.0.0.1:8000/login.html/
頁面訪問正常,輸入表單資料

點選提交的時候,出現404。因為表單的action屬性,指向的還是login頁面,但是它已經不存在了!

來一個簡單粗暴的方法,直接修改action的屬性為/login.html/,再次訪問頁面,重新提交。ok,正常了!
這只是一個html檔案,如果有多個怎麼辦?一個個改?太浪費時間了!
如果交接給新人,再有變動時,他需要在專案裡面,一個個找!
現在問題的核心點,是更改了url。現有一個反向解析技術,能完美解決這個問題。
修改修改app01_urls.py,增加一個別名
path('login.html/', views.login, name="login_in"),
這個別名,它代指的是這一條url。此時login_in對應的值是路徑login.html/
更改login.html檔案,需要用到一個特殊寫法,來引用url變數
<form action="{% url 'login_in' %}" method="post">
它表示從url檔案(urls.py)中,呼叫變數login_in。利用render將頁面渲染,返回給瀏覽器。
重新訪問url:http://127.0.0.1:8000/login.html/
使用控制檯檢視html程式碼,發現action的屬性,就是login.html。說明已經被後端給渲染出來了

再次提交表單,就不會出現404錯誤了!
這就是反向解析,路徑會變,但是別名不會變。別名是隨著路徑的變動而變動的。
推薦以後寫頁面,使用反向解析。
增加登入驗證
修改檢視函式login

def login(request):
    if request.method == "POST":
        user = request.POST.get("user")
        pwd = request.POST.get("pwd")
        if user == 'xiao' and pwd == '123':
            return HttpResponse("登入成功!")
    return render(request,"login.html")

