
SpringBoot簡單整合Swagger2
阿新 • • 發佈:2018-12-22
Swagger是什麼
Swagger 是一系列 RESTful API 的工具,通過 Swagger 可以獲得專案的一種互動式文件,客戶端 SDK 的自動生成等功能。
使用 Spring Boot 整合 Swagger 的理念是,使用註解來標記出需要在 API 文件中展示的資訊,Swagger 會根據專案中標記的註解來生成對應的 API 文件。Swagger 被號稱世界上最流行的 API 工具,它提供了 API 管理的全套解決方案,API 文件管理需要考慮的因素基本都包含,這裡將講解最常用的定製內容。
簡單使用
1.建立springboot專案
2.引入swagger2的依賴
<dependency>
			<groupId>io.springfox</groupId>
			<artifactId>springfox-swagger2</artifactId>
			<version>2.8.0</version>
		</dependency>
		<dependency>
			<groupId>io.springfox</groupId>
			<artifactId>springfox-swagger-ui</artifactId>
			<version>2.8.0</version>
		</dependency>
3.建立配置類:
@Configuration //啟動時載入此類
@EnableSwagger2 //表示此專案啟用 Swagger API 文件
public class SwaggerConfig {
@Bean
public Docket api() {
return new Docket(DocumentationType.SWAGGER_2)
.apiInfo(apiInfo())
.select()
// 自行修改為自己的包路徑
. 4.啟動application;訪問 http://localhost:8080/swagger-ui.html ,發現報錯:
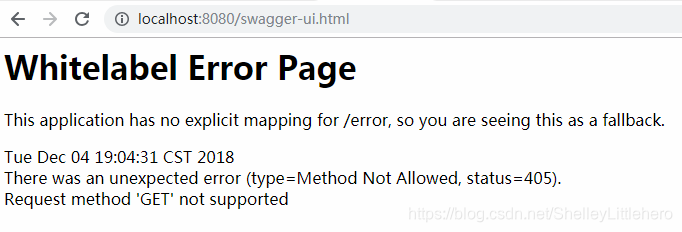
這是由於在專案中出現了一個很不起眼的錯誤:
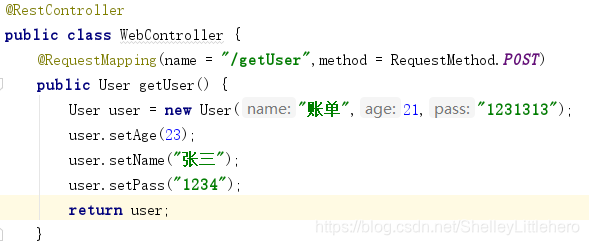
注意:
需要注意的是:WebController中出現了@RequestMapping(name="/getUser")應為@RequestMapping(value="/getUser"),修改過之後可以訪問頁面,我推測,在Springboot啟動過程中應該是對註解做了校驗的;後期可以研究一下.

Swagger常用註解
| 作用範圍 | API | 使用位置 |
|---|---|---|
| 協議集描述 | @Api | 用於 Controller 類上 |
| 協議描述 | @ApiOperation | 用在 Controller 的方法上 |
| 非物件引數集 | @ApiImplicitParams | 用在 Controller 的方法上 |
| 非物件引數描述 | @ApiImplicitParam | 用在 @ApiImplicitParams 的方法裡邊 |
| 響應集 | @ApiResponses | 用在 Controller 的方法上 |
| 響應資訊引數 | @ApiResponse | 用在 @ApiResponses 裡邊 |
| 描述返回物件的意義 | @ApiModel | 用在返回物件類上 |
| 物件屬性 | @ApiModelProperty | 用在出入引數物件的欄位上 |