
深入解析Angular Component的原始碼示例
本篇文章主要介紹了剖析Angular Component的原始碼示例,寫的十分的全面細緻,具有一定的參考價值,對此有需要的朋友可以參考學習下。如有不足之處,歡迎批評指正。

Web Component
定義
W3C為統一元件化標準方式,提出Web Component的標準。
每個元件包含自己的html、css、js程式碼。
Web Component標準包括以下四個重要的概念:
1.Custom Elements(自定義標籤):可以建立自定義 HTML 標記和元素;
2.HTML Templates(HTML模版):使用 標籤去預定義一些內容,但並不載入至頁面,而是使用 JS 程式碼去初始化它;
3.Shadow DOM(虛擬DOM):可以建立完全獨立與其他元素的DOM子樹;
4.HTML Imports(HTML匯入):一種在 HTML 文件中引入其他 HTML 文件的方法,。
概括來說就是,可以建立自定義標籤來引入元件是前端元件化的基礎,在頁面引用 HTML 檔案和 HTML 模板是用於支撐編寫元件檢視和元件資源管理,而 Shadow DOM 則是隔離元件間程式碼的衝突和影響。
示例
定義hello-component
<template id="hello-template">
  <style>
    h1 {
      color: red;
    }
  </style>
  <h1>Hello Web Component!</h1>
</template>

<script>

  // 指向匯入文件,即本例的index.html
  var indexDoc = document;

  // 指向被匯入文件,即當前文件hello.html
  var helloDoc = (indexDoc._currentScript || indexDoc.currentScript).ownerDocument;

  // 獲得上面的模板
  var tmpl = helloDoc.querySelector('#hello-template');

  // 建立一個新元素的原型,繼承自HTMLElement
  var HelloProto = Object.create(HTMLElement.prototype);

  // 設定 Shadow DOM 並將模板的內容克隆進去
  HelloProto.createdCallback = function() {
    var root = this.createShadowRoot();
    root.appendChild(indexDoc.importNode(tmpl.content, true));
  };

  // 註冊新元素
  var hello = indexDoc.registerElement('hello-component', {
    prototype: HelloProto
  });
</script>
使用hello-component
<!DOCTYPE html>
<html lang="zh-cn">
<head>
<meta charset="UTF-8">
<meta http-equiv="X-UA-COMPATIBLE" content="IE=edge">
<meta name="viewport" content="width=device-width, initial-scale=1">
<meta name="author" content="賴祥燃, [email protected] 從以上程式碼可看到,hello.html 為按標準定義的元件(名稱為 hello-component ),在這個元件中有自己的結構、樣式及邏輯,然後在 index.html 中引入該元件檔案,即可像普通標籤一樣使用。
Angular Component
Angular Component屬於指令的一種,可以理解為擁有模板的指令。其它兩種是屬性型指令和結構型指令。
基本組成
@Component({
  selector: 'demo-component',
  template: 'Demo Component'
})
export class DemoComponent {}
- 元件裝飾器:每個元件類必須用@component進行裝飾才能成為Angular元件。
- 元件元資料:元件元資料:selector、template等,下文將著重講解每個元資料的含義。
- 元件類:元件實際上也是一個普通的類,元件的邏輯都在元件類裡定義並實現。
- 元件模板:每個元件都會關聯一個模板,這個模板最終會渲染到頁面上,頁面上這個DOM元素就是此元件例項的宿主元素。
元件元資料
自身元資料屬性

從 core/Directive 繼承
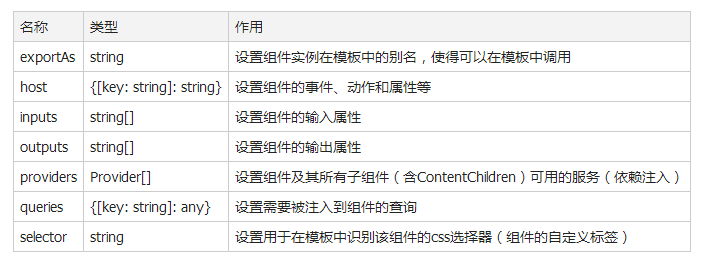
幾種元資料詳解
以下幾種元資料的等價寫法會比元資料設定更簡潔易懂,所以一般推薦的是等價寫法。
inputs
@Component({
  selector: 'demo-component',
  inputs: ['param']
})
export class DemoComponent {
  param: any;
}
等價於:
@Component({
  selector: 'demo-component'
})
export class DemoComponent {
  @Input() param: any;
}
outputs
@Component({
  selector: 'demo-component',
  outputs: ['ready']
})
export class DemoComponent {
  ready = new eventEmitter<false>();
}
等價於:
@Component({
  selector: 'demo-component'
})
export class DemoComponent {
  @Output() ready = new eventEmitter<false>();
}
host
@Component({
  selector: 'demo-component',
  host: {
    '(click)': 'onClick($event.target)', // 事件
    'role': 'nav', // 屬性
    '[class.pressed]': 'isPressed', // 類
  }
})
export class DemoComponent {
  isPressed: boolean = true;

  onClick(elem: HTMLElement) {
    console.log(elem);
  }
}
等價於:
@Component({
  selector: 'demo-component'
})
export class DemoComponent {
  @HostBinding('attr.role') role = 'nav';
  @HostBinding('class.pressed') isPressed: boolean = true;


  @HostListener('click', ['$event.target'])
  onClick(elem: HTMLElement) {
    console.log(elem);
  }
}
queries - 檢視查詢
@Component({
  selector: 'demo-component',
  template: `
    <input #theInput type='text' />
    <div>Demo Component</div>
  `,
  queries: {
    theInput: new ViewChild('theInput')
  }
})
export class DemoComponent {
  theInput: ElementRef;
}
等價於:
@Component({
  selector: 'demo-component',
  template: `
    <input #theInput type='text' />
    <div>Demo Component</div>
  `
})
export class DemoComponent {
  @ViewChild('theInput') theInput: ElementRef;
}
queries - 內容查詢
<my-list>
  <li *ngFor="let item of items;">{{item}}</li>
</my-list>

@Directive({
  selector: 'li'
})
export class ListItem {}

@Component({
  selector: 'my-list',
  template: `
    <ul>
      <ng-content></ng-content>
    </ul>
  `,
  queries: {
    items: new ContentChild(ListItem)
  }
})
export class MyListComponent {
  items: QueryList<ListItem>;
}
等價於:
@Component({
  selector: 'my-list',
  template: `
    <ul>
      <ng-content></ng-content>
    </ul>
  `
})
export class MyListComponent {
  @ContentChild(ListItem) items: QueryList<ListItem>;
}
styleUrls、styles
styleUrls和styles允許同時指定。
優先順序:模板內聯樣式 > styleUrls > styles。
建議:使用styleUrls引用外部樣式表文件,這樣程式碼結構相比styles更清晰、更易於管理。同理,模板推薦使用templateUrl引用模板檔案。
changeDetection
ChangeDetectionStrategy.Default:元件的每次變化監測都會檢查其內部的所有資料(引用物件也會深度遍歷),以此得到前後的資料變化。
ChangeDetectionStrategy.OnPush:元件的變化監測只檢查輸入屬性(即@Input修飾的變數)的值是否發生變化,當這個值為引用型別(Object,Array等)時,則只對比該值的引用。
顯然,OnPush策略相比Default降低了變化監測的複雜度,很好地提升了變化監測的效能。如果元件的更新只依賴輸入屬性的值,那麼在該元件上使用OnPush策略是一個很好的選擇。
encapsulation
ViewEncapsulation.None:無 Shadow DOM,並且也無樣式包裝。
ViewEncapsulation.Emulated:無 Shadow DOM,但是通過Angular提供的樣式包裝機制來模擬元件的獨立性,使得元件的樣式不受外部影響,這是Angular的預設設定。
ViewEncapsulation.Native:使用原生的 Shadow DOM 特性。
生命週期
當Angular使用建構函式新建元件後,就會按下面的順序在特定時刻呼叫這些生命週期鉤子方法:

結語
感謝您的觀看,如有不足之處,歡迎批評指正。
本次給大家推薦一個免費的學習群,裡面概括移動應用網站開發,css,html,webpack,vue node angular以及面試資源等。
對web開發技術感興趣的同學,歡迎加入Q群:864305860,不管你是小白還是大牛我都歡迎,還有大牛整理的一套高效率學習路線和教程與您免費分享,同時每天更新視訊資料。
最後,祝大家早日學有所成,拿到滿意offer,快速升職加薪,走上人生巔峰。