
OpenCv-C++-小案例實戰-切邊(二)
阿新 • • 發佈:2018-12-23
接上篇文章…
一般的,一個掃描的檔案是不可能完完全全擺正了的。它多多少少會有些傾斜。
現在有如下圖片:

它逆時針進行了旋轉,那麼想要把多餘的白邊去掉且擺正應該怎麼做呢?
步驟如下:
1、邊緣檢測
2、找出輪廓
3、找出最小外接矩形,獲得旋轉的角度
4、根據旋轉的角度進行仿射變換
5、按切邊的操作進行
程式碼(沒有用到的已註釋):
#include<opencv2/opencv.hpp> #include<iostream> #include<math.h> using namespace cv; using namespace std; Mat src, dst, gray_src; int current_level = 50; int max_level = 255; void cut_image(int, void*); void rotating_image(int, void*); const char* output_title = "rectminArea"; int main(int argc, char**argv) { src = imread("D:/test/切邊測試圖-旋轉.png", 1); if (src.empty()) { cout << "圖片未找到" << endl; return -1; } //namedWindow(output_title,CV_WINDOW_AUTOSIZE); //createTrackbar("Value", output_title, ¤t_level, max_level, cut_image); //cut_image(0,0); //影象切邊 rotating_image(0,0); // 將影象旋轉成正的 imshow("input image", src); waitKey(0); return 0; } //將影象旋轉成正的 void rotating_image(int, void*) { /*1、邊緣檢測 2、找出輪廓 3、找出最小外接矩形,獲得旋轉的角度 4、仿射變換 5、按切邊的操作進行 */ Mat canny_out; Canny(src, canny_out, current_level, 2 * current_level, 3, false); imshow("canny_out",canny_out); float minw = 0; float minh = 0; double angle = 0; vector<vector<Point>> contours; vector<Vec4i> hierarchy; findContours(canny_out, contours,hierarchy, RETR_TREE,CHAIN_APPROX_SIMPLE, Point(0, 0)); Mat showImg= Mat::zeros(src.size(), CV_8UC3);; RNG rng(12345); for (size_t t = 0; t < contours.size(); t++) { RotatedRect minrect = minAreaRect(contours[t]); angle = minrect.angle; if (angle != 0) { minh = max(minh,minrect.size.height); minw = max(minw,minrect.size.width); } } printf("minw:%f\n", minw); printf("minh:%f\n", minh); printf("angle:%f\n", angle);//值為負數,說明逆時針旋轉,值為正數,說明順時針旋轉 for (size_t t = 0; t < contours.size(); t++) { RotatedRect minrect = minAreaRect(contours[t]); if (minrect.size.height== minh && minrect.size.width == minw) { Point2f pts[4]; minrect.points(pts); for (int i = 0; i < 4; i++) { Scalar color = Scalar(rng.uniform(0, 255), rng.uniform(0, 255), rng.uniform(0, 255)); line(showImg, pts[i], pts[(i + 1) % 4], color, 2, 8, 0); } } } imshow("showImg", showImg); Mat dst; Point2f center(src.cols/2, src.rows/2); Mat rota = getRotationMatrix2D(center, angle, 1.0); warpAffine(src, dst, rota, src.size(), INTER_LINEAR,0,Scalar(255,255,255)); imshow("correct image",dst); //影象切邊 } //影象切邊 void cut_image(int, void*) { Mat canyImg; cvtColor(src, gray_src, CV_BGR2GRAY); Canny(gray_src, canyImg, current_level, 2 * current_level, 3,false); vector<vector<Point>> contours; vector<Vec4i>hierachy; Mat showImg = Mat::zeros(src.size(), CV_8UC3); findContours(canyImg, contours, hierachy, RETR_TREE, CHAIN_APPROX_SIMPLE, Point(0, 0)); RNG rng(12345); int minw = src.cols*0.75; int minh = src.rows*0.75; Rect box; //獲取roi區域 Mat contoursimg= Mat::zeros(src.size(), CV_8UC3); for (size_t t = 0; t < contours.size(); t++) { Scalar color = Scalar(rng.uniform(0, 255), rng.uniform(0, 255), rng.uniform(0, 255)); drawContours(contoursimg, contours, int(t), color, 1, 8, hierachy, 0, Point(0, 0)); RotatedRect minrect = minAreaRect(contours[t]); //獲取輪廓的最小外接矩形 float angle = abs(minrect.angle); if (minrect.size.height > minh && minrect.size.width > minw && minrect.size.width < (src.cols - 5)) { Point2f pts[4]; minrect.points(pts); //獲取最小外接矩形的四個頂點座標 for(int i=0;i<4;i++) { line(showImg,pts[i], pts[(i + 1) % 4], color, 2, 8, 0); cout << "X座標:" << minrect.center.x <<" "<< "Y座標:" << minrect.center.y << " "<<"偏移角度:" << angle << endl; } box = minrect.boundingRect(); } if (box.width > 0 && box.height > 0) { Mat roiImg=src(box);//擷取roi區域 imshow("roiImg", roiImg); } } imshow(output_title, showImg); imshow("contours image", contoursimg); } /* //做旋轉圖片的程式碼 int main() { Mat src = imread("D:/test/切邊測試圖.png"); imshow("src", src); double angle = 45; Point2f center(src.cols / 2, src.rows / 2); Mat rot = getRotationMatrix2D(center, angle, 1); Rect bbox = RotatedRect(center, src.size(), angle).boundingRect(); rot.at<double>(0, 2) += bbox.width / 2.0 - center.x; rot.at<double>(1, 2) += bbox.height / 2.0 - center.y; Mat dst; warpAffine(src, dst, rot, bbox.size(),1,0,Scalar(255,255,255)); imshow("dst", dst); imwrite("D:/test/切邊測試圖-旋轉.png",dst); waitKey(0); return 0; } */
執行結果:


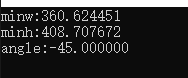
由此可以知道,該圖片旋轉的角度是-45度,也就是逆時針旋轉了45度。
那麼就可以進行仿射變換:
Mat dst;
	Point2f center(src.cols/2, src.rows/2);
	Mat rota = getRotationMatrix2D(center, angle, 1.0);
	warpAffine(src, dst, rota, src.size(), INTER_LINEAR,0,Scalar(255,255,255));
	imshow("correct image",dst);
最終的結果是:

接下來就是切邊的操作了,這裡參考上一篇文章:
https://blog.csdn.net/Daker_Huang/article/details/85033368