八款 Python GUI 開發框架
PyQt 很多人在用,但用在公司的產品上,可能要考慮授權或付費問題。使用較多人在用的,遇到問題時會有比較多人幫忙解決。
Kivy
Kivy是一個開源工具包能夠讓使用相同原始碼建立的程式能跨平臺執行。它主要關注創新型使用者介面開發,如:多點觸控應用程式。Kivy還提供一個多點觸控滑鼠模擬器。當前支援的平臺包括:Linux、Windows、Mac OS X和Android。
Kivy擁有能夠處理動畫、快取、手勢、繪圖等功能。它還內建許多使用者介面控制項如:按紐、攝影機、表格、Slider和樹形控制項等。
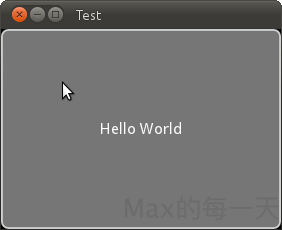
程式範例:
from kivy.app import App from kivy.uix.buttonimport Button class TestApp(App): def build(self): return Button(text='Hello World') TestApp().run()
執行畫面:
Flexx
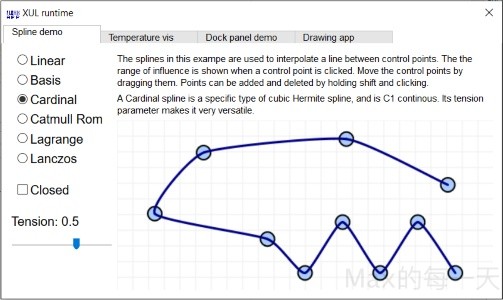
Flexx 是一個純 Python 工具包,用來建立圖形化介面應用程式。其使用 Web 技術進行介面的渲染。你可以用 Flexx 來建立桌面應用,同時也可以匯出一個應用到獨立的 HTML 文件。因為使用純 Python 開發,所以 Flexx 是跨平臺的。只需要有 Python 和瀏覽器就可以執行。
執行畫面:
PyQt
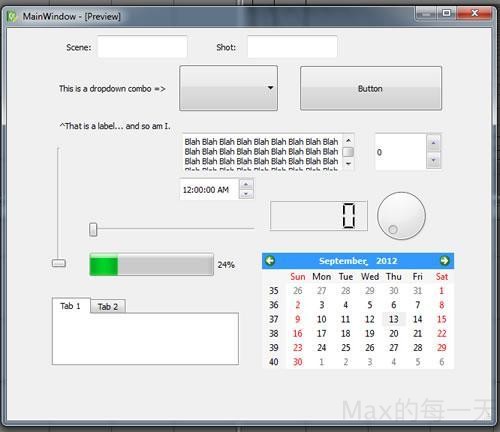
PyQt是Qt庫的Python版本。PyQt3支援Qt1到Qt3。 PyQt4支援Qt4。它的首次發布也是在1998年,但是當時它叫 PyKDE,因為開始的時候SIP和PyQt沒有分開。PyQt是用SIP寫的。PyQt 提供 GPL版和商業版。意思是使用 PyQt 做出商業用途是需要付錢的。
wxPython
wxPython 是 Python 語言的一套優秀的 GUI 圖形庫,允許 Python 程式設計師很方便的建立完整的、功能鍵全的 GUI 使用者介面。 wxPython 是作為優秀的跨平臺 GUI 庫 wxWidgets 的 Python 封裝和 Python 模組的方式提供給使用者的。
就如同Python和wxWidgets一樣,wxPython也是一款開源軟體,並且具有非常優秀的跨平臺能力,能夠執行在32位windows、絕大多數的Unix或類Unix系統、Macintosh OS X上。
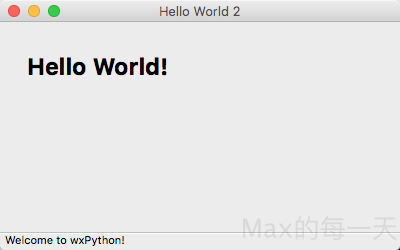
範例程式:
#!/bin/python
"""
Hello World, but with more meat.
"""

import wx

class HelloFrame(wx.Frame):
    """
    A Frame that says Hello World
    """

    def __init__(self, *args, **kw):
        # ensure the parent's __init__ is called
        super(HelloFrame, self).__init__(*args, **kw)

        # create a panel in the frame
        pnl = wx.Panel(self)

        # and put some text with a larger bold font on it
        st = wx.StaticText(pnl, label="Hello World!", pos=(25,25))
        font = st.GetFont()
        font.PointSize += 10
        font = font.Bold()
        st.SetFont(font)

        # create a menu bar
        self.makeMenuBar()

        # and a status bar
        self.CreateStatusBar()
        self.SetStatusText("Welcome to wxPython!")


    def makeMenuBar(self):
        """
        A menu bar is composed of menus, which are composed of menu items.
        This method builds a set of menus and binds handlers to be called
        when the menu item is selected.
        """

        # Make a file menu with Hello and Exit items
        fileMenu = wx.Menu()
        # The "\t..." syntax defines an accelerator key that also triggers
        # the same event
        helloItem = fileMenu.Append(-1, "&Hello...\tCtrl-H",
                "Help string shown in status bar for this menu item")
        fileMenu.AppendSeparator()
        # When using a stock ID we don't need to specify the menu item's
        # label
        exitItem = fileMenu.Append(wx.ID_EXIT)

        # Now a help menu for the about item
        helpMenu = wx.Menu()
        aboutItem = helpMenu.Append(wx.ID_ABOUT)

        # Make the menu bar and add the two menus to it. The '&' defines
        # that the next letter is the "mnemonic" for the menu item. On the
        # platforms that support it those letters are underlined and can be
        # triggered from the keyboard.
        menuBar = wx.MenuBar()
        menuBar.Append(fileMenu, "&File")
        menuBar.Append(helpMenu, "&Help")

        # Give the menu bar to the frame
        self.SetMenuBar(menuBar)

        # Finally, associate a handler function with the EVT_MENU event for
        # each of the menu items. That means that when that menu item is
        # activated then the associated handler function will be called.
        self.Bind(wx.EVT_MENU, self.OnHello, helloItem)
        self.Bind(wx.EVT_MENU, self.OnExit,  exitItem)
        self.Bind(wx.EVT_MENU, self.OnAbout, aboutItem)


    def OnExit(self, event):
        """Close the frame, terminating the application."""
        self.Close(True)


    def OnHello(self, event):
        """Say hello to the user."""
        wx.MessageBox("Hello again from wxPython")


    def OnAbout(self, event):
        """Display an About Dialog"""
        wx.MessageBox("This is a wxPython Hello World sample",
                      "About Hello World 2",
                      wx.OK|wx.ICON_INFORMATION)


if __name__ == '__main__':
    # When this module is run (not imported) then create the app, the
    # frame, show it, and start the event loop.
    app = wx.App()
    frm = HelloFrame(None, title='Hello World 2')
    frm.Show()
    app.MainLoop()
執行畫面:
Tkinter
Tkinter 是使用python 進行視窗視窗設計的模組. 簡單的構造, 多平臺, 多系統的相容性, 能讓它成為讓你快速入門定製視窗檔案的好助手. 它在python 視窗視窗模組中是一款簡單型的
Tk 原先是為 Tcl 語言所開發的 GUI 套件, 因為是 Tcl 的第一個擴充, 所以現在都合起來稱呼為 Tcl/Tk. Tcl 是一種以 string-based 的跨平臺工具命令式直譯語言 (Tool command language), 繼承了 LISP/C/Shell 等語言的優點, 並具有語法簡單, 容易擴充套件與可靈活嵌入其他語言的特點, 而且全面支援 unicode.
而 Tkinter 是 Python 內建的標準模組, 內部嵌入了 Tcl/Tk GUI 套件, 用來在 Python 中建構 GUI 圖形介面程式, 它具有如下優點 :
- 簡單易學 :
比 Python 其他 GUI 要容易, 甚至於我覺得比學 Java Swing 還容易. - 程式碼精簡 :
以很短的程式碼便能產生強大功能的 GUI 程式. - 跨平臺 :
同樣的程式可以在 Linux/Windows/Mac 等系統上執行.
不過在 Python 2 中的模組名稱 Tkinter 到 Python 3 版後已被改為小寫的 tkinter, 使用時要注意所用之 Python 版本, 匯入時注意該用首字大寫與否. 不過 Python 2 下以 Tkinter 所寫的 GUI 程式可以利用 2to3 程式轉成 Python 3 版的程式.
教學:
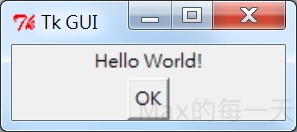
範例程式:
import Tkinter as tk
win=tk.Tk()     #建立視窗容器物件
win.title("Tk GUI")
label=tk.Label(win, text="Hello World!")   #建立標籤物件
label.pack()       #顯示元件
button=tk.Button(win, text="OK")
button.pack()     #顯示元件
win.mainloop()
執行畫面:
Pywin32
沒人在用了,略過。
PyGtk
PyGTK是一套用Python封裝的,用於GTK+的GUI庫。PyGTK是在LGPL授權下的自由軟體。它的作者是著名的GNOME開發者James Henstridge。
沒有人在維護了,略過。
pyui4win
沒有人在維護了,略過。
