
Linux Centos 搭建ReidsCluster叢集
Redis-Cluster簡介
什麼是Redis-Cluster
為何要搭建Redis叢集。Redis是在記憶體中儲存資料的,而我們的電腦一般記憶體都不大,這也就意味著Redis不適合儲存大資料,適合儲存大資料的是Hadoop生態系統的Hbase或者是MogoDB。Redis更適合處理高併發,一臺裝置的儲存能力是很有限的,但是多臺裝置協同合作,就可以讓記憶體增大很多倍,這就需要用到叢集。
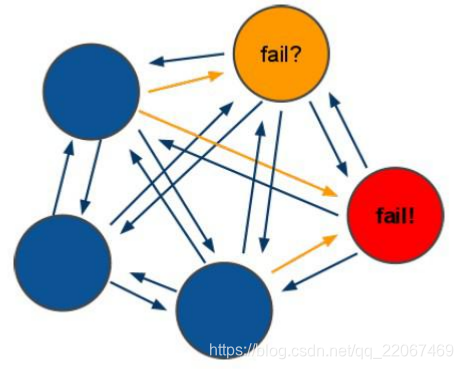
Redis叢集搭建的方式有多種,例如使用客戶端分片、Twemproxy、Codis等,但從redis 3.0之後版本支援redis-cluster叢集,它是Redis官方提出的解決方案,Redis-Cluster採用無中心結構,每個節點儲存資料和整個叢集狀態,每個節點都和其他所有節點連線。其redis-cluster架構圖如下:

客戶端與 redis 節點直連,不需要中間 proxy 層。客戶端不需要連線叢集所有節點連線叢集中任何一個可用節點即可。
所有的 redis 節點彼此互聯(PING-PONG 機制),內部使用二進位制協議優化傳輸速度和頻寬。
分佈儲存機制-槽
1、redis-cluster 把所有的物理節點對映到[0-16383]slot上,cluster 負責維護
node<->slot<->value
2、Redis 叢集中內建了 16384 個雜湊槽,當需要在 Redis 叢集中放置一個 key-value 時,redis 先對 key 使用 crc16 演算法算出一個結果,然後把結果對 16384 求餘數,這樣每個key 都會對應一個編號在 0-16383 之間的雜湊槽,redis 會根據節點數量大致均等的將雜湊槽對映到不同的節點。
例如三個節點:槽分佈的值如下
- SERVER1:0-5460
- SERVER2:5461-10922
- SERVER3:10923-16383
容錯機制-投票
1、選舉過程是叢集中所有master參與,如果半數以上master節點與故障節點通訊超過(cluster-node-timeout),認為該節點故障,自動觸發故障轉移操作,故障節點對應的從節點自動升級為主節點。
2、什麼時候整個叢集不可用(cluster_state:fail)?
如果叢集任意master掛掉,且當前master沒有slave,叢集進入fail狀態,也可以理解成叢集的slot對映[0-16383]不完成時進入fail狀態。
搭建Redis-Cluster
搭建要求
- 需要 6 臺 redis伺服器。本次搭建同樣是使用偽叢集的方式。
- 需要 6 個 redis例項。
- 需要執行在不同的埠,本次埠為 7001-7006
準備工作
1、安裝 gcc
因為安裝reids需要通過原始碼安裝的方式,redis是C言語開發的。redis需要C語言的編譯環境。如果沒有 gcc 需要線上安裝。
yum install gcc-c++
2、使用yum命令安裝 ruby
我們需要使用ruby指令碼來實現叢集搭建
yum install ruby
yum install rubygems
3、下載redis原始碼包
如果網路不好可以先下載好後,在上傳到伺服器。
wget http://download.redis.io/releases/redis-5.0.0.tar.gz
4、編譯redis原始碼,進入redis原始碼資料夾。
tar -xvzf redis-5.0.0.tar.gz
cd redis-5.0.0
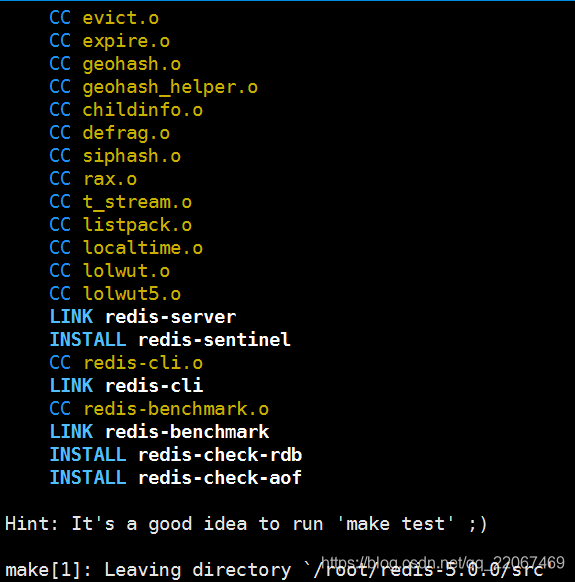
make
看到以下輸出結果,表示編譯成功
5、建立目錄 /usr/local/redis-cluster,安裝6個redis例項,分別安裝在以下目錄
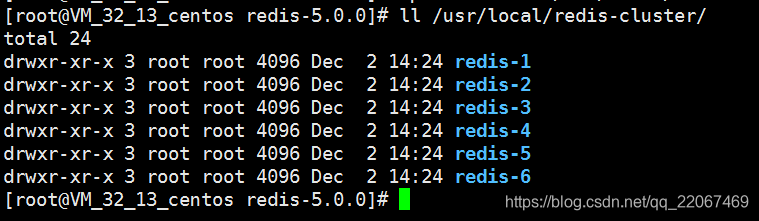
以第一個 redis 例項為例,命令如下
make install PREFIX=/usr/local/redis-cluster/redis-1

出現此提示表示安裝成功,按此方法安裝其餘5個redis例項。
6、複製配置檔案 將/redis-5.0.0/redis.conf複製到redis下的bin目錄下。
cp redis.conf /usr/local/redis-cluster/redis-1/bin
cp redis.conf /usr/local/redis-cluster/redis-2/bin
cp redis.conf /usr/local/redis-cluster/redis-3/bin
cp redis.conf /usr/local/redis-cluster/redis-4/bin
cp redis.conf /usr/local/redis-cluster/redis-5/bin
cp redis.conf /usr/local/redis-cluster/redis-6/bin
配置叢集
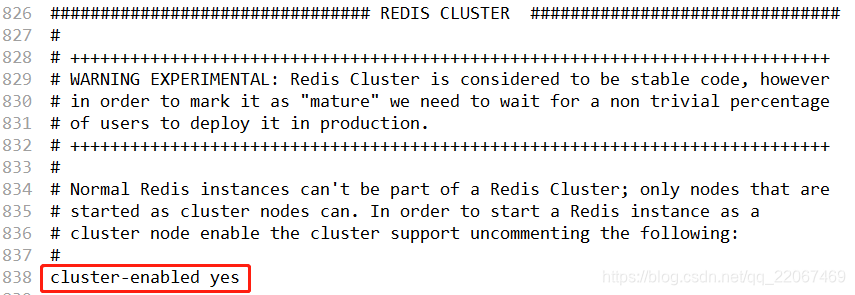
1、修改每個redis節點下的配置檔案 redis.conf
- 把 bind 127.0.0.1註釋掉(# bind 127.0.0.1)如果不註釋則外部無法連線到redis,如果不註釋掉只是本機可以訪問
- 修改埠為 8001-8006
- 將cluster-enabled yes 前的註釋去掉(我這邊是在838行具體的根據實際情況查詢)


2、啟動每個redis例項
以第一個為例
cd /usr/local/redis-cluster/redis-1/bin/
./redis-server redis.conf
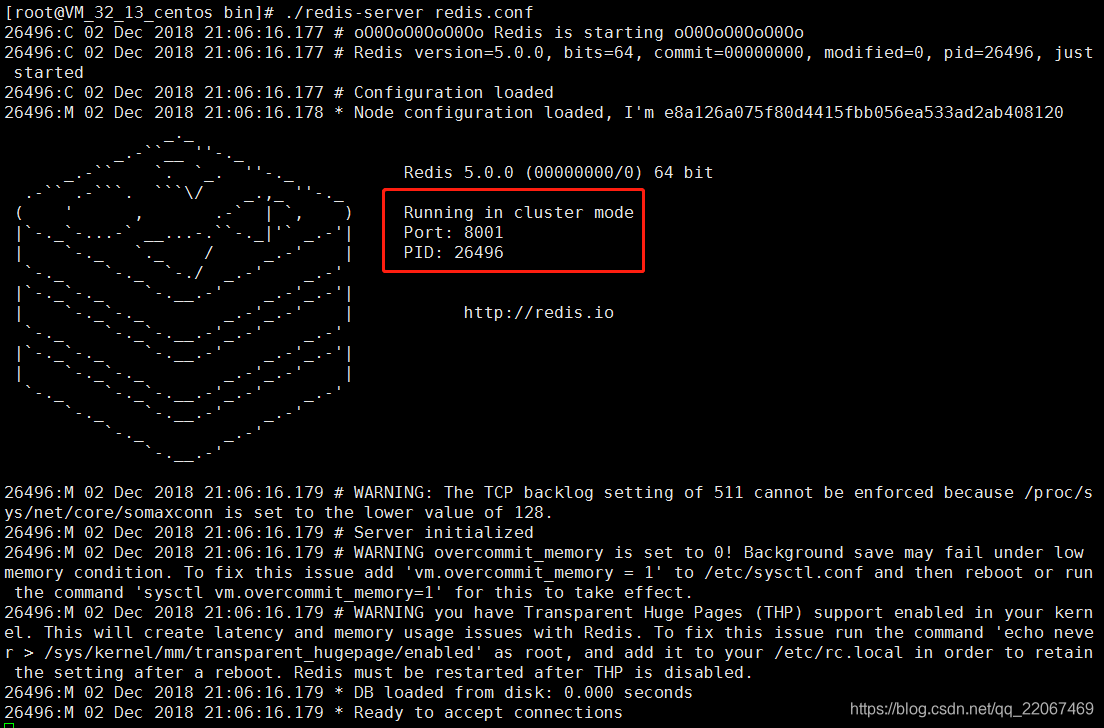
把其餘5個啟動好,檢查是否成功啟動了

3、上傳 redis-3.0.0.gem,安裝 ruby用於搭建redis叢集的指令碼。

如果提示command not found,請先安裝gem,準備工作2有安裝步驟
4、使用 ruby 指令碼搭建叢集
進入 redis原始碼目錄中 redis5.0.0/src目錄執行下面命令
./redis-trib.rb create --replicas 1 119.29.181.129:8001 119.29.181.129:8002 119.29.181.129:8003 119.29.181.129:8004 119.29.181.129:8005 119.29.181.129:8006
執行./redis-trib.rb出現錯誤
redis-trib.rb:6: odd number list for Hash
        white: 29,
              ^
redis-trib.rb:6: syntax error, unexpected ':', expecting '}'
        white: 29,
              ^
redis-trib.rb:7: syntax error, unexpected ',', expecting kEND
原因是因為我的gem版本太低了
[[email protected]_32_13_centos src]# gem -v
1.3.7
直接用yum安裝的話可以是由於源的原因,導致安裝的版本太低了,這裡到官網下載了一個 ruby-2.4.5.tar.gz的版本 ,上傳到伺服器,ruby-2.4.5.tar.gz下載地址
tar -xvzf ruby-2.4.5.tar.gz
cd ruby-2.4.5
./configure
make
make install
成功安裝
ln -s /usr/local/bin/ruby /usr/bin/ruby
ruby -v
ruby 2.4.5p335 (2018-10-18 revision 65137) [x86_64-linux]
安裝成功後再次執行命令
./redis-trib.rb create --replicas 1 119.29.181.129:8001 119.29.181.129:8002 119.29.181.129:8003 119.29.181.129:8004 119.29.181.129:8005 119.29.181.129:8006
再次提示警告
WARNING: redis-trib.rb is not longer available!
You should use redis-cli instead.

All commands and features belonging to redis-trib.rb have been moved
to redis-cli.
In order to use them you should call redis-cli with the --cluster
option followed by the subcommand name, arguments and options.

Use the following syntax:
redis-cli --cluster SUBCOMMAND [ARGUMENTS] [OPTIONS]

Example:
redis-cli --cluster create 119.29.181.129:8001 119.29.181.129:8002 119.29.181.129:8003 119.29.181.129:8004 119.29.181.129:8005 119.29.181.129:8006 --cluster-replicas 1

To get help about all subcommands, type:
redis-cli --cluster help
goole 翻譯出
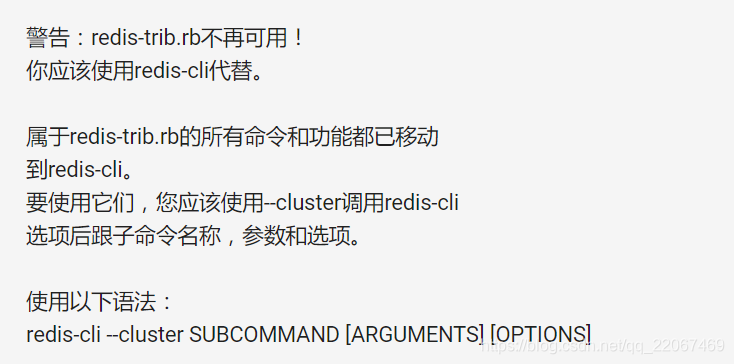
原因是因為 redis5.0.0版本的redis-trib.rb替換成了redis-cli。
提示的總沒錯照著再次執行命令
./redis-cli --cluster create 119.29.181.129:8001 119.29.181.129:8002 119.29.181.129:8003 119.29.181.129:8004 119.29.181.129:8005 119.29.181.129:8006 --cluster-replicas 1
結果又出現錯誤
[ERR] Node 119.29.181.129:8001 DENIED Redis is running in protected mode because protected mode is enabled, no bind address was specified, no authentication password is requested to clients. In this mode connections are only accepted from the loopback interface. If you want to connect from external computers to Redis you may adopt one of the following solutions: 1) Just disable protected mode sending the command 'CONFIG SET protected-mode no' from the loopback interface by connecting to Redis from the same host the server is running, however MAKE SURE Redis is not publicly accessible from internet if you do so. Use CONFIG REWRITE to make this change permanent. 2) Alternatively you can just disable the protected mode by editing the Redis configuration file, and setting the protected mode option to 'no', and then restarting the server. 3) If you started the server manually just for testing, restart it with the '--protected-mode no' option. 4) Setup a bind address or an authentication password. NOTE: You only need to do one of the above things in order for the server to start accepting connections from the outside.
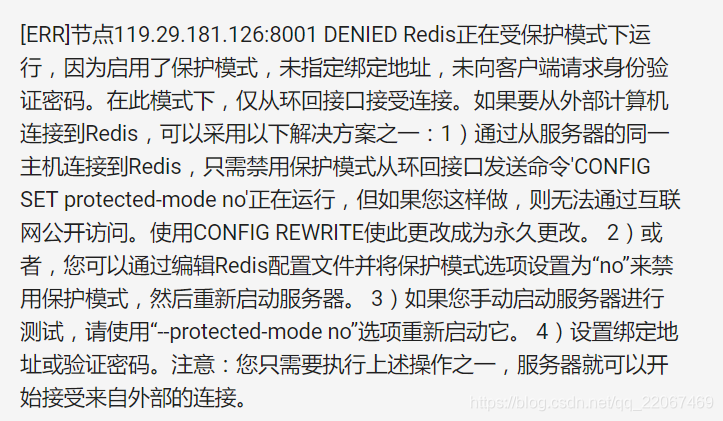
提示說叫我執行 config set protected-mode no ,由於現在是受保護狀態,需要禁用保護模式。
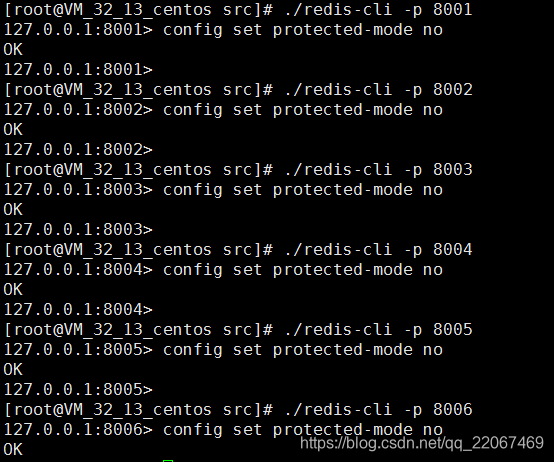
沒辦法只能照做,執行下命令
./redis-cli -p 8001
config set protected-mode no
./redis-cli -p 8002
config set protected-mode no
./redis-cli -p 8003
config set protected-mode no
./redis-cli -p 8004
config set protected-mode no
./redis-cli -p 8005
config set protected-mode no
./redis-cli -p 8006
config set protected-mode no
注意,這裡修改之後只是暫時有效,重啟之後保護模式以將開啟,如果需要永久禁用保護模式,需要修改配置,protected-mode yes改為protected-mode no。(不建議)

經過一翻折騰繼續執行命令
./redis-cli --cluster create 119.29.181.129:8001 119.29.181.129:8002 119.29.181.129:8003 119.29.181.129:8004 119.29.181.129:8005 119.29.181.129:8006 --cluster-replicas 1
這次終於執行成功
>>> Performing hash slots allocation on 6 nodes...
Master[0] -> Slots 0 - 5460
Master[1] -> Slots 5461 - 10922
Master[2] -> Slots 10923 - 16383
Adding replica 119.29.181.129:8004 to 119.29.181.129:8001
Adding replica 119.29.181.129:8005 to 119.29.181.129:8002
Adding replica 119.29.181.129:8006 to 119.29.181.129:8003
>>> Trying to optimize slaves allocation for anti-affinity
[WARNING] Some slaves are in the same host as their master
M: e8a126a075f80d4415fbb056ea533ad2ab408120 119.29.181.129:8001
   slots:[0-5460] (5461 slots) master
M: b6a692d9cc595ad3116227b236b4ead32286bc16 119.29.181.129:8002
   slots:[5461-10922] (5462 slots) master
M: f74e7cdc51ae957b2487d71feaf9b41c4a5f85b2 119.29.181.129:8003
   slots:[10923-16383] (5461 slots) master
S: 9721ff89484e5d860d72c47d9aee6e98993e7c10 119.29.181.129:8004
   replicates b6a692d9cc595ad3116227b236b4ead32286bc16
S: 2823bd01ac5a27853ad01a0a071776fd615d3c71 119.29.181.129:8005
   replicates f74e7cdc51ae957b2487d71feaf9b41c4a5f85b2
S: 00a78303e605bf9370f56e114a4def2b6d7196f3 119.29.181.129:8006
   replicates e8a126a075f80d4415fbb056ea533ad2ab408120
Can I set the above configuration? (type 'yes' to accept): yes
>>> Nodes configuration updated
>>> Assign a different config epoch to each node
>>> Sending CLUSTER MEET messages to join the cluster
Waiting for the cluster to join
.....
>>> Performing Cluster Check (using node 119.29.181.129:8001)
M: e8a126a075f80d4415fbb056ea533ad2ab408120 119.29.181.129:8001
   slots:[0-5460] (5461 slots) master
   1 additional replica(s)
S: 9721ff89484e5d860d72c47d9aee6e98993e7c10 119.29.181.129:8004
   slots: (0 slots) slave
   replicates b6a692d9cc595ad3116227b236b4ead32286bc16
S: 2823bd01ac5a27853ad01a0a071776fd615d3c71 119.29.181.129:8005
   slots: (0 slots) slave
   replicates f74e7cdc51ae957b2487d71feaf9b41c4a5f85b2
M: f74e7cdc51ae957b2487d71feaf9b41c4a5f85b2 119.29.181.129:8003
   slots:[10923-16383] (5461 slots) master
   1 additional replica(s)
S: 00a78303e605bf9370f56e114a4def2b6d7196f3 119.29.181.129:8006
   slots: (0 slots) slave
   replicates e8a126a075f80d4415fbb056ea533ad2ab408120
M: b6a692d9cc595ad3116227b236b4ead32286bc16 119.29.181.129:8002
   slots:[5461-10922] (5462 slots) master
   1 additional replica(s)
[OK] All nodes agree about slots configuration.
>>> Check for open slots...
>>> Check slots coverage...
[OK] All 16384 slots covered.
結果分析
Master[0] -> Slots 0 - 5460
Master[1] -> Slots 5461 - 10922
Master[2] -> Slots 10923 - 16383
Adding replica 119.29.181.129:8004 to 119.29.181.129:8001
Adding replica 119.29.181.129:8005 to 119.29.181.129:8002
Adding replica 119.29.181.129:8006 to 119.29.181.129:8003
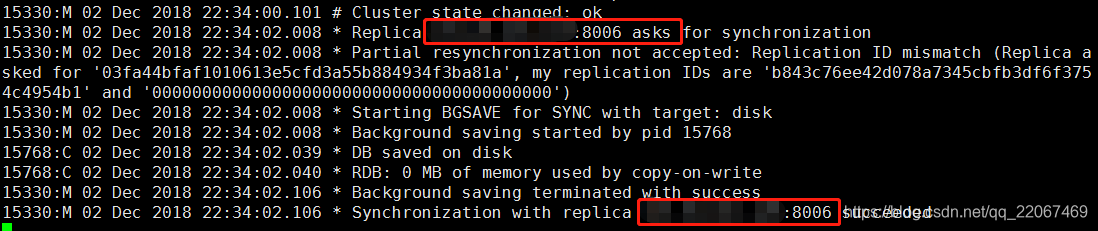
可以看到每個主節點的槽分配,8001、8002、8003為主,分別對應8004、8005、8006為從。
可以看到8006連線到8001
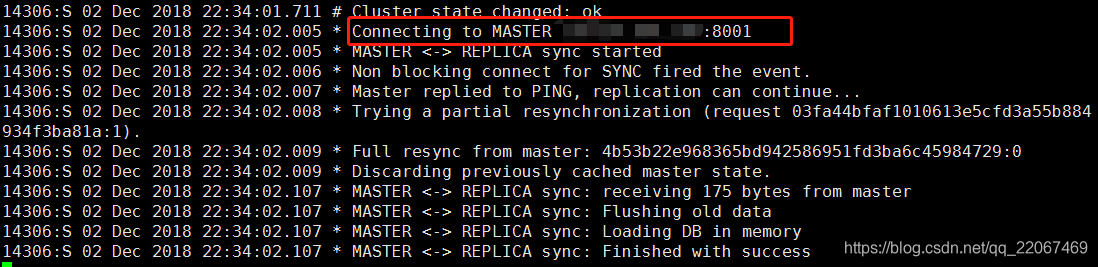
可以看到8001的從為8006
連線Redis-Cluster
本次使用客戶端工具連線。
redis-cli 連線叢集
redis-cli -h 主機IP -p 埠 (叢集中任意埠) -c
redis-cli -h 119.29.181.129 -p 8001 -c
-c 代表連線的是redis叢集
測試值的存取
1、從本地連線到叢集redis  使用8001埠 加 -c 引數
redis-cli -h 119.29.181.129 -p 8001 -c
2、存入name值為kyrie ,系統提示此值被存入到了8002埠所在的redis (槽是5798)
-> Redirected to slot [5798] located at 119.29.181.129:8002
OK
3、提取name的值,可以提取
4、退出(quit)
5、再次以8001埠進入,不帶C
6、查詢name值,無法獲取,因為值在8002埠的redis上
(error) MOVED 5798 119.29.181.129:8002
7、再以8002埠進入不帶C的,獲取name值發現是可以獲取的,而以其它埠進入均不能獲取
119.29.181.129:8002> get name
"kyrie"
SpringDataRedis連線Redis叢集
工程新增配置檔案,applicationContext-redis-cluster.xml
<?xml version="1.0" encoding="UTF-8"?>
<beans xmlns="http://www.springframework.org/schema/beans"
  xmlns:xsi="http://www.w3.org/2001/XMLSchema-instance" xmlns:p="http://www.springframework.org/schema/p"
  xmlns:context="http://www.springframework.org/schema/context"
  xsi:schemaLocation="http://www.springframework.org/schema/beans
            http://www.springframework.org/schema/beans/spring-beans.xsd
            http://www.springframework.org/schema/context
            http://www.springframework.org/schema/context/spring-context.xsd">

	<!-- 載入配置屬性檔案 按需載入 -->
	<context:property-placeholder ignore-unresolvable="true" location="classpath:properties/redis-cluster-config.properties" />
	<bean id="redisClusterConfiguration" class="org.springframework.data.redis.connection.RedisClusterConfiguration">
		<property name="maxRedirects" value="${redis.maxRedirects}"></property>
		<property name="clusterNodes">
			<set>
				<bean class="org.springframework.data.redis.connection.RedisClusterNode">
					<constructor-arg name="host" value="${redis.host1}"></constructor-arg>
					<constructor-arg name="port" value="${redis.port1}"></constructor-arg>
				</bean>
				<bean class="org.springframework.data.redis.connection.RedisClusterNode">
					<constructor-arg name="host" value="${redis.host2}"></constructor-arg>
					<constructor-arg name="port" value="${redis.port2}"></constructor-arg>
				</bean>
					<bean class="org.springframework.data.redis.connection.RedisClusterNode">
					<constructor-arg name="host" value="${redis.host3}"></constructor-arg>
					<constructor-arg name="port" value="${redis.port3}"></constructor-arg>
				</bean>
				<bean class="org.springframework.data.redis.connection.RedisClusterNode">
					<constructor-arg name="host" value="${redis.host4}"></constructor-arg>
					<constructor-arg name="port" value="${redis.port4}"></constructor-arg>
				</bean>
				<bean class="org.springframework.data.redis.connection.RedisClusterNode">
					<constructor-arg name="host" value="${redis.host5}"></constructor-arg>
					<constructor-arg name="port" value="${redis.port5}"></constructor-arg>
				</bean>
				<bean class="org.springframework.data.redis.connection.RedisClusterNode">
					<constructor-arg name="host" value="${redis.host6}"></constructor-arg>
					<constructor-arg name="port" value="${redis.port6}"></constructor-arg>
				</bean>
			</set>
		</property>
	</bean>
	<bean id="jedisPoolConfig"   class="redis.clients.jedis.JedisPoolConfig">
	        <property name="maxIdle" value="${redis.maxIdle}" />
			<property name="maxTotal" value="${redis.maxTotal}" />
	</bean>
	<bean id="jeidsConnectionFactory" class="org.springframework.data.redis.connection.jedis.JedisConnectionFactory"  >
		<constructor-arg ref="redisClusterConfiguration" />
		<constructor-arg ref="jedisPoolConfig" />
	</bean>
	<bean id="redisTemplate" class="org.springframework.data.redis.core.RedisTemplate">
		<property name="connectionFactory" ref="jeidsConnectionFactory" />
	</bean>
</beans>
新增屬性檔案 redis-cluster-config.properties
#cluster configuration
redis.host1=119.29.181.129
redis.port1=8001

redis.host2=119.29.181.129
redis.port2=8002

redis.host3=119.29.181.129
redis.port3=8003

redis.host4=119.29.181.129
redis.port4=8004

redis.host5=119.29.181.129
redis.port5=8005

redis.host6=119.29.181.129
redis.port6=8006

redis.maxRedirects=3
redis.maxIdle=100
redis.maxTotal=600
模擬叢集異常測試
關閉節點命令
./redis-cli -h IP -p 埠 shutdown
以下面主從節點關係進行測試
8002(主)對應 8004(從)
8003(主)對應 8005(從)
8006(主)對應 8001(從)
1、測試關閉8006 和8001, 看看會發生什麼。
各節點收到以下訊息
- 8002(主)
4903:M 03 Dec 2018 21:19:51.747 * Marking node 00a78303e605bf9370f56e114a4def2b6d7196f3 as failing (quorum reached).
4903:M 03 Dec 2018 21:19:51.747 # Cluster state changed: fail
4903:M 03 Dec 2018 21:19:54.356 * Marking node e8a126a075f80d4415fbb056ea533ad2ab408120 as failing (quorum reached).
- 8003(主)
4912:M 03 Dec 2018 21:19:51.748 * Marking node 00a78303e605bf9370f56e114a4def2b6d7196f3 as failing (quorum reached).
4912:M 03 Dec 2018 21:19:51.748 # Cluster state changed: fail
4912:M 03 Dec 2018 21:19:54.354 * Marking node e8a126a075f80d4415fbb056ea533ad2ab408120 as failing (quorum reached).
- 8004(從)
6823:S 03 Dec 2018 21:19:51.748 * FAIL message received from b6a692d9cc595ad3116227b236b4ead32286bc16 about 00a78303e605bf9370f56e114a4def2b6d7196f3
6823:S 03 Dec 2018 21:19:51.748 # Cluster state changed: fail
6823:S 03 Dec 2018 21:19:54.355 * FAIL message received from f74e7cdc51ae957b2487d71feaf9b41c4a5f85b2 about e8a126a075f80d4415fbb056ea533ad2ab408120
- 8005(從)
4940:S 03 Dec 2018 21:19:51.748 * FAIL message received from b6a692d9cc595ad3116227b236b4ead32286bc16 about 00a78303e605bf9370f56e114a4def2b6d7196f3
4940:S 03 Dec 2018 21:19:51.749 # Cluster state changed: fail
4940:S 03 Dec 2018 21:19:54.355 * FAIL message received from f74e7cdc51ae957b2487d71feaf9b41c4a5f85b2 about e8a126a075f80d4415fbb056ea533ad2ab408120
得出結論
(1)主節點 8002、8003 判定 8001失聯
(2)從節點 8004、8005 收到主節點8002和8003說8001失聯
2、測試關閉8002、8003、8006 會發生什麼。
上面關閉的是三個主節點,主節點關閉後,從節點會一直反覆的嘗試連線主節點
8001(從)
8336:S 03 Dec 2018 21:31:07.425 # Error condition on socket for SYNC: Connection refused
8336:S 03 Dec 2018 21:31:08.429 * Connecting to MASTER 119.29.181.126:8006
8336:S 03 Dec 2018 21:31:08.429 * MASTER <-> REPLICA sync started

8004(從)
6823:S 03 Dec 2018 21:31:06.074 # Error condition on socket for SYNC: Connection refused
6823:S 03 Dec 2018 21:31:07.079 * Connecting to MASTER 119.29.181.126:8002
6823:S 03 Dec 2018 21:31:07.079 * MASTER <-> REPLICA sync started

8005(從)
4940:S 03 Dec 2018 21:31:05.070 # Error condition on socket for SYNC: Connection refused
4940:S 03 Dec 2018 21:31:06.073 * Connecting to MASTER 119.29.181.126:8003
4940:S 03 Dec 2018 21:31:06.073 * MASTER <-> REPLICA sync started
得出結論
(1)當主節點被全部關閉時,從節點會連線不到從而導致整個叢集崩潰掉。
總結
1、在搭建過程中需要細心一點做好每一步,一步步來。
2、yum源安裝東西的版本比較低,安裝一些軟體需要更換源。
3、客戶端連線reids需要在redis.conf將註釋掉 # bind 127.0.0.1