github在eclipse上的外掛egit官方使用指南
Getting Started
Overview
If you're new to Git or distributed version control systems generally, then you might want to read Git for Eclipse Users first. More background and details can be found in the on-line book Pro Git.
If there you are coming from CVS, you can find common CVS workflows for Git
Basic Tutorial: Adding a project to version control
Configuration
Identifying yourself
Whenever the history of the repository is changed (technically, whenever a commit is created), Git keeps track of the user who created that commit. The identification consists of a name (typically
a person's name) and an e-mail address. This information is stored in file ~/.gitconfig
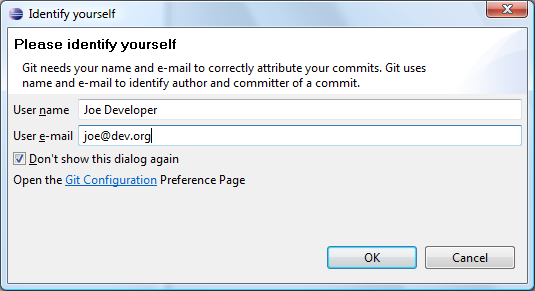
EGit will ask you for this information when you create your first commit. By default, this dialog is shown only once until you create a new workspace or tick the checkbox "Show initial configuration dialog" on the Git Preference page:
You can also untick "Don't show this dialog again" if you want to see it again later.
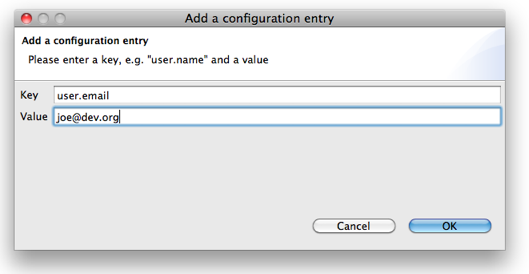
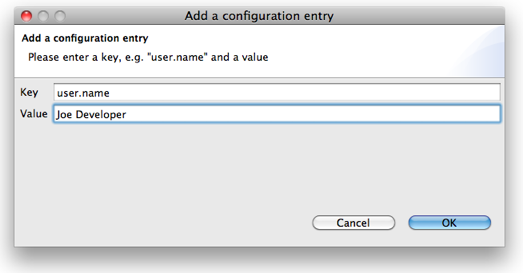
Instead of using this dialog, you can always change this information using the Git configuration:
- Click Preferences > Team > Git > Configuration
- Click New Entry and enter the key value pairs
user.emailanduser.name
Setting up the Home Directory on Windows
Add the environment variable HOME to your environment variables.
- In Windows 7, type "environment" at the start menu
- Select "Edit environment variables for your account"
- Click the "New" button.
- Enter "HOME" in the name field
- Enter "%USERPROFILE%" or some other path in the value field.
- Click OK, and OK again. You have just added the Home directory on Windows.
EGit needs this path for looking up the user configuration (.gitconfig). HOME should point to your home directory e.g. C:\Users\Tom. Ensure
correct case! E.g. C:\users instead of C:\Users may cause problems!
If the HOME variable is not defined the home directory will be calculated by concatenating HOMEDRIVE and HOMEPATH.
If both HOME and HOMEDRIVE are not defined HOMESHARE will
be used.
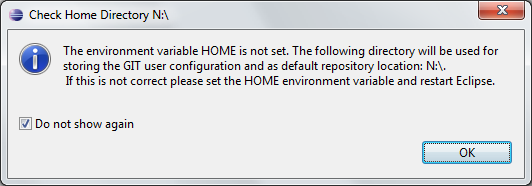
EGit shows a warning if HOME is not defined explicitly. Keep in mind that if you set the HOME environment variable while Eclipse is running,
you will still see following warning. You will have to restart Eclipse for it to recognize the HOME value.
Pointing out the System wide configuration
If you use Git for Windows as a companion to EGit, make sure EGit knows where Git is installed so it can find the "system wide settings", e.g. how core.autocrlf is set. Go to the settings and look under Team>Git>Configuration and then the System Settings tab.
If you selected one of the options to use Git from the Command Line Prompt when you installed Git for Windows, then the location of the system wide settings is filled in with a path and everything is fine. If not, use the Browse button to locate where Git is installed, e.g. C:\Program Files(x86)\Git.
This advice also applies to users of other Git packagings, e.g. Git under Cygwin or TortoiseGit.
Non-Windows users should in theory check this setting, but the system wide settings are usually not used on non-Windows platforms.
Create Repository
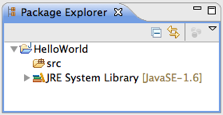
- Create a new Java project
HelloWorld. (In this case, the project was built outside of your Eclipse Workspace.)
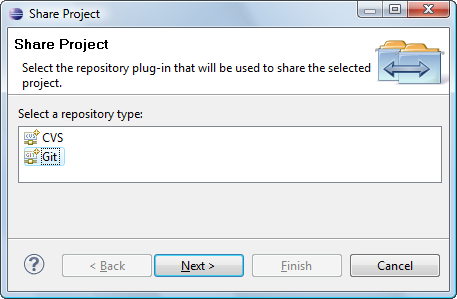
- Select the project, click File > Team > Share Project
- Select repository type Git and click Next
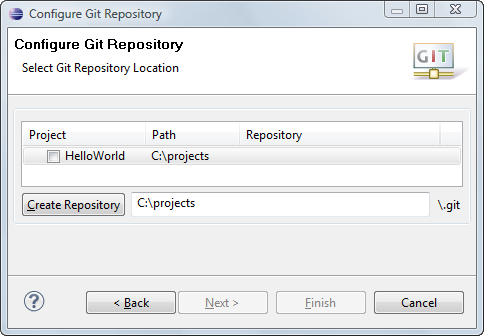
- To configure the Git repository select the new project
HelloWorld
- Click Create Repository to initialize a new Git repository for the
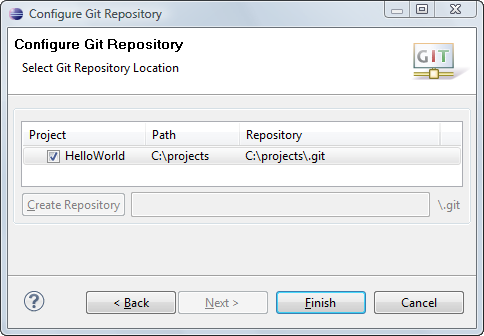
HelloWorldproject. If your project already resides in the working tree of an existing Git repository the repository is chosen automatically.
- Click Finish to close the wizard.
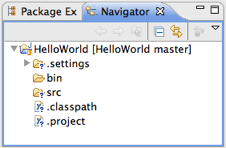
- The decorator text "[master]" behind the project shows that this project is tracked in a repository on the master branch and the question mark decorators show that the
.classpathand.projectand the.settingsfiles are not yet under version control
Track Changes
- Click Team > Add on the project node. (This menu item may read Add to Index on recent versions of Egit)
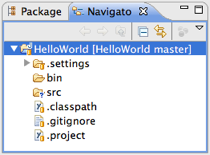
- The + decorators show that now the project's files have been added to version control
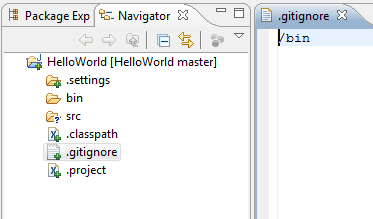
- Mark the "bin" folder as "ignored by Git", either by right-clicking on it and selecting Team > Ignore or by creating a file
.gitignorein the project folder with the following content
/bin
- This excludes the
binfolder from Git's list of tracked files. - Add
.gitignoreto version control (Team > Add):
- You may have to set your Package Explorer filters in order to see
.gitignoredisplayed in the Package Explorer. To access filters, select the down arrow at right of Package Explorer tab to display View Menu.
- Select Filters... from the View Menu and you will be presented with the Java Element Filters dialog. Unselect the top entry to display files that begin with . (period) such as
.gitignore.
- Click Team > Commit in the project context menu
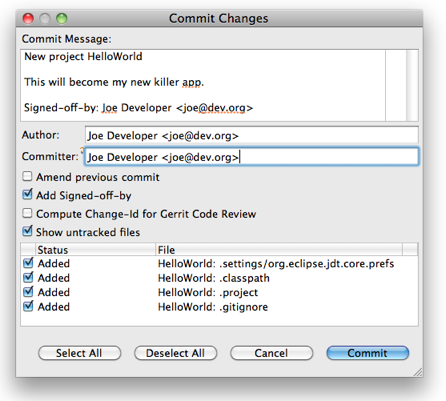
- Enter a commit message explaining your change, the first line (followed by an empty line) will become the short log for this commit. By default the author and committer are taken from the
.gitconfigfile in your home directory. - You may click Add Signed-off-by to add a Signed-off-by: tag.
- If you are committing the change of another author you may alter the author field to give the name and email address of the author.
- Click Commit to commit your first change.
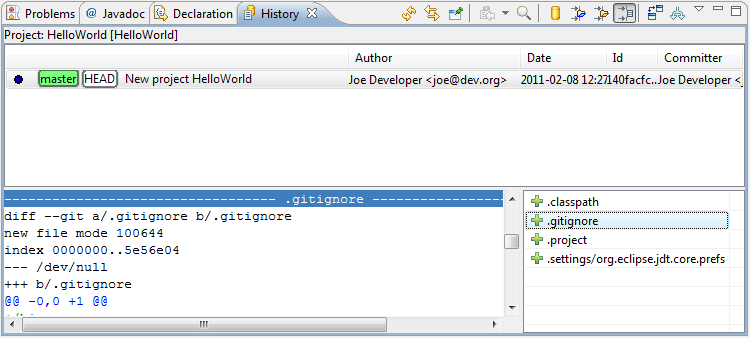
- Note that the decorators of the committed files changed.
Inspect History
- Click Team > Show in History from the context menu to inspect the history of a resource
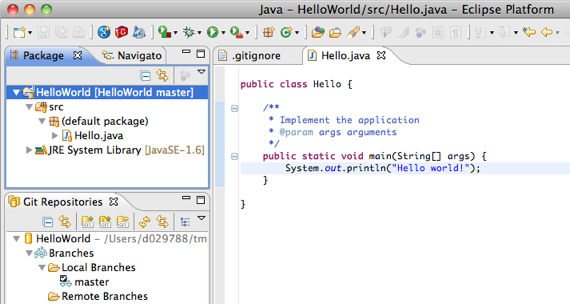
- Create a new Java class
Hello.javaand implement it - Add it to version control and commit your change
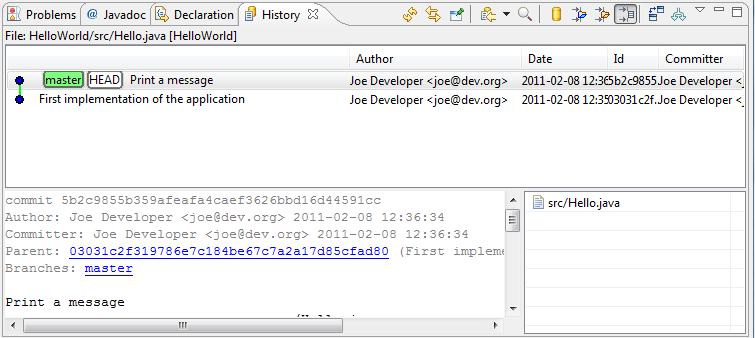
- Improve your implementation and commit the improved class
- The resource history should now show 2 commits for this class
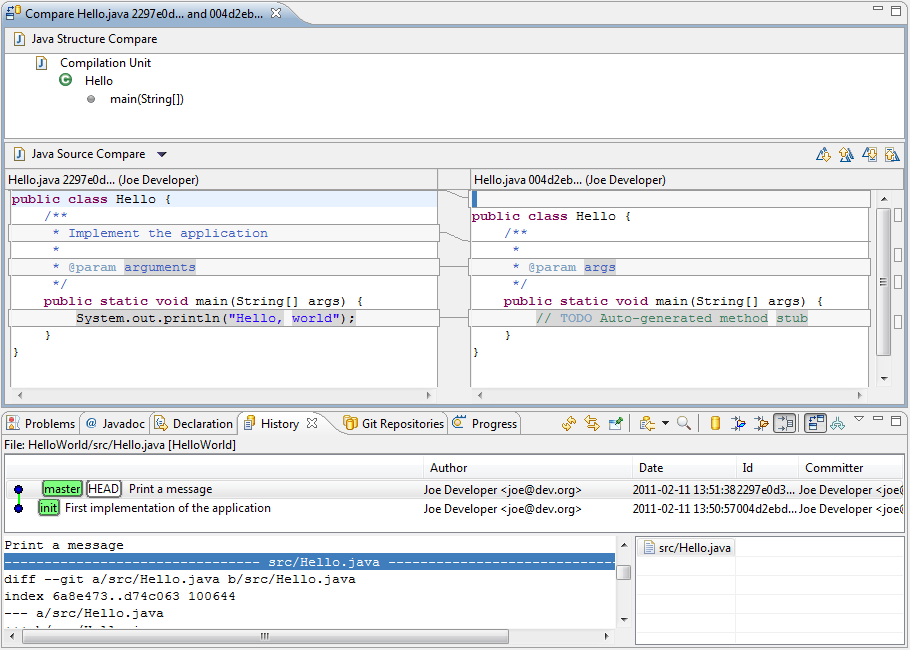
- Click the Compare Mode toggle button in the History View
- Double click
src/Hello.javain the Resource list of the History View to open your last committed change in the Compare View
Congratulations, you just have mastered your first project using Git !
GitHub Tutorial
Create Local Repository
- follow EGit/User Guide/Getting Started to create a new local repository (with your content instead of the demo project)
Create Repository at GitHub
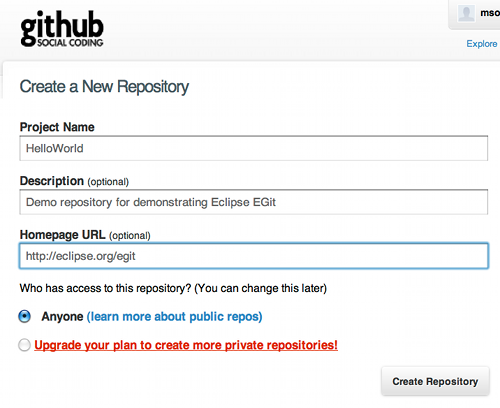
- create a new repository at GitHub
On the next screen you can see the URLs you may use to access your fresh new repository:
- click SSH to choose the SSH protocol. It can be used for read and write access
- click HTTP to choose the HTTP protocol. It can also be used for read and write access.
- click Git Read-Only to choose the anonymous git protocol for cloning. It's the most efficient protocol git supports. Since the git protocol doesn't support authentication it's usually used to provide efficient read-only access to public repositories.
Eclipse SSH Configuration
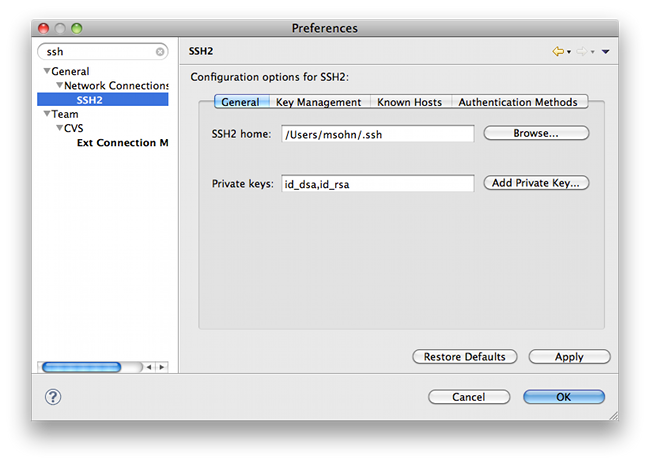
- Open the Eclipse Preferences and ensure that your SSH2 home is configured correctly (usually this is ~/.ssh) and contains your SSH2 keys
- if you don't have SSH keys yet you may generate them on the second tab Key Management of this dialog, use a good pass phrase to protect your private key, for more details see "working with key passphrases"
Push Upstream
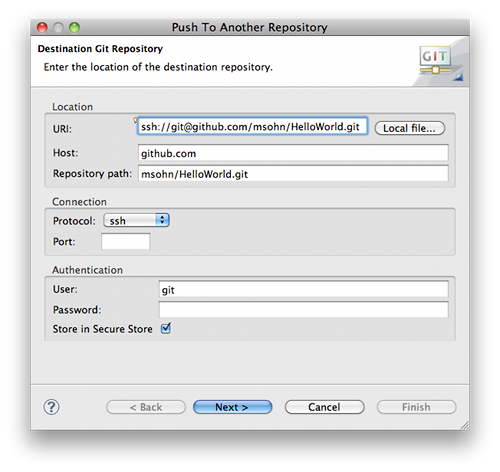
- Click Team > Remote > Push... and copy and paste the SSH URL of your new GitHub repository
- If you are behind a firewall which doesn't allow SSH traffic use the GitHub HTTPS URL instead and provide your GitHub user and password instead of using the uploaded public SSH key. To store your credentials into the Eclipse secure store click Store in Secure Store.
- Note: many HTTP proxies are configured to block HTTP URLs containing a user name, since disclosing a user name in an HTTP URL is considered a security risk. In that case remove the username from the HTTP URL and only provide it in the user field. It will be sent as an HTTP header.
- Click Next and on first connection accept GitHub's host key.
- Enter your SSH key's passphrase and click OK.
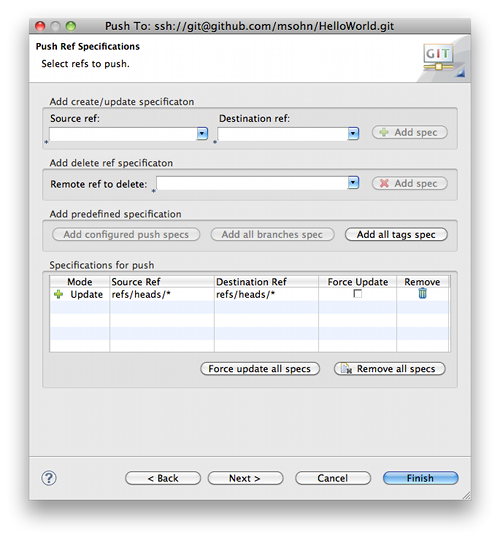
- On the next wizard page click Add all branches spec to map your local branch names 1:1 to the same branch names in the destination repository.
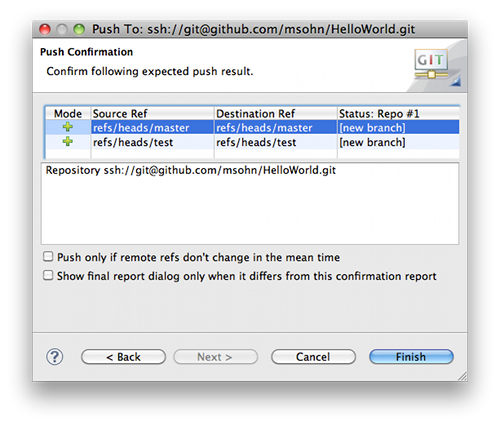
- Click Next. The push confirmation dialog will show a preview of the changes that will be pushed to the destination repository.
- Click Finish to confirm that you want to push these changes.
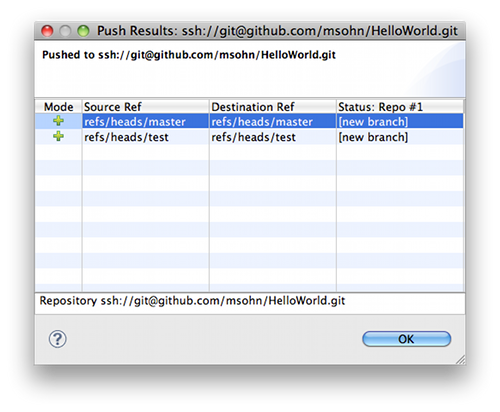
- The next dialog reports the result of the push operation.
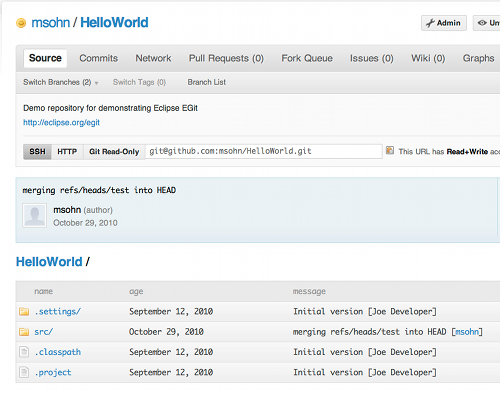
- Point your browser at your GitHub repository to see that your new repository content has arrived
EclipseCon 2012 Git Tutorial
Find all exercises and the slides here.
Follow the exercise #1 to prepare for the Git Tutorial.
Concepts
Git is built on a few simple and very powerful ideas. Knowing them helps to understand more easily how git works.
Repository
The Repository or Object Database stores all objects which make up the history of the project. All objects in this database are identified through a secure 20 byte SHA-1 hash of the object content. This has several advantages:
- comparing two objects boils down to comparing two SHA-1 hashes
- since object names are computed from the object content in the same way in every git repository the same object will be stored under the same name in all repositories which happen to contain this object
- an object never changes once created (obvious since changing the contents means a new hash must be calculated and a new name assigned)
- repository corruption can easily be detected by checking if the SHA-1 object name still is the secure hash of the object's content
Git has four object types :
- A Blob object stores file content
- A Tree object stores the directory structure and contains Blob objects and other Tree objects together with their file system names and modes
- A Commit object represents a snapshot of the directory structure at the time of the commit and has a link to its predecessor Commit objectwhich form an acyclic graph of the repository revisions forming the repository history.
- A Tag object is a symbolic named link to another repository object which contains the object name and type of the referenced object and optionally information about the one who created the tag and signing information.
The object database is stored in the .git/objects directory. Objects are either stored as loose objects or in a pack format efficiently
packing many objects into a single file to enable efficient storage and transport of objects.
Trust
Git provides a built-in trust chain through secure SHA-1 hashes which allow it to verify if objects obtained from a (potentially untrusted) source are correct and have not been modified since they have been created.
If you get the signed tag for e.g. a project release which you can verify with e.g. the tagger's (e.g. the project lead's) public signing key git ensures that the chain of trust covers the following:
- the signed tag identifies a commit object
- the commit object represents exactly one project revision including its content and history
- the commit object contains the tree of blob objects and other tree objects representing the directory structure of the project revision
- the blob objects contain the file contents for this project revision
All of the involved object names can be checked for consistency using the SHA-1 algorithm to ensure the correctness of the project revision and this way ensure that the entire history can be trusted.
Index
The Git Index is a binary file stored in the .git/index directory containing a sorted list of file names, file modes,
file meta data used to efficiently detect file modifications and the SHA-1 object name of blob objects.
It has the following important properties:
- The index contains all information necessary to generate a single uniquely defined tree object. E.g. a commit operation generates this tree, stores it in the object database and associates it with the commit.
- The index enables fast comparison of the tree it defines with the current working directory. This is achieved by storing additional meta data about the involved files in the index data.
- The index can efficiently store information about merge conflicts between the trees involved in the merge so that for each pathname there is enough information about the involved trees to enable a three-way merge.
Branches
A branch in Git is a named reference to a commit. There are two types of branches, namely "Local" and "Remote Tracking" branches which serve different purposes.
Local Branches
Whenever a change to a (local) Repository is committed, a new commit object is created. Without any other means, it would be very difficult to keep track of the changes in the Repository, in particular when other commits are added to the Repository, for example due to an update from the remote Repository or when checking out another commit.
A local branch helps with this task by providing a (local) name by which the "current" commit can be found. When changes are committed to the local repository, the branch is automatically updated to point to the newly created commit.
In addition, it is possible to add a so-called upstream configuration to a local branch which can be helpful when synchronizing with a remote repository.
Remote Tracking Branches
Remote tracking branches are created automatically when cloning and fetching from remote repositories. A remote tracking branch in the local repository always corresponds to a (local) branch in the remote repository, and the name of such a branch is following a certain convention.
The remote tracking branch points to the same commit as the corresponding branch in the remote repository (at the time of clone/fetch).
Remote tracking branches can be used for automated creation of upstream configuration for local branches.
Working Directory
The working directory is the directory used to modify files for the next commit. By default it is located one level above the .git directory. Making a new commit involves typically the following steps :
- Checkout the branch the new commit shall be based on, this changes the working directory so that it reflects the HEAD revision of the branch.
- Do modifications in the working directory
- Tell git about these modifications (add modified files). This transfers the modified file contents into the object database and prepares the tree to be committed in the index.
- Commit the tree prepared in the index into the object database.
- The result is a new commit object and the HEAD of the current branch moves to the new commit.
Recording Changes in the Repository
You start from a fresh checkout of a branch of a local repository. You want to do some changes and record snapshots of these changes in the repository whenever you reach a state of your changes you want to record.
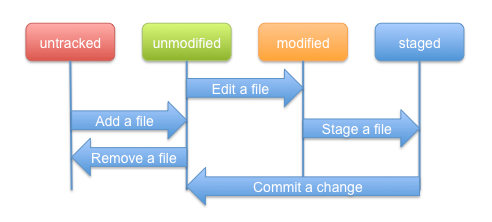
Each file in the working directory can either be tracked or untracked.
- Tracked files are those which were in the last snapshot or files which have been newly staged into the index. They can be unmodified, modified, orstaged.
- Untracked files are all other files which were not in the last snapshot and have not been added to the index.
When you first clone a repository all files in the working directory will be tracked and unmodified since they have been freshly checked out and you didn't start editing them yet.
As you edit files git will recognize they are modified since you have modified them since the last commit. You stage the modified files into the index and then commit the staged changes and the cycle repeats.
This lifecycle is illustrated here
Tasks
Creating Repositories
Considerations for Git Repositories to be used in Eclipse
The short story
When setting up Git Repositories with EGit, there are two recommendations for the creation of "productive" (as opposed for "playground") Repositories:
- Don't create the Repository within the Eclipse workspace
- Be careful when cloning or creating a Repository
- Make sure to use the Git Sharing Wizard correctly
- Don't create a Repository with an Eclipse project as root
- Make sure to use the Git Sharing Wizard correctly
The first one happens when you specify a workspace folder during cloning or creation of a Repository.
Both of the above will happen when you use the Git Sharing Wizard from an Eclipse project that you have created manually in your workspace without taking precautions (the wizard has been fixed in the latest version).
Below you will find some motivation for these recommendations.
The longer story
Eclipse Workspace and Repository working directory
Git Repositories can be created in different ways, for example by cloning from an existing Repository, by creating one from scratch, or by using the EGit Sharing wizard.
In any case (unless you create a "bare" Repository, but that's not discussed here), the new Repository is essentially a folder on the local hard disk which contains the "working directory" and the metadata folder. The metadata folder is a dedicated child folder named ".git" and often referred to as ".git-folder". It contains the actual repository (i.e. the Commits, the References, the logs and such).
The metadata folder is totally transparent to the Git client, while the working directory is used to expose the currently checked out Repository content as files for tools and editors.
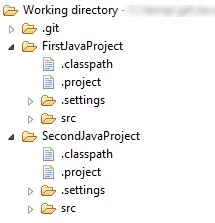
Typically, if these files are to be used in Eclipse, they must be imported into the Eclipse workspace in one way or another. In order to do so, the easiest way would be to check in .project files from which the "Import Existing Projects" wizard can create the projects easily. Thus in most cases, the structure of a Repository containing Eclipse projects would look similar to something like this:
Implications
The above has the following implications:
- It is probably not a good idea to make a project the root folder of your Repository
- The reason is that you will never be able to add another project to this Repository, as the .project file will occupy the root folder; you could still add projects as sub-folders, but this kind of project nesting is known to cause lots of problems all over the place. In order to add another project, you would have to move the project to a sub-folder in the Repository and add the second project as another sub-folder before you could commit this change.
- It is a good idea to keep your Repository outside of your Eclipse Workspace
- There are several reasons for this:
- The new Repository will consider the complete folder structure of the Eclipse workspace as (potential) content. This can result in performance issues, for example when calculating the changes before committing (which will scan the complete .metadata folder, for example); more often than not, the workspace will contain dead folders (e.g. deleted projects) which semantically are not relevant for EGit but can not be excluded easily.
- The metadata (.git-) folder will be a child of the Eclipse Workspace. It is unclear whether this might cause unwanted folder traversals by Eclipse.
- You can easily destroy your Repository by destroying your Eclipse Workspace
Creating a new empty Git Repository
You can create a project first and share it afterwards. The Share Project Wizard supports creation of Git repositories (see Adding a project to version control).
You can also create a new empty Git Repository from the Git Repositories View (see Creating a Repository).
Creating a Git Repository for multiple Projects
You may first create multiple projects under a common directory and then create a common repository for all projects in one go:
- create the Eclipse projects e.g. a, b, c under a common directory e.g. /repos/examples/
- select all projects a, b, c - from context menu click Team > Share Project > Git
- press Next
- select all projects a, b, c
- the wizard automatically moves up the default repository location to the parent folder /repos/examples/ since multiple projects have been selected
- click Create Repository and Finish
Starting from existing Git Repositories
In order to work with the content of a Git repository in the Eclipse workbench, the contained files and folders must be imported as projects. In principle, this import can be done using the generic "New Project" or "Import..." wizards, since the working directory of a Git Repository is just a normal directory in the local file system. However, the newly created projects would still have to be shared manually with Git. The "Import Projects from Git" wizards integrates project import and sharing and also offers some extra convenience.
Starting the import wizard
To start the wizard click Import > Git > Projects from Git
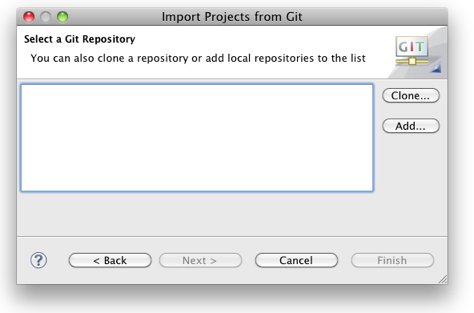
If you started in a clean workspace, the first page will display an empty list:
Before you can continue, you need to add one or several Git repositories to the list. If you have already repositories in the list, this step is optional.
Cloning or adding Repositories
There are two ways to add Git repositories to the list:
- Clone a remote repository
- Add an existing repository from your local file system
Cloning a Repository
The first option is used if you start with a remote repository. The clone operation will copy that repository to your local file system. To start the Clone Wizard click Clone.... The Clone Wizard is described in more detail in Cloning Remote Repositories. Upon successful completion of the clone operation, the newly cloned repository appears in the list automatically.
Adding a Repository
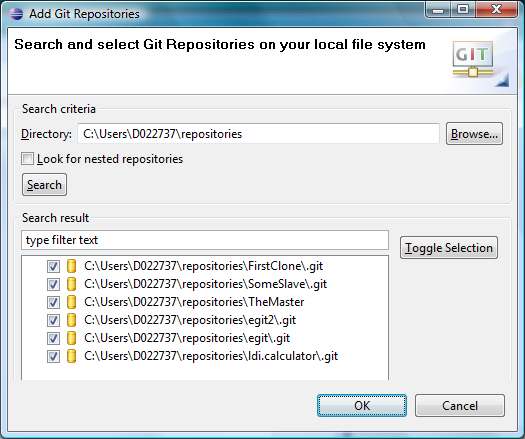
The second option is useful if you already have a repository in your local file system, for example because you have cloned it earlier, you created it from scratch or you copied it from somewhere else. Click Add...; and select a directory in the local file system. Press Search to trigger a scan for Git repositories contained in this directory. If Git repositories are found, they will be listed and you can select repositories to add :
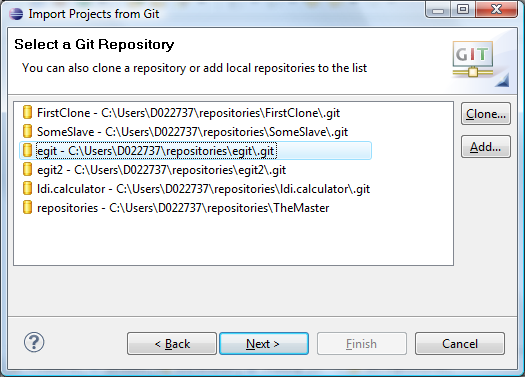
After successful completion, the repository list should contain some repositories:
Selecting a Repository from the List
You can now select a repository and click Next. On the following wizard page, you will decide how to import projects.
Importing projects
This page offers a group with radio buttons that allow you to select a wizard and a directory tree that optionally allows you to select a folder in the working directory.
相關推薦
github在eclipse上的外掛egit官方使用指南
< EGit Getting Started Overview If you're new to Git or distributed version control systems generally, then you might want to read Git
Eclipse上GIT外掛EGIT使用手冊
首先下載EGIT外掛就可以使用,最好下載ZIP檔案比較好配置,可惡的Great Wall.地下面重啟myeclipse 就可以了。配置個人資訊,最重要的是user.name和user.emaill Preferences > Team > Git > Con
Eclipse上GIT外掛EGIT使用手冊之六_遠端GIT倉庫
此小結的前提是已經搭建GIT伺服器,並通過SSH協議連線,可參看文件《RHEL下搭建GIT伺服器》《WindowsXP下搭建GIT伺服器》《GIT伺服器使用基礎》。本文使用RHEL5.5系統下的GIT-2012-01-11,使用者root/password,GIT倉庫統
Eclipse上GIT外掛EGIT使用手冊[轉]
或者使用Eclipse Marketplace,搜尋EGit 配置個人資訊,最重要的是user.name和user.email l Preferences > Team > Git > Configuration l New Entry 新建NC modul
Eclipse上GIT外掛EGIT使用手冊之八_解決推送衝突
多人協作開發的情況下,往伺服器推送更新時難免出現衝突,所以推送之前需要解決伺服器端的最新版本和本地倉庫的衝突。Pull操作就是把伺服器端的更新拉攏到本地倉庫進行合併,解決好合並衝突後,就可以順利push到伺服器分支了。 假設現在Mairo兄弟在用GIT協作開發NewSu
Eclipse上GIT外掛EGIT使用手冊之十一_Fetch和Rebase
MairoBro來做fetch和rebase的測試,首先Mairo弟弟在client中新增檔案OPQ分別提交,並push到伺服器,如圖: 此時伺服器端的歷史已經被更新,但是Mairo哥哥的remote tracking中mirror分支並沒有更新到最新的記錄,如圖:
Eclipse上GIT外掛EGIT使用手冊之七_推送遠端倉庫
克隆伺服器端倉庫後,會在本地建立一個一樣的倉庫,稱本地倉庫。在本地進行commit操作將把更新提交到本地倉庫,然後可以將伺服器端的更新pull到本地倉庫進行合併,最後將合併好的本地倉庫push到伺服器端,這樣就進行了一次遠端提交。 先提交一次到本地倉庫 然後push
Eclipse上GIT外掛EGIT使用手冊之三_新建GIT倉庫
新建NC module project l File > Team > Share Project 選擇GIT 建立倉庫後,在$workspace\demo目錄下的.git資料夾,就是git的倉庫地址。和CVS、SVN不同,GIT不會在每一個目錄下建
在 Ubuntu 上安裝 TensorFlow (官方文檔的翻譯)
tree com docker x86 cup 早期 guid director doc 本指南介紹了如何在 Ubuntu 上安裝 TensorFlow。這些指令也可能對其他 Linux 變體起作用, 但是我們只在Ubuntu 14.04 或更高版本上測試了(我們只支持
開發筆記12 | Cloud Toolkit 外掛 Command 編寫指南
標準的 Java Web Tomcat 應用 如上圖所示,假設在 Linux 系統的 /root/tomcat/ 目錄下,放置了 Tomcat 的基目錄,因此我們需要將 Java Web 應用的 WAR 包部署到 /root/tomcat/webapps 目錄下去,對應的 Command 配置
Visual Studio 2017上配置OpenGL程式設計指南第8版開發環境
一直想學習一下OpenGL,買了紅寶書第8版,卻因為工作原因一直沒有時間看,最近利用週末嘗試了一下配置開發環境,遇到了一些坑點,現在記錄下來備用。 第一步:開啟Visual Studio 2017,建立一個空的C++工程 第二步:新建triangles.cpp檔案,並寫入書本例子中的程式碼 /
Android WorkManager官方指南
文章目錄 1. 使用WorkManager排程任務 1.1 主題 1.2 [WorkManager高階功能](https://developer.android.google.cn/topic/libraries/architecture/wor
Android Data binding官方指南
1. 佈局和繫結表示式 1.1 資料物件 1.2 繫結資料 1.3 表示式語言 1.3.1 共同的特徵 1.3.2 不支援的操作符 1.
Android Room 官方指南
官方文件翻譯 簡介 匯入庫 使用Room儲存本地資料到資料庫中 使用Room實體定義資料 使用主鍵 註解宣告與唯一性 定義物件之間的關係 建立巢狀物件 使用Room DAO
Android 外掛化入手指南之classLoader完全解析
原文:https://blog.csdn.net/u012124438/article/details/53235848 Java程式碼都是寫在Class裡面的,程式執行在虛擬機器上時,虛擬機器需要把需要的Class載入進來才能建立例項物件並工作,而完成這一個載入工作的角色就是Cla
奉上一份雲上資料安全保護指南
阿里雲資深安全專家黃瑞瑞 本方案的目標是為使用者提供從底層雲平臺數據安全到上層的雲上環境保護,並標明各層次模組,讓使用者可以像建房子一樣,一層層的搭建可信的在雲上資料的安全保護。在各橫向層次模組之外,雲上資料安全也需要縱向的認證、授權、訪問控制和日誌審計功能,從而為客戶提供可控和合規的雲上
CentOS 7安裝Docker官方指南
解除安裝舊版本 安裝新版本docker-ce前,需要先解除安裝舊版本docker或docker-engine,和關聯依賴。 $ sudo yum remove docker \ &nb
《Groovy官方指南》目錄
入門篇(Getting Started) Groovy語言規範(Language Specification) 語法(Syntax) 運算子(Operators) 程式結構(Program structure) 面向物件(Object orientation)
《RabbitMQ官方指南》路由
Routing 在上一節我們建立了一個簡單的日誌系統,已經能夠傳播日誌資訊給接收者了。 在這一節我們將給它增加一個特性-訂閱部分訊息。比如說,我們能夠從控制檯列印的所有日誌資訊中將至關重要的錯誤資訊指向日誌檔案(儲存在硬盤裡)。 Bindings 在前面的例子中我們已經創造了bindings
Apache Velocity官方指南-資源
原文地址 對於程式設計師來說,這裡有相當多的資源和示例可以獲取到。我們推薦你檢視我們的示例、文件甚至原始碼。以下便是一些很好的途徑: 使用者和開發者社群: 通過此頁加入我們。 從此頁還可以獲取到郵件列表的歷史檔案。 原始碼: src/java/…。 Velocity專案中的所有原始碼

