Linux磁碟擴容LVM
mongodb資料庫伺服器運行了一段時間之後發現磁碟空間慢慢的都被耗盡了額。就參照網上的步驟一步一步的開始擴容工作。在這將自己的操作步驟做一個記錄以便未來不時之需。
前沿:
在安裝系統的時候我選擇的是自動分割槽,系統就會自動以LVM的方式分割槽。為了保證系統後期的可用性,建議所有新系統安裝都採用LVM。
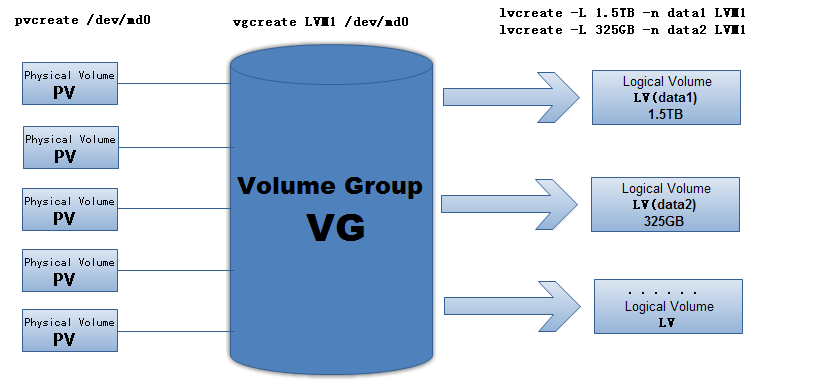
LVM結構圖
擴容步驟
1. 檢視磁碟裝置
命令:# fdisk -l
結果:
Disk /dev/sda: 697.9 GB, 697932185600 bytes
255 heads, 63 sectors/track, 84852 cylinders
Units = cylinders of 找到需要擴充套件的磁碟裝置
2.使用fdisk /dev/sda 對磁碟進行分割槽
命令:# fdisk /dev/sda
結果:
WARNING: DOS-compatible mode is deprecated. It's strongly recommended to
switch off the mode (command 'c') and change display units to
sectors (command 'u').
Command (m for 依次輸入n,p, 3(分割槽號,根據實際情況配置),enter,enter ,最後按w儲存

之前最大的分割槽號是2,所以將本分割槽號設定為3,本人理解。
3.使用fdisk -l檢視分割槽是否建立成功
命令: fdisk -l
結果:
本結果應該是有3個分割槽才正確,這裡不給出結果內容
4.重啟機器
命令:# reboot
因為只有重啟後,才能正式生效。
5.使用pvcreate建立物理卷
命令:# pvcreate /dev/sda3
結果: Physical volume "/dev/sda3" successfully created
6.檢視原VG的情況
命令: vgdisplay
結果:
--- Volume group ---
VG Name               VolGroup //注意記錄此名字,擴容時將新的pv加入指定的名字
System ID
Format                lvm2
Metadata Areas        1
Metadata Sequence No  3
VG Access             read/write
VG Status             resizable
MAX LV                0
Cur LV                2
Open LV               2
Max PV                0
Cur PV                1
Act PV                1
VG Size               7.51 GiB
PE Size               4.00 MiB
Total PE              1922
AllocPE / Size       1922 / 7.51 GiB
Free  PE / Size       0 / 0
VG UUID               FnUsmX-s284-GeRK-hJNJ-BbIG-Vpe7-OuFZE1
7.擴展卷組,將/dev/sdb物理卷新增到VolGroup卷組中
命令:# vgextend VolGroup /dev/sda3
結果:
Volume group "VolGroup" successfully extended其中,VolGroup就是步驟6中檢視得到的VG Name。
再檢視VG情況,可以看到VG大小變化,空餘空間。
8.檢視更改後VG的情況
命令:# vgdisplay
結果:
--- Volume group ---
VG Name               VolGroup
System ID
Format                lvm2
Metadata Areas        2
Metadata Sequence No  4
VG Access             read/write
VG Status             resizable
MAX LV                0
Cur LV                2
Open LV               2
Max PV                0
Cur PV                2
Act PV                2
VG Size               22.50 GiB
PE Size               4.00 MiB
Total PE              5761
AllocPE / Size       1922 / 7.51 GiB
Free  PE / Size       3839 / 15.00 GiB
VG UUID               FnUsmX-s284-GeRK-hJNJ-BbIG-Vpe7-OuFZE1
9.將新的VG空間劃入LV(擴容lv_root)
命令:# lvextend -L +340G /dev/mapper/vgGW-lvRoot
結果: 暫無內容
10.檢查/root邏輯卷
命令:# e2fsck -f /dev/mapper/vgGW-lvRoot
結果: 暫無內容
11.重新定義分割槽大小
命令:# resize2fs /dev/mapper/vgGW-lvRoot
結果: 暫無內容
12.檢視擴充後的磁碟狀態
命令:# df -h
到此為止,我們的擴盤工作已經完成了。

