OpenGL學習——第6天(紋理)
學習來源:https://learnopengl-cn.github.io/01%20Getting%20started/06%20Textures/
還是老話吧,為了學過就忘,準備寫點東西,或者摘抄點東西。
注:本文所有程式碼教程都有,若是看不慣本文的可以直接去教程裡找。
(出現任何差錯的,歡迎在評論區與我討論!)
目錄
√紋理是一個2D圖片(甚至也有1D和3D的紋理),它可以用來新增物體的細節。
√使用紋理座標獲取紋理顏色叫做取樣(Sampling)。

√我們為三角形指定了3個紋理座標點。如上圖所示,我們希望三角形的左下角對應紋理的左下角,因此我們把三角形左下角頂點的紋理座標設定為(0, 0);三角形的上頂點對應於圖片的上中位置所以我們把它的紋理座標設定為(0.5, 1.0);同理右下方的頂點設定為(1, 0)。我們只要給頂點著色器傳遞這三個紋理座標就行了,接下來它們會被傳片段著色器中,它會為每個片段進行紋理座標的插值。
紋理座標看起來就像這樣:
float texCoords[] = {
    0.0f, 0.0f, // 左下角
    1.0f, 0.0f, // 右下角
    0.5f, 1.0f // 上中
};
紋理環繞方式
√紋理座標的範圍通常是從(0, 0)到(1, 1),如果超出了:
| 環繞方式 |
描述 |
| GL_REPEAT |
對紋理的預設行為。重複紋理影象。 |
| GL_MIRRORED_REPEAT |
和GL_REPEAT一樣,但每次重複圖片是映象放置的。 |
| GL_CLAMP_TO_EDGE |
紋理座標會被約束在0到1之間,超出的部分會重複紋理座標的邊緣,產生一種邊緣被拉伸的效果。 |
| GL_CLAMP_TO_BORDER |
超出的座標為使用者指定的邊緣顏色。 |

glTexParameteri(GL_TEXTURE_2D, GL_TEXTURE_WRAP_S, GL_MIRRORED_REPEAT);
glTexParameteri(GL_TEXTURE_2D, GL_TEXTURE_WRAP_T, GL_MIRRORED_REPEAT);引數一:指定了紋理目標;我們使用的是2D紋理,因此紋理目標是GL_TEXTURE_2D。
引數二:指定設定的選項與應用的紋理軸。我們打算配置的是WRAP選項,並且指定S和T軸。
引數三:傳遞一個環繞方式(Wrapping),在這個例子中OpenGL會給當前啟用的紋理設定紋理環繞方式為GL_MIRRORED_REPEAT。
√如果我們選擇GL_CLAMP_TO_BORDER選項,我們還需要指定一個邊緣的顏色。這需要使用glTexParameter函式的fv字尾形式,用GL_TEXTURE_BORDER_COLOR作為它的選項,並且傳遞一個float陣列作為邊緣的顏色值:
float borderColor[] = { 1.0f, 1.0f, 0.0f, 1.0f };
glTexParameterfv(GL_TEXTURE_2D, GL_TEXTURE_BORDER_COLOR, borderColor);
紋理過濾
√GL_NEAREST(也叫鄰近過濾,Nearest Neighbor Filtering)是OpenGL預設的紋理過濾方式。(選擇離紋理座標(圖中是那個“+”)最近的畫素)

√GL_LINEAR(也叫線性過濾,(Bi)linear Filtering):按照一定的權重,計算附近的權平均畫素值。


√當進行放大(Magnify)和縮小(Minify)操作的時候可以設定紋理過濾的選項,比如你可以在紋理被縮小的時候使用鄰近過濾,被放大時使用線性過濾。
glTexParameteri(GL_TEXTURE_2D, GL_TEXTURE_MIN_FILTER, GL_NEAREST);
glTexParameteri(GL_TEXTURE_2D, GL_TEXTURE_MAG_FILTER, GL_LINEAR);
多級漸遠紋理
√多級漸遠紋理(Mipmap):一系列的紋理影象,後一個紋理影象是前一個的二分之一。(使用與紋理被縮小,不適用於放大)

√OpenGL在兩個不同級別的多級漸遠紋理層之間會產生不真實的生硬邊界,為了指定不同多級漸遠紋理級別之間的過濾方式,你可以使用下面四個選項中的一個代替原有的過濾方式:
| 過濾方式 |
描述 |
| GL_NEAREST_MIPMAP_NEAREST |
使用最鄰近的多級漸遠紋理來匹配畫素大小,並使用鄰近插值進行紋理取樣 |
| GL_LINEAR_MIPMAP_NEAREST |
使用最鄰近的多級漸遠紋理級別,並使用線性插值進行取樣 |
| GL_NEAREST_MIPMAP_LINEAR |
在兩個最匹配畫素大小的多級漸遠紋理之間進行線性插值,使用鄰近插值進行取樣 |
| GL_LINEAR_MIPMAP_LINEAR |
在兩個鄰近的多級漸遠紋理之間使用線性插值,並使用線性插值進行取樣 |
√就像紋理過濾一樣,我們可以使用glTexParameteri將過濾方式設定為前面四種提到的方法之一:
glTexParameteri(GL_TEXTURE_2D, GL_TEXTURE_MIN_FILTER, GL_LINEAR_MIPMAP_LINEAR);
glTexParameteri(GL_TEXTURE_2D, GL_TEXTURE_MAG_FILTER, GL_LINEAR);
載入與建立紋理
√先去https://github.com/nothings/stb/blob/master/stb_image.h
下載stb_image.h檔案。點右上角的“派生”,然後下載zip,開啟壓縮包裡面就有我們的stb_image.h檔案,把它加入到我們的專案中,然後在main所在檔案裡面寫上:
#define STB_IMAGE_IMPLEMENTATION
#include "stb_image.h"


√要使用stb_image.h載入圖片,我們需要使用它的stbi_load函式:
int width, height, nrChannels;
unsigned char *data = stbi_load("container.jpg", &width, &height, &nrChannels, 0);√首先接受一個影象檔案的位置作為輸入。接下來它需要三個int作為它的第二、第三和第四個引數,stb_image.h將會用影象的寬度、高度和顏色通道的個數填充這三個變數。
生成紋理
√和之前生成的OpenGL物件一樣,紋理也是使用ID引用的。讓我們來建立一個:
unsigned int texture;
glGenTextures(1, &texture);√glGenTextures函式首先需要輸入生成紋理的數量,然後把它們儲存在第二個引數的unsigned int陣列中。
√繫結這個紋理:
glBindTexture(GL_TEXTURE_2D, texture);√使用前面載入的圖片資料生成一個紋理了。紋理可以通過glTexImage2D來生成:
glTexImage2D(GL_TEXTURE_2D, 0, GL_RGB, width, height, 0, GL_RGB, GL_UNSIGNED_BYTE, data);
glGenerateMipmap(GL_TEXTURE_2D);√引數1:指定了紋理目標(Target)。
引數2:多級漸遠紋理的級別(0:基本級別)。
引數3:紋理儲存方式。
引數4、5:寬高。
引數6:不要管,寫0。
引數7、8:源圖的格式和資料型別。
引數9:真正的影象資料。
√生成了紋理和相應的多級漸遠紋理後,釋放影象的記憶體
stbi_image_free(data);√生成一個紋理的過程應該看起來像這樣
unsigned int texture;
glGenTextures(1, &texture);
glBindTexture(GL_TEXTURE_2D, texture);// 為當前繫結的紋理物件設定環繞、過濾方式
glTexParameteri(GL_TEXTURE_2D, GL_TEXTURE_WRAP_S, GL_REPEAT);
glTexParameteri(GL_TEXTURE_2D, GL_TEXTURE_WRAP_T, GL_REPEAT);
glTexParameteri(GL_TEXTURE_2D, GL_TEXTURE_MIN_FILTER, GL_LINEAR);
glTexParameteri(GL_TEXTURE_2D, GL_TEXTURE_MAG_FILTER, GL_LINEAR);// 載入並生成紋理int width, height, nrChannels;unsigned char *data = stbi_load("container.jpg", &width, &height, &nrChannels, 0);if (data)
{
    glTexImage2D(GL_TEXTURE_2D, 0, GL_RGB, width, height, 0, GL_RGB, GL_UNSIGNED_BYTE, data);
    glGenerateMipmap(GL_TEXTURE_2D);
}else
{
    std::cout << "Failed to load texture" << std::endl;
}
stbi_image_free(data);
應用紋理
√我們需要告知OpenGL如何取樣紋理,所以我們必須使用紋理座標更新頂點資料:
float vertices[] = {//     ---- 位置 ----       ---- 顏色 ----     - 紋理座標 -
     0.5f,  0.5f, 0.0f,   1.0f, 0.0f, 0.0f,   1.0f, 1.0f,   // 右上
     0.5f, -0.5f, 0.0f,   0.0f, 1.0f, 0.0f,   1.0f, 0.0f,   // 右下
    -0.5f, -0.5f, 0.0f,   0.0f, 0.0f, 1.0f,   0.0f, 0.0f,   // 左下
    -0.5f,  0.5f, 0.0f,   1.0f, 1.0f, 0.0f,   0.0f, 1.0f    // 左上
};√告訴OpenGL我們新的頂點格式:
glVertexAttribPointer(2, 2, GL_FLOAT, GL_FALSE, 8 * sizeof(float), (void*)(6 * sizeof(float)));
glEnableVertexAttribArray(2);√調整頂點著色器使其能夠接受頂點座標為一個頂點屬性,並把座標傳給片段著色器:(4.1.texture.vs裡的內容)
#version 330 core
layout (location = 0) in vec3 aPos;
layout (location = 1) in vec3 aColor;
layout (location = 2) in vec2 aTexCoord;

out vec3 ourColor;
out vec2 TexCoord;
void main(){
    gl_Position = vec4(aPos, 1.0);
    ourColor = aColor;
    TexCoord = aTexCoord;
}√調整片段著色器:簡單宣告一個uniform sampler2D把一個紋理新增到片段著色器中:使用GLSL內建的texture函式來取樣紋理的顏色,它第一個引數是紋理取樣器,第二個引數是對應的紋理座標。(4.1.texture.fs裡的內容)
#version 330 core
out vec4 FragColor;

in vec3 ourColor;
in vec2 TexCoord;

uniform sampler2D ourTexture;
void main(){
    FragColor = texture(ourTexture, TexCoord);
}√這兩個vs與fs的檔案放在你自己的檔案這裡,如果你想放在別的地方,那就改一下路徑。

√只剩下在呼叫glDrawElements之前繫結紋理了,它會自動把紋理賦值給片段著色器的取樣器:
glBindTexture(GL_TEXTURE_2D, texture);
glBindVertexArray(VAO);
glDrawElements(GL_TRIANGLES, 6, GL_UNSIGNED_INT, 0);
完整的原始碼:
https://learnopengl.com/code_viewer_gh.php?code=src/1.getting_started/4.1.textures/textures.cpp
以下是我的程式碼(加了一些中文註釋):
#include <glad/glad.h>
#include <GLFW/glfw3.h>
#include <shader_s.h>
#define STB_IMAGE_IMPLEMENTATION
#include "stb_image.h"

#include <iostream>
using namespace std;

const unsigned int SCR_WIDTH = 800;
const unsigned int SCR_HEIGHT = 600;


void framebuffer_size_callback(GLFWwindow* window, int width, int height);
void processInput(GLFWwindow *window);

void processInput(GLFWwindow *window)
{
	if (glfwGetKey(window, GLFW_KEY_ESCAPE) == GLFW_PRESS)
		glfwSetWindowShouldClose(window, true);
}

void framebuffer_size_callback(GLFWwindow* window, int width, int height)
{
	glViewport(0, 0, width, height);
}


int main()
{
	glfwInit();
	glfwWindowHint(GLFW_CONTEXT_VERSION_MAJOR, 3);
	glfwWindowHint(GLFW_CONTEXT_VERSION_MINOR, 3);
	glfwWindowHint(GLFW_OPENGL_PROFILE, GLFW_OPENGL_CORE_PROFILE);

	/*建立新視窗*/
	GLFWwindow* window = glfwCreateWindow(SCR_WIDTH, SCR_HEIGHT, "LearnOpenGL", NULL, NULL);
	if (window == NULL)
	{
		std::cout << "Failed to create GLFW window" << std::endl;
		glfwTerminate();
		return -1;
	}
	glfwMakeContextCurrent(window);
	glfwSetFramebufferSizeCallback(window, framebuffer_size_callback);


	if (!gladLoadGLLoader((GLADloadproc)glfwGetProcAddress))
	{
		std::cout << "Failed to initialize GLAD" << std::endl;
		return -1;
	}

	Shader ourShader("4.1.texture.vs", "4.1.texture.fs");

	float vertices[] = {
		// positions          // colors           // texture coords
		 0.5f,  0.5f, 0.0f,   1.0f, 0.0f, 0.0f,   1.0f, 1.0f, // top right
		 0.5f, -0.5f, 0.0f,   0.0f, 1.0f, 0.0f,   1.0f, 0.0f, // bottom right
		-0.5f, -0.5f, 0.0f,   0.0f, 0.0f, 1.0f,   0.0f, 0.0f, // bottom left
		-0.5f,  0.5f, 0.0f,   1.0f, 1.0f, 0.0f,   0.0f, 1.0f  // top left
	};

	unsigned int indices[] = {
		0,1,3,/*第一個三角形*/
		1,2,3/*第二個三角形*/
	};
	unsigned int VBO, VAO, EBO;
	glGenVertexArrays(1, &VAO);
	glGenBuffers(1, &VBO);
	glGenBuffers(1, &EBO);

	glBindVertexArray(VAO);

	glBindBuffer(GL_ARRAY_BUFFER, VBO);
	glBufferData(GL_ARRAY_BUFFER, sizeof(vertices), vertices, GL_STATIC_DRAW);

	glBindBuffer(GL_ELEMENT_ARRAY_BUFFER, EBO);
	glBufferData(GL_ELEMENT_ARRAY_BUFFER, sizeof(indices), indices, GL_STATIC_DRAW);

	glVertexAttribPointer(0, 3, GL_FLOAT, GL_FALSE, 8 * sizeof(float), (void*)0);
	glEnableVertexAttribArray(0);
	glVertexAttribPointer(1, 3, GL_FLOAT, GL_FALSE, 8 * sizeof(float), (void*)(3 * sizeof(float)));
	glEnableVertexAttribArray(1);
	glVertexAttribPointer(2, 2, GL_FLOAT, GL_FALSE, 8 * sizeof(float), (void*)(6 * sizeof(float)));
	glEnableVertexAttribArray(2);

	/*載入並建立紋理*/
	unsigned int texture;
	glGenTextures(1, &texture);
	glBindTexture(GL_TEXTURE_2D, texture);/*繫結這個紋理*/
	/*紋理過濾*/
	glTexParameteri(GL_TEXTURE_2D, GL_TEXTURE_WRAP_S, GL_REPEAT);
	glTexParameteri(GL_TEXTURE_2D, GL_TEXTURE_WRAP_T, GL_REPEAT);
	glTexParameteri(GL_TEXTURE_2D, GL_TEXTURE_MIN_FILTER, GL_LINEAR);
	glTexParameteri(GL_TEXTURE_2D, GL_TEXTURE_MAG_FILTER, GL_LINEAR);

	/*載入圖片*/
	int width, height, nrChannels;
	unsigned char *data = stbi_load(FileSystem::getPath("container.jpg").c_str(), &width, &height, &nrChannels, 0);
	if (data)
	{
		glTexImage2D(GL_TEXTURE_2D, 0, GL_RGB, width, height, 0, GL_RGB, GL_UNSIGNED_BYTE, data);
		glGenerateMipmap(GL_TEXTURE_2D);
	}
	else
	{
		std::cout << "Failed to load texture" << std::endl;
	}
	stbi_image_free(data);


	while (!glfwWindowShouldClose(window))
	{

		processInput(window);

		glClearColor(0.2f, 0.3f, 0.3f, 1.0f);
		glClear(GL_COLOR_BUFFER_BIT);

		ourShader.use();
		glBindVertexArray(VAO);
		//glDrawArrays(GL_TRIANGLES, 0, 3);
		glDrawElements(GL_TRIANGLES, 6, GL_UNSIGNED_INT, 0);

		glfwSwapBuffers(window);
		glfwPollEvents();
	}

	glDeleteVertexArrays(1, &VAO);
	glDeleteBuffers(1, &VBO);
	glDeleteBuffers(1, &EBO);

	glfwTerminate();
	return 0;
}(注意!)

√這裡我一直報錯,你們可以看到教程給出的程式碼是
int width, height, nrChannels;
unsigned char *data = stbi_load(FileSystem::getPath("container.jpg").c_str(), &width, &height, &nrChannels, 0);我就一直報“::後面是名稱空間...”這個錯,我查找了很久都沒有找到合適的解決方案,最後,我發現直接寫圖片途徑就可以了!(一隻菜鳥的哭泣!)
√結果:

√更改4.1.texture.fs
把
void main()
{
	FragColor = texture(texture1, TexCoord);
}
改為
void main()
{
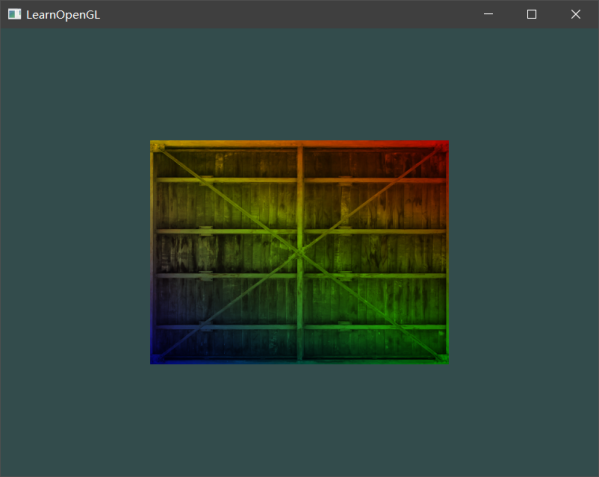
	FragColor = texture(texture1, TexCoord) * vec4(ourColor, 1.0);
}
輸出就變成了:

紋理單元
√一個紋理的位置值通常稱為一個紋理單元(Texture Unit)。紋理單元的主要目的是讓我們在著色器中可以使用多於一個的紋理。
√首先啟用對應的紋理單元。就像glBindTexture一樣,我們可以使用glActiveTexture啟用紋理單元,傳入我們需要使用的紋理單元:
glActiveTexture(GL_TEXTURE0); // 在繫結紋理之前先啟用紋理單元
glBindTexture(GL_TEXTURE_2D, texture);√需要編輯片段著色器來接收另一個取樣器(修改4.1.texture.fs):
#version 330 core
...

uniform sampler2D texture1;
uniform sampler2D texture2;
void main(){
    FragColor = mix(texture(texture1, TexCoord), texture(texture2, TexCoord), 0.2);
}√為了使用第二個紋理(以及第一個),我們必須改變一點渲染流程,先繫結兩個紋理到對應的紋理單元,然後定義哪個uniform取樣器對應哪個紋理單元:
√接下來說一下所有修改過的地方:
①4.1.texture.fs
②while之前,從一張圖片到兩張圖片的演變
/*載入並建立紋理*/
	unsigned int texture;
	glGenTextures(1, &texture);
	glBindTexture(GL_TEXTURE_2D, texture);/*繫結這個紋理*/
	/*紋理過濾*/
	glTexParameteri(GL_TEXTURE_2D, GL_TEXTURE_WRAP_S, GL_REPEAT);
	glTexParameteri(GL_TEXTURE_2D, GL_TEXTURE_WRAP_T, GL_REPEAT);
	glTexParameteri(GL_TEXTURE_2D, GL_TEXTURE_MIN_FILTER, GL_LINEAR);
	glTexParameteri(GL_TEXTURE_2D, GL_TEXTURE_MAG_FILTER, GL_LINEAR);

	/*載入圖片*/
	int width, height, nrChannels;
	unsigned char *data = stbi_load(FileSystem::getPath("container.jpg").c_str(), &width, &height, &nrChannels, 0);
	if (data)
	{
		glTexImage2D(GL_TEXTURE_2D, 0, GL_RGB, width, height, 0, GL_RGB, GL_UNSIGNED_BYTE, data);
		glGenerateMipmap(GL_TEXTURE_2D);
	}
	else
	{
		std::cout << "Failed to load texture" << std::endl;
	}
	stbi_image_free(data);
↓
/*載入並建立紋理*/
	unsigned int texture1,texture2;
	glGenTextures(1, &texture1);
	glBindTexture(GL_TEXTURE_2D, texture1);/*繫結這個紋理*/
	/*紋理過濾*/
	glTexParameteri(GL_TEXTURE_2D, GL_TEXTURE_WRAP_S, GL_REPEAT);
	glTexParameteri(GL_TEXTURE_2D, GL_TEXTURE_WRAP_T, GL_REPEAT);
	glTexParameteri(GL_TEXTURE_2D, GL_TEXTURE_MIN_FILTER, GL_LINEAR);
	glTexParameteri(GL_TEXTURE_2D, GL_TEXTURE_MAG_FILTER, GL_LINEAR);

	/*載入圖片*/
	int width, height, nrChannels;
	stbi_set_flip_vertically_on_load(true);/*確保箱子是正的*/
	unsigned char *data = stbi_load("container.jpg", &width, &height, &nrChannels, 0);
	if (data)
	{
		glTexImage2D(GL_TEXTURE_2D, 0, GL_RGB, width, height, 0, GL_RGB, GL_UNSIGNED_BYTE, data);
		glGenerateMipmap(GL_TEXTURE_2D);
	}
	else
	{
		std::cout << "Failed to load texture" << std::endl;
	}
	stbi_image_free(data);

	glGenTextures(1, &texture2);
	glBindTexture(GL_TEXTURE_2D, texture2);
	/*紋理過濾,與前面類似*/
	glTexParameteri(GL_TEXTURE_2D, GL_TEXTURE_WRAP_S, GL_REPEAT);
	glTexParameteri(GL_TEXTURE_2D, GL_TEXTURE_WRAP_T, GL_REPEAT);
	glTexParameteri(GL_TEXTURE_2D, GL_TEXTURE_MIN_FILTER, GL_LINEAR);
	glTexParameteri(GL_TEXTURE_2D, GL_TEXTURE_MAG_FILTER, GL_LINEAR);

data = stbi_load("awesomeface.png", &width, &height, &nrChannels, 0);③while迴圈裡,ourShader.use();之前加了一段程式碼:
glActiveTexture(GL_TEXTURE0);
glBindTexture(GL_TEXTURE_2D, texture1);
glActiveTexture(GL_TEXTURE1);
glBindTexture(GL_TEXTURE_2D, texture2);
教程程式碼:
我的程式碼(加了一點中文註釋):
#include <glad/glad.h>
#include <GLFW/glfw3.h>
#include <shader_s.h>
#define STB_IMAGE_IMPLEMENTATION
#include "stb_image.h"

#include <iostream>
using namespace std;

const unsigned int SCR_WIDTH = 800;
const unsigned int SCR_HEIGHT = 600;


void framebuffer_size_callback(GLFWwindow* window, int width, int height);
void processInput(GLFWwindow *window);

void processInput(GLFWwindow *window)
{
	if (glfwGetKey(window, GLFW_KEY_ESCAPE) == GLFW_PRESS)
		glfwSetWindowShouldClose(window, true);
}

void framebuffer_size_callback(GLFWwindow* window, int width, int height)
{
	glViewport(0, 0, width, height);
}


int main()
{
	glfwInit();
	glfwWindowHint(GLFW_CONTEXT_VERSION_MAJOR, 3);
	glfwWindowHint(GLFW_CONTEXT_VERSION_MINOR, 3);
	glfwWindowHint(GLFW_OPENGL_PROFILE, GLFW_OPENGL_CORE_PROFILE);

	/*建立新視窗*/
	GLFWwindow* window = glfwCreateWindow(SCR_WIDTH, SCR_HEIGHT, "LearnOpenGL", NULL, NULL);
	if (window == NULL)
	{
		std::cout << "Failed to create GLFW window" << std::endl;
		glfwTerminate();
		return -1;
	}
	glfwMakeContextCurrent(window);
	glfwSetFramebufferSizeCallback(window, framebuffer_size_callback);


	if (!gladLoadGLLoader((GLADloadproc)glfwGetProcAddress))
	{
		std::cout << "Failed to initialize GLAD" << std::endl;
		return -1;
	}

	Shader ourShader("4.1.texture.vs", "4.1.texture.fs");

	float vertices[] = {
		// positions          // colors           // texture coords
		 0.5f,  0.5f, 0.0f,   1.0f, 0.0f, 0.0f,   1.0f, 1.0f, // top right
		 0.5f, -0.5f, 0.0f,   0.0f, 1.0f, 0.0f,   1.0f, 0.0f, // bottom right
		-0.5f, -0.5f, 0.0f,   0.0f, 0.0f, 1.0f,   0.0f, 0.0f, // bottom left
		-0.5f,  0.5f, 0.0f,   1.0f, 1.0f, 0.0f,   0.0f, 1.0f  // top left
	};

	unsigned int indices[] = {
		0,1,3,/*第一個三角形*/
		1,2,3/*第二個三角形*/
	};

	unsigned int VBO, VAO, EBO;
	glGenVertexArrays(1, &VAO);
	glGenBuffers(1, &VBO);
	glGenBuffers(1, &EBO);

	glBindVertexArray(VAO);

	glBindBuffer(GL_ARRAY_BUFFER, VBO);
	glBufferData(GL_ARRAY_BUFFER, sizeof(vertices), vertices, GL_STATIC_DRAW);

	glBindBuffer(GL_ELEMENT_ARRAY_BUFFER, EBO);
	glBufferData(GL_ELEMENT_ARRAY_BUFFER, sizeof(indices), indices, GL_STATIC_DRAW);

	glVertexAttribPointer(0, 3, GL_FLOAT, GL_FALSE, 8 * sizeof(float), (void*)0);
	glEnableVertexAttribArray(0);
	glVertexAttribPointer(1, 3, GL_FLOAT, GL_FALSE, 8 * sizeof(float), (void*)(3 * sizeof(float)));
	glEnableVertexAttribArray(1);
	glVertexAttribPointer(2, 2, GL_FLOAT, GL_FALSE, 8 * sizeof(float), (void*)(6 * sizeof(float)));
	glEnableVertexAttribArray(2);

	/*載入並建立紋理*/
	unsigned int texture1,texture2;
	glGenTextures(1, &texture1);
	glBindTexture(GL_TEXTURE_2D, texture1);/*繫結這個紋理*/
	/*紋理過濾*/
	glTexParameteri(GL_TEXTURE_2D, GL_TEXTURE_WRAP_S, GL_REPEAT);
	glTexParameteri(GL_TEXTURE_2D, GL_TEXTURE_WRAP_T, GL_REPEAT);
	glTexParameteri(GL_TEXTURE_2D, GL_TEXTURE_MIN_FILTER, GL_LINEAR);
	glTexParameteri(GL_TEXTURE_2D, GL_TEXTURE_MAG_FILTER, GL_LINEAR);

	/*載入圖片*/
	int width, height, nrChannels;
	stbi_set_flip_vertically_on_load(true);/*確保箱子是正的*/
	unsigned char *data = stbi_load("container.jpg", &width, &height, &nrChannels, 0);
	if (data)
	{
		glTexImage2D(GL_TEXTURE_2D, 0, GL_RGB, width, height, 0, GL_RGB, GL_UNSIGNED_BYTE, data);
		glGenerateMipmap(GL_TEXTURE_2D);
	}
	else
	{
		std::cout << "Failed to load texture" << std::endl;
	}
	stbi_image_free(data);

	glGenTextures(1, &texture2);
	glBindTexture(GL_TEXTURE_2D, texture2);
	/*紋理過濾,與前面類似*/
	glTexParameteri(GL_TEXTURE_2D, GL_TEXTURE_WRAP_S, GL_REPEAT);
	glTexParameteri(GL_TEXTURE_2D, GL_TEXTURE_WRAP_T, GL_REPEAT);
	glTexParameteri(GL_TEXTURE_2D, GL_TEXTURE_MIN_FILTER, GL_LINEAR);
	glTexParameteri(GL_TEXTURE_2D, GL_TEXTURE_MAG_FILTER, GL_LINEAR);

	data = stbi_load("awesomeface.png", &width, &height, &nrChannels, 0);

	if (data)
	{
		glTexImage2D(GL_TEXTURE_2D, 0, GL_RGBA, width, height, 0, GL_RGBA, GL_UNSIGNED_BYTE, data);
		glGenerateMipmap(GL_TEXTURE_2D);
	}
	else
	{
		std::cout << "Failed to load texture" << std::endl;
	}
	stbi_image_free(data);

	ourShader.use();
	glUniform1i(glGetUniformLocation(ourShader.ID, "texture1"), 0);/*設定uniform*/
	ourShader.setInt("texture2", 1);/*或者使用著色器類設定*/

	while (!glfwWindowShouldClose(window))
	{

		processInput(window);

		glClearColor(0.2f, 0.3f, 0.3f, 1.0f);
		glClear(GL_COLOR_BUFFER_BIT);

		glActiveTexture(GL_TEXTURE0);
		glBindTexture(GL_TEXTURE_2D, texture1);
		glActiveTexture(GL_TEXTURE1);
		glBindTexture(GL_TEXTURE_2D, texture2);

		ourShader.use();
		glBindVertexArray(VAO);
		//glDrawArrays(GL_TRIANGLES, 0, 3);
		glDrawElements(GL_TRIANGLES, 6, GL_UNSIGNED_INT, 0);

		glfwSwapBuffers(window);
		glfwPollEvents();
	}

	glDeleteVertexArrays(1, &VAO);
	glDeleteBuffers(1, &VBO);
	glDeleteBuffers(1, &EBO);

	glfwTerminate();
	return 0;
}
輸出:

最後,如果修改4.1.texture.fs中main裡面為:
FragColor = mix(texture(texture1, TexCoord), texture(texture2, vec2(1.0 - TexCoord.x, TexCoord.y)), 0.2);輸出就會變為:

