
JavaWeb從新手到入門(三)EeayUI後臺管理介面
參考:《傳智播客-淘淘商城》
一、EasyUI
1.1 EasyUI
jQuery EasyUI 是一個基於 jQuery 的框架,集成了各種使用者介面外掛。jQuery EasyUI 框架提供了建立網頁所需的一切,可以幫助使用者輕鬆搭建頁面,由於使用簡單,是搭建後臺管理介面的絕佳選擇(後臺管理介面對美觀和設計感的要求不強,EasyUI可以滿足需要)。
1.2 EasyUI的宣告
在使用EasyUI之前必須先宣告UI控制元件,有兩個方法宣告它。
1. 直接在 HTML 宣告元件。
2. 編寫 JavaScript 程式碼來建立元件。<div class="easyui-dialog" style="width:400px;height:200px" data-options="title:'My Dialog',collapsible:true,iconCls:'icon-ok',onOpen:function(){}"> dialog content. </div>
<input id="cc" style="width:200px" />$('#cc').combobox({
url: ...,
required: true,
valueField: 'id',
textField: 'text'
});1.3 EasyUI的佈局
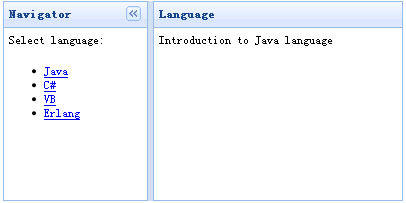
邊框佈局(border layout)提供五個區域:east、west、north、south、center。以下是一些通常用法:
- north 區域可以用來顯示網站的標語。
- south 區域可以用來顯示版權以及一些說明。
- west 區域可以用來顯示導航選單。
- east 區域可以用來顯示一些推廣的專案。
- center 區域可以用來顯示主要的內容。
我們在一個 <div> 容器中建立了一個邊框佈局(border layout),佈局(layout)把容器切割為兩個部分,左邊是導航選單,右邊是主要內容。最後我們寫一個 onclick 事件處理函式來檢索資料,'showcontent' 函式非常簡單:<div class="easyui-layout" style="width:400px;height:200px;"> <div region="west" split="true" title="Navigator" style="width:150px;"> <p style="padding:5px;margin:0;">Select language:</p> <ul> <li><a href="javascript:void(0)" onclick="showcontent('java')">Java</a></li> <li><a href="javascript:void(0)" onclick="showcontent('cshape')">C#</a></li> <li><a href="javascript:void(0)" onclick="showcontent('vb')">VB</a></li> <li><a href="javascript:void(0)" onclick="showcontent('erlang')">Erlang</a></li> </ul> </div> <div id="content" region="center" title="Language" style="padding:5px;"> </div> </div>
function showcontent(language){
        $('#content').html('Introduction to ' + language + ' language');
    }
1.4 EasyUI標籤頁
EasyUI還可以建立標籤頁(Tabs 元件),Tabs 一次僅僅顯示一個面板(panel),每個面板(panel)都有標題、圖示和關閉按鈕。 當 Tabs 被選中時,將顯示對應的面板(panel)的內容。
從 HTML 標記建立 Tabs,包含一個 DIV 容器和一些 DIV 面板(panel)。
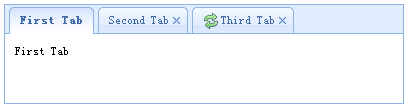
    <div class="easyui-tabs" style="width:400px;height:100px;">
        <div title="First Tab" style="padding:10px;">
            First Tab
        </div>
        <div title="Second Tab" closable="true" style="padding:10px;">
            Second Tab
        </div>
        <div title="Third Tab" iconCls="icon-reload" closable="true" style="padding:10px;">
            Third Tab
        </div>
</div><div style="margin-bottom:10px">
<a href="#" class="easyui-linkbutton" onclick="addTab('google','http://www.google.com')">google</a>
<a href="#" class="easyui-linkbutton" onclick="addTab('jquery','http://jquery.com/')">jquery</a>
<a href="#" class="easyui-linkbutton" onclick="addTab('easyui','http://jeasyui.com/')">easyui</a>
</div>
<div id="tt" class="easyui-tabs" style="width:400px;height:250px;">
<div title="Home">
</div>
</div>
新增Tab的JavaScript程式碼如下:
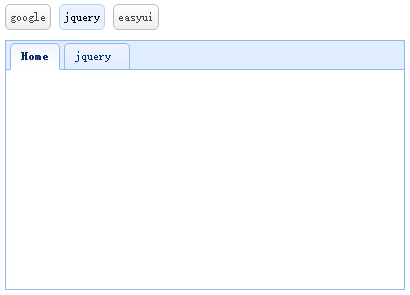
function addTab(title, url){
	if ($('#tt').tabs('exists', title)){
		$('#tt').tabs('select', title);
	} else {
		var content = '<iframe scrolling="auto" frameborder="0"  src="'+url+'" style="width:100%;height:100%;"></iframe>';
		$('#tt').tabs('add',{
			title:title,
			content:content,
			closable:true
		});
	}
}
1.5 EasyUI資料網格
EasyUI資料網格(datagrid)的列資訊是定義在 <thead> 標記中,資料是定義在 <tbody> 標記中。確保為所有的資料列設定 field 名稱,請看下面的例項:
<table id="tt" class="easyui-datagrid" style="width:400px;height:auto;">
        <thead>
            <tr>
                <th field="name1" width="50">Col 1</th>
                <th field="name2" width="50">Col 2</th>
                <th field="name3" width="50">Col 3</th>
                <th field="name4" width="50">Col 4</th>
                <th field="name5" width="50">Col 5</th>
                <th field="name6" width="50">Col 6</th>
            </tr>
        </thead>
        <tbody>
            <tr>
                <td>Data 1</td>
                <td>Data 2</td>
                <td>Data 3</td>
                <td>Data 4</td>
                <td>Data 5</td>
                <td>Data 6</td>
            </tr>
            <tr>
                <td>Data 1</td>
                <td>Data 2</td>
                <td>Data 3</td>
                <td>Data 4</td>
                <td>Data 5</td>
                <td>Data 6</td>
            </tr>
            <tr>
                <td>Data 1</td>
                <td>Data 2</td>
                <td>Data 3</td>
                <td>Data 4</td>
                <td>Data 5</td>
                <td>Data 6</td>
            </tr>
            <tr>
                <td>Data 1</td>
                <td>Data 2</td>
                <td>Data 3</td>
                <td>Data 4</td>
                <td>Data 5</td>
                <td>Data 6</td>
            </tr>
        </tbody>
</table><thead>
<tr>
<th field="name1" width="50" rowspan="2">Col 1</th>
<th field="name2" width="50" rowspan="2">Col 2</th>
<th field="name3" width="50" rowspan="2">Col 3</th>
<th colspan="3">Details</th>
</tr>
<tr>
<th field="name4" width="50">Col 4</th>
<th field="name5" width="50">Col 5</th>
<th field="name6" width="50">Col 6</th>
</tr>
</thead>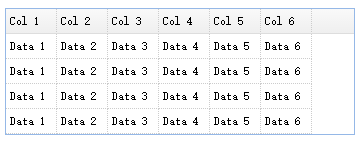
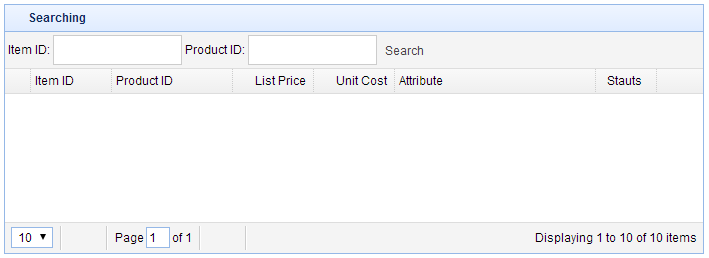
如上簡單的表格一般難以滿足動態更新的需要,動態更新的表格如下圖:
其程式碼如下所示:
    <table id="tt" class="easyui-datagrid" style="width:600px;height:250px"
            url="datagrid24_getdata.php" toolbar="#tb"
            title="Load Data" iconCls="icon-save"
            rownumbers="true" pagination="true">
        <thead>
            <tr>
                <th field="itemid" width="80">Item ID</th>
                <th field="productid" width="80">Product ID</th>
                <th field="listprice" width="80" align="right">List Price</th>
                <th field="unitcost" width="80" align="right">Unit Cost</th>
                <th field="attr1" width="150">Attribute</th>
                <th field="status" width="60" align="center">Stauts</th>
            </tr>
        </thead>
</table> <div id="tb" style="padding:3px">
<span>Item ID:</span>
<input id="itemid" style="line-height:26px;border:1px solid #ccc">
<span>Product ID:</span>
<input id="productid" style="line-height:26px;border:1px solid #ccc">
<a href="#" class="easyui-linkbutton" plain="true" onclick="doSearch()">Search</a>
</div>function doSearch(){
$('#tt').datagrid('load',{
itemid: $('#itemid').val(),
productid: $('#productid').val()
});
}1.6 EasyUI樹形選單
一個樹形選單(Tree)可以從標記建立。easyui 樹形選單(Tree)也可以定義在 <ul> 元素中。無序列表的 <ul> 元素提供一個基礎的樹(Tree)結構。每一個 <li> 元素將產生一個樹節點,子 <ul> 元素將產生一個父樹節點。
<ul class="easyui-tree">
        <li>
            <span>Folder</span>
            <ul>
                <li>
                    <span>Sub Folder 1</span>
                    <ul>
                        <li><span>File 11</span></li>
                        <li><span>File 12</span></li>
                        <li><span>File 13</span></li>
                    </ul>
                </li>
                <li><span>File 2</span></li>
                <li><span>File 3</span></li>
            </ul>
        </li>
        <li><span>File21</span></li>
    </ul>
二、後臺管理介面
網站的後臺管理介面首頁為index.jsp,開啟網站後預設跳轉,介面如下:

如下為網站首頁原始碼:
<%@ page language="java" contentType="text/html; charset=UTF-8" pageEncoding="UTF-8"%>
<!DOCTYPE html PUBLIC "-//W3C//DTD HTML 4.01 Transitional//EN" "http://www.w3.org/TR/html4/loose.dtd">
<html>
<head>
<meta http-equiv="Content-Type" content="text/html; charset=UTF-8">
<title>淘淘商城後臺管理系統</title>
<link rel="stylesheet" type="text/css" href="js/jquery-easyui-1.4.1/themes/default/easyui.css" />
<link rel="stylesheet" type="text/css" href="js/jquery-easyui-1.4.1/themes/icon.css" />
<link rel="stylesheet" type="text/css" href="css/taotao.css" />
<script type="text/javascript" src="js/jquery-easyui-1.4.1/jquery.min.js"></script>
<script type="text/javascript" src="js/jquery-easyui-1.4.1/jquery.easyui.min.js"></script>
<script type="text/javascript" src="js/jquery-easyui-1.4.1/locale/easyui-lang-zh_CN.js"></script>
<script type="text/javascript" src="js/common.js"></script>
<style type="text/css">
	.content {
		padding: 10px 10px 10px 10px;
	}
</style>
</head>
<body class="easyui-layout">
    <div data-options="region:'west',title:'選單',split:true" style="width:180px;">
    	<ul id="menu" class="easyui-tree" style="margin-top: 10px;margin-left: 5px;">
         	<li>
         		<span>商品管理</span>
         		<ul>
	         		<li data-options="attributes:{'url':'item-add'}">新增商品</li>
	         		<li data-options="attributes:{'url':'item-list'}">查詢商品</li>
	         		<li data-options="attributes:{'url':'item-param-list'}">規格引數</li>
	         	</ul>
         	</li>
         	<li>
         		<span>網站內容管理</span>
         		<ul>
	         		<li data-options="attributes:{'url':'content-category'}">內容分類管理</li>
	         		<li data-options="attributes:{'url':'content'}">內容管理</li>
	         	</ul>
         	</li>
         </ul>
    </div>
    <div data-options="region:'center',title:''">
    	<div id="tabs" class="easyui-tabs">
		    <div title="首頁" style="padding:20px;">

		    </div>
		</div>
    </div>

<script type="text/javascript">
$(function(){
	$('#menu').tree({
		onClick: function(node){
			if($('#menu').tree("isLeaf",node.target)){
				var tabs = $("#tabs");
				var tab = tabs.tabs("getTab",node.text);
				if(tab){
					tabs.tabs("select",node.text);
				}else{
					tabs.tabs('add',{
					    title:node.text,
					    href: node.attributes.url,
					    closable:true,
					    bodyCls:"content"
					});
				}
			}
		}
	});
});
</script>
</body>
</html>index.jsp中使用了easyui-layout和easyui-tree兩個EasyUI元件,併為樹形選單提供了方法function,在點選樹形選單時新建標籤頁,且請求與頁面的名稱一致,故點選相應選單項(如“新增商品”:<li data-options="attributes:{'url':'item-add'}">新增商品</li>)時即可跳轉到Url指定的頁面:item-add.jsp。
三、介面跳轉
頁面開啟和跳轉需要在服務端新增一個頁面跳轉服務,因此需要在Web工程中新增一個Controller,即為PageController:
package priv.ality.controller;

import org.springframework.stereotype.Controller;
import org.springframework.web.bind.annotation.PathVariable;
import org.springframework.web.bind.annotation.RequestBody;
import org.springframework.web.bind.annotation.RequestMapping;

/**
 *
 */
@Controller
public class PageController {

    @RequestMapping("/")
    public String showIndex(){
        return "index";
    }

    @RequestMapping("/{page}")
    public String showPage(@PathVariable String page){
        return page;
    }
}四、SpringMVC 靜態資源訪問
後臺管理的index.jsp中包含了服務端下的CSS/JS檔案(<link>和<script>定義),而在前面的配置中在web.xml檔案中配置的預設Servlet如下:
<!-- springmvc的前端控制器 -->
  <servlet>
    <servlet-name>ality-manager</servlet-name>
    <servlet-class>org.springframework.web.servlet.DispatcherServlet</servlet-class>
    <init-param>
      <param-name>contextConfigLocation</param-name>
      <param-value>classpath:spring-mvc.xml</param-value>
    </init-param>
    <load-on-startup>1</load-on-startup>
  </servlet>


  <servlet-mapping>
    <servlet-name>ality-manager</servlet-name>
    <url-pattern>/</url-pattern>
</servlet-mapping><!-- 配置註解驅動 -->
<mvc:annotation-driven/>
<mvc:resources mapping="/js/**" location="/js/"/>
<mvc:resources mapping="/css/**" location="/css/"/>
<!-- 定義跳轉的檔案的前後綴 ,檢視模式配置 -->
<bean class="org.springframework.web.servlet.view.InternalResourceViewResolver">
<property name="prefix" value="/WEB-INF/jsp/" />
<property name="suffix" value=".jsp"/>
</bean>