
springboot連線redis單機版
1 首先redis要開啟
cd redis-3.0.0 cd /usr/local/redis19 cd bin/ ./redis-server redis.conf ps -aux | grep redis 看到埠號出來就證明啟動了2 pom.xml中 加入
<!-- 加入redis起步依賴 -->
<dependency>
<groupId>org.springframework.boot</groupId>
<artifactId>spring-boot-starter-redis</artifactId>
</dependency>
application.properties
加入 spring.redis.host=ip地址
spring.redis.port=6379 埠號
3 main檔案 加入 @EnableCaching
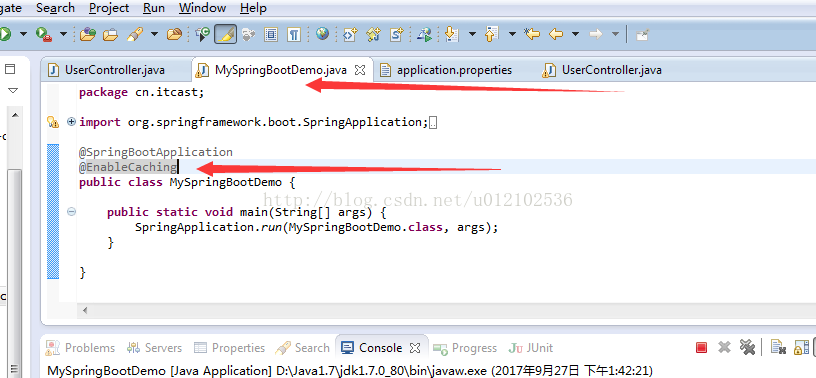
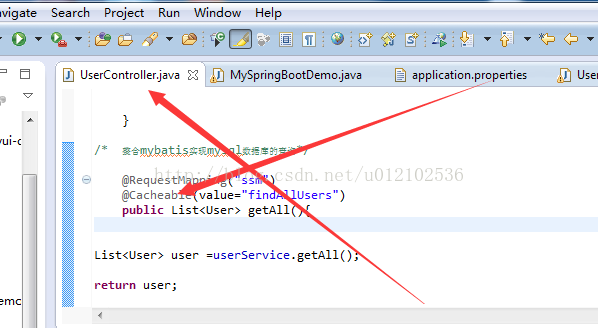
4 controller方法上加上 @Cacheable(value="findAllUsers")
相關推薦
springboot連線redis單機版
1 首先redis要開啟 cd redis-3.0.0 cd /usr/local/redis19 cd bin/ ./redis-server redis.conf ps -aux | grep redis 看到埠號出來就證明啟動了 2 pom.xml中 加入 &
使用jedis客戶端連線redis,單機版和叢集版
單機版 1.入門例項 @Test public void testJedis(){ //建立一個jedis物件,需要指定服務的ip和埠號 Jedis jedis=new Jedis("192.168.25.11",
SpringBoot整合Redis(單機版)
一:環境搭建. 1.1 SpringBoot的環境是 1.5.10.RELEASE. <dependency> <groupId>org.springframework.boot</gro
SpringBoot整合Redis(單機+叢集) —— 含Spring版附件文件
首先推薦一個文件: 介紹了redis單機、叢集的搭建,以及Spring專案中如何使用Jedis、JedisCluster進行redis操作,看不懂本文的看這個文件也行。 ---------------------------------------------------
虛擬機搭建redis單機版及redis-cluster,使用redis desktop manager和java(eclipse)連接redis過程遇到問題匯總
init clu centos 一律 有用 tex 保護模式 bin service 如果你看到這裏,我默認你已經安裝好了redis,並且已經成功的在虛擬機的Linux系統中ping通。 介紹一下我的環境:VMware虛擬機安裝centos 6.5版的Linux系統,red
快速搭建redis單機版和redis集群版
rdo replicas src install 分布式 安裝redis 運行環境 color spa 單機版 第一步:需要安裝redis所需的C語言環境,若虛擬機聯網,則執行 yum install gcc-c++ 第二步:redis的源碼包上傳到linux系
Redis單機版安裝
比較 -c 修改配置 all href 上傳文件 www p s 修改配置文件 1.工具簡單介紹 1.博主使用的是Xshell工具 ps:需要設置端口和連接名稱,端口一般默認為22,需要的童鞋可以自行百度 2.Redis單機版安裝 第一步:安裝gcc編譯環境 yum in
linux下redis單機版搭建
運行 在線好友 列表 適應 後端 c++ 字符串 moni 集合類型 1.1.什麽是redis Redis是用C語言開發的一個開源的高性能鍵值對(key-value)數據庫。它通過提供多種鍵值數據類型來適應不同場景下的存儲需求,目前為止Redis支持的鍵值數據類型如下: 字
linux搭建redis(單機版)
1.redis的安裝 1.1 redis 下載 官網地址 點選開啟連結 下載地址 點選開啟連結 1.2 redis 的安裝 安裝
CentOS 7 安裝Redis單機版和叢集
Redis下載 http://download.redis.io/releases/redis-4.0.11.tar.gz 一、單機版搭建 1.上傳壓縮包到 /usr/download (我自定義放安裝包的目錄) 2.安裝gcc編譯環境,命令 yum install gcc-c++
通過jedis連線redis單機成功,使用redis客戶端可以連線叢集,但使用JedisCluster連線redis叢集一直報Could not get a resource from th
原因是這個地方以前我沒註釋redis.conf檔案中的bind 127.0.0.1 然後做叢集時使用的命令是: ./redis-trib.rb create –replicas 1 127.0.0.1:7001 127.0.0.1:7002 127.0.0.1:7003 127.0.
SSM框架中使用Redis單機版
上一篇文章就說要嘗試在程式碼中實現Redis使用,但是有一段時間很(tou)忙(lan),所以現在才寫。 Maven依賴 <!-- Redis --> <dependency> <groupId>redis
redis單機版和叢集版工具類
單機版叢集版共同實現的介面 package com.hr.common.redis; public interface JedisClient { String set(String key ,String value); String get(Stri
redis單機版的安裝部署以及java實現
2018年11月05日 20:39:57 孤獨求劍 閱讀數:1 個人分類: dedis
redis單機版偽分散式叢集搭建
繼上一篇redis單機伺服器搭建成功之後,按如下方式進行叢集搭建。 搭建一個最小的叢集需要6臺機器(由節點投票機制決定至少需要3臺主節點,另外為了高可用每個主節點至少要備一個從節點,所以總共需要6個節點。這裡6個節點全部設在一臺機上,通過埠號來分別。實現偽分散式
redis單機版,哨兵,叢集的一些總結
首先需要了解的是Redis是c語言開發的。安裝redis需要c語言的編譯環境。如果沒有gcc需要線上安裝。yum install gcc-c++一、單機版 1.下載redis的linux版本檔案並上傳伺服器並且解壓這裡我上傳到了伺服器/data/file/目錄下的位置解壓命令
redis單機版安裝+測試+專案運用
【簡介】 Redis是一個開源的使用ANSI C語言編寫、支援網路、可基於記憶體亦可持久化的日誌型、Key-Value資料庫,並提供多種語言的API。 應用場景:前臺有一部分內容經常被大量多次的訪問的情況下就有必要使用redis了 優點:減少了對資料的訪問,
Redis單機版安裝與配置
1,採用tar命令,解壓redis到指定目錄。 具體命令為 tar -xzvf redis-3.2.5.tar.gz -C ./ -C 指定解壓到目錄 2.進入redis目錄,將redis安裝到指定目錄。使用make PREFIX=/usr/local/redis i
spring整合redis單機版
1:在ApplicationContex.xml中配置JedisPool的例項。指定ip地址和埠號; 2:建立dao層介面; 3:實現介面 4:將快取新增到業務邏輯 注:JsonUtils
專案中使用redis單機版和叢集版
redis搭建請看上一篇文章新增jedis依賴: <!-- Redis客戶端 --> <dependency> <groupId>redis.clients</groupId> &l