如何更好的判斷系統上傳檔案是指定檔案型別--檔案魔術數字
阿新 • • 發佈:2018-12-25
理論介紹
這裡所說的表示不同檔案型別的魔術數字,指定是檔案的最開頭的幾個用於唯一區別其它檔案型別的位元組,有了這些魔術數字,我們就可以很方便的區別不同的檔案,這也使得程式設計變得更加容易,因為我減少了我們用於區別一個檔案的檔案型別所要花費的時間。
比如,一個JPEG檔案,它開頭的一些位元組可能是類似這樣的”ffd8 ffe0 0010 4a46 4946 0001 0101 0047 ……JFIF…..G“,這裡”ffd8“就表示了這個檔案是一個JPEG型別的檔案,”ffe0“表示這是JFIF型別結構。
以下例出的是一些我們常見的檔案型別,以及它用於判斷這種檔案的型別的幾個開始位元組及所對尖的ASCII數字:
圖片檔案
| 檔案型別 | 副檔名 | 16進位制數字,xx這裡表示變數 | Ascii數字 . = 不是Ascii字元 |
|---|---|---|---|
| Bitmap format | .bmp | 42 4d | BM |
| FITS format | .fits | 53 49 4d 50 4c 45 | SIMPLE |
| GIF format | .gif | 47 49 46 38 | GIF8 |
| Graphics Kernel System | .gks | 47 4b 53 4d | GKSM |
| IRIS rgb format | .rgb | 01 da | .. |
| ITC (CMU WM) format | .itc | f1 00 40 bb | …. |
| JPEG File Interchange Format | .jpg | ff d8 ff e0 | …. |
| NIFF (Navy TIFF) | .nif | 49 49 4e 31 | IIN1 |
| PM format | .pm | 56 49 45 57 | VIEW |
| PNG format | .png | 89 50 4e 47 | .PNG |
| Postscript format | .[e]ps | 25 21 | %! |
| Sun Rasterfile | .ras | 59 a6 6a 95 | Y.j. |
| Targa format | .tga | xx xx xx | … |
| TIFF format (Motorola – big endian) | .tif | 4d 4d 00 2a | MM.* |
| TIFF format (Intel – little endian) | .tif | 49 49 2a 00 | II*. |
| X11 Bitmap format | .xbm | xx xx | |
| XCF Gimp file structure | .xcf | 67 69 6d 70 20 78 63 66 20 76 | gimp xcf |
| Xfig format | .fig | 23 46 49 47 | #FIG |
| XPM format | .xpm | 2f 2a 20 58 50 4d 20 2a 2f | /* XPM */ |
壓縮檔案
| 檔案型別 | 副檔名 | 16進位制數字 xx這裡表示變數 | Ascii數字. = 不是Ascii字元 |
|---|---|---|---|
| Bzip | .bz | 42 5a | BZ |
| Compress | .Z | 1f 9d | .. |
| gzip format | .gz | 1f 8b | .. |
| pkzip format | .zip | 50 4b 03 04 | PK.. |
存檔檔案
| 檔案型別 | 副檔名 | 16進位制數字xx這裡表示變數 | Ascii數字. = 不是Ascii字元 |
|---|---|---|---|
| TAR (pre-POSIX) | .tar | xx xx | (a filename) |
| TAR (POSIX) | .tar | 75 73 74 61 72 | ustar (offset by 257 bytes) |
可執行檔案
| 檔案型別 | 副檔名 | 16進位制數字xx這裡表示變數 | Ascii數字. = 不是Ascii字元 |
|---|---|---|---|
| MS-DOS, OS/2 or MS Windows | 4d 5a | MZ | |
| Unix elf | 7f 45 4c 46 | .ELF |
其它檔案
| 檔案型別 | 副檔名 | 16進位制數字xx這裡表示變數 | Ascii數字. = 不是Ascii字元 |
|---|---|---|---|
| pgp public ring | 99 00 | .. | |
| pgp security ring | 95 01 | .. | |
| pgp security ring | 95 00 | .. | |
| pgp encrypted data | a6 00 | ¦. |
java實現(圖片型別判斷)
使用魔術數字判斷
import java.io.File;
import java.io.FileInputStream;
import java.io.IOException;
import java.io.InputStream;

public class ImageTypeCheck {

    public static String bytesToHexString(byte[] src) {
        StringBuilder stringBuilder = new StringBuilder();
        if (src == null || src.length <= 0) {
            return null;
        }
        for (int i = 0; i < src.length; i++) {
            // byte轉int
            int v = src[i] & 0xFF;
            String hv = Integer.toHexString(v);
            if (hv.length() < 2) {
                stringBuilder.append(0);
            }
            stringBuilder.append(hv);
        }
        return stringBuilder.toString();
    }
    public static void main(String[] args) throws IOException {
        String imagePath = "c:/favicon.png";
        File image = new File(imagePath);
        InputStream is = new FileInputStream(image);
        byte[] bt = new byte[2];
        is.read(bt);
        System.out.println(bytesToHexString(bt));
    }
}
使用圖片長寬判斷
如果能夠正常的獲取到一張圖片的寬高屬性,那肯定這是一張圖片,因為非圖片檔案我們是獲取不到它的寬高屬性的,以下是用於獲取根據是否可以獲取到圖片寬高屬性來判斷這是否一張圖片的JAVA程式碼:
/**
 * 通過讀取檔案並獲取其width及height的方式,來判斷判斷當前檔案是否圖片,這是一種非常簡單的方式。
 *
 * @param imageFile
 * @return
 */
public static boolean isImage(File imageFile) {
    if (!imageFile.exists()) {
        return false;
    }
    Image img = null;
    try {
        img = ImageIO.read(imageFile);
        if (img == null || img.getWidth(null) <= 0 || img.getHeight(null) <= 0) {
            return false;
        }
        return true;
    } catch (Exception e) {
        return false;
    } finally {
        img = null;
    }
}
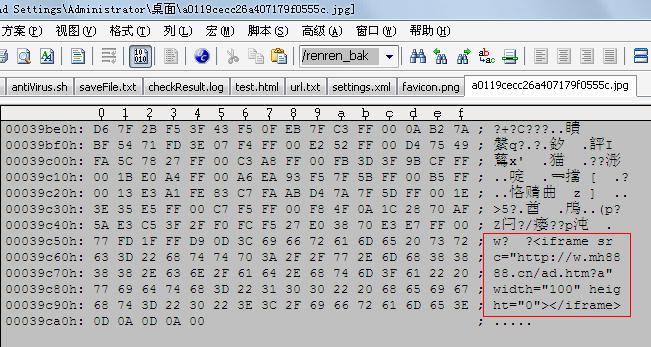
好了,我們終於判斷出一個檔案是否圖片了,可是如果是在一個可以正常瀏覽的圖片檔案中加入一些非法的程式碼呢:

這就是在一張正常的圖片末尾增加的一些iframe程式碼,我曾經嘗試過單獨開啟這張圖片,也將這張圖片放於網頁上開啟,雖然這樣都不會被執行,但並不代表插入其它的程式碼也並不會執行,防毒軟體(如AVAST)對這種修改是會報為病毒的。
那我們要如何預防這種東西,即可以正常開啟,又具有正確的圖片副檔名,還可以獲取到它的寬高屬性?呵,我們這個時候可以對這個圖片進地重寫,給它增加水印或者對它進行resize操作,這樣新生成的圖片就不會再包含這樣的惡意程式碼了,以下是一個增加水印的JAVA實現:
增加水印的JAVA實現
/**
     * 新增圖片水印
     *
     * @param srcImg 目標圖片路徑,如:C:\\kutuku.jpg
     * @param waterImg 水印圖片路徑,如:C:\\kutuku.png
     * @param x 水印圖片距離目標圖片左側的偏移量,如果x<0, 則在正中間
     * @param y 水印圖片距離目標圖片上側的偏移量,如果y<0, 則在正中間
     * @param alpha 透明度(0.0 -- 1.0, 0.0為完全透明,1.0為完全不透明)
     * @throws IOException
     */
    public final static void addWaterMark(String srcImg, String waterImg, int x, int y, float alpha) throws IOException {
        // 載入目標圖片
        File file = new File(srcImg);
        String ext = srcImg.substring(srcImg.lastIndexOf(".") + 1);
        Image image = ImageIO.read(file);
        int width = image.getWidth(null);
        int height = image.getHeight(null);

        // 將目標圖片載入到記憶體。
        BufferedImage bufferedImage = new BufferedImage(width, height, BufferedImage.TYPE_INT_RGB);
        Graphics2D g = bufferedImage.createGraphics();
        g.drawImage(image, 0, 0, width, height, null);

        // 載入水印圖片。
        Image waterImage = ImageIO.read(new File(waterImg));
        int width_1 = waterImage.getWidth(null);
        int height_1 = waterImage.getHeight(null);
        // 設定水印圖片的透明度。
        g.setComposite(AlphaComposite.getInstance(AlphaComposite.SRC_ATOP, alpha));

        // 設定水印圖片的位置。
        int widthDiff = width - width_1;
        int heightDiff = height - height_1;
        if (x < 0) {
            x = widthDiff / 2;
        } else if (x > widthDiff) {
            x = widthDiff;
        }
        if (y < 0) {
            y = heightDiff / 2;
        } else if (y > heightDiff) {
            y = heightDiff;
        }

        // 將水印圖片“畫”在原有的圖片的制定位置。
        g.drawImage(waterImage, x, y, width_1, height_1, null);
        // 關閉畫筆。
        g.dispose();

        // 儲存目標圖片。
        ImageIO.write(bufferedImage, ext, file);
} 