
架構篇--系統監控--spring-boot2.0.X 系統原生資訊監控,SQL資訊監控,cpu溫度監控報警,cup磁碟記憶體使用率監控報警,自定義端點監控以及子節點獲取,系統異常郵件通知
阿新 • • 發佈:2018-12-25
架構篇–系統監控–spring-boot2.0.X 系統原生資訊監控,SQL資訊監控,cpu溫度監控報警,cup磁碟記憶體使用率監控報警,自定義端點監控以及子節點獲取,加工原生端點,系統異常郵件通知,ui介面spring-boot-admin2.0整合等等內容
@author Simon
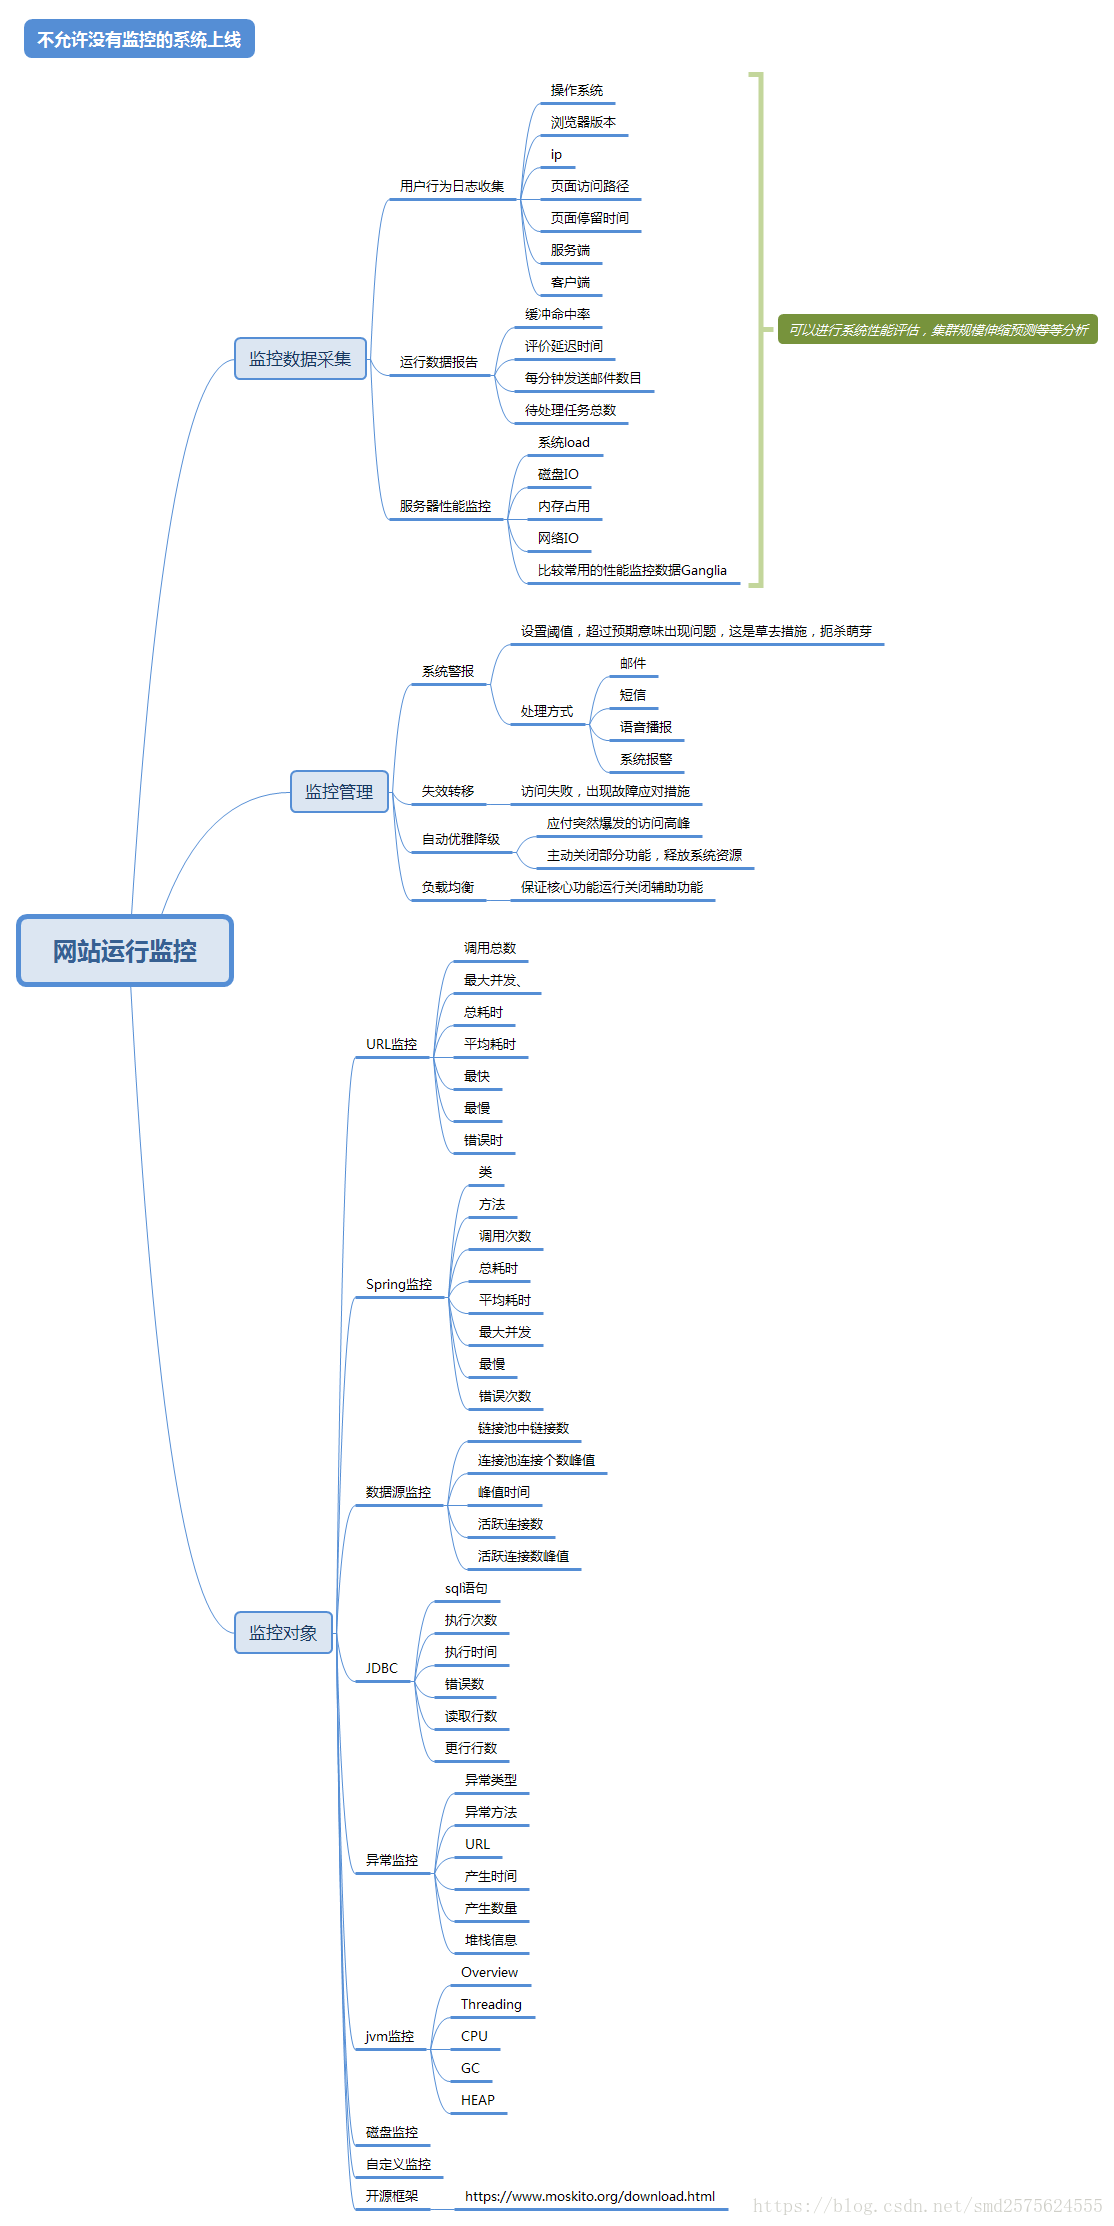
監控是系統中的一個重要組成部分,沒有監控的系統是不允許被上線的。
監控是為了防患於未然,將錯誤扼殺在搖籃。系統報警設定閾值,一旦接觸危險,馬上通知所有人。錯誤資訊記錄,將錯誤直接暴露在眼前,不必要浪費人力物力去大面積測試尋找,合理化控制了日誌輸出,減少運維工程師的負擔,也方便開發工程師定位解決錯誤。
這就是監控,先求生存,而後謀發展,保證系統萬無一失,這才是監控的作用。
有關具體的監控內容請看下圖:
Actuator專案為測試demo,非工程化專案,功能基礎,結構簡單,僅僅為測試監控內容實現,考察技術難度編寫,前後端傳值為json形式,restful標準介面。
本專案使用2.0.2.RELEASE,請注意使用2.0.0之前的版本不會匹配。springboot推出2.0版本的actuator模組產生很大改變。
重點上程式碼:自己擼(專案原始碼)
依賴模組
springboot依賴
1. spring-boot-starter-parent
2. spring-boot-starter
3. spring-boot-starter-actuator
4. spring-boot-starter-data-jpa
5. spring-boot-starter-web
6. spring-boot-starter-test
7. spring-boot-starter-security
8. spring-context-support
其他依賴
1. com.alibaba
2. jolokia-core
3. org.hsqldb
4. mysql-connector-java
application.yml
#專案路徑和埠
server.servlet.context-path=/ds
server.port=9999
#監控配置
management.server.port=8888
#開啟全部端點
management.endpoints.web.exposure.include=*
#health
management.endpoints.web.path-mapping.health=healthcheck
management.endpoint.health.show- actuator 提供的端點資訊
| 端點 | 描述 | HTTP 方法 |
|---|---|---|
| auditevents | 顯示通用的監控資訊 | GET |
| beans | 顯示應用程式上下文所有的Spring bean | GET |
| configprops | 顯示所有 @ConfigurationProperties 的配置屬性列表 |
GET |
| threaddump | 顯示執行緒活動的快照 | GET |
| env | 顯示應用的環境變數 | GET |
| healthcheck | 顯示應用程式的健康指標,這些值由HealthIndicator的實現類提供。常見取值:UP / DOWN / UNKNOWN / OUT_OF_SERVICE |
GET |
| info | 顯示應用的資訊,可使用 info.* 屬性自定義info端點公開的資料 |
GET |
| mappings | 顯示所有的URL路徑 | GET |
| metrics | 顯示應用的度量標準資訊 | GET |
| shutdown | 關閉應用(預設情況下不啟用,如需啟用,需設定endpoints.shutdown.enabled=true) |
POST |
| sessions | 程式sessions的資訊 | GET |
| conditions | 顯示配置的條件和原因 | GET |
| httptrace | 顯示http追蹤資訊 | GET |
| loggers | 顯示修飾和配置的日誌 | GET |
| scheduledtasks | 顯示程式中預定的任務 | GET |
實時檢視效能狀態
訪問方式
效能查詢
springboot 原生整合的資訊檢視內容
##############################################################################
# 1、http資訊

http.client.requests
http.server.requests

# 2、jvm資訊
jvm.gc.pause
jvm.gc.max.data.size
jvm.gc.live.data.size
jvm.gc.memory.promoted
jvm.gc.memory.allocated

jvm.memory.used
jvm.memory.max
jvm.memory.committed

jvm.threads.daemon
jvm.threads.live
jvm.threads.peak

jvm.classes.loaded
jvm.classes.unloaded

jvm.buffer.count
jvm.buffer.memory.used
jvm.buffer.total.capacity

# 3、process資訊
process.uptime
process.start.time

# 4、系統資訊
system.cpu.count
system.cpu.usage
system.load.average.1m


# 5、tomcat資訊
#cache
tomcat.cache.hit
tomcat.cache.access

#session
tomcat.sessions.active.current
tomcat.sessions.active.max
tomcat.sessions.rejected
tomcat.sessions.expired
tomcat.sessions.created
#global
tomcat.global.request.max
tomcat.global.request
tomcat.global.sent
tomcat.global.received
tomcat.global.error
#servlet
tomcat.servlet.error
tomcat.servlet.request.max
tomcat.servlet.request
#threads
tomcat.threads.current
tomcat.threads.busy
tomcat.threads.config.max

#logback
logback.events
druid實時資訊監控
Druid是Java語言中最好的資料庫連線池。
Druid能夠提供強大的監控和擴充套件功能。
訪問地址
資源引入
	<dependency>
		<groupId>com.alibaba</groupId>
		<artifactId>druid</artifactId>
		<version>${druid-version}</version>
	</dependency>
自定義監控端點
工程化專案需要對自身專案進行監控,本demo是對功能資訊考察
import java.util.Date;
import java.util.HashMap;
import java.util.Map;
import org.springframework.boot.actuate.endpoint.annotation.Endpoint;
import org.springframework.boot.actuate.endpoint.annotation.ReadOperation;
import org.springframework.boot.actuate.endpoint.annotation.Selector;
import org.springframework.boot.actuate.endpoint.annotation.WriteOperation;
import org.springframework.stereotype.Component;

/**
 *
 * @author Simon
 * @version 2018年5月25日
 * 自定義端點
 */
@Endpoint(id = "get-time")
@Component
public class GetTime {
	private final Map<String,Object> message =(Map<String, Object>) new HashMap();
    private GetTime(){
	 this.message.put("當前時間", new Date());
	 this.message.put("我是", "Simon");
	 this.message.put("111", "222");
    }
    @ReadOperation
    public  Map<String,Object> getAll() {
        return message;
    }
    @ReadOperation
    public  Map<String,Object> getOne(@Selector String name) {
    	Object value=message.get(name);
    	Map<String,Object> message2=  new HashMap<String,Object>();
        return message2;
    }
    @WriteOperation
    public void updatePerson(@Selector String name) {
        this.message.put(name, name);
    }
}
訪問地址
import java.util.*;

import org.springframework.boot.actuate.endpoint.annotation.Endpoint;
import org.springframework.boot.actuate.endpoint.annotation.ReadOperation;
import org.springframework.boot.actuate.endpoint.annotation.Selector;
import org.springframework.boot.actuate.endpoint.annotation.WriteOperation;
import org.springframework.boot.actuate.endpoint.web.EndpointMapping;
import org.springframework.boot.actuate.endpoint.web.EndpointMediaTypes;
import org.springframework.boot.actuate.endpoint.web.ExposableWebEndpoint;
import org.springframework.boot.actuate.endpoint.web.annotation.WebEndpoint;
import org.springframework.boot.actuate.web.mappings.MappingDescriptionProvider;
import org.springframework.context.ApplicationContext;
import org.springframework.stereotype.Component;
import org.springframework.web.cors.CorsConfiguration;

/**
 *
 * @author Simon
 * @version 2018年5月25日
 *
 * 自定義監視端點
 */
@Endpoint(id = "person")
@Component
public class PersonEndpoint {
    private final Map<String, Person> people = new HashMap<>();

    PersonEndpoint() {
        this.people.put("Simon", new Person("Michael Simon"));
        this.people.put("Alan", new Person("Rowena Alan"));
        this.people.put("Bryant", new Person("Barry Bryant"));
    }

    @ReadOperation
    public Map<String, Person> getAll() {
        return people;
    }

    @ReadOperation
    public Person getPerson(@Selector String person) {
        return this.people.get(person);
    }

    @WriteOperation
    public void updatePerson(@Selector String name, String person) {
        this.people.put(name, new Person(person));
    }

}
訪問地址
ui介面spring-boot-admin2.0整合
建立新maven專案monitoring-server作為監控的服務端
pom.xml
		<!--服務端監控-->
		 <dependency>
            <groupId>de.codecentric</groupId>
            <artifactId>spring-boot-admin-starter-server</artifactId>
            <version>2.0.0</version>
        </dependency>
        <dependency>
            <groupId>de.codecentric</groupId>
            <artifactId>spring-boot-admin-server-ui</artifactId>
            <version>2.0.0</version>
        </dependency>
        <!-- 在管理介面中與 JMX-beans 進行互動所需要被依賴的 JAR -->
        <dependency>
            <groupId>org.jolokia</groupId>
            <artifactId>jolokia-core</artifactId>
        </dependency>
        <dependency>
            <groupId>org.springframework.boot</groupId>
            <artifactId>spring-boot-starter-actuator</artifactId>
        </dependency>
        <dependency>
            <groupId>org.springframework.boot</groupId>
            <artifactId>spring-boot-starter-web</artifactId>
        </dependency>
application.properties
server.port=8080
#設定監控的名稱
spring.application.name=monitor-server
啟動項
import de.codecentric.boot.admin.server.config.EnableAdminServer;
import org.springframework.boot.SpringApplication;
import org.springframework.boot.autoconfigure.EnableAutoConfiguration;
import org.springframework.context.annotation.Configuration;

/**
 * @author Simon
 * @create 2018-10-11 14:26
 * @desc
 **/
@Configuration
@EnableAutoConfiguration
@EnableAdminServer
public class MainApplication {
    public static void main(String[] args) {

        SpringApplication.run(MainApplication.class, args);
    }
}
完成服務端配置
編寫要監控的服務專案author
pom.xml
		<!--監控客戶端-->
		<dependency>
			<groupId>de.codecentric</groupId>
			<artifactId>spring-boot-admin-starter-client</artifactId>
			<version>2.0.0</version>
		</dependency>
application.properties
#開啟全部端點
management.endpoints.web.exposure.include=*
#配置伺服器
spring.boot.admin.client.url=http://localhost:8080
完成配置,先執行monitoring-server,再執行author
在瀏覽器上執行http://localhost:8080/#/wallboard

