Python資料庫騷操作——教如何玩轉MySQL!
資料庫是每個程式後端最重要一部分,他能儲存你所輸入的資料,因此,學會運用資料庫是非常有必要的。本文主要介紹 MySQL 的 orm 庫 SQLAlchemy 。那什麼是 orm 呢?Object Relational Mapper,描述程式中物件和資料庫中資料記錄之間的對映關係的統稱。行了,廢話不多BB了,我就直接開始吧!
MySQL GUI 工具
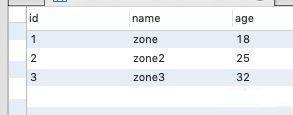
首先介紹一款 MySQL 的 GUI 工具 Navicat for MySQL,初學 MySQL 用這個來檢視資料真的很爽。可以即時看到資料的增刪改查,不用操作命令列來檢視。
MySQL 遇上 Docker
繼續分享一下 Docker compose 程式碼片段,用過 docker 之後,我相信你再也不會為了配置各種開發環境而煩惱了。
version: '3'
services:
 mysql_container:
 image: mysql
 ports:
 - "3306:3306"
 volumes:
 - /usr/local/db/mysql:/var/lib/mysql
# - /root/docker/test-mysql/conf.d:/etc/mysql/conf.d
 environment:
 - MYSQL_DATABASE=dbname
 - MYSQL_ROOT_PASSWORD=your_password
增刪改查
首先定義表結構
# 建立單表
class Users(Base):
 # 表名
 __tablename__ = 'users'
 id = Column(BIGINT, primary_key=True, autoincrement=True)
 # 定義欄位
 name = Column(String(32))
 age = Column(Integer())
# 初始化資料庫
def init_db():
 Base.metadata.create_all(engine)
# 刪除資料庫
def drop_db():
 Base.metadata.drop_all(engine)
連線
from sqlalchemy import create_engine, Column, Integer, String, BIGINT, ForeignKey, UniqueConstraint, Index, and_, or_, inspect
from sqlalchemy.orm import sessionmaker, relationship,contains_eager
# echo 為 True 將會列印 SQL 原生語句
engine = create_engine('mysql+pymysql://username:[email protected]:3306/db_name',echo=True)
from sqlalchemy.ext.declarative import declarative_base
Base = declarative_base()
Session = sessionmaker(bind=engine)
session = Session()
增加
new_user = Users(name='zone', age=18)
session.add(new_user)
# 批量新增
session.add_all([
 User(name='zone2', age=25),
 User(name='zone3', age=32)
])
# 提交
session.commit()
刪除
session.query(User).filter_by(name="zone").delete()
# 提交
session.commit()
修改
session.query(User).filter(User.name == 2).update({"name": "new name"})
session.query(User).filter(User.id >= 3).update({User.name: "關注公眾號【zone7】"}, synchronize_session=False)
session.query(User).filter(User.age == 50).update({"age": 123}, synchronize_session="evaluate")
session.commit()
查詢
查詢的需求會比較多變,我這邊就列出比較常見的查詢需求。
result = session.query(User).all() # 結果為一個列表
result = session.query(User.id, User.age).all()
result = session.query(User).filter_by(name='zone').first()
result = session.query(User).filter_by(name='zone2').all()
# 與、或
result = session.query(User).filter_by(and_(name='zone5',age="23")).all()
result = session.query(User).filter_by(or_(name='zone5',age="23")).all()
# 模糊查詢
result = session.query(User).filter(User.name.like('zon%')).all()
# 排序
result = session.query(User).order_by(User.age.desc()).all()
# 分頁查詢
result = session.query(User).offset(1).limit(1).all()
一對多
關係型資料庫,少不了各種表與表的關係。back_populates 在一對多的關係中建立雙向的關係,這樣的話在對方看來這就是一個多對一的關係。
def one_to_many():
 class Parent(Base):
 __tablename__ = 'parent'
 id = Column(Integer, primary_key=True)
 children = relationship("Child", back_populates="parent")
 class Child(Base):
 __tablename__ = 'child'
 id = Column(Integer, primary_key=True)
 parent_id = Column(Integer, ForeignKey('parent.id'))
 parent = relationship("Parent", back_populates="children")
 name = Column(String(32))
 # 子表類中附加一個 relationship() 方法
 # 並且在(父)子表類的 relationship() 方法中使用 relationship.back_populates 引數
 drop_db()
 init_db()
 child1 = Child(name="zone1")
 child2 = Child(name="zone2")
 parent = Parent(children=[child1, child2])
 session.add(parent)
 session.commit()
 result = session.query(Parent).join(Child).first()
 print(object_as_dict(result.children[0]))
one_to_many()
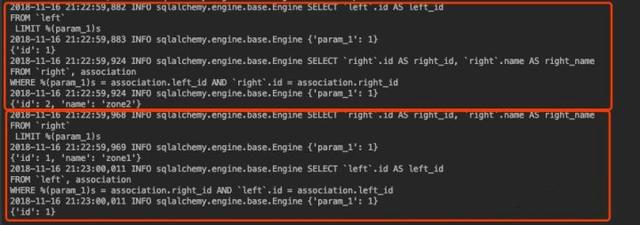
執行結果
一對一
back_populates 指定雙向關係,uselist=False 只需要在一對多關係基礎上的父表中使用 uselist 引數來表示
def one_to_one():
 class Parent(Base):
 __tablename__ = 'parent'
 id = Column(Integer, primary_key=True)
 child = relationship("Child", uselist=False, back_populates="parent")
 class Child(Base):
 __tablename__ = 'child'
 id = Column(Integer, primary_key=True)
 parent_id = Column(Integer, ForeignKey('parent.id'))
 parent = relationship("Parent", back_populates="child")
 name = Column(String(32))
 # 清空資料庫,並且重新初始化
 drop_db()
 init_db()
 child = Child(name="zone")
 parent = Parent(child=child)
 session.add(parent)
 session.commit()
 result = session.query(Parent).join(Child).first()
 print(object_as_dict(result.child))
one_to_one()
多對多
多對多關係會在兩個類之間增加一個關聯的表來表示其中的關係。這個關聯的表在 relationship() 方法中通過 secondary 引數來表示。通常,這個表會通過 MetaData 物件來與宣告基類關聯。
def many_to_many():
 association_table = Table('association', Base.metadata,
 Column('left_id', Integer, ForeignKey('left.id')),
 Column('right_id', Integer, ForeignKey('right.id'))
 )
 class Parent(Base):
 __tablename__ = 'left'
 id = Column(Integer, primary_key=True,autoincrement=True)
 children = relationship(
 "Child",
 secondary=association_table,
 back_populates="parents")
 class Child(Base):
 __tablename__ = 'right'
 id = Column(Integer, primary_key=True,autoincrement=True)
 name = Column(String(32))
 parents = relationship(
 "Parent",
 secondary=association_table,
 back_populates="children")
 # 清空資料庫,並且重新初始化
 drop_db()
 init_db()
 child1 = Child(name="zone1")
 child2 = Child(name="zone2")
 child3 = Child(name="zone3")
 parent = Parent()
 parent2 = Parent()
 # parent 新增 child
 parent.children.append(child1)
 parent.children.append(child2)
 parent2.children.append(child1)
 parent2.children.append(child2)
 # save
 session.add(parent)
 session.add(parent2)
 session.commit()
 # 查詢
 result = session.query(Parent).first()
 print(object_as_dict(result))
 print(object_as_dict(result.children[1]))
 result2 = session.query(Child).first()
 print(object_as_dict(result2))
 print(object_as_dict(result2.parents[1]))
many_to_many()
本文到此就告一段落了,喜歡本文的小夥伴或者覺得本文對你有幫助可以點播關注或轉發。
最後
小編精心推薦一個學習Python的好去處,如有想來的小夥伴可以加QQ2789278246。小編這裡有免費的學習資料可以領取喔!
本文來自網路,如有侵權,請聯絡小編刪除!


