
粗暴解決 HTMLTestRunner 加入截圖展示功能
最近使用appium+python來做自動化,測試報告用的網上共享的HTMLTestRunner模組,但是裡面貌似沒有展示截圖的功能,於是自己動手稍微修改了一下!
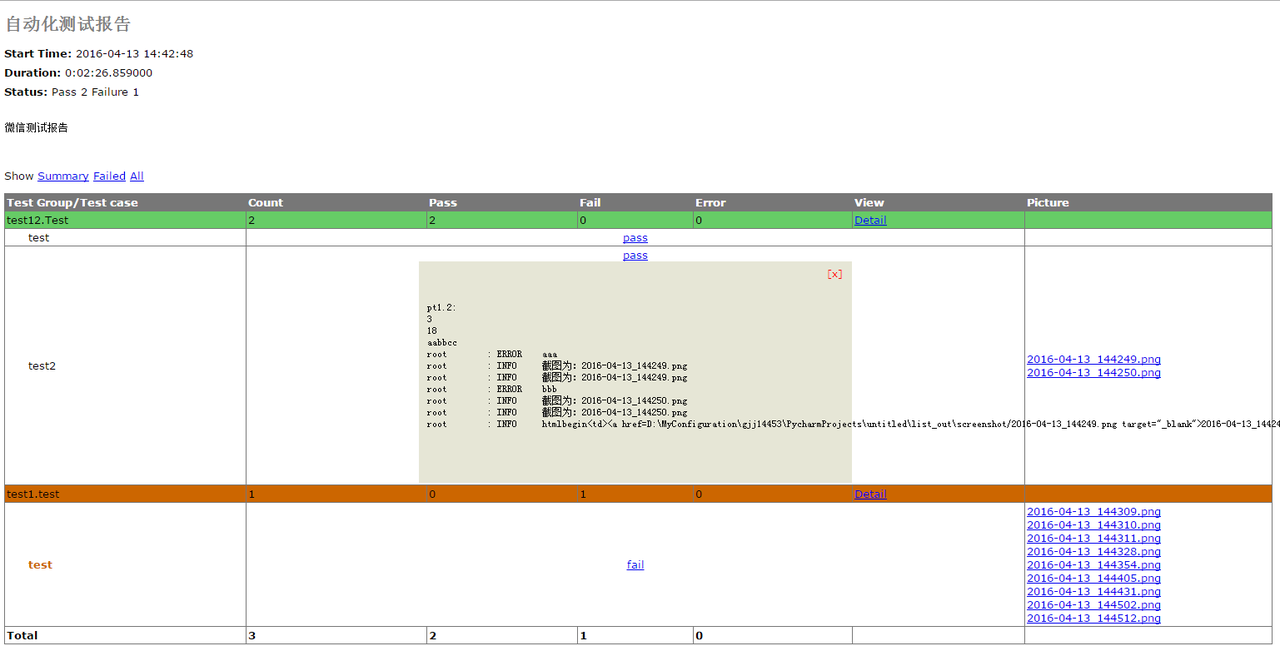
先上成果圖,點選圖片名字就能開啟圖片
總體思路為:在HTMLTestRunner的report模板中加入一列picture,然後將用來展示圖片的html列印到每個case的日誌中,再從日誌中將這段文字截取出來放入report中(主要是為了簡單粗暴的將每個case與相關截圖正確對應起來~想不到其他辦法啦!歡迎高手們給出更加簡單快捷的辦法~)
以下為我的操作方法,有點長~
一、在HTMLTestRunner.py裡的原有的html表格中插入了一列picture(在
<tr id='header_row'>
<td>Test Group/Test case</td>
<td>Count</td>
<td>Pass</td>
<td>Fail</td>
<td>Error</td>
<td>View</td>
<td>Picture</td>
</tr> 二、還是在HTMLTestRunner.py裡插入一行%(html)s來放置對應指令碼的截圖
    REPORT_TEST_WITH_OUTPUT_TMPL = r"""
<tr id='%(tid)s' class='%(Class)s'>
    <td class='%(style)s'><div class='testcase'>%(desc)s</div></td>
    <td colspan='5' align='center'>

    <!--css div popup start-->
    <a class="popup_link" onfocus='this.blur();' href="javascript:showTestDetail('div_%(tid)s')" >
        %(status)s</a>

    <div id='div_%(tid)s' class="popup_window">
        <div style='text-align: right; color:red;cursor:pointer'>
        <a onfocus='this.blur();' onclick="document.getElementById('div_%(tid)s').style.display = 'none' " >
           [x]</a>
        </div>
        <pre>
        %(script)s
        </pre>
    </div>
    <!--css div popup end-->

    </td>
    %(html)s
</tr>
三、依然在HTMLTestRunner.py中,_generate_report_test()函式中,插入html的內容,因為本身初學者,對unittest和htmltestrunner都不怎麼了解,觀察htmltestrunner的報告發現它能展示指令碼執行過程中列印的log文字,所以我強行把自己組裝的用於展示圖片html程式碼列印到執行日誌中,然後通過關鍵字截取出來,放置在script後面的位置,也就是剛才新建的picture列(要是覺得最後report中列印的log中加入了這段html影響美觀,可以在下面程式碼中script裡刪掉~我懶得寫了~)
script = self.REPORT_TEST_OUTPUT_TMPL % dict(
    id = tid,
    output = saxutils.escape(uo+ue),
)

s = uo+ue
html = s[s.find('htmlbegin')+9:s.find('htmlend')]

row = tmpl % dict(
    tid = tid,
    Class = (n == 0 and 'hiddenRow' or 'none'),
    style = n == 2 and 'errorCase' or (n == 1 and 'failCase' or 'none'),
    desc = desc,
    script = script,
    html = html,
    status = self.STATUS[n],
)
四、在自己封裝的手機截圖方法中加入分別將截圖名稱和截圖存放路徑插入對應的陣列中(也可以使用二維陣列),以下分別為列印日誌,截圖,組裝html的方法,在組裝完成的html程式碼開頭和結尾分別叫上htmlbegin和htmlend作為之後擷取使用的關鍵字
# _*_ coding:utf-8 _*_
__author__ = 'gjj14453'
import logging
import os
import common.myDate as myDate


PATH = lambda p: os.path.abspath(
    os.path.join(os.path.dirname(__file__), p))


pics = []
picpath = []


##################################
#  日誌
# 0: debug
# 1:info
# 2:warning
# -1:error
###################################
def mylogger(msg, flag=1):
    logging.basicConfig(level=logging.INFO,
                    format='%(asctime)s %(filename)s %(levelname)s %(message)s',
                    datefmt='%a, %d %b %Y %H:%M:%S',
                    filename='mylog.log',
                    filemode='w')
    console = logging.StreamHandler()
    console.setLevel(logging.DEBUG)
    formatter = logging.Formatter('%(name)-12s: %(levelname)-8s %(message)s')
    console.setFormatter(formatter)
    logging.getLogger('').addHandler(console)
    if flag == 0:
        logging.debug(msg)
    elif flag == 1:
        logging.info(msg)
    elif flag == 2:
        logging.warning(msg)
        screenshot()
    elif flag == -1:
        logging.error(msg)
        screenshot()
    logging.getLogger('').removeHandler(console)


#  截圖
def screenshot():
    dirname = PATH('D:\\MyConfiguration\\gjj14453\\PycharmProjects\\untitled\\list_out' + "/screenshot")
    os.popen("adb wait-for-device")
    os.popen("adb shell screencap -p /data/local/tmp/tmp.png")
    if not os.path.isdir(dirname):
        os.makedirs(dirname)
    pic = myDate.timestampname() + ".png"
    path = dirname + "/" + pic
    os.popen("adb pull /data/local/tmp/tmp.png " + PATH(path))
    os.popen("adb shell rm /data/local/tmp/tmp.png")
    mylogger("截圖為:" + pic)
    pics.append(pic)
    picpath.append(path)


def creathtml(path, pic):
    html = ''
    if range(len(path)) > 0:
        for i in range(len(path)):
            if i == 0:
                html = '<a href=' + path[i] + ' target="_blank">' + pic[i] + '</a>'
            else:
                html = html + '<br /><a href=' + path[i] + ' target="_blank">' + pic[i] + '</a>'
    else:
        html = ''
    htmls = 'htmlbegin<td>' + html +'</td>htmlend'
    return htmls
五、之後在case中加入列印html到日誌中的語句就OK啦
class Test(unittest.TestCase):

    def setUp(self):
        log.picpath = []
        log.pics = []
        pass

    def tearDown(self):
        pass

    def test(self):
        log.mylogger('aaa', -1)
        log.mylogger('bbb', -1)
        log.mylogger(log.creathtml(log.picpath, log.pics))


以上是大牛的原創, 好像是針對安卓測試的,自己修改了下,整合到了web端的自動化測試中了。
修改的地方包括:
1、移動log.py到htmlrunnertest的同級目錄下
2、修改log中的截圖函式,直接用PIL來實現的。
3、更新了截圖的時機,在執行出錯的時候,才去截圖處理。
後臺後的部分程式碼如下。
HTMLrunnertest.pydef addError(self, test, err):
log.picpath = []
log.pics = []
log.mylogger('errorTTT', -1)
log.mylogger(log.creathtml(log.picpath, log.pics),-1)
self.error_count += 1
log.py
#  截圖
def screenshot():
    dirname = PATH('D:\\**')
    if not os.path.isdir(dirname):
        os.makedirs(dirname)

   pic = time.strftime("%y%m%d%H%M%S")+str(random.randint(1,100))+".png"

    im = ImageGrab.grab()

    path = dirname + "\\" + pic
    im.save(path)
    mylogger("截圖為:" + pic)
    pics.append(pic)
    picpath.append(path)
    print 'pic path is :',path