Python實現機器人語音聊天
一、前言說明
1.功能簡述
Python學習資料或者需要程式碼、視訊加Python學習群:960410445
登入後進入聊天介面,如果伺服器都在同一個地址,則都進入同一個房間
進入/離開/發訊息同一房間使用者都可以看到,輸入“tuling”或“chatbot”可以切換為和Tuling機器人或者ChatBot聊天
按住Say說話,自動錄音並轉為文字傳送
如果是跟機器人聊天,則自動回覆文字並播放文字語音
Tuling,是圖靈,已經錄入大量中文對話,直接呼叫介面即可實現自動回覆,實用於開發聊天軟體
ChatBot,可自行訓練機器人,讓機器人擁有自己的語料庫,實用於企業智慧聊天個性化
2.需要的核心技術
a. 輸入語音,識別後轉換為輸入文字
b. Tuling或ChatBot兩種機器人,回覆輸出文字
c. 輸出文字,轉換為輸出語音並播放
以上a和c主要呼叫Baidu提供的API進行轉換,如果理解本文,可自行嘗試呼叫Google提供的API實現,Google技術強大但是否對中文支援良好,博主不曾嘗試不妄自揣度
3.環境說明
系統環境Win10,執行環境Python3.6,執行工具Pycharm
二、原始碼設計(貼上完整原始碼自己去理解)
1.執行順序
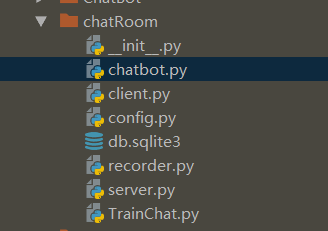
(1)TrainChat.py訓練本地chatbot機器人(每次更新訓練內容,執行一次即可)
(2) server.py開啟伺服器
(3)client.py執行n次,每次執行都可登陸一個使用者
2.伺服器server.py
主要處理使用者的登入校驗,房間的人員訊息處理
此處通過config.py中配置的列表PORT = range(1, 3)生成兩個房間,地址分別是127.0.0.1:1和127.0.0.1:2(實用時可以無限個)
啟用客戶端前,這個伺服器要先執行,程式碼中CommandHandler類拆解client客戶端傳送的資訊中的命令,並繫結函式
import asynchat
import asyncore
from config import PORT
# 定義結束異常類
class EndSession(Exception):
pass
class ChatServer(asyncore.dispatcher):
"""
聊天伺服器
"""
def __init__(self, port):
asyncore.dispatcher.__init__(self)
# 建立socket
self.create_socket()
# 設定 socket 為可重用
self.set_reuse_addr()
# 監聽埠
self.bind(('', port))
self.listen(5)
self.users = {}
self.main_room = ChatRoom(self)
def handle_accept(self):
conn, addr = self.accept()
ChatSession(self, conn)
class ChatSession(asynchat.async_chat):
"""
負責和客戶端通訊
"""
def __init__(self, server, sock):
asynchat.async_chat.__init__(self, sock)
self.server = server
self.set_terminator(b'\n')
self.data = []
self.name = None
self.enter(LoginRoom(server))
def enter(self, room):
# 從當前房間移除自身,然後新增到指定房間
try:
cur = self.room
except AttributeError:
pass
else:
cur.remove(self)
self.room = room
room.add(self)
def collect_incoming_data(self, data):
# 接收客戶端的資料
self.data.append(data.decode("utf-8"))
def found_terminator(self):
# 當客戶端的一條資料結束時的處理
line = ''.join(self.data)
self.data = []
try:
self.room.handle(self, line.encode("utf-8"))
# 退出聊天室的處理
except EndSession:
self.handle_close()
def handle_close(self):
# 當 session 關閉時,將進入 LogoutRoom
asynchat.async_chat.handle_close(self)
self.enter(LogoutRoom(self.server))
class CommandHandler:
"""
命令處理類
"""
def unknown(self, session, cmd):
# 響應未知命令
# 通過 aynchat.async_chat.push 方法傳送訊息
session.push(('Unknown command {} \n'.format(cmd)).encode("utf-8"))
def handle(self, session, line):
line = line.decode()
# 命令處理
if not line.strip():
return
parts = line.split(' ', 1)
cmd = parts[0]
try:
line = parts[1].strip()
except IndexError:
line = ''
# 通過協議程式碼執行相應的方法
method = getattr(self, 'do_' + cmd, None)
try:
method(session, line)
except TypeError:
self.unknown(session, cmd)
class Room(CommandHandler):
"""
包含多個使用者的環境,負責基本的命令處理和廣播
"""
def __init__(self, server):
self.server = server
self.sessions = []
def add(self, session):
# 一個使用者進入房間
self.sessions.append(session)
def remove(self, session):
# 一個使用者離開房間
self.sessions.remove(session)
def broadcast(self, line):
# 向所有的使用者傳送指定訊息
# 使用 asynchat.asyn_chat.push 方法傳送資料
for session in self.sessions:
session.push(line)
def do_logout(self, session, line):
# 退出房間
raise EndSession
class LoginRoom(Room):
"""
處理登入使用者
"""
def add(self, session):
# 使用者連線成功的迴應
Room.add(self, session)
# 使用 asynchat.asyn_chat.push 方法傳送資料
session.push(b'Connect Success')
def do_login(self, session, line):
# 使用者登入邏輯
name = line.strip()
# 獲取使用者名稱稱
if not name:
session.push(b'UserName Empty')
# 檢查是否有同名使用者
elif name in self.server.users:
session.push(b'UserName Exist')
# 使用者名稱檢查成功後,進入主聊天室
else:
session.name = name
session.enter(self.server.main_room)
class LogoutRoom(Room):
"""
處理退出使用者
"""
def add(self, session):
# 從伺服器中移除
try:
del self.server.users[session.name]
except KeyError:
pass
class ChatRoom(Room):
"""
聊天用的房間
"""
def add(self, session):
# 廣播新使用者進入
session.push(b'Login Success')
self.broadcast((session.name + ' has entered the room.\n').encode("utf-8"))
self.server.users[session.name] = session
Room.add(self, session)
def remove(self, session):
# 廣播使用者離開
Room.remove(self, session)
self.broadcast((session.name + ' has left the room.\n').encode("utf-8"))
def do_say(self, session, line):
# 客戶端傳送訊息
self.broadcast((session.name + ': ' + line + '\n').encode("utf-8"))
def do_noone_say(self, session, line):
# 圖靈回覆訊息
self.broadcast((line + '\n').encode("utf-8"))
def do_chatbot_say(self, session, line):
# 圖靈回覆訊息
self.broadcast(('ChatBot: ' + line + '\n').encode("utf-8"))
def do_tuling_say(self, session, line):
# 圖靈回覆訊息
self.broadcast(('Tuling: ' + line + '\n').encode("utf-8"))
def do_look(self, session, line):
# 檢視線上使用者
session.push(b'All Online Users Are:\n')
for other in self.sessions:
session.push((other.name + '\n').encode("utf-8"))
if __name__ == '__main__':
for i in range(len(PORT)):
ChatServer(PORT[i])
print("Chat server run at '127.0.0.1:{0}'".format(PORT[i]))
try:
asyncore.loop()
except KeyboardInterrupt:
print("Chat server exit")
server.py
3.訓練chatbot的TrainChat.py
主要用來訓練chatbot機器人,資料儲存在本地sqlite資料庫(如果沒有資料庫自動建立)
個人學習此資料足以,作為企業可改為mongodb儲存資料,速度會有保障
#!/usr/bin/python
# -*- coding: utf-8 -*-
from chatterbot import ChatBot
from chatterbot.trainers import ListTrainer
from chatterbot.trainers import ChatterBotCorpusTrainer
my_bot = ChatBot("Training demo",
database="./db.sqlite3")
# 直接寫語句訓練
my_bot.set_trainer(ListTrainer)
my_bot.train(["你叫什麼名字?", "我叫小白兔!", ])
my_bot.train([
"Test1",
"Test2",
"Test3",
"Test4",
])
# 使用自定義語句訓練它
my_bot.set_trainer(ChatterBotCorpusTrainer)
my_bot.train("chatterbot.corpus.mytrain")
# while True:
# print(my_bot.get_response(input("user:")))
TrainChat.py
4.訓練chatbot的語料庫
提供了兩種語料訓練方法
(1)TrainChat.py裡面可以直接寫訓練語句,也可開啟通過聊天時候的語句自動訓練
(2)自定義語料庫訓練,自定義語料格式,直接參照chatbot提供的一些寫就行
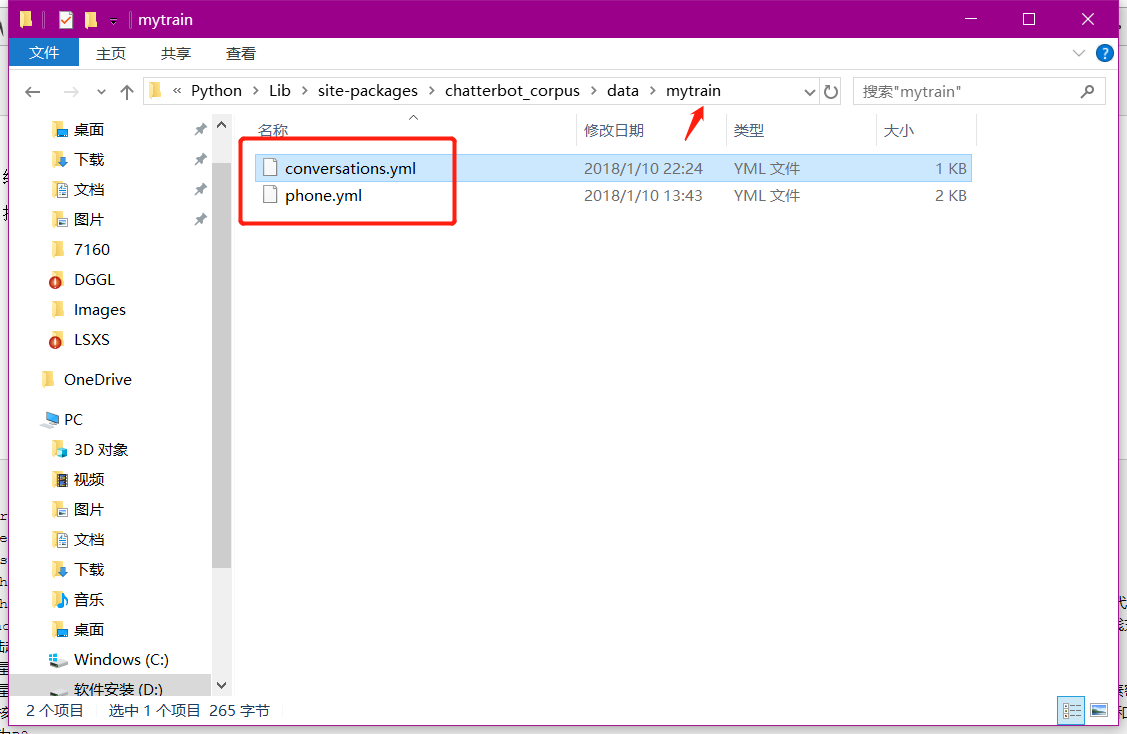
找到安裝chatbot後預設提供的中文語料格式D:\Python\Lib\site-packages\chatterbot_corpus\data\chinese
開啟後格式就有了,這裡我們按照格式新增一個mytrain資料夾,寫入自己的語料檔案,如我寫的phone.yml
categories:
- phone
conversations:
- - iPhoneX
- iPhone X是Apple(蘋果公司)於北京時間2017年9月13日凌晨1點,在Apple Park新總部的史蒂夫·喬布斯劇院會上釋出的新機型。其中“X”是羅馬數字“10”的意思,代表著蘋果向iPhone問世十週年致敬。iPhone X屬於高階版機型,採用全新設計,搭載色彩銳利的OLED螢幕,配備升級後的相機,使用3D面部識別(Face ID)感測器解鎖手機,支援AirPower(空中能量)無線充電。分為64GB、256GB兩個版本,中國大陸起售價8388人民幣,美國起售價999美元,2017年10月27日預售,11月3號正式開賣。
- - 三星Galaxy S6
- 三星Galaxy S6是三星公司(SAMSUNG)在2015年3月2日推出的一款手機,已於2015年4月11日正式上市。\n三星Galaxy S6採用5.1英寸螢幕,2560×1440畫素,畫素密度高達573ppi,內建Exynos 7420八核64位處理器,能夠提供更強的效能以及更低的功耗;採用前500W畫素+後1600W畫素的雙鏡頭設計,均支援F1.9大光圈,感光元件是索尼IMX 240,支援OIS光學防抖和自動HDR技術。
- - 華為P8
- P系列是華為手機中的旗艦系列,到2017年1月,共有6款機型:P1、P2、P6、P7、P8、P8 MAX、P9、P9 Plus。從2012年1月11日在美國拉斯維加斯釋出全球最薄6.68毫米的P1開始,P系列便創立了以驚豔ID設計融合強大均衡軟硬體配置為主的旗艦產品地位。之後,華為於2013年6月18日釋出P6,2014年5月7日釋出P7,均分別輕鬆創下了數百萬銷量的佳績,一舉奠定了華為在國內領先、國際一流的品牌地位
phone.yml
5.錄音並儲存檔案recorder.py
提供錄音功能並將錄音檔案儲存在本地
#!/usr/bin/python3
# -*- coding: utf-8 -*-
from pyaudio import PyAudio, paInt16
import numpy as np
from datetime import datetime
import wave
import sys
import time
class Recoder:
NUM_SAMPLES = 2000 # py audio內建緩衝大小
SAMPLING_RATE = 8000 # 取樣頻率
LEVEL = 500 # 聲音儲存的閾值
COUNT_NUM = 20 # NUM_SAMPLES個取樣之內出現COUNT_NUM個大於LEVEL的取樣則記錄聲音
SAVE_LENGTH = 8 # 聲音記錄的最小長度:SAVE_LENGTH * NUM_SAMPLES 個取樣
TIME_COUNT = 10 # 錄音時間,單位s
Voice_String = []
def savewav(self, filename):
wf = wave.open(filename, 'wb')
wf.setnchannels(1)
wf.setsampwidth(2)
wf.setframerate(self.SAMPLING_RATE)
wf.writeframes(np.array(self.Voice_String).tostring())
# wf.writeframes(self.Voice_String.decode())
wf.close()
def recoder(self):
pa = PyAudio()
stream = pa.open(format=paInt16, channels=1, rate=self.SAMPLING_RATE, input=True,
frames_per_buffer=self.NUM_SAMPLES)
save_count = 0
save_buffer = []
time_count = self.TIME_COUNT
while True:
time_count -= 1
# print time_count
# 讀入NUM_SAMPLES個取樣
string_audio_data = stream.read(self.NUM_SAMPLES)
# 將讀入的資料轉換為陣列
audio_data = np.fromstring(string_audio_data, dtype=np.short)
# 計算大於LEVEL的取樣的個數
large_sample_count = np.sum( audio_data > self.LEVEL )
print(np.max(audio_data))
# 如果個數大於COUNT_NUM,則至少儲存SAVE_LENGTH個塊
if large_sample_count > self.COUNT_NUM:
save_count = self.SAVE_LENGTH
else:
save_count -= 1
if save_count < 0:
save_count = 0
if save_count > 0:
# 將要儲存的資料存放到save_buffer中
# print save_count > 0 and time_count >0
save_buffer.append(string_audio_data )
else:
# print save_buffer
# 將save_buffer中的資料寫入WAV檔案,WAV檔案的檔名是儲存的時刻
# print "debug"
if len(save_buffer) > 0 :
self.Voice_String = save_buffer
save_buffer = []
print("Recode a piece of voice successfully!")
return True
if time_count == 0:
if len(save_buffer)>0:
self.Voice_String = save_buffer
save_buffer = []
print("Recode a piece of voice successfully!")
return True
else:
return False
def recording():
r = Recoder()
r.recoder()
r.savewav(r"E:\Python_Doc\voice_say\say_voice.wav")
recorder.py
6. chatbot.py
提供播放音訊檔案
呼叫圖靈Tuling介面返回文字資訊
呼叫chatbot返回文字資訊
呼叫百度api語音識別
呼叫百度api轉文字為語音(有兩個百度api都可用,第一個不用密匙),其中chatbot的資料庫配置要和TrainChat.py中配置的名稱一致
import pygame
from chatterbot import ChatBot
import requests
import json
from config import *
import time
import os
import random
import urllib.request
import base64
# 初始化百度返回的音訊檔案地址,後面會變為全域性變數,隨需改變
mp3_url = 'E:\Python_Doc\\voice_du\\voice_ss.mp3'
# 播放Mp3檔案
def play_mp3():
# 接受伺服器的訊息
pygame.mixer.init()
pygame.mixer.music.load(mp3_url)
pygame.mixer.music.play()
while pygame.mixer.music.get_busy():
time.sleep(1)
pygame.mixer.music.stop()
pygame.mixer.quit()
# 刪除聲音檔案
def remove_voice():
path = r"E:\Python_Doc\voice_du"
for i in os.listdir(path):
path_file = os.path.join(path, i)
try:
os.remove(path_file)
except:
continue
# 圖靈自動回覆
def tuling(info):
url = tuling_url + "?key=%s&info=%s" % (tuling_app_key, info)
content = requests.get(url, headers=headers)
answer = json.loads(content.text)
return answer['text']
# 聊天機器人回覆
def chatbot(info):
my_bot = ChatBot("", read_only=True,
database="./db.sqlite3")
res = my_bot.get_response(info)
return str(res)
# 百度講文字轉為聲音檔案儲存在本地 tts地址,無需token實時認證
def baidu_api(answer):
api_url = '{11}?idx={0}&tex={1}&cuid={2}&cod={3}&lan={4}&ctp={5}&pdt={6}&spd={7}&per={8}&vol={9}&pit={10}'\
.format(baidu_api_set["idx"], answer, baidu_api_set["cuid"], baidu_api_set["cod"], baidu_api_set["lan"],
baidu_api_set["ctp"], baidu_api_set["pdt"], baidu_api_set["spd"], baidu_api_set["per"],
baidu_api_set["vol"], baidu_api_set["pit"], baidu_api_url)
res = requests.get(api_url, headers=headers2)
# 本地Mp3語音檔案儲存位置
iname = random.randrange(1, 99999)
global mp3_url
mp3_url = 'E:\Python_Doc\\voices\\voice_tts' + str(iname) + '.mp3'
with open(mp3_url, 'wb') as f:
f.write(res.content)
# 百度講文字轉為聲音檔案儲存在本地 方法2 tsn地址
def baidu_api2(answer):
# 獲取access_token
token = getToken()
get_url = baidu_api_url2 % (urllib.parse.quote(answer), "test", token)
voice_data = urllib.request.urlopen(get_url).read()
# 本地Mp3語音檔案儲存位置
name = random.randrange(1, 99999)
global mp3_url
mp3_url = 'E:\Python_Doc\\voice_du\\voice_tsn' + str(name) + '.mp3'
voice_fp = open(mp3_url, 'wb+')
voice_fp.write(voice_data)
voice_fp.close()
return
# 百度語音轉文字
def getText(filename):
# 獲取access_token
token = getToken()
data = {}
data['format'] = 'wav'
data['rate'] = 16000
data['channel'] = 1
data['cuid'] = str(random.randrange(123456, 999999))
data['token'] = token
wav_fp = open(filename, 'rb')
voice_data = wav_fp.read()
data['len'] = len(voice_data)
data['speech'] = base64.b64encode(voice_data).decode('utf-8')
post_data = json.dumps(data)
# 語音識別的api url
upvoice_url = 'http://vop.baidu.com/server_api'
r_data = urllib.request.urlopen(upvoice_url, data=bytes(post_data, encoding="utf-8")).read()
print(json.loads(r_data))
err = json.loads(r_data)['err_no']
if err == 0:
return json.loads(r_data)['result'][0]
else:
return json.loads(r_data)['err_msg']
# 獲取百度API呼叫的認證,實時生成,因為有時間限制
def getToken():
# token認證的url
api_url = "https://openapi.baidu.com/oauth/2.0/token?" \
"grant_type=client_credentials&client_id=%s&client_secret=%s"
token_url = api_url % (BaiDu_API_Key_GetVoi, BaiDu_Secret_Key_GetVoi)
r_str = urllib.request.urlopen(token_url).read()
token_data = json.loads(r_str)
token_str = token_data['access_token']
return token_str
chatbot.py
7.client.py
提供登入視窗,聊天視窗,已及響應事件
say按鈕繫結sayDown錄音和sayUp獲取語音文字併發送兩個事件
Users顯示當前房間所有使用者...
import wx
import telnetlib
from time import sleep
import _thread as thread
import time
import os
from chatbot import baidu_api2, chatbot, tuling, play_mp3, remove_voice, getText
from config import BOTS, BOT, default_server, VOICE_SWITCH
from recorder import recording
bot_use = BOT
class LoginFrame(wx.Frame):
"""
登入視窗
"""
def __init__(self, parent, id, title, size):
# 初始化,新增控制元件並繫結事件
wx.Frame.__init__(self, parent, id, title)
self.SetSize(size)
self.Center()
self.serverAddressLabel = wx.StaticText(self, label="Server Address", pos=(15, 40), size=(120, 25))
self.userNameLabel = wx.StaticText(self, label="UserName", pos=(45, 90), size=(120, 25))
self.serverAddress = wx.TextCtrl(self, value=default_server,
pos=(120, 37), size=(150, 25), style=wx.TE_PROCESS_ENTER)
self.userName = wx.TextCtrl(self, pos=(120, 87), size=(150, 25), style=wx.TE_PROCESS_ENTER)
self.loginButton = wx.Button(self, label='Login', pos=(50, 145), size=(90, 30))
self.exitButton = wx.Button(self, label='Exit', pos=(180, 145), size=(90, 30))
# 繫結登入方法
self.loginButton.Bind(wx.EVT_BUTTON, self.login)
# 繫結退出方法
self.exitButton.Bind(wx.EVT_BUTTON, self.exit)
# 伺服器輸入框Tab事件
self.serverAddress.SetFocus()
self.Bind(wx.EVT_TEXT_ENTER, self.usn_focus, self.serverAddress)
# 使用者名稱回車登入
self.Bind(wx.EVT_TEXT_ENTER, self.login, self.userName)
self.Show()
# 回車調到使用者名稱輸入欄
def usn_focus(self, event):
self.userName.SetFocus()
def login(self, event):
# 登入處理
try:
serverAddress = self.serverAddress.GetLineText(0).split(':')
con.open(serverAddress[0], port=int(serverAddress[1]), timeout=10)
response = con.read_some()
if response != b'Connect Success':
self.showDialog('Error', 'Connect Fail!', (200, 100))
return
con.write(('login ' + str(self.userName.GetLineText(0)) + '\n').encode("utf-8"))
response = con.read_some()
if response == b'UserName Empty':
self.showDialog('Error', 'UserName Empty!', (200, 100))
elif response == b'UserName Exist':
self.showDialog('Error', 'UserName Exist!', (200, 100))
else:
self.Close()
ChatFrame(None, 2, title='當前使用者:'+str(self.userName.GetLineText(0)), size=(515, 400))
except Exception:
self.showDialog('Error', 'Connect Fail!', (95, 20))
def exit(self, event):
self.Close()
# 顯示錯誤資訊對話方塊
def showDialog(self, title, content, size):
dialog = wx.Dialog(self, title=title, size=size)
dialog.Center()
wx.StaticText(dialog, label=content)
dialog.ShowModal()
class ChatFrame(wx.Frame):
"""
聊天視窗
"""
def __init__(self, parent, id, title, size):
# 初始化,新增控制元件並繫結事件
wx.Frame.__init__(self, parent, id, title, style=wx.SYSTEM_MENU | wx.CAPTION | wx.CLOSE_BOX |
wx.DEFAULT_FRAME_STYLE)
self.SetSize(size)
self.Center()
self.chatFrame = wx.TextCtrl(self, pos=(5, 5), size=(490, 310), style=wx.TE_MULTILINE | wx.TE_READONLY)
self.sayButton = wx.Button(self, label="Say", pos=(5, 320), size=(58, 25))
self.message = wx.TextCtrl(self, pos=(65, 320), size=(240, 25), style=wx.TE_PROCESS_ENTER)
self.sendButton = wx.Button(self, label="Send", pos=(310, 320), size=(58, 25))
self.usersButton = wx.Button(self, label="Users", pos=(373, 320), size=(58, 25))
self.closeButton = wx.Button(self, label="Close", pos=(436, 320), size=(58, 25))
# 傳送按鈕繫結傳送訊息方法
self.sendButton.Bind(wx.EVT_BUTTON, self.send)
# 輸入框回車傳送資訊
self.message.SetFocus()
# 傳送訊息
self.sayButton.Bind(wx.EVT_LEFT_DOWN, self.sayDown)
self.sayButton.Bind(wx.EVT_LEFT_UP, self.sayUp)
# 傳送訊息
self.Bind(wx.EVT_TEXT_ENTER, self.send, self.message)
# Users按鈕繫結獲取線上使用者數量方法
self.usersButton.Bind(wx.EVT_BUTTON, self.lookUsers)
# 關閉按鈕繫結關閉方法
self.closeButton.Bind(wx.EVT_BUTTON, self.close)
thread.start_new_thread(self.receive, ())
# self.ShowFullScreen(True)
self.Show()
def sayDown(self, event):
thread.start_new_thread(recording, ())
# print("ON")
def sayUp(self, event):
sayText = getText(r"E:\Python_Doc\voice_say\say_voice.wav")
self.message.AppendText(str(sayText))
self.send(self)
def send(self, event):
# 傳送訊息
message = str(self.message.GetLineText(0)).strip()
global bot_use
if message != '':
if message == "chatbot":
bot_use = "ChatBot"
self.message.Clear()
con.write(('noone_say You have been changed ChatBot-Chat' + '\n').encode("utf-8"))
return
elif message == "tuling":
bot_use = "TuLing"
self.message.Clear()
con.write(('noone_say You have been changed TuLing-Chat' + '\n').encode("utf-8"))
return
elif message == "user":
bot_use = "User"
self.message.Clear()
con.write(('noone_say You have been changed User-Chat' + '\n').encode("utf-8"))
return
con.write(('say ' + message + '\n').encode("utf-8"))
self.message.Clear()
# 機器人回覆
if bot_use == "ChatBot":
answer = chatbot(message)
con.write(('chatbot_say ' + answer + '\n').encode("utf-8"))
elif bot_use == "TuLing":
answer = tuling(message)
con.write(('tuling_say ' + answer + '\n').encode("utf-8"))
elif bot_use == "User":
return
if VOICE_SWITCH:
# 寫本地音樂檔案
baidu_api2(answer)
# 新建執行緒播放音樂
thread.start_new_thread(play_mp3, ())
return
def lookUsers(self, event):
# 檢視當前線上使用者
con.write(b'look\n')
def close(self, event):
# 關閉視窗
thread.start_new_thread(remove_voice, ())
con.write(b'logout\n')
con.close()
self.Close()
def receive(self):
# 接受伺服器的訊息
while True:
sleep(0.6)
result = con.read_very_eager()
if result != '':
self.chatFrame.AppendText(result)
if __name__ == '__main__':
app = wx.App()
con = telnetlib.Telnet()
LoginFrame(None, -1, title="Login", size=(320, 250))
app.MainLoop()
client.py
8.config配置檔案
百度API的KEY等內容也可自行去對應官網申請,本文提供僅供學習使用
# 預設輸入的伺服器地址,測試時候使用,避免登入總是輸入地址麻煩
default_server = "127.0.0.1:1"
# 定義伺服器埠,一個埠一個房間
PORT = range(1, 3)
# 圖靈Tuling機器人還是ChatBot聊天機器人選擇
BOTS = ["TuLing", "ChatBot", "User"]
BOT = BOTS[2]
# 瀏覽器請求標頭檔案
headers = {'User-Agent': 'Mozilla/5.0 (Windows NT 6.1; Win64; x64) AppleWebKit/537.36 '
'(KHTML, like Gecko) Chrome/53.0.2785.143 Safari/537.36', }
headers2 = {'User-Agent': 'Mozilla/5.0 (Windows NT 10.0; WOW64) AppleWebKit/537.36 '
'(KHTML, like Gecko)Chrome/62.0.3202.94 Safari/537.36'}
# 圖靈密匙,自動回覆地址,選擇的key不同,tuling機器人的回答也各不相同
tuling_app_key = "e5ccc9c7c8834ec3b08940e290ff1559"
tuling_app_key2 = "4bc32d41c10be18627438ae45eb839ac"
tuling_url = "http://www.tuling123.com/openapi/api"
# 語音儲存播放開關
VOICE_SWITCH = True
# 百度文字轉語音地址和配置 tts地址
baidu_api_url = "http://tts.baidu.com/text2audio"
baidu_api_set = {"idx": 1, "cuid": "baidu_speech_demo", "cod": 2,
"lan": "zh", "ctp": 1, "pdt": 1, "spd": 4, "per": 4, "vol": 5, "pit": 5}
# 百度文字轉語音 tsn地址
baidu_api_url2 = "http://tsn.baidu.com/text2audio?tex=%s&lan=zh&cuid=%s&ctp=1&tok=%s"
BaiDu_API_Key_GetVoi = "2NagVAULCYCnOnamrc8MNUPc"
BaiDu_Secret_Key_GetVoi = "af4860b64e77d187643db05ccdb060e4"
# 百度語音識別
BaiDu_App_ID = "10623076"
BaiDu_API_Key = "2NagVAULCYCnOnamrc8MNUPc"
BaiDu_Secret_Key = "af4860b64e77d187643db05ccdb060e4"
BaiDu_OpenApi_Url = "https://openapi.baidu.com/oauth/2.0/token" \
"?grant_type=client_credentials&client_id=%&client_secret=%"
config.py
三、總結
此文在本地語音儲存解析過程有時間差問題,讀者可自行優化。


