從零開始學caffe(九):在Windows下實現影象識別
本系列文章主要介紹了在win10系統下caffe的安裝編譯,運用CPU和GPU完成簡單的小專案,文章之間具有一定延續性。
step1:準備資料集
資料集是進行深度學習的第一步,在這裡我們從以下五個連結中下載所需要的資料集:
animal
flower
plane
house
guitar
我們在原先的models資料夾下新建資料夾my_models_recognition,用於存放本文在實現影象識別過程中的相關檔案。我們之前下載的五個壓縮包包含animal、flower、plane、house和guitar五個類別。我們首先需要將其分成訓練集和測試集兩個部分,在這裡,我們採用手工的方法來製作資料集。
首先分別在train和test資料夾下新建五個類別的資料夾,用於存放每個類別的訓練集和測試集。

在這裡,我們設定訓練集的數目為500,測試集的數目為300,我們將每個分類的前500章圖片剪下到train資料夾的相應類別下,用於作為訓練集,剪下300張圖片到test的相應資料夾下作為測試集。至此,我們已經完成了資料集的準備工作。
step2:製作標籤
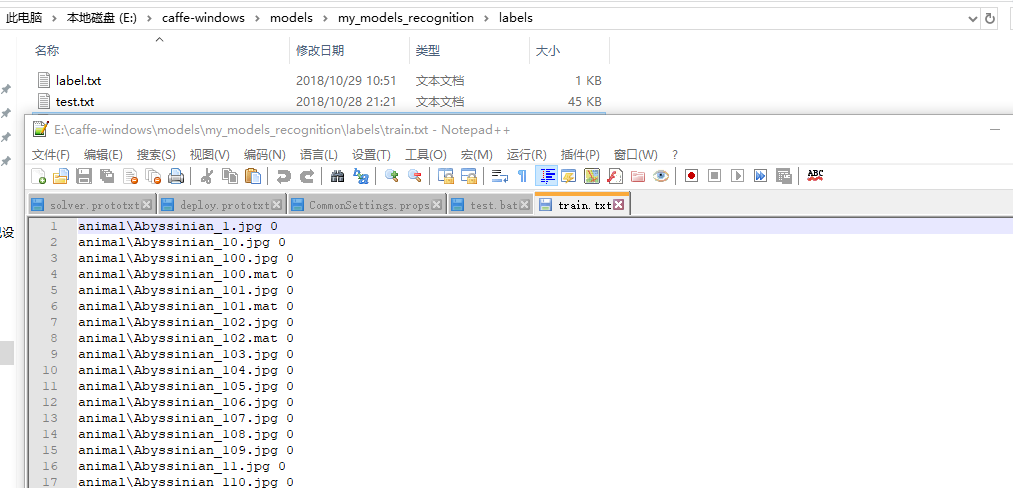
我們以“檔案路徑+標籤”的形式對每個影象進行命名,在這裡,如果我們繼續採用手工操作對影象標籤進行製作,這個過程需要耗費大量的時間。為此,我們在jupyter 中執行下列程式來幫助我們完成標籤製作。在執行程式之前先新建labels資料夾用於存放產生的標籤。
import os
#定義Caffe根目錄
caffe_root = 'E:/caffe-windows/'
#製作訓練標籤資料
i = 0 #標籤
with open(caffe_root + 'models/my_models_recognition/labels/train.txt','w') as train_txt:
for root,dirs,files in os.walk(caffe_root+'models/my_models_recognition/data/train/'): #遍歷資料夾
for dir in dirs:
for 執行程式,輸出“成功生成檔案列表”,開啟labels資料夾,就可以在裡面分別找到train和test的標籤檔案。
至此,我們也已經完成了標籤的製作過程。
step3:資料轉換
由於我們的資料集中圖片是png的形式,我們需要將其轉化為LMDB的格式,新建lmdb資料夾用於存放生成的lmdb檔案。
和之前我們講述的方法一樣,在這裡我們運用convert_imageset.exe來完成格式轉化。執行批處理檔案如下,對訓練集的影象進行格式轉換並打亂圖片順序:
%格式轉換的可執行檔案%
%重新設定影象大小%
%打亂圖片%
%轉換格式%
%圖片路徑%
%圖片標籤%
%lmdb檔案的輸出路徑%

E:\caffe-windows\Build\x64\Release\convert_imageset.exe ^
--resize_height=256  --resize_width=256 ^
--shuffle ^
--backend="lmdb" ^
E:\caffe-windows\models\my_models_recognition\data\train\ ^
E:\caffe-windows\models\my_models_recognition\labels\train.txt ^
E:\caffe-windows\models\my_models_recognition\lmdb\train\
pause
同理,執行如下程式修改測試集中的圖片格式。
%格式轉換的可執行檔案%
%重新設定影象大小%
%打亂圖片%
%轉換格式%
%圖片路徑%
%圖片標籤%
%lmdb檔案的輸出路徑%

E:\caffe-windows\Build\x64\Release\convert_imageset.exe ^
--resize_height=256  --resize_width=256 ^
--shuffle ^
--backend="lmdb" ^
E:\caffe-windows\models\my_models_recognition\data\test\ ^
E:\caffe-windows\models\my_models_recognition\labels\test.txt ^
E:\caffe-windows\models\my_models_recognition\lmdb\test\
pause

step5:修改網路引數檔案
在之前的文章中,我們使用過Googlenet,Googlenet適用於分類多,資料量大的情況,當資料集太小的時候容易出現過擬合現象(如本文只採用500個數據集),因此在這裡我們使用caffenet來完成影象的分類。

把上述檔案複製到my_models_recognition中,然後編輯網路引數檔案
在這裡,我們沒有使用均值檔案,因此將下列程式碼註釋掉
#  transform_param {
#   mirror: true
#    crop_size: 227
#    mean_file: "data/ilsvrc12/imagenet_mean.binaryproto"
#  }
# mean pixel / channel-wise mean instead of mean image
同理,還有下列程式碼:
#  transform_param {
#    mirror: false
#    crop_size: 227
#    mean_file: "data/ilsvrc12/imagenet_mean.binaryproto"
#  }
# mean pixel / channel-wise mean instead of mean image
將第25行batch size改為100
將293和333行num_output改為512
373行中,因為這裡我們只有五個類別,所以只需要5個輸出即可,將1000改為5
step6:修改超引數檔案
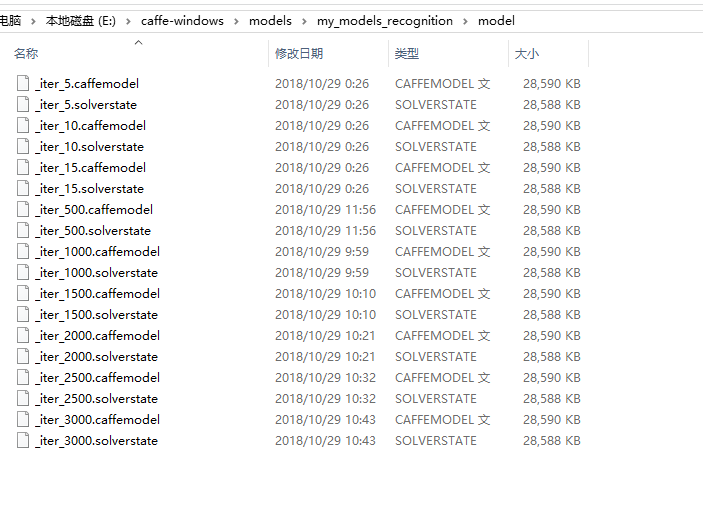
對超引數檔案中的路徑進行修改,最大迭代次數改為3000.,每500次迭代輸出一次model,並新建資料夾model,用於存放訓練得到的模型
net: "E:/caffe-windows/models/my_models_recognition/train_val.prototxt"
test_iter: 30
test_interval: 200
base_lr: 0.01
lr_policy: "step"
gamma: 0.1
stepsize: 1000
display: 50
max_iter: 3000
momentum: 0.9
weight_decay: 0.0005
snapshot: 500
snapshot_prefix: "E:/caffe-windows/models/my_models_recognition/model/"
solver_mode: GPU
step7:準備標籤
新建label檔案,在裡面放置物體的類別

step8:修改deploy Prototxt檔案
雖然在之前我們已經修改了網路結構檔案,但是在測試過程中我們使用的是deploy Prototxt檔案,因此我們對其進行同樣的修改:
181行和157行輸出改為512,第205行改為5.
step9:模型執行
執行批處理檔案如下:
%train訓練資料%
%超引數檔案%

E:\caffe-windows\Build\x64\Release\caffe.exe train ^
-solver=E:/caffe-windows/models/my_models_recognition/solver.prototxt ^
pause

(第一次進行訓練的時候是設定沒5次迭代輸出一次結構,第二次訓練改為500次訓練輸出一次結構,因此前面有那些第五次第十次之類,忽略即可)
step10:準備測試圖片
新建image資料夾,將我們要測試的圖片放置在其中:

step11:模型測試
在jupyter中執行如下程式碼:
import caffe
import numpy as np
import matplotlib.pyplot as plt
import os
import PIL
from PIL import Image
import sys

#定義Caffe根目錄
caffe_root = 'E:/caffe-windows/'
#網路結構描述檔案
deploy_file = caffe_root+'models/my_models_recognition/deploy.prototxt'
#訓練好的模型
model_file = caffe_root+'models/my_models_recognition/model/_iter_3000.caffemodel'

#gpu模式
#caffe.set_device(0)
caffe.set_mode_cpu()

#定義網路模型
net = caffe.Classifier(deploy_file, #呼叫deploy檔案
                       model_file,  #呼叫模型檔案
                       channel_swap=(2,1,0),  #caffe中圖片是BGR格式,而原始格式是RGB,所以要轉化
                       raw_scale=255,         #python中將圖片儲存為[0, 1],而caffe中將圖片儲存為[0, 255],所以需要一個轉換
                       image_dims=(227, 227)) #輸入模型的圖片要是227*227的圖片


#分類標籤檔案
imagenet_labels_filename = caffe_root +'models/my_models_recognition/labels/label.txt'
#載入分類標籤檔案
labels = np.loadtxt(imagenet_labels_filename, str)

#對目標路徑中的影象,遍歷並分類
for root,dirs,files in os.walk(caffe_root+'models/my_models_recognition/image/'):
    for file in files:
        #載入要分類的圖片
        image_file = os.path.join(root,file)
        input_image = caffe.io.load_image(image_file)

        #列印圖片路徑及名稱
        image_path = os.path.join(root,file)
        print(image_path)

        #顯示圖片
        img=Image.open(image_path)
        plt.imshow(img)
        plt.axis('off')
        plt.show()

        #預測圖片類別
        prediction = net.predict([input_image])
        print 'predicted class:',prediction[0].argmax()

        # 輸出概率最大的前5個預測結果
        top_k = prediction[0].argsort()[::-1]
        for node_id in top_k:
            #獲取分類名稱
            human_string = labels[node_id]
            #獲取該分類的置信度
            score = prediction[0][node_id]
            print('%s (score = %.5f)' % (human_string, score))
執行程式碼即可輸出分類結果,我們發現模型的識別準確率非常高

