2 springboot專案整合使用disconf,基於docker環境
上一篇我們完成了disconf服務端的環境搭建,這一篇我們來看看客戶端springboot如何繼承disconf,最終在docker下執行。
假定你已經在本機搭建好了disconf的web端環境,並已經能使用localhost訪問到disconf的web介面。
下面看客戶端如何使用disconf。
新建一個springboot專案,勾選web和aop。至於為什麼要勾aop,後面用到disconf的回撥時才用的上,先不用管它。
然後在pom裡新增disconf的依賴。最終pom.xml如下
<?xml version="1.0" encoding="UTF-8"?>
<project xmlns="http://maven.apache.org/POM/4.0.0" xmlns:xsi="http://www.w3.org/2001/XMLSchema-instance"
         xsi:schemaLocation="http://maven.apache.org/POM/4.0.0 http://maven.apache.org/xsd/maven-4.0.0.xsd">
    <modelVersion>4.0.0</modelVersion>

    <groupId>com.tianyalei</groupId>
    <artifactId>test_disconf</artifactId>
    <version>0.0.1-SNAPSHOT</version>
    <packaging>jar</packaging>

    <name>test_disconf</name>
    <description>Demo project for Spring Boot</description>

    <parent>
        <groupId>org.springframework.boot</groupId>
        <artifactId>spring-boot-starter-parent</artifactId>
        <version>1.5.7.RELEASE</version>
        <relativePath/> <!-- lookup parent from repository -->
    </parent>

    <properties>
        <project.build.sourceEncoding>UTF-8</project.build.sourceEncoding>
        <project.reporting.outputEncoding>UTF-8</project.reporting.outputEncoding>
        <java.version>1.8</java.version>
    </properties>

    <dependencies>
        <dependency>
            <groupId>org.springframework.boot</groupId>
            <artifactId>spring-boot-starter-web</artifactId>
        </dependency>
        <dependency>
            <groupId>com.baidu.disconf</groupId>
            <artifactId>disconf-client</artifactId>
            <version>2.6.36</version>
        </dependency>
        <dependency>
            <groupId>org.springframework.boot</groupId>
            <artifactId>spring-boot-starter-aop</artifactId>
        </dependency>
        <dependency>
            <groupId>org.springframework.boot</groupId>
            <artifactId>spring-boot-starter-test</artifactId>
            <scope>test</scope>
        </dependency>
    </dependencies>

    <build>
        <plugins>
            <plugin>
                <groupId>org.springframework.boot</groupId>
                <artifactId>spring-boot-maven-plugin</artifactId>
            </plugin>
        </plugins>
    </build>


</project>
disconf的官方文件地址:http://disconf.readthedocs.io/zh_CN/latest/tutorial-client/index.html,可以參考著來,它這個是基於spring的配置,全是xml,比較麻煩,我們用的是springboot,那就配置起來簡單多了。
我們新建一個配置類,DisConfig
注意設定一下scanpackage設定包名。其他的沒什麼,配置類就這一類,很簡單。package com.tianyalei.disconf.config; import com.baidu.disconf.client.DisconfMgrBean; import com.baidu.disconf.client.DisconfMgrBeanSecond; import org.springframework.context.annotation.Bean; import org.springframework.context.annotation.Configuration; /** * @author wuweifeng wrote on 2017/10/16. */ @Configuration public class DisConfig { @Bean(destroyMethod = "destroy") public DisconfMgrBean getDisconfMgrBean() { DisconfMgrBean disconfMgrBean = new DisconfMgrBean(); disconfMgrBean.setScanPackage("com.tianyalei.disconf"); return disconfMgrBean; } @Bean(destroyMethod = "destroy", initMethod = "init") public DisconfMgrBeanSecond getDisconfMgrBean2() { return new DisconfMgrBeanSecond(); } }
然後在resources下建立一個disconf.properties
這裡需要注意的地方有server_host地址,像這裡我是跑在本機,並且上一篇的docker-compose.xml中配置了nginx的埠80並且對映本機的80,所以這裡就直接寫localhost:80.代表disconf服務端的地址,如果是部署在docker的話,需要寫對映的容器別名,如nginxhost:80。version、app、env都需要和在server端新增的保持一致。# 是否使用遠端配置檔案 # true(預設)會從遠端獲取配置 false則直接獲取本地配置 enable.remote.conf=true # # 配置伺服器的 HOST,用逗號分隔 127.0.0.1:8000,127.0.0.1:8000 # conf_server_host=localhost:80 # 版本, 請採用 X_X_X_X 格式 version=1_0_0_0 # APP 請採用 產品線_服務名 格式 app=test_disconf # 環境 env=local # debug debug=true # 忽略哪些分散式配置,用逗號分隔 ignore= # 獲取遠端配置 重試次數,預設是3次 conf_server_url_retry_times=1 # 獲取遠端配置 重試時休眠時間,預設是5秒 conf_server_url_retry_sleep_seconds=1
然後我們建立一個類,來使用disconf的配置功能。
package com.tianyalei.disconf.service;

import com.baidu.disconf.client.common.annotations.DisconfItem;
import org.springframework.stereotype.Service;

/**
 * @author wuweifeng wrote on 2017/10/16.
 */
@Service
public class PriceService {

    private double money = 1000;

    private static final String KEY = "money";

    /**
     * 單項配置項
     */
    @DisconfItem(key = KEY)
    public double getMoney() {
        return money;
    }

    public void setMoney(double money) {
        this.money = money;
    }
}
我們再寫一個controller來獲取該price的值,看看效果。
/**
 * @author wuweifeng wrote on 2017/10/16.
 */
@RestController
public class IndexController {
    @Autowired
    private PriceService priceService;

    @RequestMapping("/index")
    public Object getPrice() {
        return priceService.getMoney();
    }
}
可以看到如下報錯資訊,就是說連不上zookeeper,找不到zkhost。
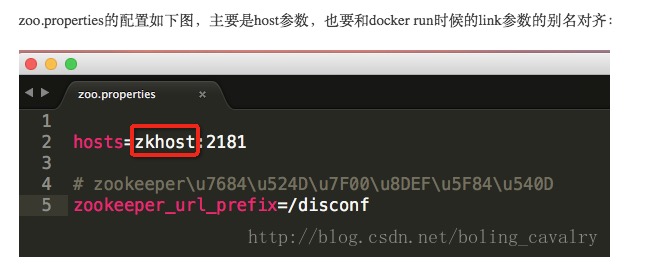
那麼這是什麼意思呢,Disconf是使用zookeeper進行的配置資訊推送,server變更後由zookeeper推送到client,在上一篇我們完成了server的配置。如果還記得的話,在配置tomcat時,裡面有個zoo.properties,裡面就是配置zookeeper的地址。
報錯資訊裡的zkhost unknown就是從這裡來的,client從server獲取zookeeper的地址,得到了這樣的地址 zkhost:2181,然後客戶端連不上zookeeper,所以就報錯了。
由於我們在部署zookeeper的docker時並沒有開放它的對外埠,也就是無法從外面直接訪問zookeeper,只能通過docker的link方式才行。所以要想跑起來這個client demo,也得在docker環境下。
我們在工程根目錄建立dockerfile
FROM hub.c.163.com/wuxukun/maven-aliyun:3-jdk-8

ADD pom.xml /tmp/build/

ADD src /tmp/build/src
        #構建應用
RUN cd /tmp/build && mvn clean package \
        #拷貝編譯結果到指定目錄
        && mv target/*.jar /app.jar \
        #清理編譯痕跡
        && cd / && rm -rf /tmp/build

VOLUME /tmp
EXPOSE 8080
ENTRYPOINT ["java","-jar","/app.jar"]conf_server_host=nginxhost:80構建映象,在工程根目錄下執行
docker build -t test_disconf .
先看看上一篇已經啟動好的容器:docker ps
啟動該映象,需要注意,我們此前已經啟動過了一個docker-compose.xml了,而現在我們要啟動一個新的容器,並且要link之前的裡面的容器。我們先來看看普通的啟動用法:
docker run --link=wuwf_disconf_zookeeper_1:zkhost --link=wuwf_disconf_nginx_1:nginxhost -d -p 8080:8080 test_disconf
發現報錯了,說not belong to the default network,這裡有解決方案,https://stackoverflow.com/questions/36489696/cannot-link-to-a-running-container-started-by-docker-compose
就是說docker-compose啟動的docker在一個network裡,你現在又啟動了一個,在另一個network裡,不同的network之間不能link。
我們通過命令來看一下docker network ls
可以看到之前的network為wuwf_default,下面我們就可以通過如下的方式來link了
docker run --link=wuwf_disconf_zookeeper_1:zkhost --link=wuwf_disconf_nginx_1:nginxhost --net wuwf_default -d -p 8080:8080 test_disconf再次執行,啟動成功了。
啟動成功後我們就可以在後臺web介面看到
我們測試一下:
訪問
localhost:8080/index

可以看到這裡取到的price的值就已經是從Disconf後臺配置的了,不再是程式碼裡寫的100.
我們來修改一下price的值
可以看到後臺修改後,立馬就生效了。
這就是配置中心的使用,後面來介紹一下複雜的配置,不僅僅是這種單個屬性的單項配置。


