【一起來學React】- 生命週期
本文為系列文章首發於我的部落格:https://www.fakin.cn
上一章我們講了一些react的基礎知識,咱們這一章來說個好玩點的東西,react的生命週期(這一章基本是都是理論)
為了文章更加清晰簡單,示例程式碼都是直接貼出,並不是真實情況的,
下面圖片,都為上一章todolist的輸出!
元件生命週期
React元件的生命週期可分成三個狀態:
    Mounting:已插入真實 DOM
    Updating:正在被重新渲染
    Unmounting:已移出真實 DOM
下面我們來看下每個狀態詳細的生命週期函式
Mounting
    componentWillMount->當元件即將掛載到頁面
    componentDidMount->當元件被掛載到頁面後
其實我覺得render函式也是生命週期,一個完整的Mounting應該是這樣的:
componentWillMount->render->componentDidMount
class App extends Component {
constructor(props) {
super(props);
}
render() {
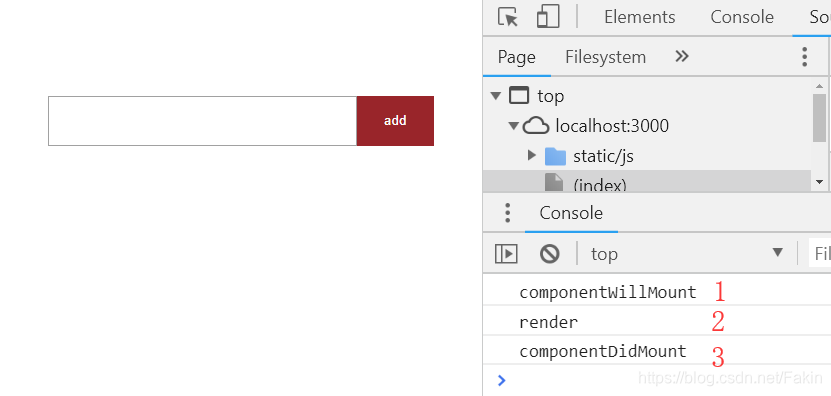
console.log 這時我們來看控制檯列印的結果,如下所示:

我想這下應該明白了Mounting狀態下的兩個(不算render)生命週期函式的具體意義了!其實從字面意思也能理解的~
Updating
顧名思義,明顯就是升級、更新的意思,Updating就是元件更新的狀態,這個狀態下生命週期函式就有點多了!
在react的Updating狀態下分別有props和states兩種型別的生命週期函式!
props:
     componentWillReceiveProps:當一個元件從父元件接收了引數(props),只有父元件的render函式被重新執行了,子元件的componentWillReceiveProps函式就會被執行
     shouldComponentUpdate:元件更新之前自動執行函式(要求返回一個布林值必須,必須告訴react元件是否要更新)
     componentWillUpdate:元件更新之前自動執行,但是他在shouldComponentUpdate執行後返回true之後才執行,如果shouldComponentUpdate返回false不執行
     componentDidUpdate:元件更新完成之後
states:
    shouldComponentUpdate:元件更新之前自動執行函式(要求返回一個布林值必須,必須告訴react元件是否要更新)
    componentWillUpdate:元件更新之前自動執行,但是他在shouldComponentUpdate執行後返回true之後才執行,如果shouldComponentUpdate返回false不執行
    componentDidUpdate:元件更新完成之後
其實props比起states的生命週期函式就多了一個componentWillReceiveProps而已,其他都是一樣的!
一個完整的Updating應該是這樣的:
(componentWillReceiveProps)->shouldComponentUpdate(true)->componentWillUpdate-componentDidUpdate
其中componentWillReceiveProps需要特殊對待!只有在子元件接收了父元件的引數,並且父元件render重新執行才會觸發這個,所以我寫在括號裡面了!
class App extends Component {
    constructor(props) {
        super(props);
    }
    componentWillReceiveProps() {
        console.log('componentWillReceiveProps')
    }
    render(){
        console.log('render')
    }
    shouldComponentUpdate(){
        console.log('shouldComponentUpdate')
        return true
    }
    componentWillUpdate(){
        console.log('componentWillUpdate')
    }
    componentDidUpdate(){
        console.log('componentDidUpdate')
    }
}

export default App;
ps:由於componentWillReceiveProps需要在子元件中,這裡直接和其他的函式寫的一起是為了看著更方便,真實的開發環境是在子元件下。
如圖

看上圖可以看到,紅色是Mounting狀態下的,而橘色是Updating狀態下的,但是為什麼只有四個生命週期函數了?
其實很簡單,componentWillReceiveProps這裡是肯定不會輸出的,原因嘛,你看上文對於componentWillReceiveProps的解釋

此圖可以得到全部Updating狀態的生命週期,
這裡的生命週期,控制檯輸入的順序,大家可以用之前我的todoList的案例去輸出下,一定要去試一下哦~
Unmounting
之前說的mounting是掛載,那麼Unmounting反過來就是解除安裝嘛,這個狀態下只有一個生命週期函式。
componentWillUnmount->當元件在頁面中即將被剔除時自動執行。
這個咱們可以去控制檯輸入看下。
(為了更好的理解,一下程式碼為子元件程式碼)
class Test extends Component {
    constructor(props) {
        super(props);
        this.state={
        }
    }
    render() {
        console.log('render')
    }
   componentWillUnmount(){
        console.log('componentWillUnmount')
   }
}

componentWillUnmount,在這張圖上是不存在的,因為你這個生命週期是在子元件定義的,子元件還沒有被解除安裝呢?
當我點選list的x的時候,那麼就是子元件被解除安裝的時候,接下來你在看

這樣是不是就有componentWillUnmount輸出了!
總結:
1、render函式會在props和state改變的時候自動重新執行
2、componentWillReceiveProps是父元件傳遞props給子元件的時候才觸發(當然有時候也會在父元件觸發,componentWillReceiveProps會有一些bug例如觸發多次等,所以react16中建議用getDerivedStateFromProps 替換 componentWillReceiveProps)
3、生命週期不難,只是需要全部死記硬背下來!
ps:文章的示例程式碼並不是真實生產的程式碼,只是為了更好理解,圖片中的輸出為上一章todolist例項輸出!
