
阿里雲伺服器配置VPN
前言
每次配置虛擬機器的網路環境,都要花不少的時間,這次在阿里雲上搗鼓VPN又出了岔子,VPN對映的網段和阿里雲的虛擬機器內網網段重疊了,而且阿里雲自動做了路由,導致VPN路由失效。
本文將總結一下阿里雲配置VPN的問題,估計自己以後也會經常回來翻看的。
目錄
網路架構
遇到的問題
如何解決問題
1. 網路架構
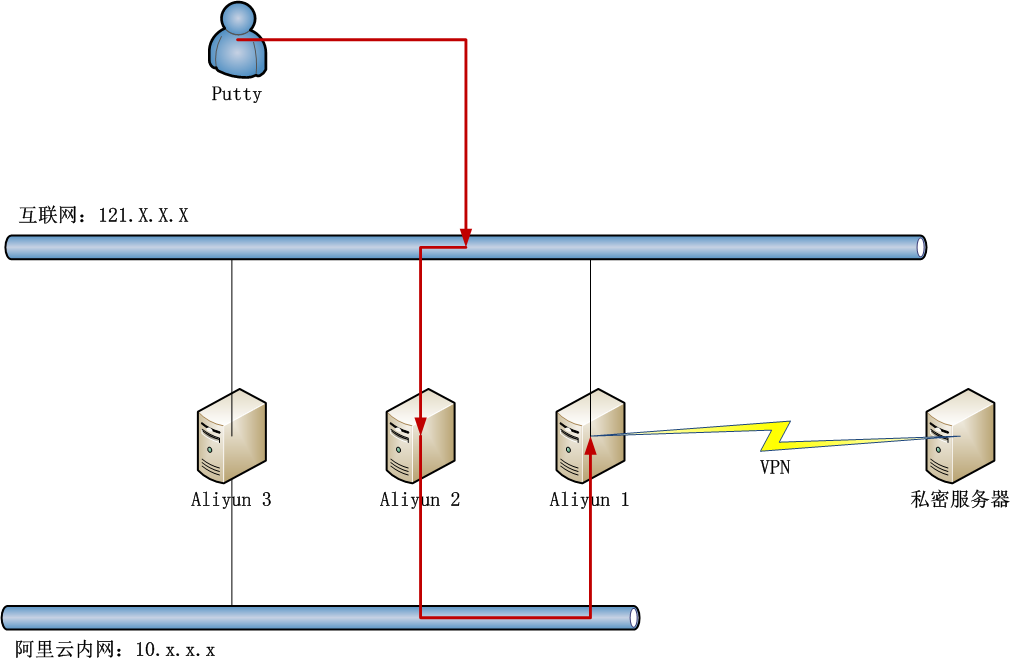
要開發一個網際網路應用,通常我們都需要購買伺服器,部署自己應用然後託管到機房。對於剛起步的小公司來說,買伺服器到託管到機房成本有點高,而且可能資源用不完,這時我們就有了一個更便宜的選擇就是先租虛擬主機,阿里雲就提供了這種服務。當然,和國外的主機服務商比阿里雲還是很貴的,而且服務還有一些差距,但和國外的其他服務商比,也只能選阿里雲了。
通常在阿里雲租的虛擬主機,都會包括一個外網IP(121.x.x.x)和一個內網IP(10.x.x.x),外網IP主要面向網際網路的訪問,內網IP可以讓內網的多臺計算機通過內網進行通訊。
接下來,我們會對應用進行分層,有用於資料儲存的伺服器(大硬碟),有用於計算的伺服器(CPU密集型),有用於使用者訪問伺服器(IO密集型)。另外,對於私密性比較高的資料或應用,我們通常用到VPN進行加密訪問,從而保證傳輸過程的安全。
aliyun
我們一旦建立VPN連線,所有外網網路訪問都將走VPN的加密通道,VPN通常只是小型私密網路,所以網際網路的訪問連線將會被切斷。那麼當網際網路的訪問被切掉到了,我們用Putty遠端連線VPN的主機,也會訪問不到了,這時就需要通過內網其他主機進行代理連線。比如,當Aliyun1開啟VPN後,我們就不能直接通過Putty連線了,需要先用Putty登陸Aliyun2,再通過Aliyun2走內網登陸到Aliyun1。
對於虛擬主機來說,即使只租用一臺伺服器也可以實現VPN的連線。當伺服器進行了VPN連線,你可以從宿主機管理控制檯,對連線VPN的計算機進行操作。阿里雲也提供了這個功能,可以通過網頁直接登陸。
aliyun-2
- 遇到的問題
上面我們介紹的,都是標準的VPN訪問流程。那麼,我其實遇到了一個問題,就是阿里雲的內網IP網段是10.x.x.x,連線VPN生成的私密網路的網段也是10.x.x.x,這時就造成了IP網段衝突。每個網絡卡都需要配置IP地址,閘道器,子網掩碼,DNS伺服器等,如果內網和外網的網段或IP發生衝突,而且兩邊的網路服務都不能進行修改,那麼就直接無解了。幸運的是,只是A類的地址衝突了,而且B類,C類,D類的地址沒有衝突。那麼,可以通過把網斷進行不同的對映,配置閘道器和路由。
其實,發現上面的問題,也是花了一些時間的。
我們先看阿里雲主機的預設網路配置。
~ ifconfig
eth0 Link encap:Ethernet HWaddr 00:16:3e:00:36:37
inet addr:10.169.0.162 Bcast:10.169.7.255 Mask:255.255.248.0
UP BROADCAST RUNNING MULTICAST MTU:1500 Metric:1
RX packets:109 errors:0 dropped:0 overruns:0 frame:0
TX packets:43 errors:0 dropped:0 overruns:0 carrier:0
collisions:0 txqueuelen:1000
RX bytes:9597 (9.5 KB) TX bytes:6767 (6.7 KB)
eth1 Link encap:Ethernet HWaddr 00:16:3e:00:3d:3b
inet addr:121.41.77.206 Bcast:121.41.79.255 Mask:255.255.252.0
UP BROADCAST RUNNING MULTICAST MTU:1500 Metric:1
RX packets:2294 errors:0 dropped:0 overruns:0 frame:0
TX packets:151 errors:0 dropped:0 overruns:0 carrier:0
collisions:0 txqueuelen:1000
RX bytes:108919 (108.9 KB) TX bytes:12624 (12.6 KB)
lo Link encap:Local Loopback
inet addr:127.0.0.1 Mask:255.0.0.0
UP LOOPBACK RUNNING MTU:65536 Metric:1
RX packets:0 errors:0 dropped:0 overruns:0 frame:0
TX packets:0 errors:0 dropped:0 overruns:0 carrier:0
collisions:0 txqueuelen:0
RX bytes:0 (0.0 B) TX bytes:0 (0.0 B)
~ cat /etc/resolv.conf
options timeout:1 attempts:1 rotate
nameserver 10.202.72.118
nameserver 10.202.72.116
~ route
Kernel IP routing table
Destination Gateway Genmask Flags Metric Ref Use Iface
default 121.41.79.247 0.0.0.0 UG 0 0 0 eth1
10.0.0.0 10.169.7.247 255.0.0.0 UG 0 0 0 eth0
10.169.0.0 * 255.255.248.0 U 0 0 0 eth0
100.64.0.0 10.169.7.247 255.192.0.0 UG 0 0 0 eth0
121.41.76.0 * 255.255.252.0 U 0 0 0 eth1
172.16.0.0 10.169.7.247 255.240.0.0 UG 0 0 0 eth0
安裝及配置VPNC
安裝VPNC
~ apt-get install vpnc
配置檔案
~ vi /etc/vpnc/default.conf
IPSec gateway xxx.com
IPSec ID xxx
IPSec obfuscated secret xxxxxxxxx
Xauth username xxx
Xauth password xxxxxx
啟動VPN連線。
~ vpnc
Stopped Name Service Cache Daemon: nscd.
* Starting Name Service Cache Daemon nscd [ OK ]
VPNC started in background (pid: 1543)…
檢視網站連線,會多出tun0的網絡卡,分配的IP地址為10.1.15.228。
~ ifconfig
eth0 Link encap:Ethernet HWaddr 00:16:3e:00:36:37
inet addr:10.169.0.162 Bcast:10.169.7.255 Mask:255.255.248.0
UP BROADCAST RUNNING MULTICAST MTU:1500 Metric:1
RX packets:1727 errors:0 dropped:0 overruns:0 frame:0
TX packets:551 errors:0 dropped:0 overruns:0 carrier:0
collisions:0 txqueuelen:1000
RX bytes:103050 (103.0 KB) TX bytes:70120 (70.1 KB)
eth1 Link encap:Ethernet HWaddr 00:16:3e:00:3d:3b
inet addr:121.41.77.206 Bcast:121.41.79.255 Mask:255.255.252.0
UP BROADCAST RUNNING MULTICAST MTU:1500 Metric:1
RX packets:128289 errors:0 dropped:0 overruns:0 frame:0
TX packets:649 errors:0 dropped:0 overruns:0 carrier:0
collisions:0 txqueuelen:1000
RX bytes:5435081 (5.4 MB) TX bytes:82302 (82.3 KB)
lo Link encap:Local Loopback
inet addr:127.0.0.1 Mask:255.0.0.0
UP LOOPBACK RUNNING MTU:65536 Metric:1
RX packets:0 errors:0 dropped:0 overruns:0 frame:0
TX packets:0 errors:0 dropped:0 overruns:0 carrier:0
collisions:0 txqueuelen:0
RX bytes:0 (0.0 B) TX bytes:0 (0.0 B)
tun0 Link encap:UNSPEC HWaddr 00-00-00-00-00-00-00-00-00-00-00-00-00-00-00-00
inet addr:10.1.15.228 P-t-P:10.1.15.228 Mask:255.255.255.255
UP POINTOPOINT RUNNING NOARP MULTICAST MTU:1412 Metric:1
RX packets:40 errors:0 dropped:0 overruns:0 frame:0
TX packets:82 errors:0 dropped:0 overruns:0 carrier:0
collisions:0 txqueuelen:500
RX bytes:3328 (3.3 KB) TX bytes:11016 (11.0 KB)
通過情況下,這樣的配置已經生效了,VPN也連線正常,但VPN網路確無法訪問。
~ ping testvpn
ping: unknown host testvpn
第一感覺是DNS出問題了,檢視DNS還是原來的內容,沒有發生變化。
~ cat /etc/resolv.conf
options timeout:1 attempts:1 rotate
nameserver 10.202.72.118
nameserver 10.202.72.116
通常VPN連線的時候,都會配置一個新的DNS,那麼我們把這個DNS設定成自動更新的。
~ dpkg-reconfigure resolvconf
同時,修改tail檔案,設定一個更快速的阿里雲DNS伺服器。
vi /etc/resolvconf/resolv.conf.d/tail
nameserver 223.5.5.5
nameserver 223.6.6.6
斷開VPN再重連線VPN
~ vpnc-disconnect
Terminating vpnc daemon (pid: 1543)
~ vpnc
Stopped Name Service Cache Daemon: nscd.
* Starting Name Service Cache Daemon nscd [ OK ]
VPNC started in background (pid: 2111)…
再次檢視DNS的配置,我們看到/etc/resolv.conf已經會自動更新了。
cat /etc/resolv.conf
Dynamic resolv.conf(5) file for glibc resolver(3) generated by resolvconf(8)
DO NOT EDIT THIS FILE BY HAND – YOUR CHANGES WILL BE OVERWRITTEN
nameserver 10.1.1.1
nameserver 10.1.1.2
search xxx.test.cn
nameserver 223.5.5.5
nameserver 223.6.6.6
但通過VPN網路還是無法訪問。
~ ping testvpn
ping: unknown host testvpn
檢查路由表
route
Kernel IP routing table
Destination Gateway Genmask Flags Metric Ref Use Iface
default * 0.0.0.0 U 0 0 0 tun0
10.0.0.0 10.169.7.247 255.0.0.0 UG 0 0 0 eth0
10.1.15.0 * 255.255.255.0 U 0 0 0 tun0
10.169.0.0 * 255.255.248.0 U 0 0 0 eth0
100.64.0.0 10.169.7.247 255.192.0.0 UG 0 0 0 eth0
121.41.76.0 * 255.255.252.0 U 0 0 0 eth1
172.16.0.0 10.169.7.247 255.240.0.0 UG 0 0 0 eth0
vpn.test.com 121.41.79.247 255.255.255.255 UGH 0 0 0 eth1
這個時候就發現了,由VPN生成的10.1.15.0被強制使用了阿里雲的10.0.0.0 的路由10.169.7.247,檢查網絡卡配置檔案/etc/network/interfaces。
~ cat /etc/network/interfaces
auto lo
iface lo inet loopback
auto eth1
iface eth1 inet static
address 121.41.77.206
netmask 255.255.252.0
up route add -net 0.0.0.0 netmask 0.0.0.0 gw 121.41.79.247 dev eth1
auto eth0
iface eth0 inet static
address 10.169.0.162
netmask 255.255.248.0
up route add -net 172.16.0.0 netmask 255.240.0.0 gw 10.169.7.247 dev eth0
up route add -net 100.64.0.0 netmask 255.192.0.0 gw 10.169.7.247 dev eth0
up route add -net 10.0.0.0 netmask 255.0.0.0 gw 10.169.7.247 dev eth0
最後一行發現了問題。
up route add -net 10.0.0.0 netmask 255.0.0.0 gw 10.169.7.247 dev eth0
這個網段的10.0.0.0所有IP統一會使用10.169.7.247的閘道器,怪不得VPN始終不通,原來是阿里雲伺服器預設的配置造成的問題。
- 如何解決問題
只要定位到了問題,解決就不難。
我們看到由於阿里雲的內網是10.x.x.x的,我們的幾臺伺服器也分別是10.168.x.x, 10.169.x.x, 10.200.x.x, 10.251.x.x,我估計它是從10.1.x.x到10.255.x.x都配置了網路,所以直接對A類網段進行了配置。通過VPN生成的IP為10.1.15.228,從B類網段開始剛好與阿里雲租的機器不重合,那麼我們重新定義阿里雲的網段配置就行了,對B類網段做對映。
修改檔案 /etc/network/interfaces。
~ vi /etc/network/interfaces
auto lo
iface lo inet loopback
auto eth1
iface eth1 inet static
address 121.41.77.206
netmask 255.255.252.0
up route add -net 0.0.0.0 netmask 0.0.0.0 gw 121.41.79.247 dev eth1
auto eth0
iface eth0 inet static
address 10.169.0.162
netmask 255.255.248.0
up route add -net 172.16.0.0 netmask 255.240.0.0 gw 10.169.7.247 dev eth0
up route add -net 100.64.0.0 netmask 255.192.0.0 gw 10.169.7.247 dev eth0
up route add -net 10.0.0.0 netmask 255.0.0.0 gw 10.169.7.247 dev eth0
up route add -net 10.200.0.0 netmask 255.255.0.0 gw 10.169.7.247 dev eth0
up route add -net 10.168.0.0 netmask 255.255.0.0 gw 10.169.7.247 dev eth0
up route add -net 10.169.0.0 netmask 255.255.0.0 gw 10.169.7.247 dev eth0
up route add -net 10.251.0.0 netmask 255.255.0.0 gw 10.169.7.247 dev eth0
重啟網絡卡
~ /etc/init.d/networking restart
竟然是無效的命令,只能重啟計算機了。
~ reboot
重啟後,檢視路由表。
~ route
Kernel IP routing table
Destination Gateway Genmask Flags Metric Ref Use Iface
default 121.41.79.247 0.0.0.0 UG 0 0 0 eth1
10.168.0.0 10.169.7.247 255.255.0.0 UG 0 0 0 eth0
10.169.0.0 * 255.255.248.0 U 0 0 0 eth0
10.169.0.0 10.169.7.247 255.255.0.0 UG 0 0 0 eth0
10.200.0.0 10.169.7.247 255.255.0.0 UG 0 0 0 eth0
10.251.0.0 10.169.7.247 255.255.0.0 UG 0 0 0 eth0
100.64.0.0 10.169.7.247 255.192.0.0 UG 0 0 0 eth0
121.41.76.0 * 255.255.252.0 U 0 0 0 eth1
172.16.0.0 10.169.7.247 255.240.0.0 UG 0 0 0 eth0
對B類網段的配置已經生效,已經去除了對A類10網段的配置。
連線VPN。
~ vpnc
Stopped Name Service Cache Daemon: nscd.
* Starting Name Service Cache Daemon nscd [ OK ]
VPNC started in background (pid: 1368)…
檢視路由表
~ route
Kernel IP routing table
Destination Gateway Genmask Flags Metric Ref Use Iface
default * 0.0.0.0 U 0 0 0 tun0
10.1.15.0 * 255.255.255.0 U 0 0 0 tun0
10.168.0.0 10.169.7.247 255.255.0.0 UG 0 0 0 eth0
10.169.0.0 * 255.255.248.0 U 0 0 0 eth0
10.169.0.0 10.169.7.247 255.255.0.0 UG 0 0 0 eth0
10.200.0.0 10.169.7.247 255.255.0.0 UG 0 0 0 eth0
10.251.0.0 10.169.7.247 255.255.0.0 UG 0 0 0 eth0
100.64.0.0 10.169.7.247 255.192.0.0 UG 0 0 0 eth0
121.41.76.0 * 255.255.252.0 U 0 0 0 eth1
172.16.0.0 10.169.7.247 255.240.0.0 UG 0 0 0 eth0
vpn.test.com 121.41.79.247 255.255.255.255 UGH 0 0 0 eth1
10.1.15.0由VPN生成的IP,沒有被強制路由。
連線VPN內網計算機
~ ping testvpn
PING testvpn.xxx.com.cn (10.1.1.13) 56(84) bytes of data.
64 bytes from testvpn.xxx.com.cn (10.1.1.13): icmp_seq=1 ttl=127 time=39.5 ms
64 bytes from testvpn.xxx.com.cn (10.1.1.13): icmp_seq=2 ttl=127 time=40.4 ms
終於訪問正常了,這樣就完成了,通過阿里雲連線VPN服務的網路配置。
本文主要記錄了網路除錯的一系列操作,阿里雲在方便易用的同時,也會有一些額外的問題,需要大家有更多的Linux使用經驗,從而有能力解決各種的VM技術問題。