ELK6.5的安裝與使用
阿新 • • 發佈:2018-12-26
一、ELK的簡介
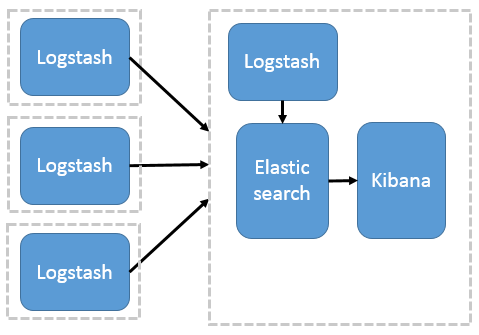
- elk分別是elasticsearch(簡稱es)和logstash以及kibana,elasticseach是用於進行儲存和索引的一個元件,而logstash是用於收集和傳輸資料的,kibana通常是配合es進行日誌展示. logstash在各個伺服器上進行資料採集,將採集到的資料儲存到es上,然後kibana通過es進行資料的獲取和查詢.以web介面的形式進行展示.
這裡只做一些基本的使用搭建和講解,想要深入的朋友可以去elk的官網進行學習,elk的元件版本不可以相差太大,相差太大的版本會無法正常使用
二、ELK的安裝和使用
伺服器: es 192.168.31.132/133    logstash 192.168.31.134 kibana 192.168.31.1
硬體: cpu2核  記憶體4G  磁碟50G
系統: centos7.
ELK版本: 6.5
JDK版本: jdk8](http://www.170hi.com/kw/other.web.nl01.sycdn.kuwo.cn/resource/n1/44/64/1077252466.mp3
2. jdk的安裝
每臺伺服器都需要安裝配置jdk,版本必須是jdk8以上的版本,這裡不講怎麼配置了,主要講下如何配置環境變數
[[email protected] 3. ES的安裝
建立目錄
[[email protected] ~]# mkdir /elk

建立使用者,es必須以非root使用者啟動
[[email protected] ~]# useradd elk

下載es二進位制包並解壓
[[email protected] ~]# cd /elk/
[[email protected] elk]# wget https://artifacts.elastic.co/downloads/elasticsearch/elasticsearch-6.5.4.tar.gz
[[email protected] elk]# tar -xf elasticsearch-6.5.4
[[email protected] elk]# cd elasticsearch-6.5.4
[[email protected] elasticsearch-6.5.4]# ls
bin  config  data  lib  LICENSE.txt  logs  modules  NOTICE.txt  plugins  README.textile
[[email protected] elasticsearch-6.5.4]# cd config/
[[email protected] config]# ls
elasticsearch.keystore  elasticsearch.yml  jvm.options  log4j2.properties  role_mapping.yml  roles.yml  users  users_roles

修改配置:node-1
[[email protected] config]# grep '^[a-Z]' elasticsearch.yml
cluster.name: escluster #叢集名稱,用於其他節點進行發現,各節點及群名必須一致
node.name: node-1   #節點名稱,每個節點不可一致
network.host: 192.168.31.132 #主機名
discovery.zen.ping.unicast.hosts: ["192.168.31.132", "192.168.31.133"]    #叢集節點ip,有多少節點就寫幾個

修改配置:node-2
[[email protected] config]# grep '^[a-Z]' elasticsearch.yml
cluster.name: escluster #叢集名稱,用於其他節點進行發現,各節點及群名必須一致
node.name: node-2   #節點名稱,每個節點不可一致
network.host: 192.168.31.133 #主機名
discovery.zen.ping.unicast.hosts: ["192.168.31.132", "192.168.31.133"]    #叢集節點ip,有多少節點就寫幾個

調整系統核心
[[email protected] bin]# sysctl -w vm.max_map_count=262144
[[email protected] bin]# echo "vm.max_map_count=262144" >> /etc/sysctl.conf
[[email protected] bin]# sysctl -p

啟動es
[[email protected] elasticsearch-6.5.4]#  chown -R elk. /elk/
[[email protected] elasticsearch-6.5.4]# bin/elasticsearch -d

訪問任意節點
http://192.168.31.132:9200/_cluster/health?pretty
注:status為green表示正常,yellow為警告,red為故障
{
  "cluster_name" : "escluster",
  "status" : "green",
  "timed_out" : false,
  "number_of_nodes" : 2,
  "number_of_data_nodes" : 2,
  "active_primary_shards" : 0,
  "active_shards" : 0,
  "relocating_shards" : 0,
  "initializing_shards" : 0,
  "unassigned_shards" : 0,
  "delayed_unassigned_shards" : 0,
  "number_of_pending_tasks" : 0,
  "number_of_in_flight_fetch" : 0,
  "task_max_waiting_in_queue_millis" : 0,
  "active_shards_percent_as_number" : 100.0
}
4. logstash的安裝和配置
建立目錄
[[email protected] ~]# mkdir /elk
[[email protected] ~]# cd /elk/

下載logstash二進位制包並解壓
[[email protected] elk]# wget https://artifacts.elastic.co/downloads/logstash/logstash-6.5.4.tar.gz
[[email protected] elk]# tar -xf logstash-6.5.4.tar.gz
[[email protected] elk]# cd logstash-6.5.4
[[email protected] logstash-6.5.4]# ls
 bin  conf  config  CONTRIBUTORS  data  Gemfile  Gemfile.lock  lib  LICENSE.txt  logs  logstash-core  logstash-core-plugin-api  modules  NOTICE.TXT  tools  vendor  x-pack

測試
[[email protected] logstash-6.5.4]# bin/logstash -e 'input { stdin { type => test } } output { stdout {  } }'
Sending Logstash logs to /elk/logstash-6.5.4/logs which is now configured via log4j2.properties
[2018-12-25T21:20:29,517][WARN ][logstash.config.source.multilocal] Ignoring the 'pipelines.yml' file because modules or command line options are specified
[2018-12-25T21:20:29,538][INFO ][logstash.runner          ] Starting Logstash {"logstash.version"=>"6.5.4"}
[2018-12-25T21:20:34,131][INFO ][logstash.pipeline        ] Starting pipeline {:pipeline_id=>"main", "pipeline.workers"=>4, "pipeline.batch.size"=>125, "pipeline.batch.delay"=>50}
[2018-12-25T21:20:40,865][INFO ][logstash.pipeline        ] Pipeline started successfully {:pipeline_id=>"main", :thread=>"#<Thread:0x52a485ca run>"}
The stdin plugin is now waiting for input:
[2018-12-25T21:20:40,929][INFO ][logstash.agent           ] Pipelines running {:count=>1, :running_pipelines=>[:main], :non_running_pipelines=>[]}
[2018-12-25T21:20:41,211][INFO ][logstash.agent           ] Successfully started Logstash API endpoint {:port=>9600}  #這裡會等待你輸入,輸入後會列印json格式的資料
hello world
{
          "type" => "test",
       "message" => "hello world",
    "@timestamp" => 2018-12-25T13:21:50.827Z,
      "@version" => "1",
          "host" => "Logstash"
}


編寫conf檔案用於收集日誌
建立conf目錄用於存放自寫的conf檔案
[[email protected] logstash-6.5.4]# mkdir conf
[[email protected] logstash-6.5.4]# cat conf/test.conf
input{
	file{					#使用file外掛
	type =>"test"
	path =>"/var/log/messages"     		#輸入日誌的路徑
	start_position => "beginning"  		#從最早的日誌開始收集
	}
}

output{						#使用es外掛
	elasticsearch{
	hosts => ["192.168.31.132:9200"]	#es主機地址
	action => "index"			#es動作設定
	index => "test-%{+YYYY-MM-dd}"		#設定索引名

	}
}

後臺啟動
[[email protected] logstash-6.5.4]# nohup bin/logstash -f conf/test.conf &

啟動完成後訪問es,檢視是否有索引
http://192.168.31.132:9200/_cat/indices?v
health status index           uuid                   pri rep docs.count docs.deleted store.size pri.store.size
green  open   test-2018-12-25 8FGxJf2MTXaBi8x6JH5GxQ   5   1       3542            0    475.6kb           460b
5. kibana的安裝和配置
建立目錄
[[email protected] ~]# mkdir /elk
[[email protected] ~]# cd /elk

下載kibana
[[email protected] ~]# wget https://artifacts.elastic.co/downloads/kibana/kibana-6.5.4-linux-x86_64.tar.gz
[[email protected] elk]#  tar -xf kibana-6.5.4-linux-x86_64

配置kibana檔案
[[email protected] elk]# cd kibana-6.5.4-linux-x86_64
[[email protected] kibana-6.5.4-linux-x86_64]# ls
bin  config  data  LICENSE.txt  node  node_modules  NOTICE.txt  optimize  package.json  plugins  README.txt  src  webpackShims
[[email protected] kibana-6.5.4-linux-x86_64]# grep '^[a-Z]' config/kibana.yml
server.host: "192.168.31.135"
elasticsearch.url: "http://192.168.31.132:9200"

啟動並訪問
http://192.168.31.135:5601

