
Java 位元組的常用封裝
一. Java 的位元組
byte (位元組) 是 Java 中的基本資料型別,一個 byte 包含8個 bit(位),byte 的取值範圍是-128到+127。
byte 跟 Java 其他基本型別的關係:

二. 常用封裝
由於工作關係,我封裝了一個操作位元組的庫
github 地址:https://github.com/fengzhizi715/bytekit
2.1 bytekit 的特點:
支援多種方式建立 Bytes
支援位元組陣列、ByteBuffer 的操作
支援 Immutable 物件:ByteArrayBytes、ByteBufferBytes
支援 Transformer: 內建 copy、contact、reverse、xor、and、or、not,也支援自定義 Transformer
支援 Hash: 內建 md5、sha1、sha256
支援轉換成16進位制字串
支援 mmap 常用讀寫操作:readByte/writeByte、readBytes/writeBytes、readInt/writeInt、readLong/writeLong、readDouble/writeDouble、readObject/writeObject
支援物件的序列化、反序列化、深拷貝
不依賴任何第三方庫
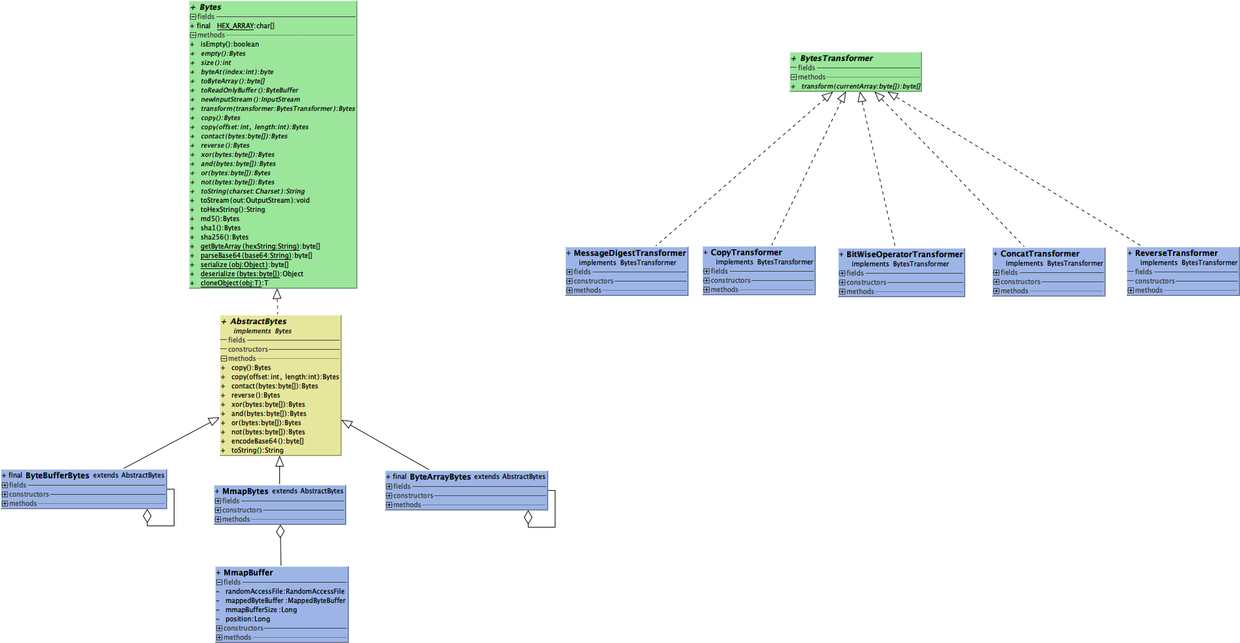
Bytes 是一個介面,它有三個實現類:ByteArrayBytes、ByteBufferBytes、MmapBytes。其中,前面兩個實現類是 Immutable 物件。
2.2 支援 Immutable 物件
Immutable 物件(不可變物件),即物件一旦被建立它的狀態(物件的資料,也即物件屬性值)就不能改變。
它的優點:
構造、測試和使用都很簡單
執行緒安全
當用作類的屬性時不需要保護性拷貝
可以很好的用作Map鍵值和Set元素
2.3 支援 Hash 加密
對 Bytes 中的 byte[] 進行加密。在 Bytes 介面中,包含下面的預設函式:
/**
* 使用md5加密
* @return
*/
default Bytes md5() {
return transform(new MessageDigestTransformer(MD5));
}
/**
* 使用sha1加密
* @return
*/
default Bytes sha1() {
return transform(new MessageDigestTransformer(SHA-1));
}
/**
* 使用sha256加密
* @return
*/
default Bytes sha256() {
return transform(new MessageDigestTransformer(SHA-256));
}
進行單元測試:
@Test
public void testHash() {
Bytes bytes = ByteArrayBytes.create(hello world);
assertEquals(5eb63bbbe01eeed093cb22bb8f5acdc3, bytes.md5().toHexString());
assertEquals(2aae6c35c94fcfb415dbe95f408b9ce91ee846ed, bytes.sha1().toHexString());
assertEquals(b94d27b9934d3e08a52e52d7da7dabfac484efe37a5380ee9088f7ace2efcde9, bytes.sha256().toHexString());
}
2.4 序列化、反序列化、深拷貝
支援物件的序列化、反序列化以及深拷貝。在 Bytes 介面中,包含下面的靜態函式:
/**
* 序列化物件,轉換成位元組陣列
* @param obj
* @return
*/
static byte[] serialize(Object obj) {
byte[] result = null;
ByteArrayOutputStream fos = null;
try {
fos = new ByteArrayOutputStream();
ObjectOutputStream o = new ObjectOutputStream(fos);
o.writeObject(obj);
result = fos.toByteArray();
} catch (IOException e) {
System.err.println(e);
} finally {
IOUtils.closeQuietly(fos);
}
return result;
}
/**
* 反序列化位元組數字,轉換成物件
* @param bytes
* @return
*/
static Object deserialize(byte[] bytes) {
InputStream fis = null;
try {
fis = new ByteArrayInputStream(bytes);
ObjectInputStream o = new ObjectInputStream(fis);
return o.readObject();
} catch (IOException e) {
System.err.println(e);
} catch (ClassNotFoundException e) {
System.err.println(e);
} finally {
IOUtils.closeQuietly(fis);
}
return null;
}
/**
* 通過序列化/反序列化實現物件的深拷貝
* @param obj
* @param
* @return
*/
staticT cloneObject(T obj) {
return (T) deserialize(serialize(obj));
}
進行單元測試:
@Test
public void testSerializeAndDeserialize() {
User u = new User();
u.name = tony;
u.password = 123456;
byte[] bytes = Bytes.serialize(u);
User newUser = (User)Bytes.deserialize(bytes);
assertEquals(u.name, newUser.name);
assertEquals(u.password,newUser.password);
}
@Test
public void testDeepCopy() {
User u = new User();
u.name = tony;
u.password = 123456;
User newUser = Bytes.cloneObject(u);
System.out.println(u);
System.out.println(newUser);
assertNotSame(u,newUser);
assertNotSame(u.name,newUser.name);
}
testDeepCopy() 執行後,u 和 newUser 地址的不同,u.name 和 newUser.name 指向的記憶體地址也不同。
2.5 copy、contact、reverse
copy、contact、reverse 都是採用 Transformer 的方式。在 AbstractBytes 類中,包含下面的函式:
@Override
public Bytes copy() {
return transform(new CopyTransformer(0, size()));
}
@Override
public Bytes copy(int offset, int length) {
return transform(new CopyTransformer(offset, length));
}
@Override
public Bytes contact(byte[] bytes) {
return transform(new ConcatTransformer(bytes));
}
@Override
public Bytes reverse() {
return transform(new ReverseTransformer());
}
進行單元測試:
@Test
public void testContact() {
Bytes bytes = ByteBufferBytes.create(hello world).contact( tony.getBytes());
assertEquals(bytes.toString(), hello world tony);
}
@Test
public void testCopy() {
Bytes bytes = ByteBufferBytes.create(hello world).contact( tony.getBytes());
assertEquals(bytes.toString(), bytes.copy().toString());
}
@Test
public void testReverse() {
Bytes bytes = ByteBufferBytes.create(hello world).contact( tony.getBytes());
assertEquals(bytes.toString(), bytes.reverse().reverse().toString());
}
2.6 位操作
xor、and、or、not 也是採用 Transformer 的方式。在 AbstractBytes 類中,包含下面的函式:
@Override
public Bytes xor(byte[] bytes) {
return transform(new BitWiseOperatorTransformer(bytes,BitWiseOperatorTransformer.Mode.XOR));
}
@Override
public Bytes and(byte[] bytes) {
return transform(new BitWiseOperatorTransformer(bytes, BitWiseOperatorTransformer.Mode.AND));
}
@Override
public Bytes or(byte[] bytes) {
return transform(new BitWiseOperatorTransformer(bytes, BitWiseOperatorTransformer.Mode.OR));
}
@Override
public Bytes not(byte[] bytes) {
return transform(new BitWiseOperatorTransformer(bytes, BitWiseOperatorTransformer.Mode.NOT));
}
進行單元測試:
@Test
public void testBitWise() {
ByteBufferBytes bytes = (ByteBufferBytes)ByteBufferBytes.create(hello world).contact( tony.getBytes());
assertEquals(bytes.toString(), bytes.and(bytes.toByteArray()).or(bytes.toByteArray()).toString());
assertEquals(bytes.toString(), bytes.not(bytes.toByteArray()).not(bytes.toByteArray()).toString());
assertEquals(bytes.toString(), bytes.xor(bytes.toByteArray()).xor(bytes.toByteArray()).toString()); //兩次xor 返回本身
}
2.7 Base64 編碼、解碼
@Test
public void testBase64() {
ByteBufferBytes bytes = (ByteBufferBytes)ByteBufferBytes.create(hello world).contact( tony.getBytes());
String base64 = new String(bytes.encodeBase64());
assertEquals(bytes.toString(), new String(Bytes.parseBase64(base64)));
}
2.8 Bytes 轉換成位元組陣列
@Test
public void testToByteArray() {
Bytes bytes = ByteBufferBytes.create(hello world).contact( tony.getBytes());
assertEquals(bytes.toString(), new String(bytes.toByteArray()));
}
三. mmap 的操作
Linux 的 mmap 是一種記憶體對映檔案的方法。
mmap將一個檔案或者其它物件對映進記憶體。檔案被對映到多個頁上,如果檔案的大小不是所有頁的大小之和,最後一個頁不被使用的空間將會清零。mmap在使用者空間對映呼叫系統中作用很大。 mmap系統呼叫是將一個開啟的檔案對映到程序的使用者空間,mmap系統呼叫使得程序之間通過對映同一個普通檔案實現共享記憶體。普通檔案被對映到程序地址空間後,程序可以像訪問普通記憶體一樣對檔案進行訪問,不必再呼叫read()、write()等操作。
import com.safframework.bytekit.domain.User;
import com.safframework.bytekit.jdk.mmap.MmapBytes;
import org.junit.After;
import org.junit.Before;
import org.junit.Test;
import static junit.framework.TestCase.assertEquals;
/**
* Created by tony on 2018-12-24.
*/
public class MmapBytesTest {
private MmapBytes mmapBytes;
private String file;
@Before
public void setUp() {
file = test;
mmapBytes = new MmapBytes(file, (long) 1024 * 10); // 10M
}
@Test
public void testWriteAndRead() throws Exception {
mmapBytes.writeInt(12);
mmapBytes.writeInt(34);
mmapBytes.writeByte((byte) 5);
mmapBytes.writeBytes((this is tony).getBytes());
mmapBytes.writeLong(6666L);
mmapBytes.writeDouble(3.14d);
assertEquals(12, mmapBytes.readInt());
assertEquals(34, mmapBytes.readInt());
assertEquals((byte) 5, mmapBytes.readByte());
assertEquals(this is tony, new String(mmapBytes.readBytes(12)));
assertEquals(6666L, mmapBytes.readLong());
assertEquals(3.14d, mmapBytes.readDouble());
}
@Test
public void testObject() throws Exception {
User u = new User();
u.name = tony;
u.password = 123456;
mmapBytes.writeObject(u);
User temp = (User)mmapBytes.readObject(117);
assertEquals(u.name, temp.name);
assertEquals(u.password, temp.password);
}
@Test
public void testFree() throws Exception {
mmapBytes.writeInt(12);
mmapBytes.writeInt(34);
mmapBytes.writeByte((byte) 5);
mmapBytes.free();
mmapBytes = new MmapBytes(file, (long) 1024 * 10); // 10M
mmapBytes.writeInt(67);
assertEquals(67, mmapBytes.readInt());
}
@After
public void tearDown() {
mmapBytes.free();
}
}
四. 總結
bytekit 是一個操作位元組的工具庫,不依賴任何第三方庫。它封裝了位元組陣列、ByteBuffer 的操作,支援 mmap 常用的讀寫。
當然,它還可以封裝 protobuf 的 ByteString 或者 Android 中的 Parcel,只需實現 Bytes 介面即可。