
Ubuntu Server 安裝 Postfix + pop3 imap
今天會學的技能是在Linux 上架設mail server,Postfix其實沒有想像中的複雜,基本的設定值也很簡單,比較難的是「寄信/收信遇到問題」的處理。
你一定覺得很奇怪,gmail 和 yahoo 信箱就很好用了,為何要自己去架設?因為facebook Workspace 只能使用公司的 Email。

Facebook Workplace 可以將同事連結在一起,方便大家交流意見,免費進行群組對話、傳送訊息、撥打語音/視訊電話,並享有無限儲存空間。專為企業設計的實用工具。
不自己架的話,可以直接花錢買gmail for bussiness,如果想省錢就花點時間自己架了。
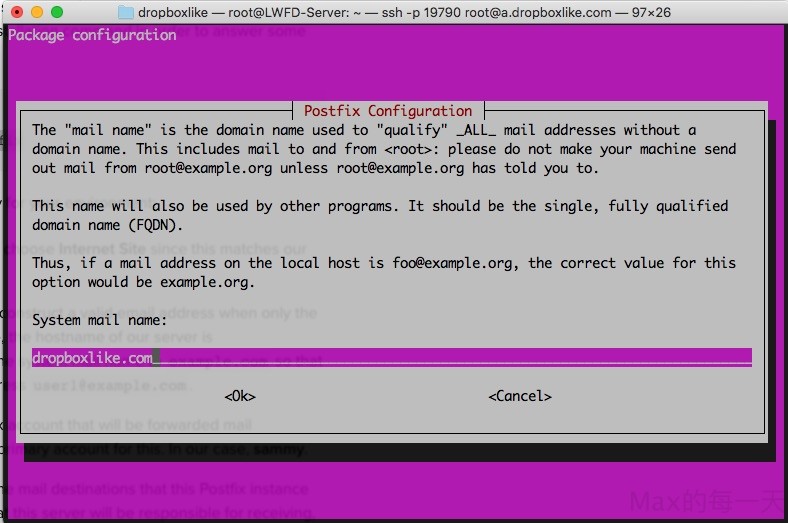
安裝教學:
外國人寫的也滿好的,看英文吃力很多,max心得是:很多地方看不懂就跳過就好了,重點是紅字的部份都要看懂即可:
連線加密,可以用 let encrypt:
certbot 指令用法:
certbot certonly --standalone -d example.com --tls-sni-01-port 443 --http-01-port 80
新的版本的 certbot 用起來更簡單:
certbot certonly --cert-name your-domain-name
我的引數設定 /etc/postfix/main.cf
# TLS parameterssmtpd_tls_cert_file=/etc/letsencrypt/live/mail.dropboxlike.com/fullchain.pem smtpd_tls_key_file=/etc/letsencrypt/live/mail.dropboxlike.com/privkey.pem smtpd_use_tls=yes smtpd_tls_session_cache_database = btree:${data_directory}/smtpd_scache smtp_tls_session_cache_database = btree:${data_directory}/smtp_scachesmtp_use_tls = yes smtp_tls_note_starttls_offer = yes
上面紅字部份是我有修改的。
如果有其他 user 也要用,可以加入下面這行設定值:
local_recipient_maps = proxy:unix:passwd.byname $alias_maps
完整的設定值,可以參考 /etc/postfix/main.cf.proto
除了設定 postfix 還要去設 dovecot 開啟 SSL 選項,
# nano /etc/dovecot/conf.d/10-ssl.conf
找到 ssl 這行,把 no 改成 yes
ssl = yes
並且把自己的私鑰和公鑰指向檔案的路徑
ssl_key =</etc/letsencrypt/live/mail.dropboxlike.com/privkey.pem
ssl_cert =</etc/letsencrypt/live/mail.dropboxlike.com/fullchain.pem
mail server debug 用的 log:
/var/log/mail.log
必學的 2個指令:
dig  your_domain

host your_domain
一定要確定 DNS 相關設定值是正確的。
如果你遇到任何的錯誤,請先確定連線的 ip 有對應到你指定的 server
遇到:How to correct Postfix’ ‘Relay Access Denied’? 處理
Diagnostic-Code: smtp; 554 5.7.1 <[email protected]>: Relay access denied
you now need to authorise your local network by adding it to mynetworks. For example,
mynetworks = 192.168.1.0/24 127.0.0.0/8測試 POP3
telnet mail.dropboxmax.com 110
Trying 128.199.124.123...
Connected to mail.dropboxmax.com.
Escape character is '^]'.
+OK Dovecot ready.
USER max
-ERR [AUTH] Plaintext authentication disallowed on non-secure (SSL/TLS) connections.
centos dsn client 的設定值放在 /etc/resolv.conf 檔案裡,設定範例:
nameserver 8.8.8.8
上面的做法,在ubuntu 裡已過時,需要改用這個解法:
在 /etc/network/interfaces 檔裡,加入下面這一行就可以指定 DNS Server 了
dns-nameservers 8.8.8.8 168.95.192.1
滿奇怪的,這個設定檔好像需要內縮,沒有內縮,我使用 reboot 後,dns 設定值沒有被修改,內縮後reboot 即可取到正確的 DNS 設定。