
Kubernetes 1.8 kube
Kubernetes 1.8 對於 kube-proxy 元件增加了 ipvs 支援,以下記錄一下 kube-proxy ipvs 開啟教程
一、環境準備
目前測試為 5 臺虛擬機器,CentOS 系統,etcd、kubernetes 全部採用 rpm 安裝,使用 systemd 來做管理,網路元件採用 calico,Master 實現了 HA;基本環境如下
| IP | 元件 |
|---|---|
| 10.10.1.5 | Master、Node、etcd |
| 10.10.1.6 | Master、Node、etcd |
| 10.10.1.7 | Master、Node、etcd |
| 10.10.1.8 | Node |
| 10.10.1.9 | Node |
二、注意事項
之所以把這個單獨寫一個標題是因為坑有點多,為了避免下面出現問題,先說一下注意事項:
2.1、SELinux
如果對 SELinux 玩的不溜的朋友,我建議先關閉 SELinux,關閉方法如下
# 編輯 /etc/selinux/config 檔案;確保 SELINUX=disabled
docker1.node ➜  ~ cat /etc/selinux/config

# This file controls the state of SELinux on the system.
# SELINUX= can take one of these three values:
#     enforcing - SELinux security policy is enforced.
#     permissive - SELinux prints warnings instead of enforcing.
#     disabled - No SELinux policy is loaded.
SELINUX=disabled
# SELINUXTYPE= can take one of three two values:
#     targeted - Targeted processes are protected,
#     minimum - Modification of targeted policy. Only selected processes are protected.
#     mls - Multi Level Security protection.
SELINUXTYPE=targeted
然後重啟機器並驗證
docker1.node ➜  ~ sestatus
SELinux status:                 disabled
2.2、Firewall
搭建時儘量關閉防火牆,如果你玩的很溜,那麼請在測試沒問題後再開啟防火牆
systemctl stop firewalld
systemctl disable firewalld
2.3、核心引數調整
確保核心已經開啟如下引數,或者說確保 /etc/sysctl.conf 有如下配置
docker1.node ➜  ~ cat /etc/sysctl.conf
# sysctl settings are defined through files in
# /usr/lib/sysctl.d/, /run/sysctl.d/, and /etc/sysctl.d/.
#
# Vendors settings live in /usr/lib/sysctl.d/.
# To override a whole file, create a new file with the same in
# /etc/sysctl.d/ and put new settings there. To override
# only specific settings, add a file with a lexically later
# name in /etc/sysctl.d/ and put new settings there.
#
# For more information, see sysctl.conf(5) and sysctl.d(5).
net.ipv4.ip_forward=1
net.bridge.bridge-nf-call-iptables=1
net.bridge.bridge-nf-call-ip6tables=1
然後執行 sysctl -p 使之生效
docker1.node ➜  ~ sysctl -p
net.ipv4.ip_forward = 1
net.bridge.bridge-nf-call-iptables = 1
net.bridge.bridge-nf-call-ip6tables = 1
2.4、核心模組載入
由於 ipvs 已經加入到核心主幹,所以需要核心模組支援,請確保核心已經載入了相應模組;如不確定,執行以下指令碼,以確保核心載入相應模組,否則會出現 failed to load kernel modules: [ip_vs_rr ip_vs_sh ip_vs_wrr] 錯誤
cat > /etc/sysconfig/modules/ipvs.modules <<EOF
#!/bin/bash
ipvs_modules="ip_vs ip_vs_lc ip_vs_wlc ip_vs_rr ip_vs_wrr ip_vs_lblc ip_vs_lblcr ip_vs_dh ip_vs_sh ip_vs_fo ip_vs_nq ip_vs_sed ip_vs_ftp nf_conntrack_ipv4"
for kernel_module in \${ipvs_modules}; do
/sbin/modinfo -F filename \${kernel_module} > /dev/null 2>&1
if [ $? -eq 0 ]; then
/sbin/modprobe \${kernel_module}
fi
done
EOF
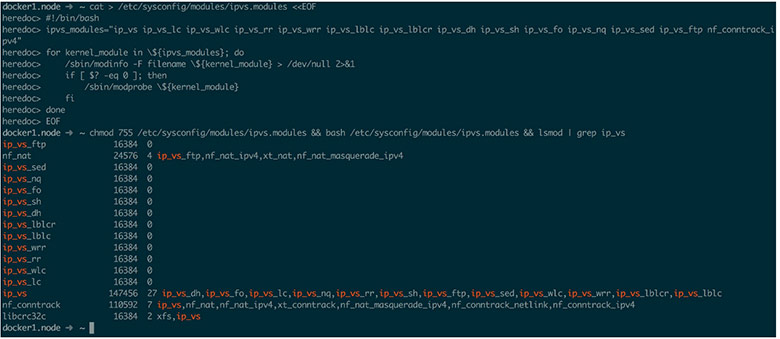
chmod 755 /etc/sysconfig/modules/ipvs.modules && bash /etc/sysconfig/modules/ipvs.modules && lsmod | grep ip_vs
執行後應該如下圖所示,如果 lsmod | grep ip_vs 並未出現 ip_vs_rr 等模組;那麼請更換核心(一般不會,2.6 以後 ipvs 好像已經就合併進主幹了)
三、開啟 ipvs 支援
3.1、修改配置
修改 /etc/kubernetes/proxy 配置如下
###
# kubernetes proxy config

# default config should be adequate

# Add your own!
KUBE_PROXY_ARGS="--bind-address=10.10.1.8 \
                 --hostname-override=docker4.node \
                 --masquerade-all \
                 --feature-gates=SupportIPVSProxyMode=true \
                 --proxy-mode=ipvs \
                 --ipvs-min-sync-period=5s \
                 --ipvs-sync-period=5s \
                 --ipvs-scheduler=rr \
                 --kubeconfig=/etc/kubernetes/kube-proxy.kubeconfig \
                 --cluster-cidr=10.254.0.0/16"
啟用 ipvs 後與 1.7 版本的配置差異如下:
- 增加 –feature-gates=SupportIPVSProxyMode=true 選項,用於告訴 kube-proxy 開啟 ipvs 支援,因為目前 ipvs 並未穩定
- 增加 ipvs-min-sync-period、–ipvs-sync-period、–ipvs-scheduler 三個引數用於調整 ipvs,具體引數值請自行查閱 ipvs 文件
- 增加 –masquerade-all 選項,以確保反向流量通過
重點說一下 –masquerade-all 選項: kube-proxy ipvs 是基於 NAT 實現的,當建立一個 service 後,kubernetes 會在每個節點上建立一個網絡卡,同時幫你將 Service IP(VIP) 繫結上,此時相當於每個 Node 都是一個 ds,而其他任何 Node 上的 Pod,甚至是宿主機服務(比如 kube-apiserver 的 6443)都可能成為 rs;按照正常的 lvs nat 模型,所有 rs 應該將 ds 設定成為預設閘道器,以便資料包在返回時能被 ds 正確修改;在 kubernetes 將 vip 設定到每個 Node 後,預設路由顯然不可行,所以要設定 –masquerade-all 選項,以便反向資料包能通過
以上描述可能並不精準,具體請看 Google 文件
3.2、測試 ipvs
修改完成後,重啟 kube-proxy 使其生效
systemctl daemon-reload
systemctl restart kube-proxy
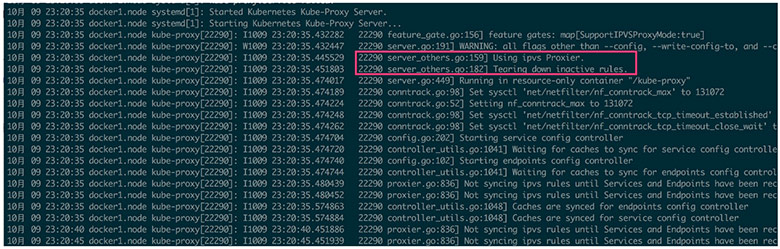
重啟後日志中應該能看到如下輸出,不應該有其他提示 ipvs 的錯誤資訊出現
同時使用 ipvsadm 命令應該能看到相應的 service 的 ipvs 規則(ipvsadm 自己安裝一下)

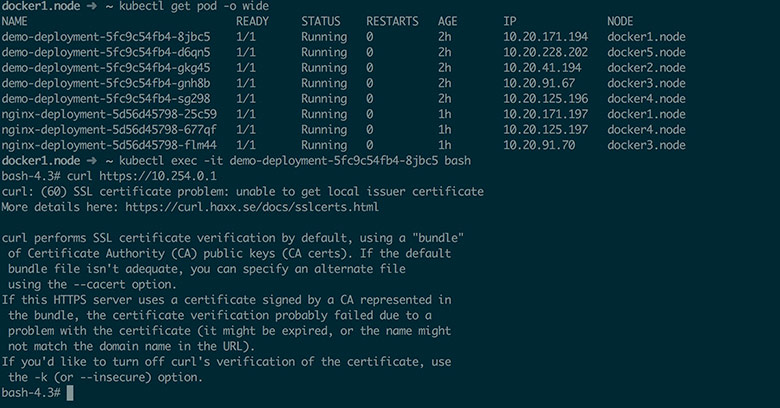
然後進入 Pod 測試
最後說一點: ipvs 尚未穩定,請慎用;而且 –masquerade-all 選項與 Calico 安全策略控制不相容,請酌情考慮使用(Calico 在做網路策略限制的時候要求不能開啟此選項)
文章由漠然編寫,本文開頭略有修改,可以檢視 原文連結 ;