React利用路由實現登入介面的跳轉
React利用路由實現登入介面的跳轉
上一篇在配置好了webpack和react的環境後,接下來開始寫登入介面,以及接下來的跳轉到主頁的功能。
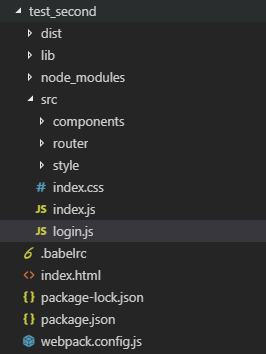
**1、首先看一下總體的目錄結構。**因為很多時候在看別人寫的例子的時候因為目錄結構不熟悉後邊會出現意想不到的岔子。
。
2、大體流程:
1)webpack配置入口檔案src/index.js
2)執行index.html後首先載入入口檔案src/index.js
3)載入路由表src/router/index.js
4)根據路由表中的配置會首先載入登入介面src/login.js
5)當在登入介面登入成功後跳轉到src/components/myView.js
6)在myView檔案中點選左側選單會分別顯示指定頁面(都是在路由表中配置)
3、寫HTML檔案。
其中,1)id為myContent處是為了放置我們寫的元件。
2)script中載入的檔案時webpack打包後的js檔案。
<body>
    <div id="myContent"></div>
    <script src="./dist/bundle.js"></script>
</body>
4、登入介面寫在了login.js中。
1)引入必要的模組:antd(Ant Design )是一個元件庫,我們專案中使用的元件都來自它。(https://ant.design/index-cn)(不引入antd.css時,那麼介面顯示不出來樣式)
import React from 'react'
import {Form,Input,Icon, Button} from 'antd'
// import {render} from 'react-dom'
// import axios from 'axios'

import '../node_modules/antd/dist/antd.css'//不引入這個檔案那麼不顯示antd的樣式
import './style/login.css';
2)建立登入表單元件。除了基本的Form、Input、Button元件外,實現跳轉功能的主要是history.push(’/View’);(其中,history = this.props.history;)push函式中的路徑是路由表中配置的路徑( ),二者要對應起來。
class LoginFrom extends React.Component{
    constructor(){
        super()
    }

    handleSubmit = (e) => {
        //提交之前判斷輸入的欄位是否有錯誤
        e.preventDefault();

        **let history = this.props.history;**
        this.props.form.validateFields((errors,values)=>{
            if (!errors) {
                console.log('Received values of form: ', values);
                **history.push('/View');**
              }
        })
    }

    render(){
        //Form.create 包裝的元件會自帶this.props.form屬性,該屬性提供了一系列API,包括以下4個
        //getFieldDecorator用於和表單進行雙向繫結
        //isFieldTouched判斷一個輸入控制元件是否經歷過 getFieldDecorator 的值收集時機 options.trigger(收集子節點的值的時機,預設時onChange)
        //getFieldError獲取某個輸入控制元件的 Error
        //獲取一組輸入控制元件的 Error ,如不傳入引數,則獲取全部元件的 Error
        const { getFieldDecorator, getFieldsError, getFieldError, isFieldTouched } = this.props.form;
        const userNameError = isFieldTouched('userName') && getFieldError('userName');
        const passWordError = isFieldTouched('password') && getFieldError('password');
        return (
            <div className="login">
                <div className="login-form">
                    <div className="login-logo">
                        <div className="login-name">MSPA</div>
                    </div>
                    <Form onSubmit={this.handleSubmit}>
                        {/* 一個FromItem中放一個被 getFieldDecorator 裝飾過的 child */}
                        <Form.Item
                            validateStatus={userNameError ? 'error' : ''}//validateStatus為校驗狀態,如不設定,則會根據校驗規則自動生成,可選:'success' 'warning' 'error' 'validating'
                        >
                        {
                            getFieldDecorator('userName',{
                                rules:[{required:true,message:"Please input your username!"}]
                            })(
                                <Input prefix={<Icon type="user" style={{ color: 'rgba(0,0,0,.25)' }}/>}
                                        placeholder="Username"
                                />
                            )
                        }
                        </Form.Item>
                        <Form.Item
                            validateStatus={passWordError ? "error" : ''}
                        >
                        {
                            getFieldDecorator('passWord',{
                                rules:[{required:true,message:"Please input your Password!"}]
                            })(
                                <Input prefix={<Icon type="lock" style={{ color: 'rgba(0,0,0,.25)' }}/>}
                                        placeholder="Password"
                                />
                            )
                        }
                        </Form.Item>
                        <Form.Item>
                            <Button
                                type="primary"
                                htmlType="submit"
                                disabled={hasErrors(getFieldsError)}
                            >登入
                            </Button>
                        </Form.Item>
                    </Form>
                </div>
            </div>
        )
    }
}
let LoginForm = Form.create()(LoginFrom);
export default LoginForm;
3、在第二步中我們已經把靜態頁面寫出來了,接下來就是配置路由表**了。**我們將路由資訊都配置在了router資料夾下的index.js中。react-router中文文件(https://react-guide.github.io/react-router-cn/),其中history的簡單介紹可以參考(https://segmentfault.com/a/1190000010251949),比較容易快速理解。
程式碼如下:前三行中引入的模組是基本的模組,後邊import的模組是寫好的元件:首頁顯示login介面,登入成功後跳轉到myView介面,myPicture和myDocument是在myView介面點選後所顯示的元件。(巢狀路由)
import React from 'react'
import {HashRouter as Router , Route , Switch} from 'react-router-dom'
import { createBrowserHistory } from "history";

import MyView from '../components/myView.js'
import LoginModule from '../login.js'
import MyPicture from '../components/myPicture'
import MyDocument from '../components/myDocument.js'

export default class MyRoute extends React.Component{
    render(){
        return(
            <Router history={createBrowserHistory()}>
                <Switch>
                    <Route exact path="/" component={LoginModule}/>
                     <MyView path='/View' component={MyDocument}>
                        <Route path="/View/abc" component={MyDocument} />
                        <Route path="/View/myPicture" component={MyPicture} />
                    </MyView>
                </Switch>
            </Router>
        )
    }
}
4、接下來我們在src資料夾下的index.js(程式的入口檔案)檔案中寫如下程式碼。
import MyRoute from './router/index.js'
import {render} from 'react-dom'
import React from 'react'
render(
    <MyRoute />,
    document.getElementById('myContent')
);
5、程式測試結果如下:
1)登入介面(login.js):
2)輸入使用者名稱和密碼點選登入後的跳轉介面(myView.js):


