
Deploy a serverless Jekyll website on a CDN at AWS
When I was developing my personal blog website with Jekyll, I was eager to deploy the site on a well-known performant and scalable platform. Namely Amazon Web Services (AWS). I already had some experience with AWS, so for me, this would be the perfect platform to deploy to. I would like to share with you the steps I did in this article.
Hosting a static website on AWS comes with a numerous of advantages. A couple of examples: You don’t have to worry about server costs, just pay for the numbers of requests to your website. If you don’t get any visitors, you don’t pay for it. I will not go into prices in this article, but this setup won’t cost you much. With AWS CloudFront’s edge locations your site is loaded within milliseconds all around the world. It’s basically a Content Delivery Network (CDN). AWS S3 is a managed object storage service, you don’t have to worry about server capacity. It’s scalable for millions. FTP deployments are outdated, deploy your website quickly with AWS CodePipeline and AWS Codebuild.
Requirements
Before we dive into setting up all those different AWS services you first need to register an account with AWS. Registration is easy, and it’s a matter of minutes before you got your account. You even get a free tier when you’re new to AWS.
When using Jekyll make sure that in your _config.yml
.html at the end of every URL, this is the way to go with AWS S3.I have my code stored in a GitHub repository. If you want to be using CodeBuild and CodePipeline in a later stage for automatic deployments, you need to save your code in a repository compatible with CodePipeline. These are of today: Github, AWS S3 and AWS CodeCommit.
A simple overview
Awesome, now that you have your AWS account registered, we can start with the good stuff! First of all, I want to share with you a basic overview of what is going on. This way you get a basic understanding of the cloud infrastructure we are going to set up.


In total, we will use three AWS services to host our website. These are Route53, CloudFront and Simple Storage Service (S3). All these services are managed by AWS. This basically means that you don’t have to worry about servers or capacity. This is all handled by AWS.
Route 53
Route 53 is a scalable and highly available Domain Name System (DNS). It manages all your DNS settings for your custom domain. Domains can be registered and transferred using Route53, or if you already have your domain registered elsewhere, you can easily set the nameservers of the domain to Route53. Besides a basic DNS service, Route53 will also provide the ability to perform health checks, make traffic flows based on health, latency, geo proximity and weighted Round Robin.
For this setup, we will only use the DNS service of Route53 to configure it for your domain. So that when a user types your domain in their browser, and a DNS lookup happens, Route53 directs the user to your CloudFront distribution. CloudFront will be the next service we will use to set up your hosting.
CloudFront
Amazon CloudFront is a global content delivery network (CDN). This basically means that data is distributed worldwide to deliver with low-latency and therefore high transfer-speeds. The big benefit, if we use CloudFront to access your website, is that your website is as fast as possible anywhere in the world. Amazon has numerous edge locations all around the world which will host your website.
An excellent tool to test latency all around the world for your current website is the performance tester by Sucuri. If your current site is not on a CDN, you will see that the latency increases when you go further away from your server location. This is because people have to connect to your server and if they are further away from it, it takes longer. CloudFront will solve this issue for you.
Besides a distributed network, CloudFront will also offload our SSL certificate. No more manual server configuration needed to get HTTPS on your website. CloudFront will handle this for us. It will even redirect all your HTTP traffic to HTTPS on your site. SSL certificates comes free for usage on AWS with the convenient certificate manager. The certificate manager will generate and auto-renew your SSL certificates easily.
What CloudFront doesn’t do is host your website files. This will be handled by Simple Storage Service (S3).
Simple Storage Service (S3)
Amazon Simple Storage Service (S3) is object storage to simply and securely collect, store and analyze data. We will use S3 to save all your website files Jekyll will build in the _site folder.
S3 is designed to deliver 99.999999999% durability and high availability and can therefore efficiently function as your storage origin.
Recap
Now that you have a basic understanding of these three different AWS services we will start to configure each one of them. We will start with S3, continue with CloudFront and if this is all set up we can configure the DNS settings in Route53.
If you would like to compare this AWS setup to an ordinary day-to-day example. Route53 would be the DNS configuration, CloudFront would be the reverse-proxy clients connect to, and S3 would be the primary origin server.
Let’s configure!
So we will start by configuring S3. Objects (files) are stored in S3 under buckets. Each bucket can contain up to five terabytes of data. This will easily be enough to hold your website files.
Start by logging into your web console. You will see the following screen displaying all of the available web services AWS offers.

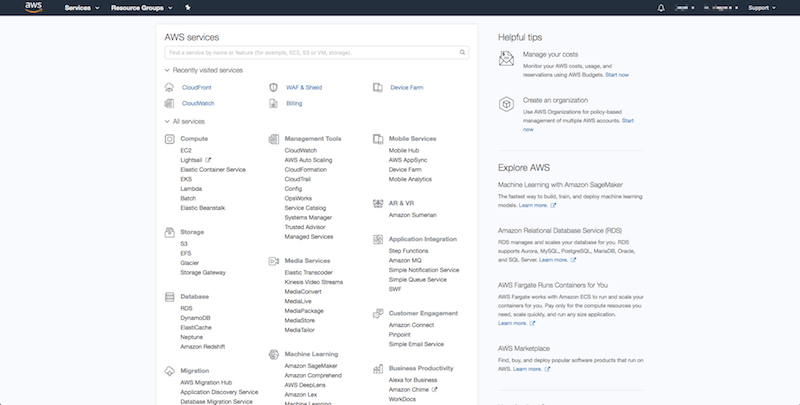
Select S3 under the storage section. This will bring you to the AWS S3 page.

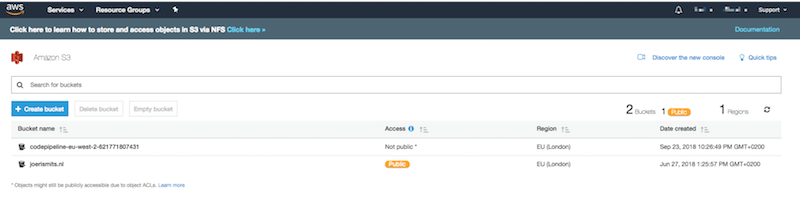
I already have some buckets set up, but if this is your first time using S3, you should not see any buckets listed there. Now to create a new bucket to host our website files click on “Create bucket”.


In this modal type a bucket name. It’s important to use the same bucket name as your domain name. So if your domain is myDomain.com, your bucket name should be myDomain.com. Select a region where you would like to store your website files. Note that this region doesn’t need to be the region where you expect most traffic from since we will be using CloudFront, in the end, to handle low latency for us
Click on next to configure any properties for the bucket. We don’t need to set any of these options for your use case so leave these empty. Click on next again to configure the bucket permissions.


The only setting you should change here is under “manage public permissions”. The default for this setting is “Do not grant public read access to this bucket (Recommended)”. However, since we want to grant access to your website files to anyone who visits we change this setting to “Grant public read access to this bucket”. Click on next to review your configuration. If everything is set as instructed press on “Create bucket”.
Your bucket is now created and should appear in the list. Click on the bucket name to enter the bucket.

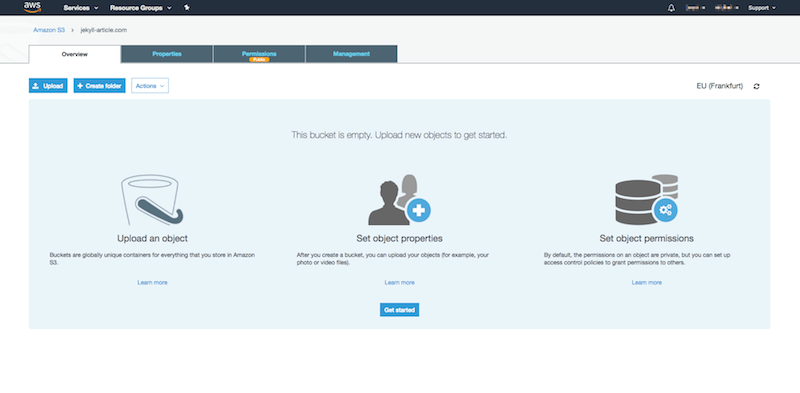
In the bucket, you can upload all contents of your _site folder by using the “upload” button in the top left corner. Don’t worry though CodePipeline and CodeBuild will handle this in the future. After you uploaded all your files select them all and make them public. To do this press the actions menu and select “make public”.
Once you uploaded all your files, we need to let S3 know we want to host a static website in your S3 bucket. We can easily do this by selecting the properties tab and click on static website hosting.

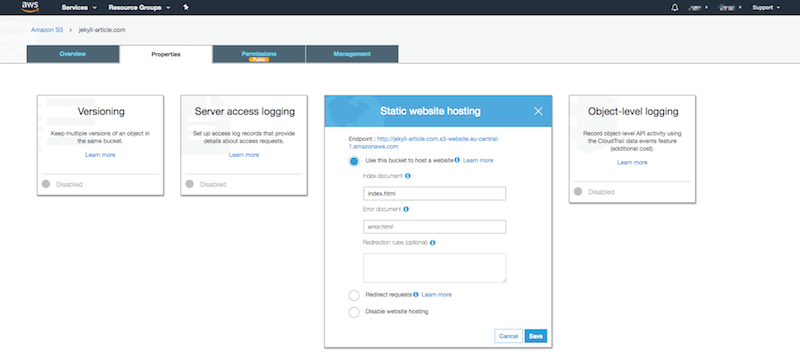
Select “Use this bucket to host a website”. Now we have to specify an index document. This document is your file which will be requested when you go to the bucket endpoint listed above in your browser. Please do save this endpoint as we need it in a later stage to configure the CloudFront distribution. The file we are going to use as the index is “index.html”. We don’t need to set an error document as this will be handled by CloudFront.
Press “save” and that’s it :-). Congratulations you have correctly configured S3 to host your website without worrying about servers or capacity. If you did all the steps correctly, you should be able to see your site hosted on the endpoint you saved earlier.
Now that we correctly have set up an origin we can start to configure a CloudFront distribution. To do so select the CloudFront service from the top left “Services” menu. This will bring you to the CloudFront page.

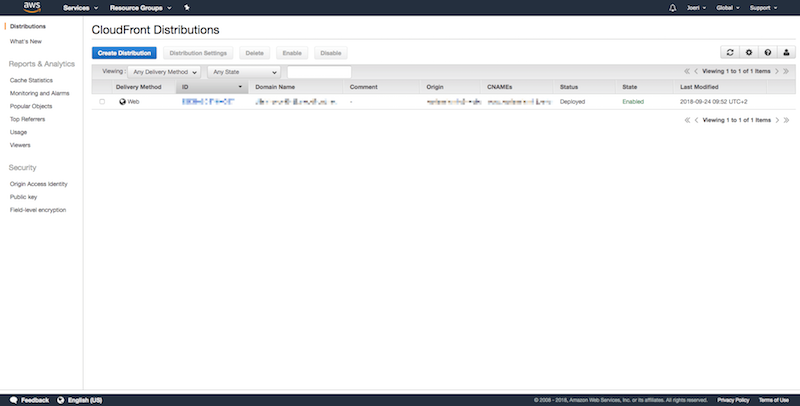
If you already have any distributions, they will be listed here. To create our new distribution click the big blue button on the top left “Create Distribution”. When you do this, you will be asked what type of distribution you want. Web or RTMP. Since we will be hosting a website, we will choose Web for our use case. In the next screen, we will configure all our settings for our distribution.

Luckily a lot of settings can be left on default values. We only need to set a couple of them to let CloudFront what to distribute and how to behave.
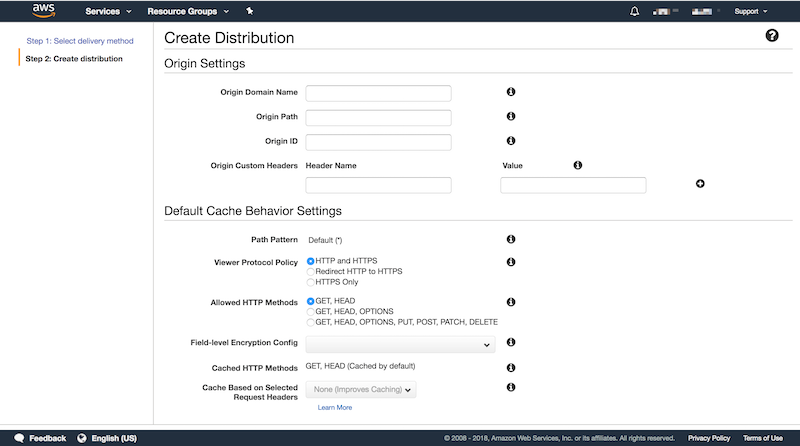
Origin Settings
First of all, remember that S3 endpoint which you saved? You need it now and needs to be placed as “Origin Domain Name”. Don’t use the suggestion by AWS here as it will conflict with Jekyll
Leave “Origin Path” empty. You can also leave the “Origin ID” to the auto-generated id by AWS. The Origin id is just an identifier to point to your origin. It can be everything you want and doesn’t really matter how it’s named as long as it is unique. Leave “Origin Custom Headers” empty as we will not need it right now.
Default Cache Behavior Settings
To specify how CloudFront should behave when it handles a request, we have to set some settings here.
First of all the “Viewer Protocol Policy”. It depends if you want to both support HTTP and HTTPS or only support HTTPS. In my opinion, a redirect from HTTP to HTTPS is the best choice here. Someone accessing your website using http:// may happen, and if you use HTTPS only, you are not able to respond to that. It’s best to just redirect those requests to HTTPS.
“Allowed HTTP Methods” should be only GET and HEAD. When you are hosting a static website, you don’t need to respond to any other methods, so this should be enough.
Leave everything else to their default value. The only setting you might want to consider changing is “Compress Objects Automatically”. When changing this setting to yes, CloudFront will compress specific type of files when requests headers can accept gzip. This will improve the load performance of your website. I recommend you change this to ‘yes’.
Distribution settings
To begin with the “Price class”. This depends on what you want to do. Do you want to deploy the distribution to all edge cases? If you do this, it will give you the best performance for the end user since the distribution will be the closest to his location. A downside of selecting this value is: updates to the CDN will take a little longer than selecting the other values. Since it has to update more servers. In my opinion, it is worth the little extra wait for the end user though.
“AWS WAF ACL” If for some reason you want a Web Application Firewall for your static website you can do that. I don’t see any useful use case though, so I leave it to “none”.
“Alternate Domain Names (CNAMEs)” These should be configured to your domain. So for example
“SSL Certificate” Remember that I spoke about off-loading your SSL Certificate with CloudFront? Well… We are about to configure that. If you have your own custom domain do use a custom SSL certificate since the default one will only be valid for *.CloudFront.net domains. You can easily create or import a certificate with ACM (Amazon Certificate Manager).
“Default Root Object” This will be index.html just as in your S3 bucket.
“Logging” I leave it to off since I don’t see the added value for a static website when CloudFront already provides a basic set of metrics out of the box. It’s up to you though, if you want additional logging you have to specify a bucket where CloudFront will drop its logs.
All other settings can be left to default value.
Congratulations! You have created a CloudFront distribution for your website. You can see it’s status on the CloudFront overview page. Make sure you copy and save the domain name. We will use it when configuring Route53. It will take a while to deploy your distribution, but it will be worth it!
Route53
Once your distribution is deployed, we will take a quick look to Route53 and configure your DNS records to direct users to your CloudFront distribution. Select the Route53 service from the services menu and navigate to “Hosted Zones”. Click on the blue button “Create Hosted Zone”. Here you have to specify which domain you want to create the hosted zone for. Enter your custom domain and leave all other settings to their default.
When you have created a hosted zone Route53 will automatically assign a set of nameservers to it. You will have to configure your domain to use these nameservers. After you did this, DNS requests will be handled by the hosted zone in Route53.
The last step we need to do is to set your A-Records to direct traffic to your CloudFront distribution. We can do this by pressing “Create Record Set”. In total, we need to configure two A-Records. One for the root domain, so the name for this one will be empty. And one for the www. domain. In that case, the name will be www
Type should have already defaulted to A - IPv4 address. Alias should be set to “yes”, so you can specify your CloudFront distribution from the list when clicking on “Alias target”. Leave the other settings to their default and click “create”. This is the last step in your AWS configuration for the user to see your website on your custom domain.
CodePipeline and CodeBuild
Congratulations you now have a website running using AWS S3 and CloudFront. Because of CloudFront, loading your website will be super fast all over the world! Now there is one issue though. It’s a bit annoying to re-upload all files in your bucket when you make any changes to your website.
Therefore we will be using CodePipeline and CodeBuild. These are two AWS services listed below “Developer Tools”. CodePipeline can be seen as a CI service. It triggers various actions based on certain triggers. In your use case, you will be using CodePipeline to trigger a Codebuild when a change has been detected in Git.
Codebuild
First of all, we want to setup Codebuild to build a new _site folder using Jekyll and replace the old content in S3. To do so head over to Codebuild and press on “Create project”.


As a project name choose anything, you like. It does not really matter as long as you can identify your Codebuild project by it.
What to build
Choose for “source provider” the source provider that is hosting your code.
How to build
The “Environment image” should be “Use an image managed by AWS CodeBuild”. We want to specify a docker image as we need Ruby for Jekyll to build the website. “Runtime” will, therefore, be “Ruby”. The “Runtime version” should be set to the latest version. Leave everything else here to their default values.
Everything else can be left to default except for the “Service role”. We need to specify a name for a service role for the Codebuild project which we can identify later.
When you fill in all settings correctly press on “Continue” and after that press “Save”.
Grant permission to Codebuild
Codebuild automatically created a service role in IAM. We now go to this role by selecting the IAM service and go to “roles” on the left side menu. Select the role you specified earlier. Click on the policy that has been already defined by Codebuild and edit the policy. You have to grant Read and Write permissions on the S3 bucket where your website files are located. Next, to that you also have to give permission for CloudFront to be able to ListInvalidations, CreateInvalidations and GetInvalidations.
Buildspec.yml
Codebuild will now look into the root of your repository and see if it can find buildspec.yml. In this yml file, you can specify the build process of your application. A buildspec file is split into multiple phases CodeBuild will execute. This way, you have much control what CodeBuild does with your application. This is the buildspec.yml I use for the Jekyll website, and you can copy this in your repository.
version: 0.1phases: install: commands: - gem install bundler - curl -sL https://deb.nodesource.com/setup_10.x | sudo -E bash - - apt-get install nodejs - bundle install build: commands: - bundle exec jekyll build - aws s3 sync --delete _site/ s3://XXXXXXX - aws cloudfront create-invalidation --distribution-id XXXXXXXXX --paths '/*'You have to replace XXXXXXX with your bucket name and your CloudFront distribution id. The build will first install nodejs, and after that, it will perform a Jekyll build. It then will sync the files inside _site with your S3 bucket. Once it has done that it will create an invalidation on your CloudFront distribution. This means that your cached CloudFront files will invalidate and new data will be retrieved from S3 by CloudFront.
Now that we have a build process for the website the only thing left to do is trigger this process whenever we commit to our repository. This can be done with CodePipeline.
CodePipeline
Go to the CodePipeline service and click on “Create pipeline”. Walk through the different steps. It should be self-explained what you need to fill in. Use AWS Codebuild as “Build provider” and select the Codebuild project we created earlier. We will not be using a “Deployment provider” so leave that to “No deployment”. Use the standard service role for CodePipeline.
Conclusion
Congratulations if you have made it this far. You now have a website that is scalable for millions and is loading very fast for every user worldwide. It even has automatic deployments so the only thing you need to do to update your website is to make a git commit.
I hope this article helped you in figuring out how to utilize AWS and it’s different services. Especially S3, CloudFront and Route53. If you liked what you read let me know :-). Some claps would mean a lot.