
House Organ—The Ignota Media Blog
nginx is a fast, nimble, and deeply powerful HTTP server. It’s extraordinarily good at getting data from a remote hard disk to a client machine over an internet connection. It’s also frequently used as a lightweight reverse proxy. Plunk it down between some other server and the rest of the internet, and it can provide load balancing, caching, SSL termination, and a host (as it were) of other handy features. If you’ve ever run a web application through an nginx frontend, you’ve used its proxying capabilities: nginx doesn’t run the app, but sits in front of it, handling incoming connections and passing them back to the application server proper through PHP-FPM, WSGI, or something like
Unit is different. The brainchild of nginx’s original author, Igor Sysoev, Unit is a full-fledged application server in its own right. It integrates directly with your application, running your code and spitting out the responses you generate—no static assets, no load balancing, all app.
With Unit, configuration is entirely dynamic, managed through calls to its RESTful API—applications can be loaded, unloaded, and configured on the fly, without messy restarts and downtime, by sending it JSON payloads. Unit also handles process management for your apps, allowing them to scale horizontally without an additional proxy. And since it’s got a little of nginx’s DNA, it’s light on its feet and resilient in the face of application failure. Neat tricks all, and ones that make it well-suited for leading-edge SRE-style orchestration patterns. It’s also fast
Since its release in September 2017, when it shipped with support for PHP, Python, and Go, Unit has added support for Perl and Ruby. Java is said to be just over the horizon. And recently, the nginx team announced Unit 1.4, with “preliminary” support for my friend and yours, the lovely and talented Node.js.
Well, sort of. The 1.4 release didn’t actually include the Node code, which snuck in just a couple of weeks ago in this commit. Personally I don’t think we should let that stop us, but caveat coder: this is all subject to refinement and change, probably unsuitable for production, and may well be outdated by the time you read it.
Still with me? Let’s dive in.
Step 0: Mise En Place


We’ll need a few things to get started. You should have Git installed, along with a recent Node.js and your platform’s build tools. (On my macOS machine, that means Git 2.19.1, Node 10, and the Xcode Command Line Tools.) We’ll be using httpie and the httpie-unixsocket plugin to communicate with Unit, because it’s gourge, but cURL would do the job as well. We’ll also spend a lot of time in the terminal, so pick up an emulator you like. And as always, a trusty text editor is your best friend. It helps if you already know your way around these tools, but don’t worry too much if you don’t—we’ll go one step at a time.
Step 1: Cloned, Cleared, Configured, I’m Yours
Grab a copy of the latest Unit sources by cloning the Git mirror of its Mercurial repository. Mash this into your terminal:
As often with *nix sources, we can tune the installation process with the configure script, which takes a number of parameters:
./configure \ --prefix=/usr/local \ --bindir=/usr/local/bin \ --sbindir=/usr/local/sbin \ --modules=/usr/local/lib/unit/modules \ --state=/usr/local/var/unit/state \ --pid=/usr/local/var/run/unit.pid \ --log=/usr/local/var/log/unit.log \ --user="$(id -un)" \ --group="$(id -gn)" \ --control=unix:/usr/local/var/run/control.unit.sock
Many of these probably look familiar. prefix, bindir, and sbindir work together to set destination directories for the built executables; modules and state are Unit-specific directories for storing, respectively, language integration libraries and hard copies of Unit’s configuration data and SSL certificates; pid and log set the locations of the daemon’s process ID and log files; and user and group set the “unprivileged” (that’s you) account Unit will use to run our application. The directory layout here follows Unix best practices (state goes in var, libraries go in lib, logs go about where you’d think) and keeps everything under /usr/local to avoid needing sudo or root.
control is the most important of the configuration flags. It tells Unit where to drop its control module’s socket, a path used as a rendezvous point for communication between processes. The control socket is where we’ll point our requests to configure the app server. control.unit.sock is the filename Unit uses by default, but we’re going to stash it in a directory that doesn’t require admin access.
Now that we’ve set up the Unit control module, let’s set up the Node.js integration. If you’re using a fairly up-to-date version of Node, you should start by installing node-gyp globally, since NPM no longer ships with it by default:
npm install --global node-gyp
Now you’re free to tell Unit that you want to build it for Node:
./configure nodejs
The configure script should automatically detect your preferred Node executable and the NPM and node-gyp modules. It may need a little hand-holding if you’re using a package like NVM, in which case you can add any or all of the following flags:
./configure nodejs \ --node="$(which node)" \ --npm="$(which npm)" \ --node-gyp="$(which node-gyp)"
If you’re planning on experimenting with other languages, consult the Unit docs for their configuration commands and unique flags.
Step 2: Make Something Of Yourself


Let’s start by installing the command module:
make install
…and then the Node module:
make node-install
Build commands will gibber across your screen for a minute or so. Once the dust settles, you can confirm that the installation worked by running a simple version check:
/usr/local/sbin/unitd --version
If all went well, the output should look a little something like this:
unit version: 1.5configured as ./configure --prefix=/usr/local --bindir=/usr/local/bin --sbindir=/usr/local/sbin --modules=/usr/local/lib/unit/modules --state=/usr/local/var/unit/state --pid=/usr/local/var/run/unit.pid --log=/usr/local/var/log/unit.log --control=unix:/usr/local/var/run/control.unit.sock --user=daniel --group=staff
Looking good? We’re done with the source now, so feel free to clean up if you’d like—all the modules are standalone and statically linked, so we won’t need it anymore.
Step 3: Hello, Unit!
We’re going to put together a dirt-simple Express application to take Unit for a spin. Start by creating a new directory called hello-unit somewhere convenient on your hard drive. From there, run npm install express to add the package to your local node_modules. (Ignore the warnings about a missing package.json — we’re not going to bother with it for now.)
When Unit compiled the Node integration, it installed the package to your global node_modules directory. Node doesn’t look there for modules by default—you’d normally only use it for packages with executables that you wanted to have handy in your environment at large—but we can give it a hint by running npm link unit-http. This command creates a symbolic link to a global package, so that scripts can import its code as though it were locally installed. (N.B.: Running other NPM commands that modify node_modules, like install and remove, seems to clobber the link—be sure to create it last, and rerun the npm link command if Node complains it can’t find unit-http.)
With our dependencies installed, we can create a file called app.js and start coding:
There are a few things going on here, and some of them are a little strange.
Unit is eventually going to run this script as an executable, so we start off with a shebang telling any process that invokes the file which interpreter to run it through—in our case, the first node command in the environment. Lines 12–19 build out a typical Express app without any surprises: we import the module (12), call the import to construct a new application (14), and create a simple route (16–19) that responds to all incoming requests by setting a header (17) and dispatching some text (18).
On line 21, we call the createServer function to create an HTTP server that uses our app as a callback, then call listen on that server to connect it to… what?
Normally, we’d import createServer from Node’s built-in http module, and we’d pass a port number to listen so the server knows where to bind. Our createServer, on the other hand, comes from unit-http; and rather than handling the network connection itself, it relies on Unit’s C++ addon for its connection logic. Here’s what it looks like in the sources:
Server.prototype.listen = function () { this.unit.listen();};Simplicity itself. We don’t need to pass in a port, or any configuration details—Unit will handle all of that for us.
So what’s going on with lines 9 and 10? I’m glad you asked.
Just as unit-http provides a createServer with an interface that’s compatible enough with Node’s own createServer for us to use them interchangeably, it provides request and response objects that look and taste a lot like Node’s, but actually leave all the requesting and responding to the Unit app server. Express—and other applications—can use these objects as though they were the real thing: because the API surface is more or less identical, the implementation details don’t actually matter.
The trouble is that Express doesn’t know about Unit, and imports ServerResponse and IncomingMessage directly from http. It uses these objects as the prototypes for its own internal request and response objects, expecting http to wire up the details when we call Server#listen.
There are two ways around this. You could fork Express and change its internal require('http') statements to require('unit-http')—which, please, let’s don’t. Because the funny thing about CommonJS imports and exports is that they’re actually mutable. We can overwrite the ServerResponse and IncomingMessage objects on the http package’s exports object with our own, which we’ve grabbed from Unit. This widely and justifiably shat-upon technique—you can imagine the trouble we’d be in here if the objects’ API surfaces were to drift even a little bit—is popularly known as monkeypatching. ?
It’s absolutely necessary to do this before you import Express so that you beat it to the punch and swap out the exports before its require statements are evaluated.
One last thing: our script isn’t a proper executable yet. Back in your terminal emulator, run chmod 755 app.js and you’re golden.
Step 4: Dynamic Duo


Let’s run app.js now, just to watch it spectacularly implode:
./app.js
2018/10/17 19:16:58.203 [alert] 33042#2677543 [unit] NXT_UNIT_INIT is not in the current environment/usr/local/lib/node_modules/unit-http/http_server.js:293 this.unit.createServer(); ^
Error: Failed to create Unit object at new Server (/usr/local/lib/node_modules/unit-http/http_server.js:293:15)
This is an error thrown from deep within unit-http’s C++ addon. What it’s telling us is that we’ve only solved the first half of the riddle: unit-http doesn’t know how to create a server on its own, without a Unit command module attached. Good thing we’ve got one lying around.
In another terminal session, run the following command:
/usr/local/sbin/unitd --no-daemon
When you see a message informing you that Unit has started, you can take it at its word and switch back to a free session.
We’ve already talked about the fact that Unit’s configuration is dynamic and controlled by a RESTful API. So let’s take a look at how.
The configuration starts out entirely bare. We can inspect it by making a GET request to the API with either httpie…
http http+unix://%2Fusr%2Flocal%2Fvar%2Frun%2Fcontrol.unit.sock
…or cURL:
curl --unix-socket /usr/local/var/run/control.unit.sock http://localhost/
Here’s what httpie gives us:

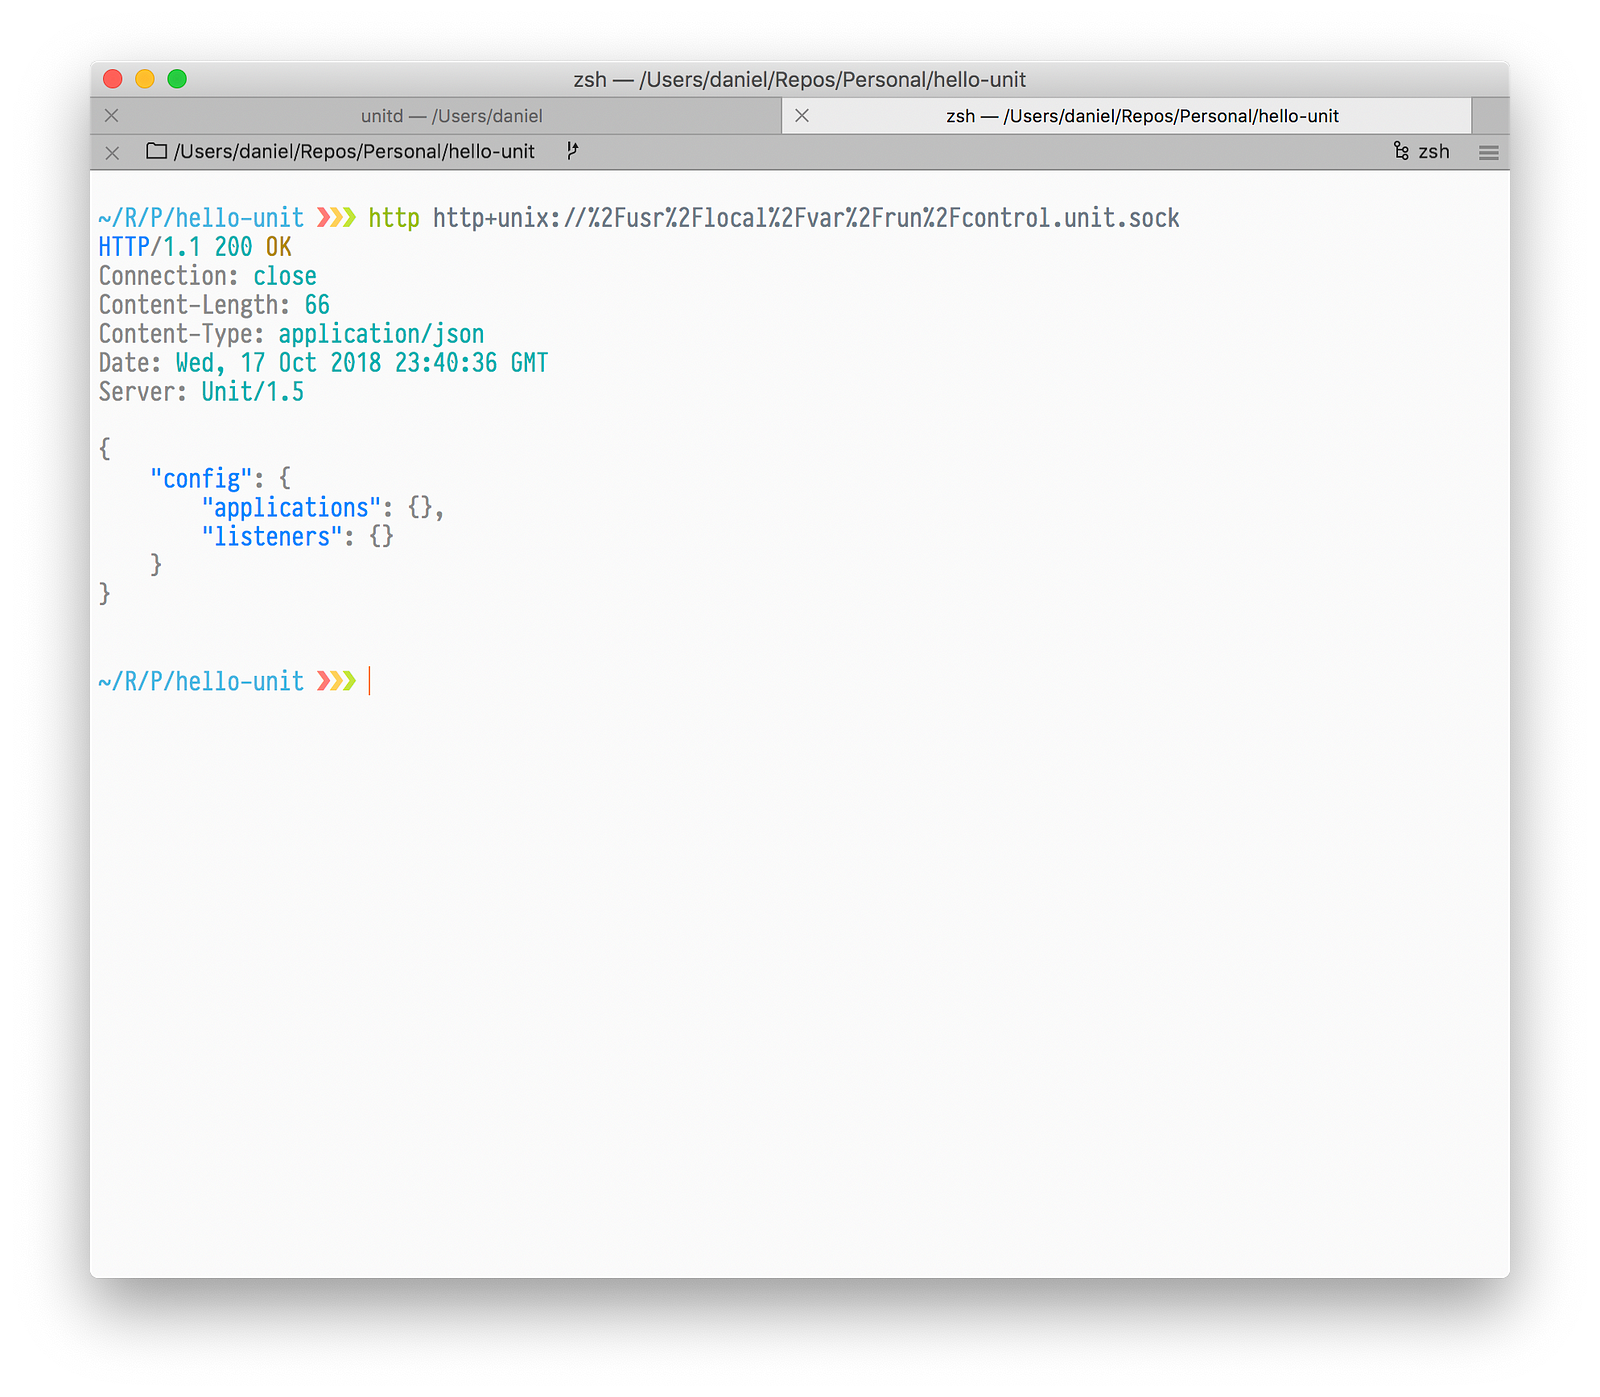
We can do better than that. Let’s create a file called unit.json alongside app.js and drop the following JSON on in there (adjusting the working_directory field to suit):
We’ll talk about what this means in a second; for now, let’s tell the Unit control module about it by making a PUT request, using either httpie:
http PUT http+unix://%2Fusr%2Flocal%2Fvar%2Frun%2Fcontrol.unit.sock/config < unit.json
…or cURL:
curl -XPUT -d @unit.json --unix-socket /usr/local/var/run/control.unit.sock http://localhost/config/
PUT requests, in REST, are a lot like POSTs: they create resources that didn’t previously exist, and replace those that already do. (Traditionally, POST updates preexisting data.) If it worked, you should get a success message from the control module, which you can verify with another GET:

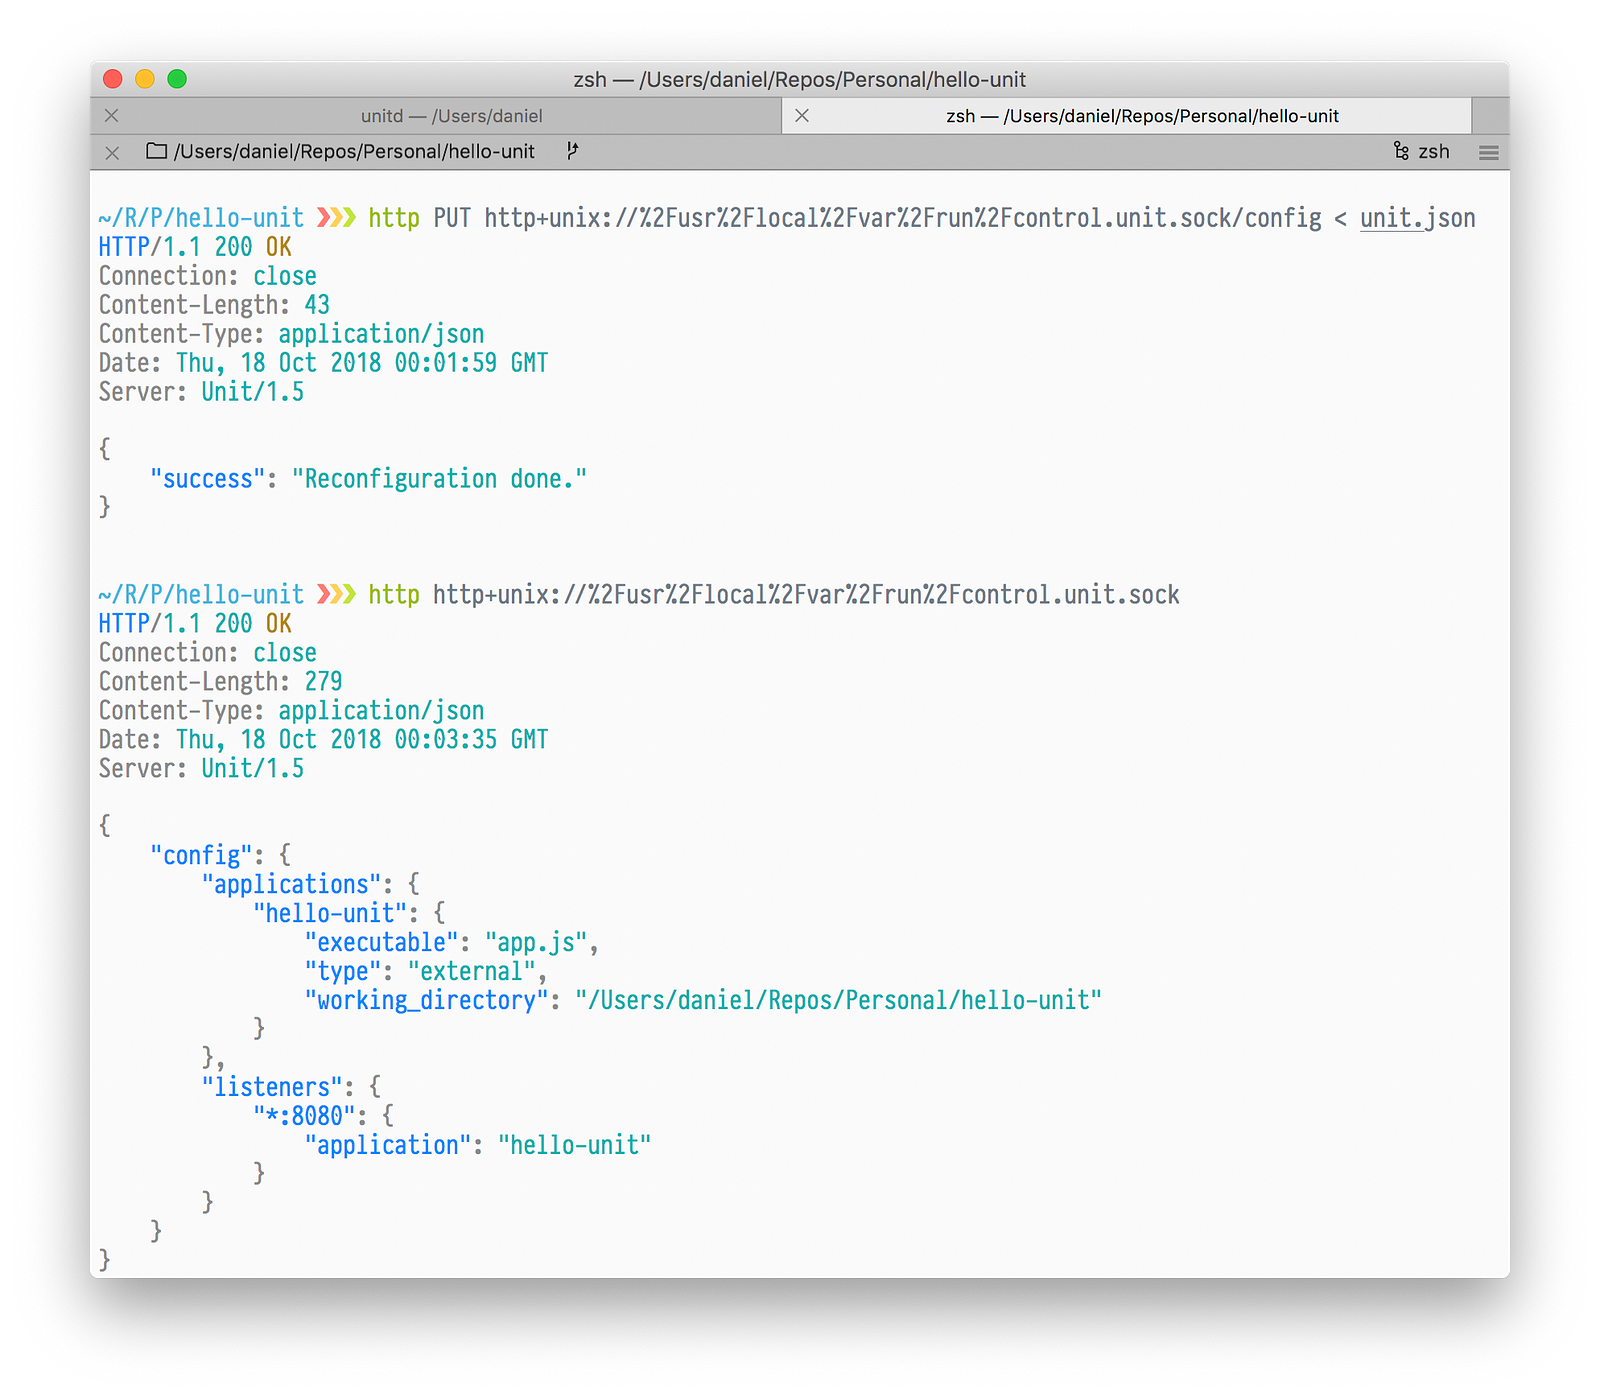
So what did all of that accomplish? Let’s take another look at unit.json:
Unit’s configuration is broken into listeners and applications. Applications tell the server where to find the runnable hunks of code to actually load and execute. Listeners bind applications to hostnames and ports.
Each application is a JSON object whose key is its identifier (hello-unit) and whose value is a description of the app. type specifies the language integration Unit should use to run the app; here, external means that the integration is furnished by a separate addon, as with Node.js and Go. working_directory tells Unit where to find the code, and executable which file in that directory to use as an entrypoint. (The required fields vary from app type to app type; see the docs for much more detail.) Each listener is a JSON object whose key is a hostname–port pair—here, *:8080 says to bind port 8080 on any network interface—and whose value is a JSON object linking the bound port to an app.
The upshot? Take a peek at port 8080 and see:

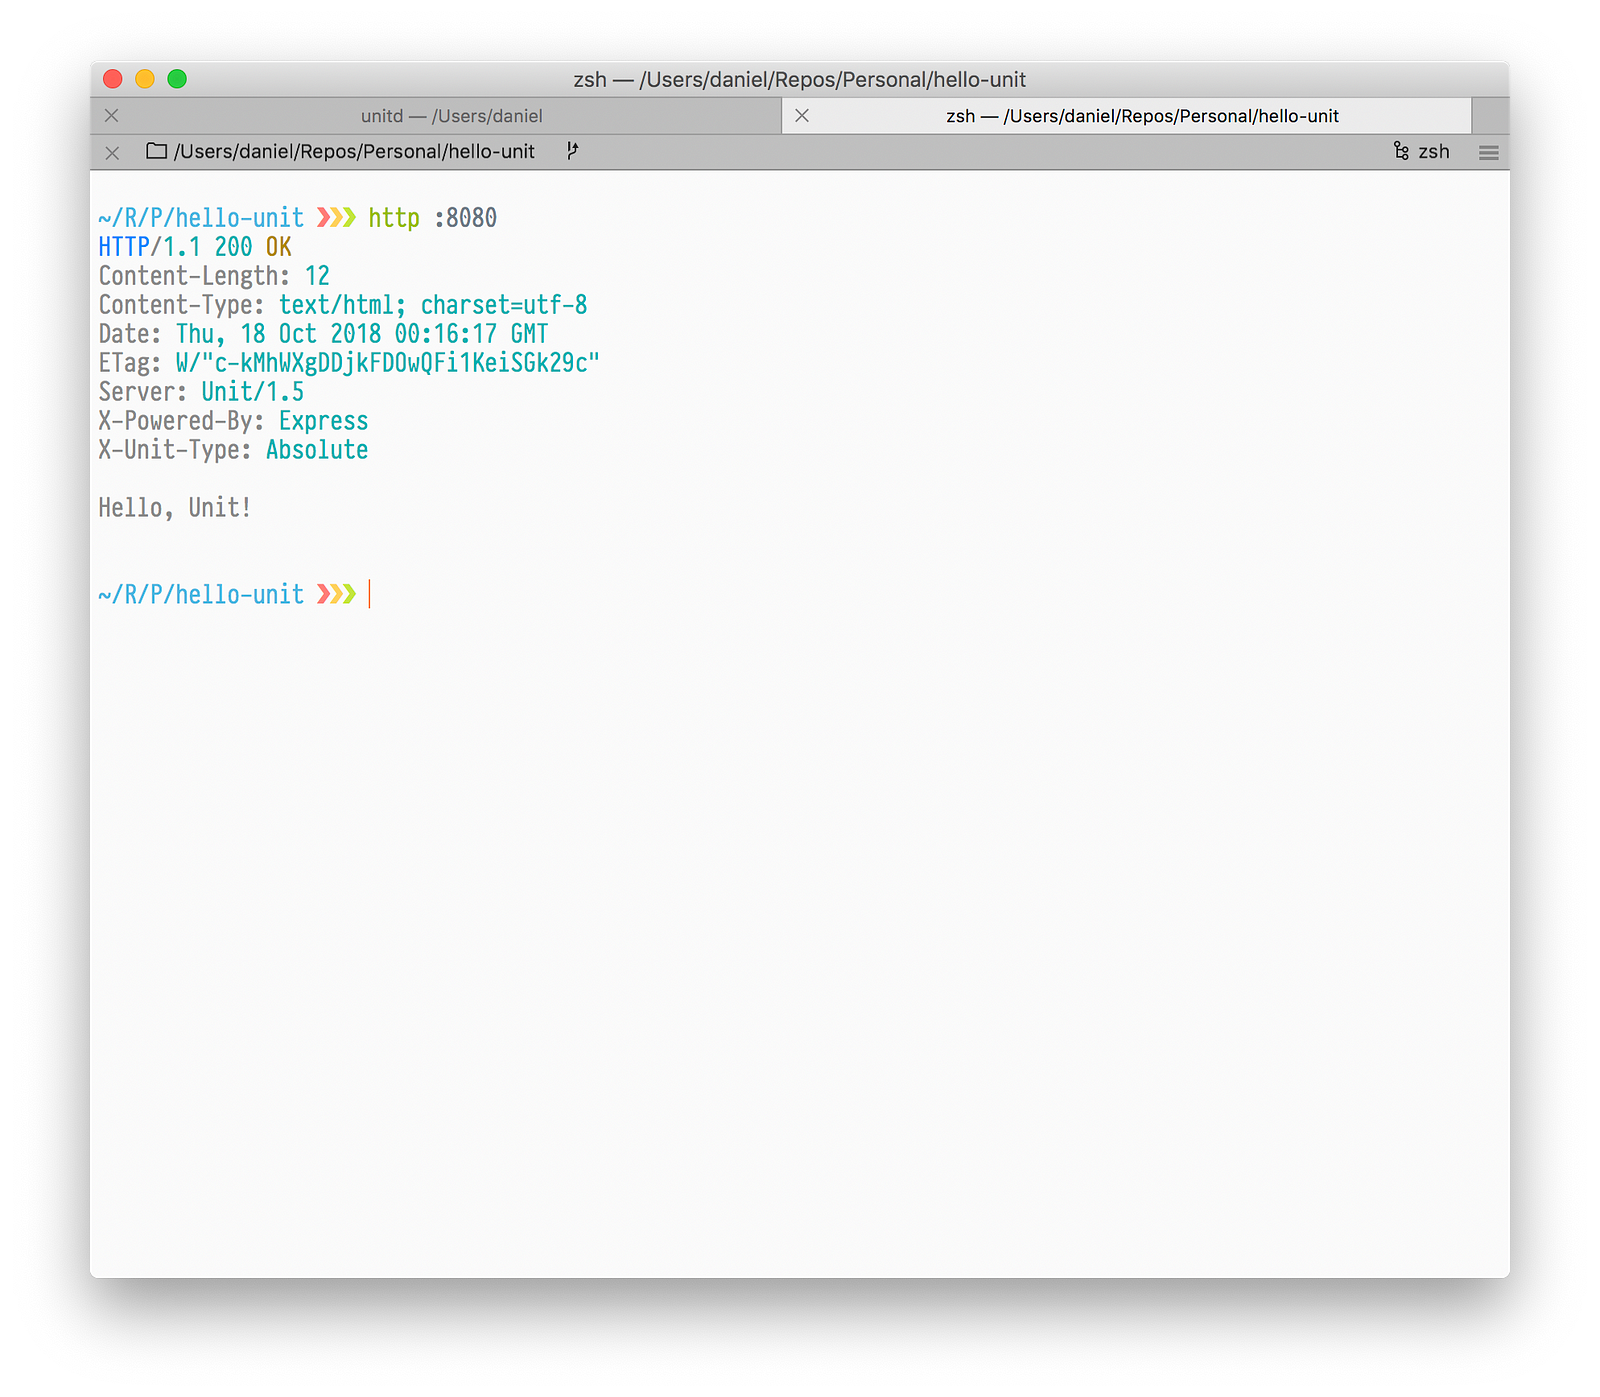
What an absolute unit.
Step 5: Superfly
Once you’ve deployed your app, it’s almost guaranteed to be virally popular—so much so that a single server process isn’t going to be enough to handle all the traffic. In the past, you might have scaled out by killing the server, editing a configuration file, and redeploying. But that means downtime, and downtime means unhappy users. What’s more, there’s always a margin for error. Flip the wrong flag in a config file and you’re down for hours rather than seconds. (I’m reminded of the time I took Ignota’s infrastructure down for fully a day by misspelling the database feature “causal clustering” as “casual clustering.”)
With Unit, configuration can be adjusted instantly and on the fly. What’s more, the config schema is validated every step of the way by the control module. Let’s do a little zero-downtime horizontal scaling:
http PUT http+unix://%2Fusr%2Flocal%2Fvar%2Frun%2Fcontrol.unit.sock/config/applications/hello-unit/processes max:=4 spare:=1
…and double-check the results:

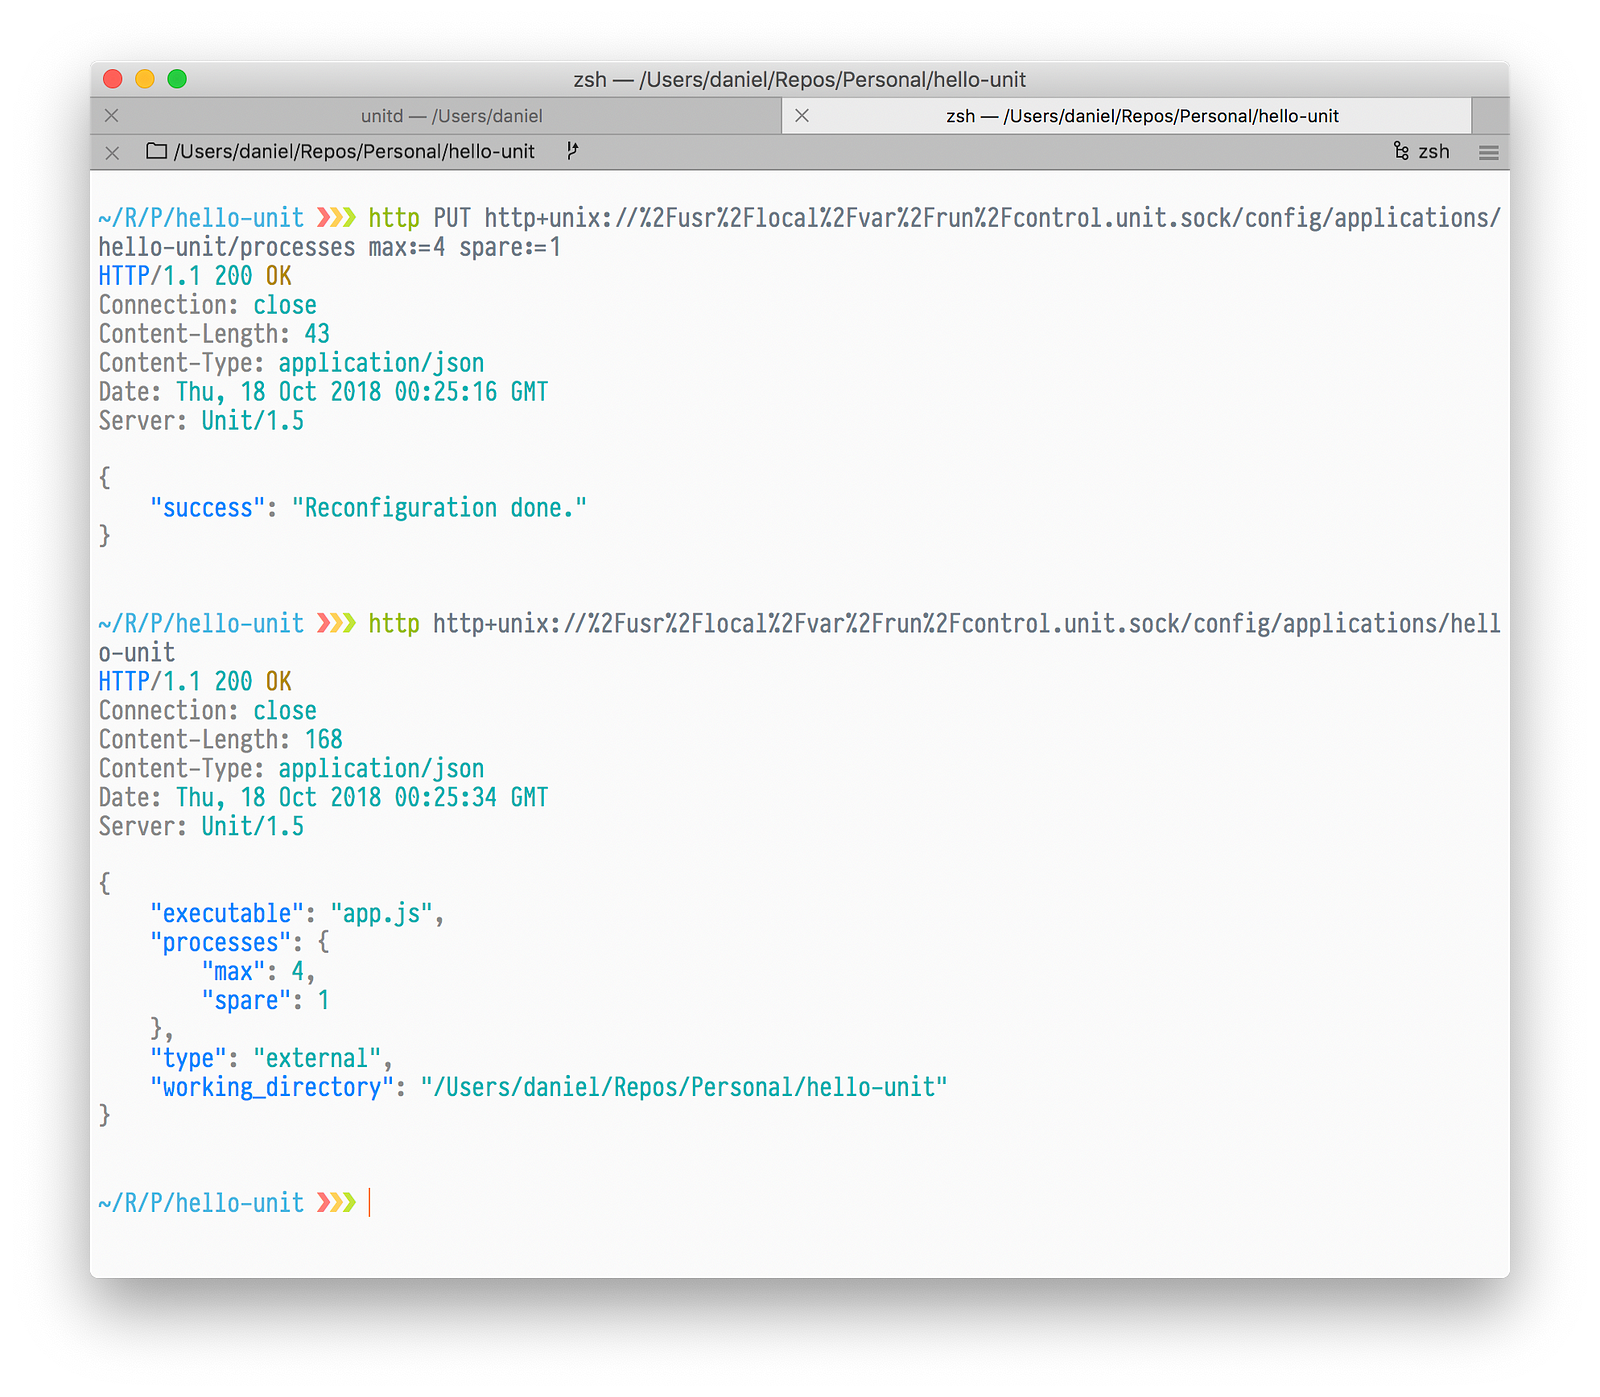
Unit happily updates your app’s process management settings to accommodate your unit’s wide load.
But maybe you don’t math so good. What happens if we try to keep four spare processes on hand out of a maximum of two?

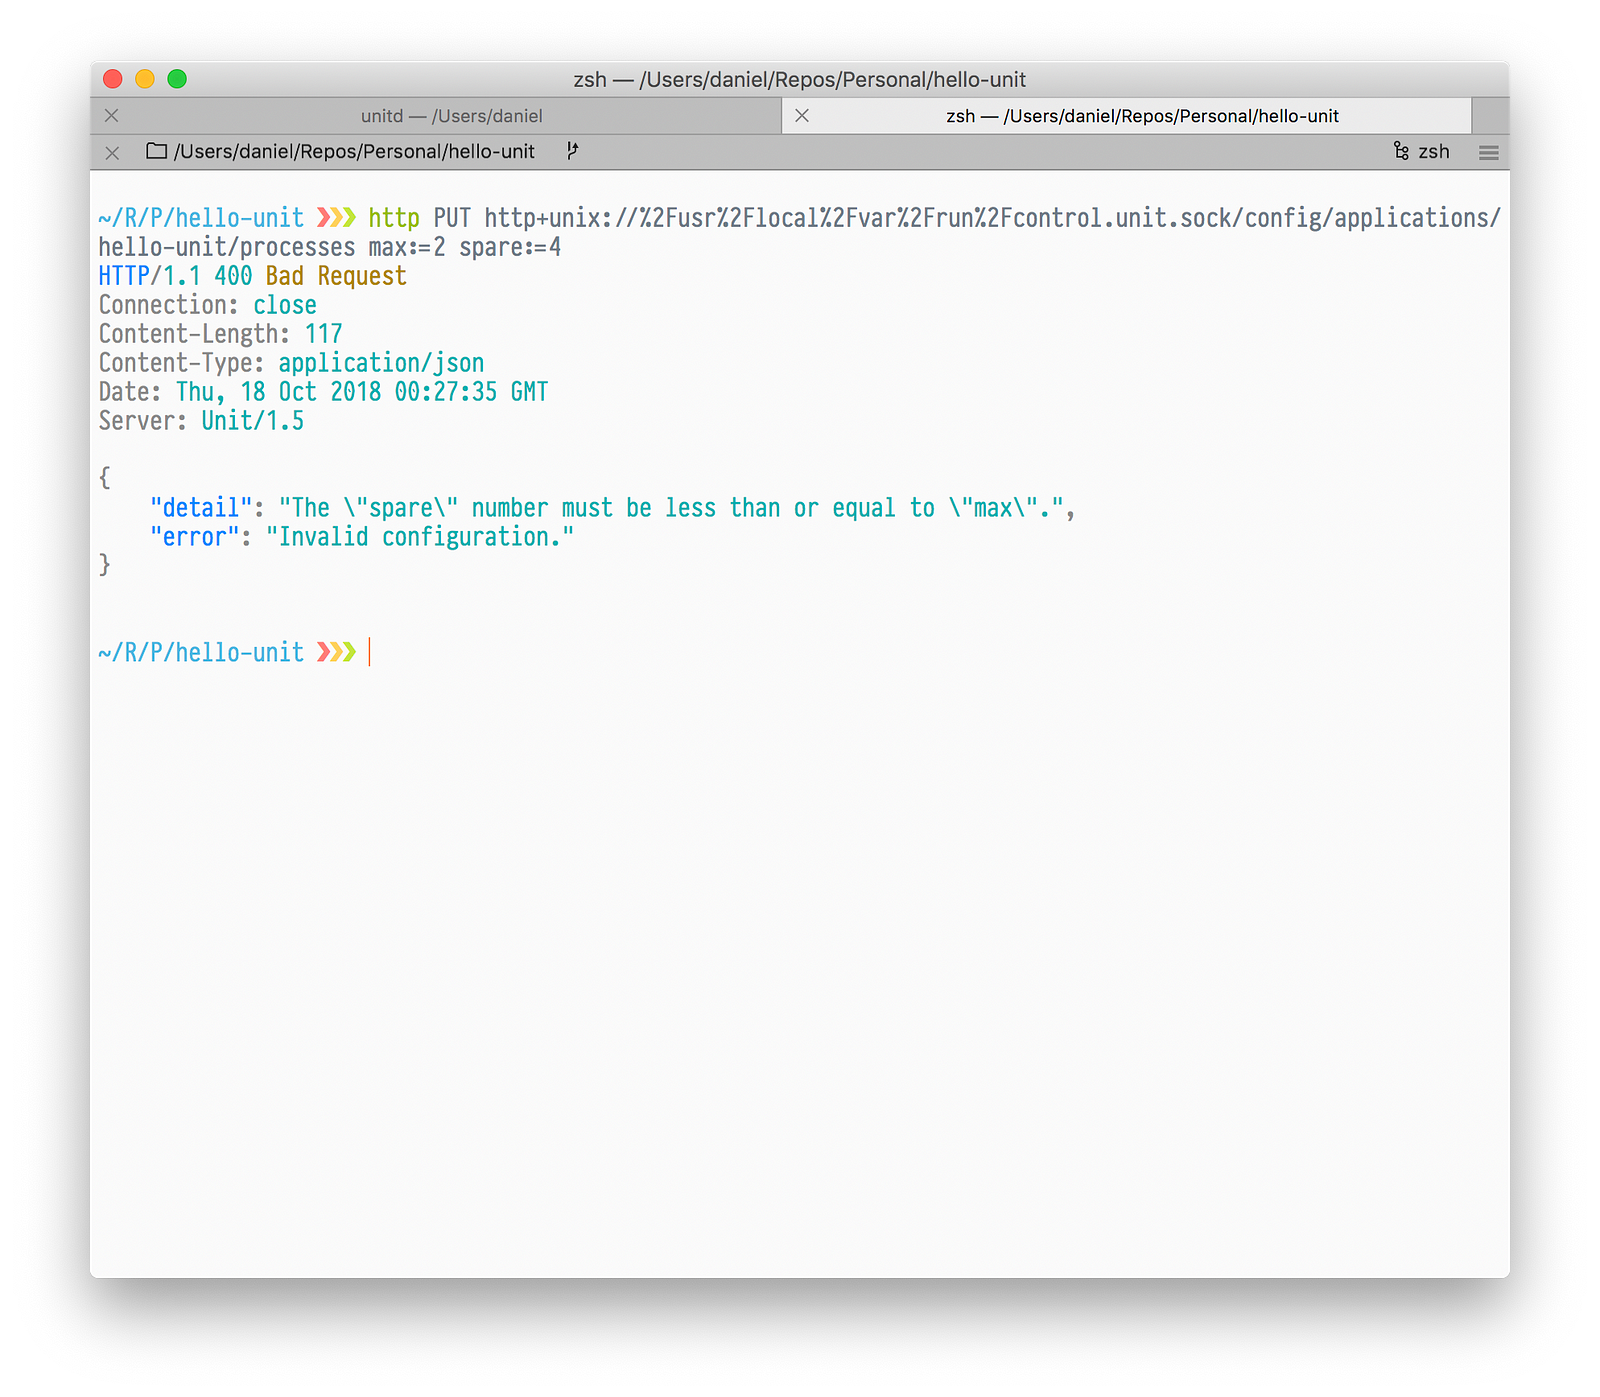
Unit detects the invalid setting and refuses to update the old config.
When the meme’s moved on and things settle down again in your infrastructure, send a DELETE request to scale the server back down:

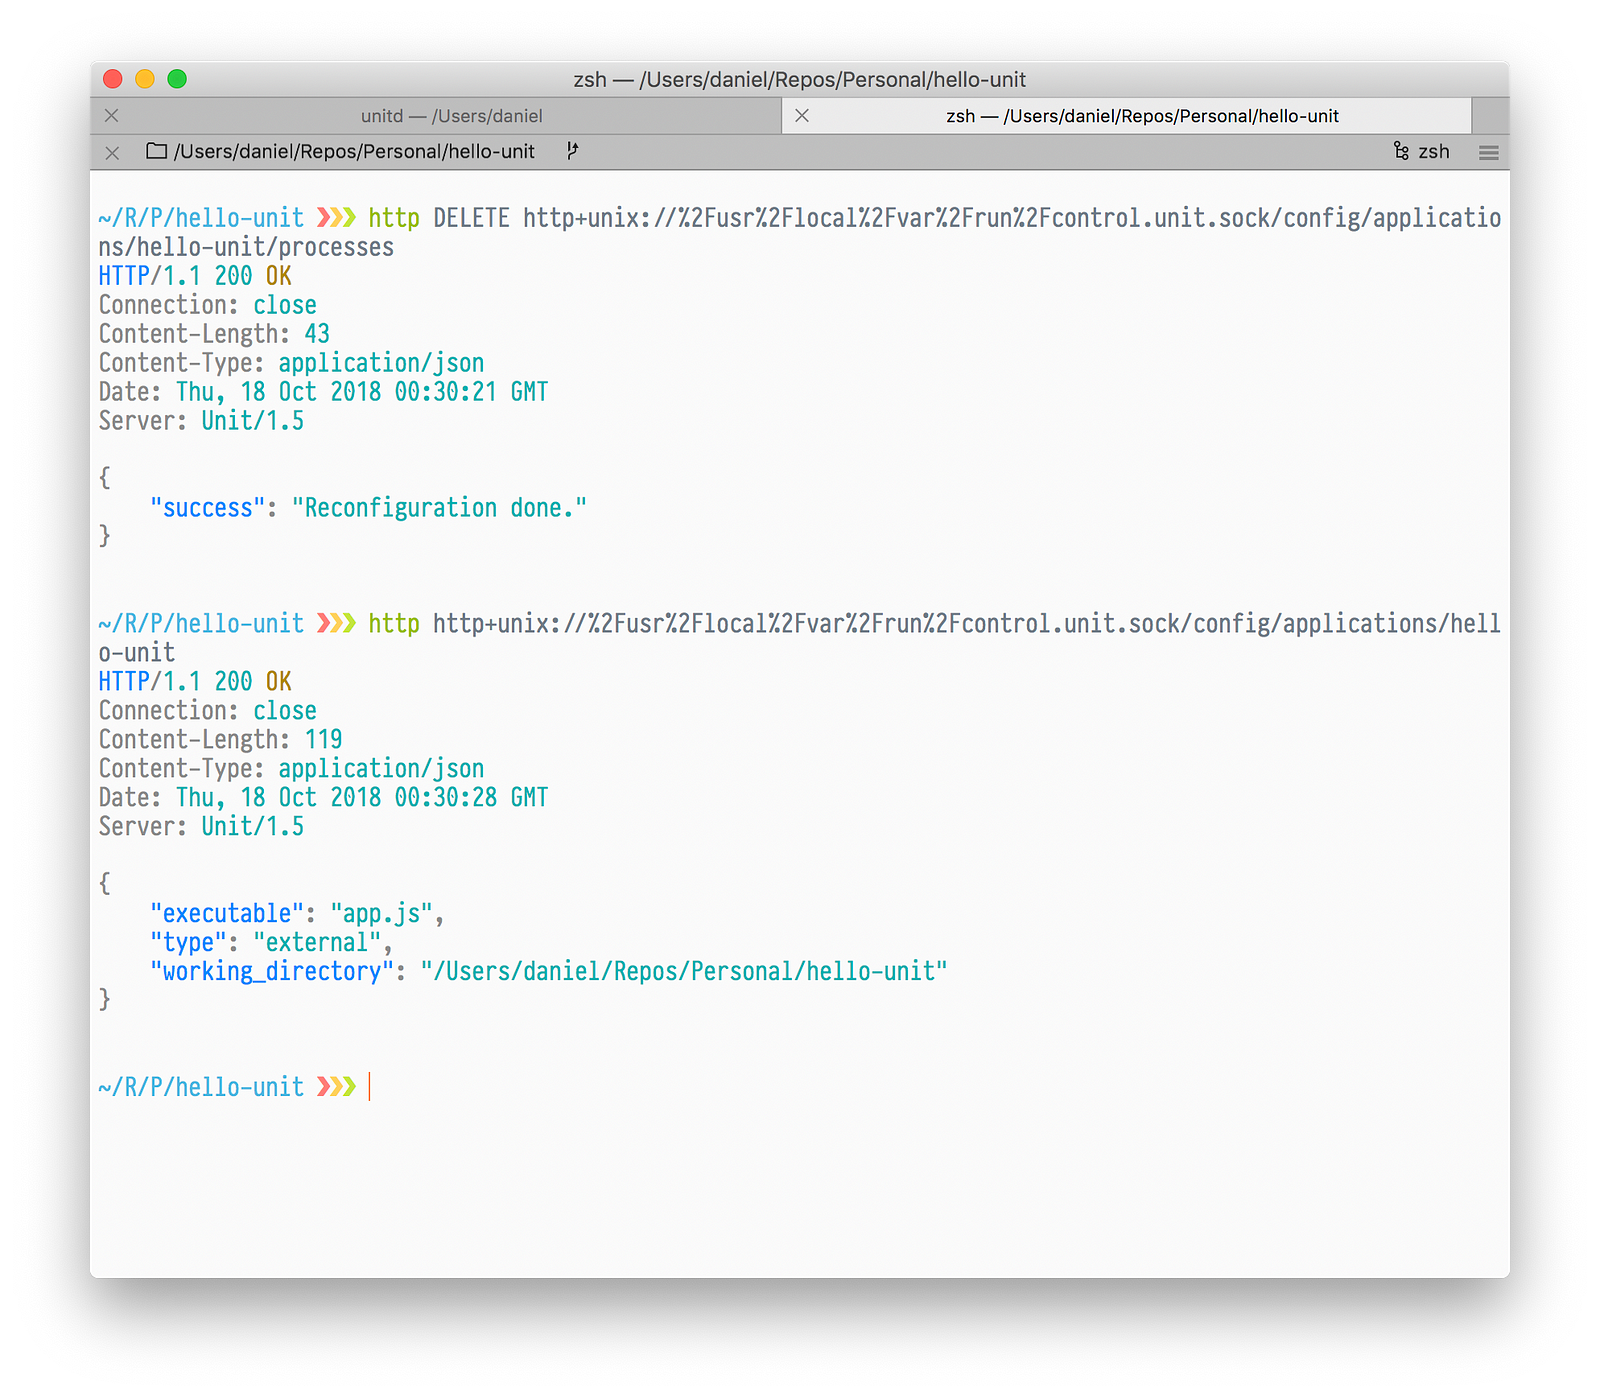
Step 6: We Did The Thing!


Unit’s Node integration is still in its infancy. The module isn’t yet on NPM. Monkeypatching http is messy. You’ll find that Koa’s use of asynchronous Promise-based middleware straight-up does not work with the C++ addon. Etc. ad naus. All the same, it’s off to a promising start. And there’s always something to be said for being on the leading edge of orchestration techniques and technologies.
At Ignota Media, we’ve been using Phusion Passenger as our application server for many happy years—nothing else has come close to providing the same level of performance and scalability for our Ruby and Node.js apps. This week, we’ll finish migrating our development environment to Unit; if that goes well, it should hit our staging environment sometime this weekend; and assuming that doesn’t go pear-shaped, it could land in our production Kubernetes cluster by the end of the month.
Follow along here or on Twitter if you’d like to track the next few stages of the trek: building Unit in Docker, configuring it for Kubernetes, and launching it into the cloud. And thanks for reading. ✨