Kubernetes: deploy Laravel the easy way
Kubernetes: deploy Laravel the easy way


Laravel is an excellent framework for developing PHP applications. Whether you need to prototype a new idea, develop an MVP (Minimum Viable Product) or release a full-fledged enterprise system, Laravel facilitates all of the development tasks and workflows.
How you deal with deploying the application is a different story. Vagrant is very good with setting up a local environment similar to a remote server. However, in production, you will most likely require more than just one web host and one database. You’ll probably have separate services for several requirements. You also need to have mechanisms in place to ensure that the application is always online and that the servers can efficiently balance the load.
In this article, I’ll explain how to deal with the simple requirement of running a Laravel application as a local Kubernetes set up.
Kubernetes, Why and What?
Kubernetes is an open-source system initially designed by Google to facilitate the management of containerised applications in a clustered environment. Some refer to it as an orchestration platform, and Kubernetes is not the only available platform of this type. Although, it does have a very high and fast adoption rate. Not to mention that it is quite easy to implement once you get used to it.
If you’re still wondering why someone can benefit from using Kubernetes, the answer is simple. Kubernetes makes it easier to set up and manage as many clusters as required across multiple projects.
Deploying a Laravel Application to Minikube
As I’ve afore-mentioned, I will be showing you how to deploy a straightforward and stateless Laravel application to Kubernetes. I aim to detail the steps involved in accomplishing this while explaining why specific actions are required. Furthermore, I will show you how to quickly scale the application and also make it available on a named host using an Ingress controller.
You can run Kubernetes on several cloud hosting providers such as Google Cloud Engine and Amazon Web Services. In this tutorial, you will run the application on Minikube, a tool that makes it easy to run Kubernetes locally.
Similar to Vagrant, Minikube is merely a Virtual Machine that contains a Kubernetes platform and Docker. You will need both to deploy your application as a Docker container and scale it to three instances using Kubernetes.
The application
I have prepared a simple Laravel application which you can clone from GitHub. It is nothing more than a fresh Laravel installation. Therefore you can follow this example using either the demo application or just create a new Laravel application. To use the demo application clone it in your project’s directory.
cd /to/your/working/directory git clone [email protected]:learnk8s/laravel-kubernetes-demo.git .Prerequisites
To follow with this demonstration, you will need the following installed on your local system:
Are you having problems installing and running these applications on Windows? Check out the article Getting started with Docker and Kubernetes on Windows 10, for a step by step guide.
Docker image
Kubernetes deploys containerised applications, and therefore as a first step, you will need to build a Docker image of the demo application. Since this tutorial will be run locally on Minikube, you can just build a local Docker Image from the Dockerfile included in the example code.
FROM composer:1.6.5 as build WORKDIR /app COPY . /app RUN composer installFROM php:7.1.8-apache EXPOSE 80 COPY --from=build /app /app COPY vhost.conf /etc/apache2/sites-available/000-default.conf RUN chown -R www-data:www-data /app \ && a2enmod rewriteThis Dockerfile is made of two parts:
- The first part extends a PHP
composerimage so that you can install the application’s dependencies. - The second part creates a final Docker image with an Apache web server to serve the application.
Before you can test the Docker image, you will need to build it:
cd /to/your/project/directory docker build -t yourname/laravel-kubernetes-demo .Then run the application with:
docker run -ti \ -p 8080:80 \ -e APP_KEY=base64:cUPmwHx4LXa4Z25HhzFiWCf7TlQmSqnt98pnuiHmzgY= \ laravel-kubernetes-demoAnd the application should be available on .
With this setup, the container is generic and the APP_KEY is not hardcoded or shared.
Building the image within Minikube
cd /to/your/project/directory eval $(minikube docker-env) docker build -t yourname/laravel-kubernetes-demo .Don’t forget to execute the eval. Building the image within the virtual machine is necessary. You should run the command only once in the current terminal.
Deploying the image
Now that the application’s image is built and available in Minikube you can go ahead with deploying it.
I always start with making sure that kubectl is in the correct context. In this case, the context is Minikube. You can quickly switch context as follows:
kubectl config use-context minikubethen you can deploy the container image:
kubectl run laravel-kubernetes-demo \ --image=yourname/laravel-kubernetes-demo \ --port=80 \ --image-pull-policy=IfNotPresent \ --env=APP_KEY=base64:cUPmwHx4LXa4Z25HhzFiWCf7TlQmSqnt98pnuiHmzgY=The above command tells kubectl to run our demo application from the Docker image. The first parameter of the command simply asks kubectl to not pull the image from a registry such as Docker Hub if it exists locally which in this case it does. Do note that you still need to be logged on to Docker’s so that kubectl can check if the image is up to date.
You can check that a Pod is created for the application by running:
kubectl get podswhich should return a similar output to:
NAME READY STATUS RESTARTS AGE laravel-kubernetes-demo-7dbb9d6b48-q54wp 1/1 Running 0 18mYou can also use the Minikube GUI dashboard to monitor the cluster. The GUI also helps with visualising most of the discussed concepts. To view the dashboard, just run the following:
minikube dashboardor to acquire the dashboard’s URL address:
minikube dashboard --url=trueExposing a Service
So far you have created a deployment which is running the application’s container. A Pod running in the cluster has a dynamic IP. If you route the traffic directly to it using the IP, you may still need to update the routing table every time you restart the Pod. In fact, on every deployment or container restart, a new IP is assigned to the Pod. To avoid managing IP addresses manually, you need to use a Service. The Service acts as a load balancer for a set of Pods. So even if the IP address of a Pod changes, the service is always pointing to it. And since the Service always has the same IP, you won’t need to update anything manually.
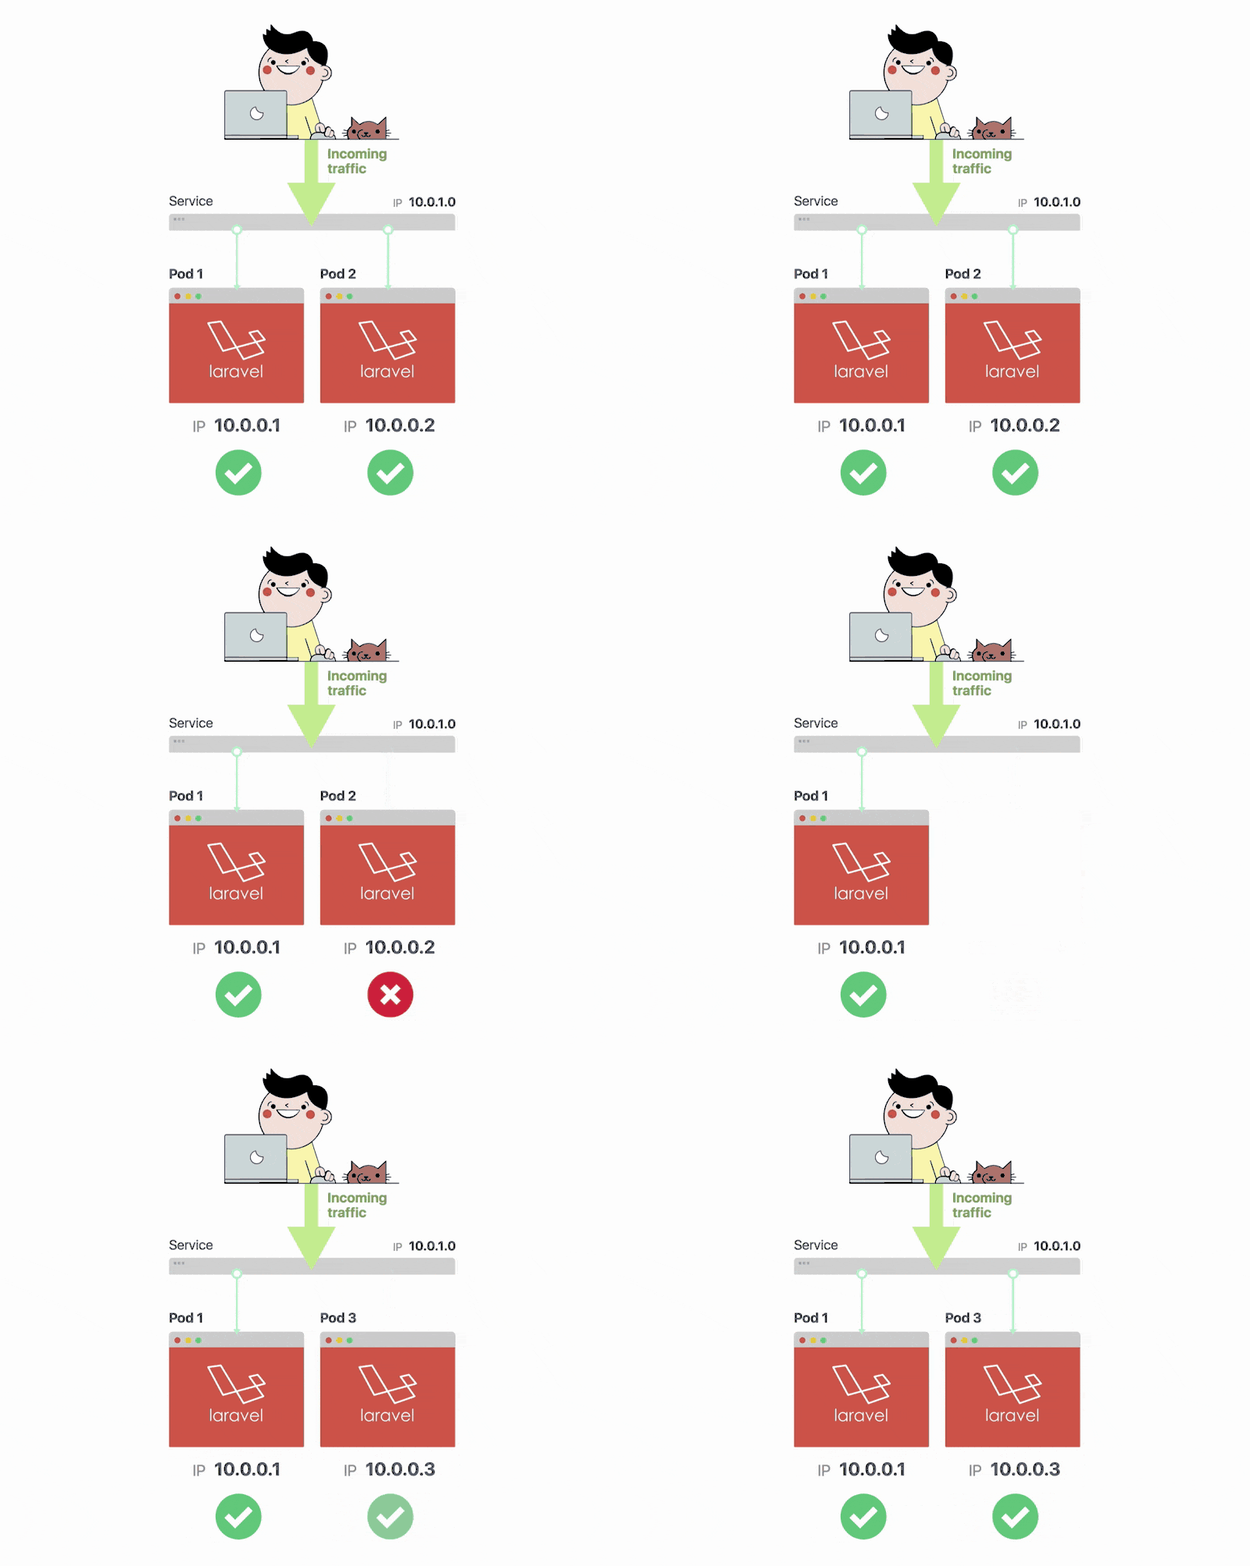
You can create a service with:
kubectl expose deployment laravel-kubernetes-demo --type=NodePort --port=80and provided all went well, you will see a confirmation similar to:
service "laravel-kubernetes-demo" exposedRunning the following command:
kubectl get serviceswill show you a list of running services. You can also view the running service under the “Services” navigation menu within the dashboard. A more exciting way to verify this deployment and the service exposure is obviously seeing the running application in the browser ?
To obtain the URL of the application (service), you can use the following command:
minikube service --url=true laravel-kubernetes-demowhich will output the IP address and port number similar to:
or, launch the application directly in the browser:
minikube service laravel-kubernetes-demoDon’t miss the next story, experiment or tip. If you’re enjoying this article, stay tuned for more. Get new content straight to your inbox and level up your expertise in Kubernetes. Subscribe now
Scaling
And that is it. You have successfully deployed the application in Kubernetes. It’s exciting. But what’s the point of doing all of this? Well, you only have one deployment with a single Pod running, provisioned to a Node with the exposed web service. Let’s scale this deployment to two more instances of the application.
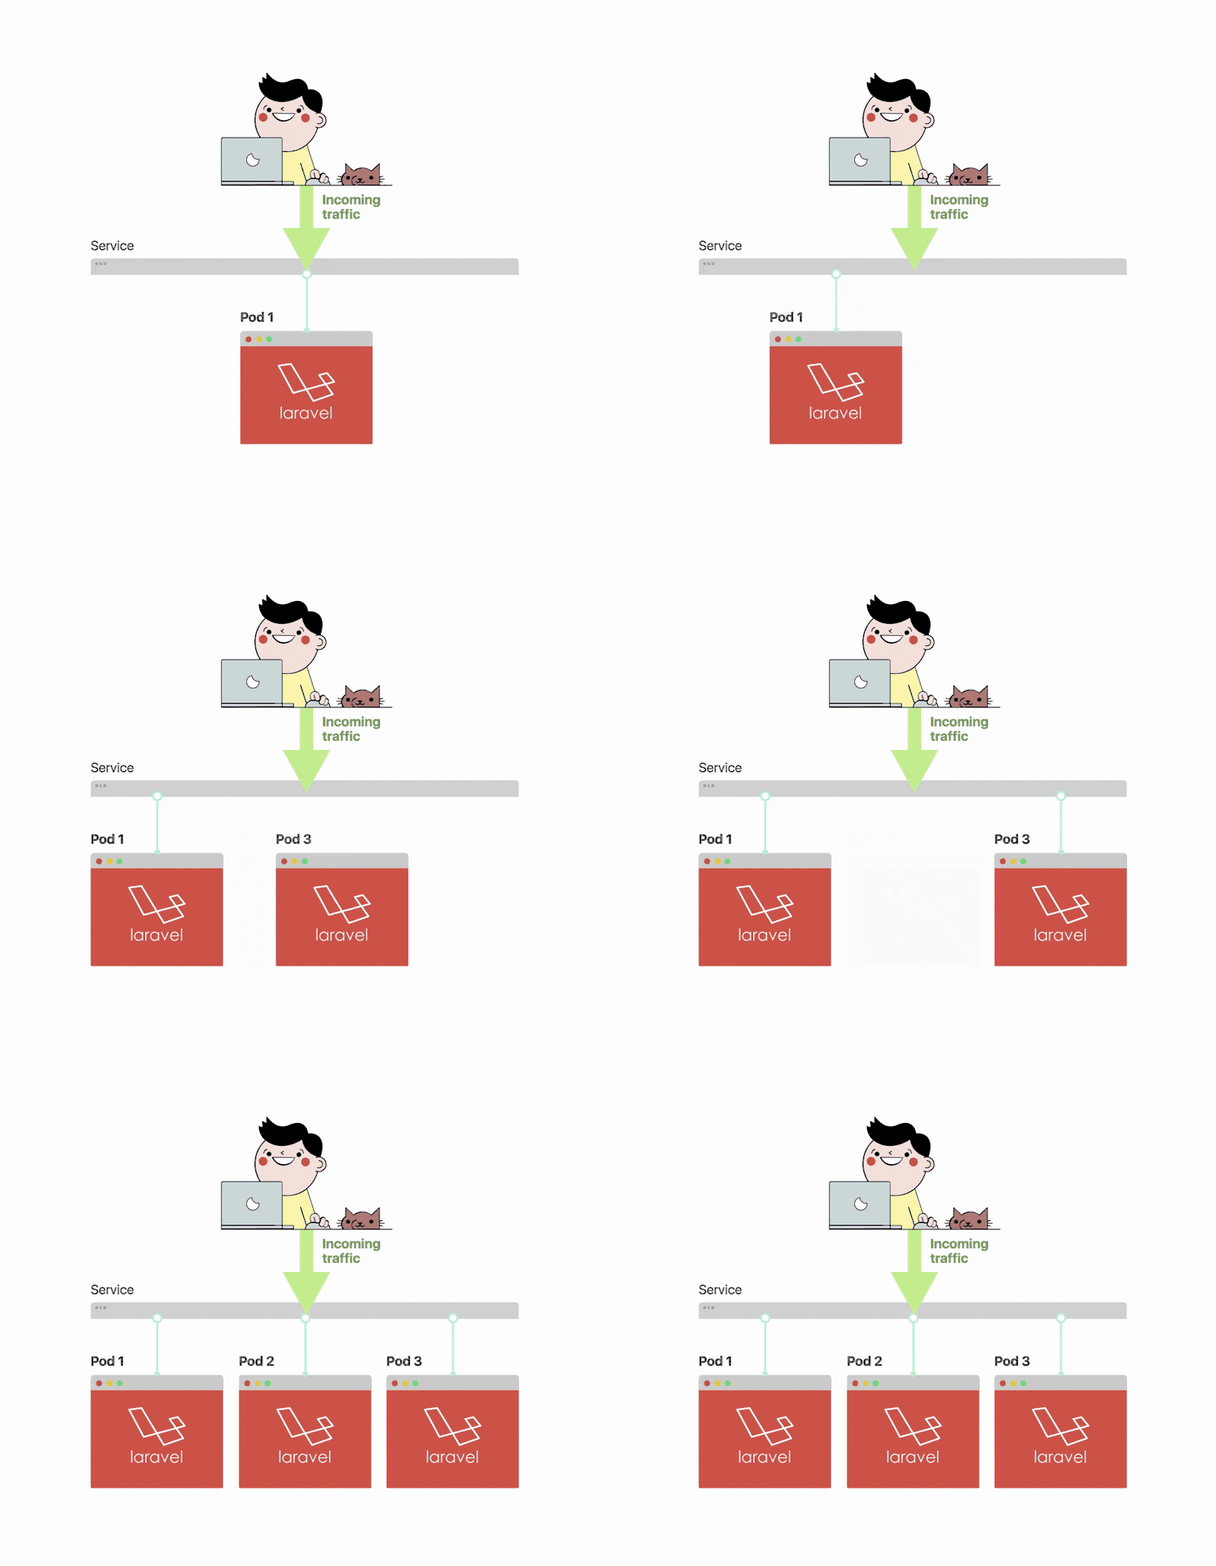

So that you understand where you are at this moment, run the following command to get a list of desired and available Pods:
kubectl get deploymentNAME DESIRED CURRENT UP-TO-DATE AVAILABLE AGE laravel-kubernetes-demo 1 1 1 1 57mThe output will be “1” for each. You want to have three available Pods so let’s scale this up:
kubectl scale --replicas=3 deployment/laravel-kubernetes-demo deployment "laravel-kubernetes-demo" scaledDone. You have replicated the first Pod to another two, giving you three Pods running this service. Running the get deployment command will verify this.
kubectl get deploymentNAME DESIRED CURRENT UP-TO-DATE AVAILABLE AGE laravel-kubernetes-demo 3 3 3 3 59mYou can also see this in the Dashboard under Pods or in the Service detail screen.
Now you’re running three instances of the applications using three Pods.
Imagine your application becoming even more popular. Thousands of visitors are using your website or software. In the past, you may have been busy writing more scripts to create more instances of your application. In Kubernetes you can scale to multiple instances in a snap:
kubectl scale --replicas=10 deployment/laravel-kubernetes-demo deployment "laravel-kubernetes-demo" scaledYou can see how convenient it is to use Kubernetes to scale your website.
Ingress
You’ve already achieved great things, you deployed the application and scaled the deployment. You have already seen the running application in the browser when pointed to the cluster’s (Minikube) IP address and node’s port number. Now, you will see how to access the application through an assigned URL as you would do when deploying to the cloud.
To use a URL in Kubernetes, you need an Ingress. An Ingress is a set of rules to allow inbound connections to reach a Kubernetes cluster. The Ingress is necessary because, in Kubernetes, resources such as Pods only have IP addresses which are routable by and within the cluster. Meaning that they are not accessible or reachable to and from the world outside.
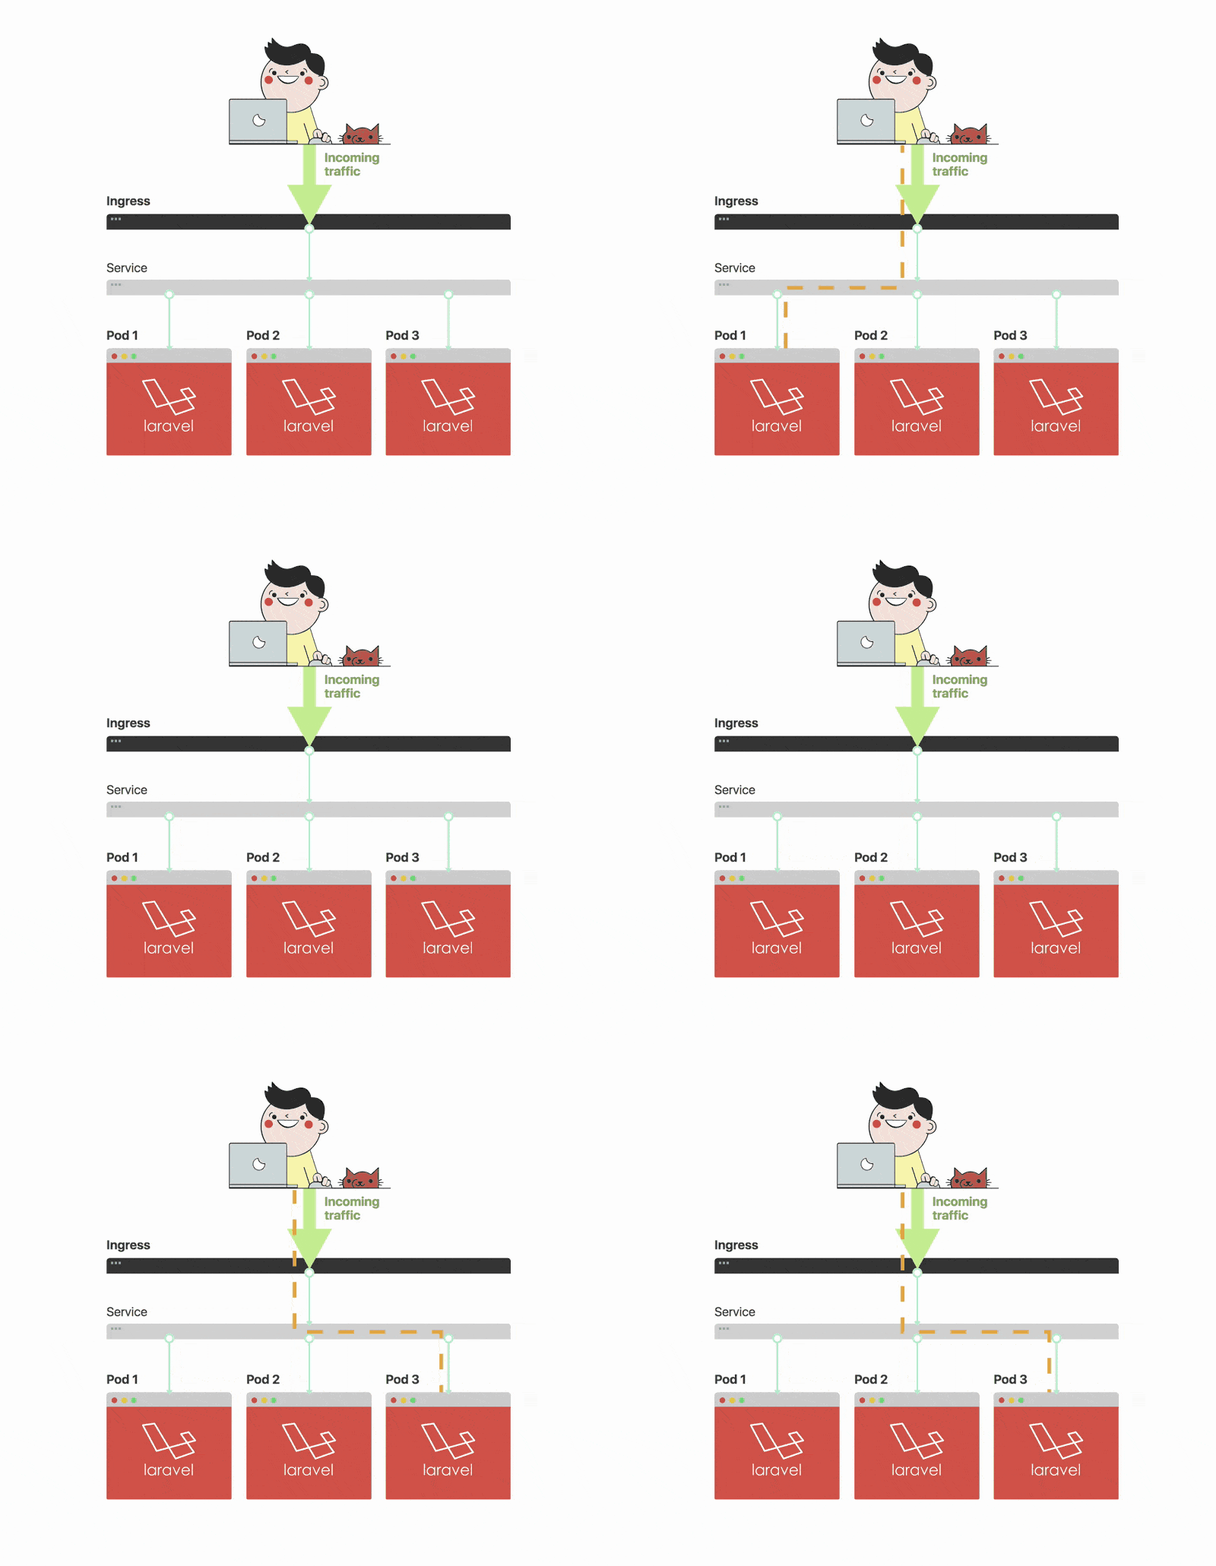
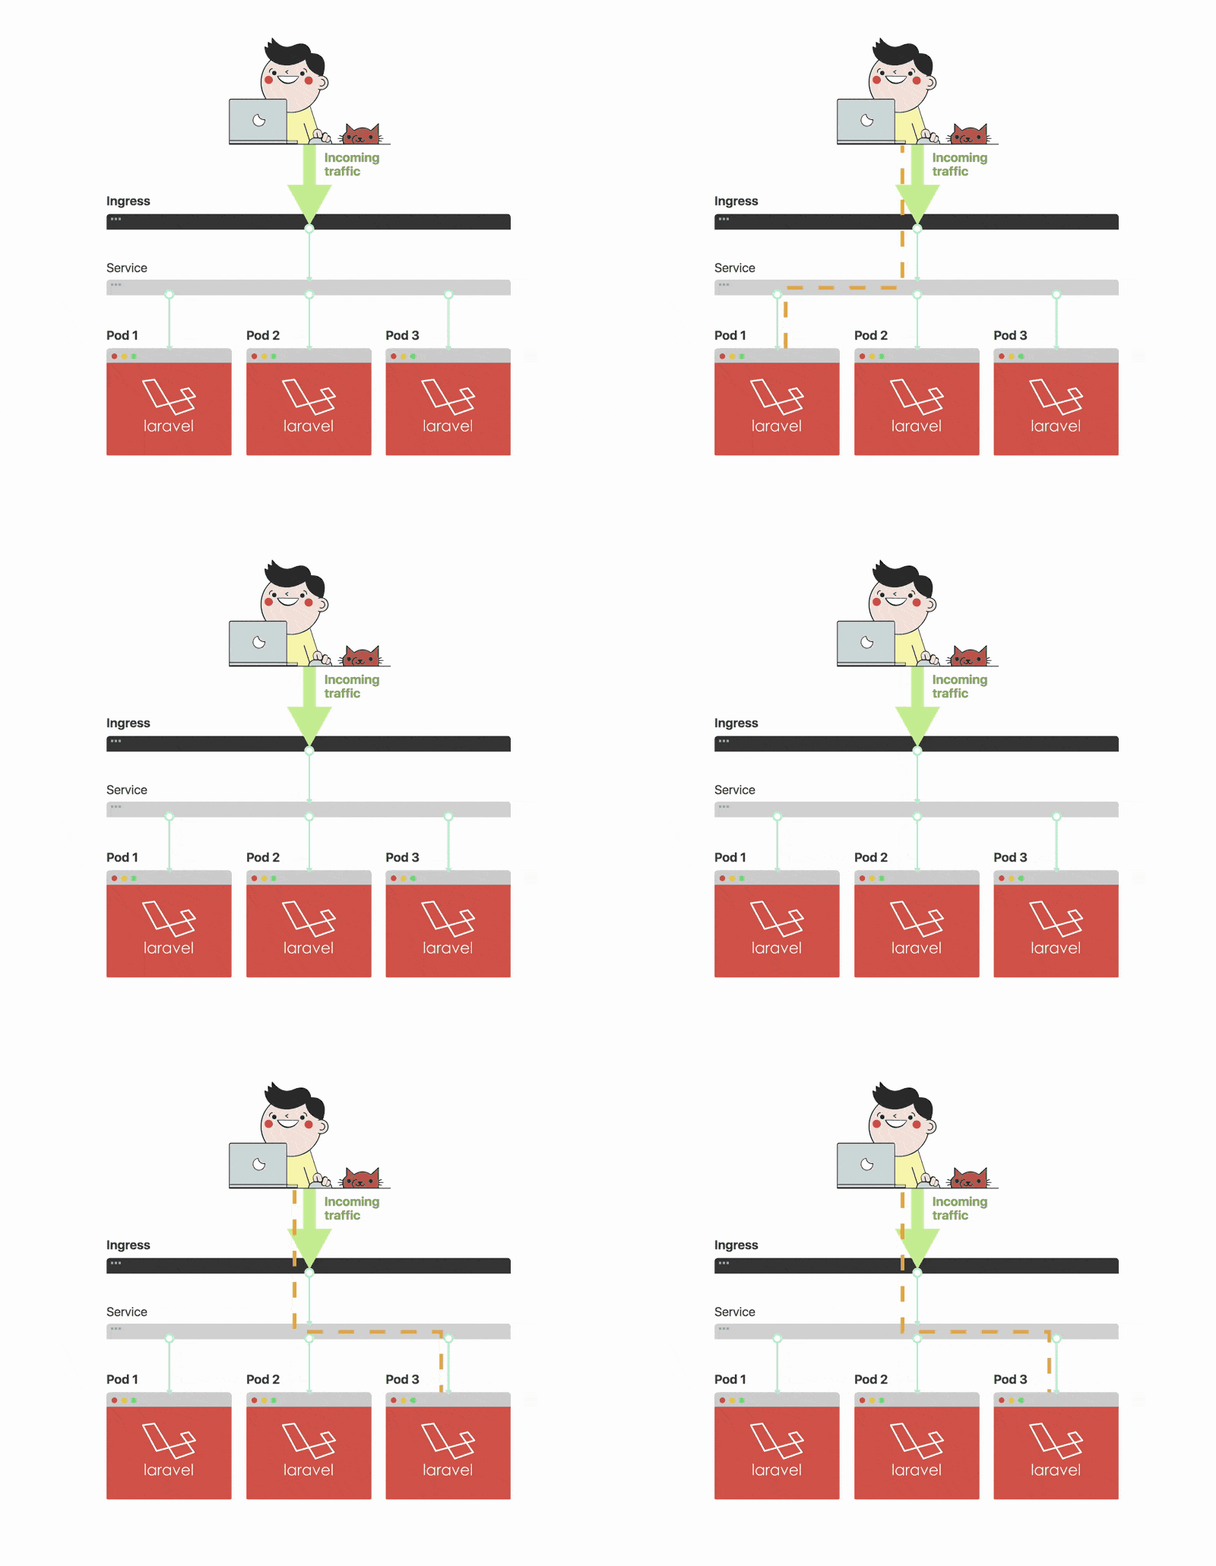
I have included an ingress.yaml file with the source code of this demo application with the following contents:
apiVersion: extensions/v1beta1 kind: Ingress metadata: name: laravel-kubernetes-demo-ingress annotations: ingress.kubernetes.io/rewrite-target: / spec: backend: serviceName: default-http-server servicePort: 80 rules: - host: laravel-kubernetes.demo - http: paths: - path: / backend: serviceName: laravel-kubernetes-demo servicePort: 80Among the basic content you would expect from a Kubernetes resource file, this file defines a set of rules to follow when routing inbound traffic. The laravel-kubernetes.demo URL will point to the Service where the application is running, as previously labelled laravel-kubernetes-demo on port 8181.
The Ingress resource is useless without an Ingress controller so you will need to create a new controller or use an existing one. This tutorial uses the Nginx Ingress controller for routing the traffic. Minikube (v0.14 and above) comes with the Nginx setup as an addon which you will need to enable manually:
minikube addons enable ingressPlease note that it may take few minutes for Minikube to download and install Nginx as an Ingress.
Once you have enabled the Ingress addon, you can create the Ingress in this way:
kubectl create -f path-to-your-ingress-file.yamlYou can verify and obtain the Ingress’ information by running the following command:
kubectl describe ing laravel-kubernetes-demo-ingresswhich outputs something similar to:
Name: laravel-kubernetes-demo-ingress Namespace: default Address: 192.168.99.101 Default backend: default-http-server:80 (<none>) Rules: Host Path Backends ---- ---- -------- * / laravel-kubernetes-demo:8181 (172.17.0.6:8181) Annotations: rewrite-target: / Events: Type Reason Age From Message ---- ------ ---- ---- ------- Normal CREATE 39s nginx-ingress-controller Ingress default/laravel-kubernetes-demo-ingressNormal UPDATE 20s nginx-ingress-controller Ingress default/laravel-kubernetes-demo-ingressYou can now access the application through the minikube IP address as shown above. To access the application through the URL https://laravel-kubernetes.demo, you will need to add an entry in your hosts file.
This is just the beginning
Hopefully, this article has helped you in getting acquainted with Kubernetes. From my own experience, once one has performed similar deployments a couple or more times, things start getting habitual and make a lot more sense. But our Kubernetes journey has only just begun. In future articles, we will walk through more real-life applications using storage volumes to persist state, and we will also learn how to deploy to Cloud providers such as Google’s Cloud Platform. Until then, check out these courses to get up to speed and possibly even become a Certified Kubernetes Administrator (CKA).
Become an expert at deploying and scaling applications in Kubernetes
This article is part of the learnk8s workshop “Deploying and Scaling applications in Kubernetes”.
In the rest of the course you will learn how to:
- Handle the busiest traffic websites without breaking a sweat
- Scale your jobs to thousands of servers and reduce the waiting time from days to minutes
- Enjoy peace of mind knowing that your apps are highly available with a multi-cloud setup
- Save ton of cash on your cloud bill by using only the resources your need
- Supercharge your delivery pipeline and deploy application around the clock
P.S. Don’t miss the next experiment, insight, or discount: subscribe to the mailing list!
