
OpenShift跨版本升級
阿新 • • 發佈:2018-12-29
官方的in-place upgrade直接線上升級,但問題是隻能一個一個版本的升無法做到跨版本升級,如果一次跨越多個版本,並且叢集規模比較大的化,就需要花費很長的時間了。
實際生產過程中因為是分散式環境,所以機器量一般都比較大,官方升級模式有一個好處就是始終能夠對外提供服務。
問題是連續升級的時間消耗比較長,而且容易出問題。而這篇文章的方法是,直接安裝新的叢集模式,同時將原有的舊節點覆蓋成新的版本。
1.原有叢集備份
基於每個project備份
- 先列一下有啥東西
[[email protected] ~]# oc get all -n myproject NAME DOCKER REPO TAGS UPDATEDis/tomcat docker-registry.default.svc:5000/myproject/tomcat 8-slim 4 minutes ago NAME REVISION DESIRED CURRENT TRIGGERED BY dc/tomcat 1 1 1 config,image(tomcat:8-slim) NAME DESIRED CURRENT READY AGE rc/tomcat-1 1 1 1 3m NAME HOST/PORT PATH SERVICES PORT TERMINATION WILDCARD routes/tomcat tomcat-myproject.app.example.com tomcat 8080-tcp None NAME CLUSTER-IP EXTERNAL-IP PORT(S) AGE svc/tomcat 172.30.66.175 <none> 8080/TCP 3m NAME READY STATUS RESTARTS AGE po/tomcat-1-6c3s0 1/1 Running 0 3m
- 備份所有專案物件
[[email protected] ~]# oc get -o yaml --export all > project.yaml
[[email protected] ~]# ls
anaconda-ks.cfg  project.yaml  tomcat.tar
- 備份serviceaccount,secrets,pvc等等資訊
[[email protected] ~]# for object in rolebindings serviceaccounts secrets imagestreamtags podpreset cms egressnetworkpolicies rolebindingrestrictions limitranges resourcequotas pvcs templates cronjobs statefulsets hpas deployments replicasets poddisruptionbudget endpoints
> do
>   oc get -o yaml --export $object > $object.yaml
> done
the server doesn't have a resource type "cms"
the server doesn't have a resource type "pvcs"
the server doesn't have a resource type "hpas"
[[email protected] ~]# ls
anaconda-ks.cfg   egressnetworkpolicies.yaml  limitranges.yaml          pvcs.yaml                     rolebindings.yaml     templates.yaml
cms.yaml          endpoints.yaml              poddisruptionbudget.yaml  replicasets.yaml              secrets.yaml          tomcat.tar
cronjobs.yaml     hpas.yaml                   podpreset.yaml            resourcequotas.yaml           serviceaccounts.yaml
deployments.yaml  imagestreamtags.yaml        project.yaml              rolebindingrestrictions.yaml  statefulsets.yaml
2.新版本叢集安裝
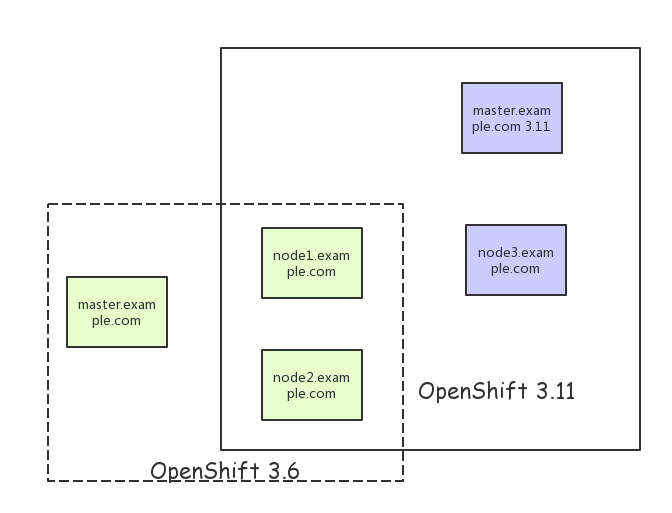
比如3.11, 加入一個fresh機器作為新的master節點
原有節點需要完成的工作包括:
- 刪除節點配置資訊
在原來的node1.example.com, node2.example.com中進行如下操作,如果不刪除配置將無法產生csr的請求
rm -rf /etc/origin/node/*
vi /etc/origin/node/resolv.conf

# nameserver updated by /etc/NetworkManager/dispatcher.d/99-origin-dns.sh
# Generated by NetworkManager
search cluster.local example.com
nameserver 192.168.56.113
- 更新/etc/hosts檔案指到新的master.example.com的地址
192.168.56.113    master.example.com
192.168.56.104    node1.example.com
192.168.56.105    node2.example.com
192.168.56.115    node3.example.com
192.168.56.115    registry.example.com
地址裡面,node1,node2是3.6的版本,而node3是新節點。
- 修改ocp.repo指到新的yum源
- 建立節點互信
ssh-copy-id [email protected]
ssh-copy-id [email protected]
master配置
master.example.com中的/etc/ansible/hosts檔案
[[email protected] ~]# cat /etc/ansible/hosts
[OSEv3:children]
masters
nodes
etcd

# Set variables common for all OSEv3 hosts
[OSEv3:vars]
# SSH user, this user should allow ssh based auth without requiring a password
ansible_ssh_user=root

# If ansible_ssh_user is not root, ansible_become must be set to true
#ansible_become=true

openshift_deployment_type=openshift-enterprise
openshift_image_tag=v3.11.16
openshift_pkg_version=-3.11.16

openshift_master_default_subdomain=apps.example.com
openshift_docker_options="--selinux-enabled --insecure-registry 172.30.0.0/16 --log-driver json-file --log-opt max-size=50M --log-opt max-file=3 --insecure-registry registry.example.com --add-registry registry.example.com"

oreg_url=registry.example.com/openshift3/ose-${component}:${version}
openshift_examples_modify_imagestreams=true

openshift_metrics_install_metrics=true
openshift_logging_install_logging=false
openshift_logging_es_nodeselector={"node-role.kubernetes.io/infra": "true"}
openshift_enable_service_catalog=false
ansible_service_broker_install=false

# uncomment the following to enable htpasswd authentication; defaults to DenyAllPasswordIdentityProvider
openshift_master_identity_providers=[{'name': 'htpasswd_auth', 'login': 'true', 'challenge': 'true', 'kind': 'HTPasswdPasswordIdentityProvider'}]

openshift_disable_check="disk_availability,docker_image_availability,memory_availability,docker_storage,package_version"

# host group for masters
[masters]
master.example.com

# host group for etcd
[etcd]
master.example.com

# host group for nodes, includes region info
[nodes]
master.example.com openshift_node_group_name='node-config-master'
node1.example.com openshift_node_group_name='node-config-infra'
node2.example.com openshift_node_group_name='node-config-compute'
node3.example.com openshift_node_group_name='node-config-compute'
資源問題,不安裝log,service catalog什麼的了。
執行部署
ansible-playbook -vv /usr/share/ansible/openshift-ansible/playbooks/deploy_cluster.yml
驗證安裝
[[email protected] openshift-ansible]# oc get nodes
NAME                 STATUS    ROLES     AGE       VERSION
master.example.com   Ready     master    44m       v1.11.0+d4cacc0
node1.example.com    Ready     infra     40m       v1.11.0+d4cacc0
node2.example.com    Ready     compute   40m       v1.11.0+d4cacc0
node3.example.com    Ready     compute   40m       v1.11.0+d4cacc0
3.專案恢復
$ oc new-project <projectname>

匯入映象(如果映象倉庫沒修改就不用了)

$ oc create -f project.yaml
$ oc create -f secret.yaml
$ oc create -f serviceaccount.yaml
$ oc create -f pvc.yaml
$ oc create -f rolebindings.yaml
備份和恢復參考
https://docs.openshift.com/container-platform/3.11/day_two_guide/project_level_tasks.html