
Simple Method of Creating Animated Graphs
Simple Method of Creating Animated Graphs
Data Science Toolkit


Introduction
After the publication of one of my latest articles, many people asked me for tips on how to create animated charts in Python. Indeed, there are often situations when a static chart is no longer sufficient and in order to illustrate the problem we are working on we need something more powerful. There are of course many libraries that allow us to make animated and sometimes even interactive graphs like Bokeh, Pygal or my personal favorite Plotly. This time however, we will go old school — I will show you how to create really impressive charts using only “simple” Matplotlib and a few command line tricks. Inside the article I will place only the most important parts of the code. But on my


Matplotlib Animation API
Looking for interesting examples that I could use in this article I decided to illustrate Lorenz Attractor. Its elegant form and unique properties makes it a great material to create eye-catching visualizations. Lorenz Attractor is famous for producing completely different results for almost identical initial conditions. Let’s try to visualize this property using a dedicated animation API in the Matplotlib library. We will create three separate trajectories in three-dimensional space and present how they behave in different points of time. First of all, of course, we have to import all the necessary dependencies.
The class that will help us perform animation is FuncAnimation (link). However, in order to use it, we first have to prepare a basic, empty chart and a function that will be executed in each iteration updating the data presented in the current frame. In my example, the process of creating and styling the graph has been extracted into a separate auxiliary function — create_blank_chart_with_styling
At the heart of our animation lies the chart updating function, which takes the index of the currently rendered frame as an argument and makes sure that an appropriate set of data is displayed on the chart. In version, I used, in each frame Matplotlib, takes a clean graph which we supplied in the constructor and adds currently selected data to it. This means that in each frame I have to add all the elements that I want to be displayed. By the way, it is worth noting that the library also contains another mode, namely adding more elements to the graph obtained in the previous iteration.


Finally, we create an instance of the FuncAnimation class, giving as arguments: initial graph, updating function, number of frames, as well as the time interval in which they should change. We can now choose the output file format and the quality of our animation. The results of our work can be seen in Figure 2.
Let’s read neural network thoughts
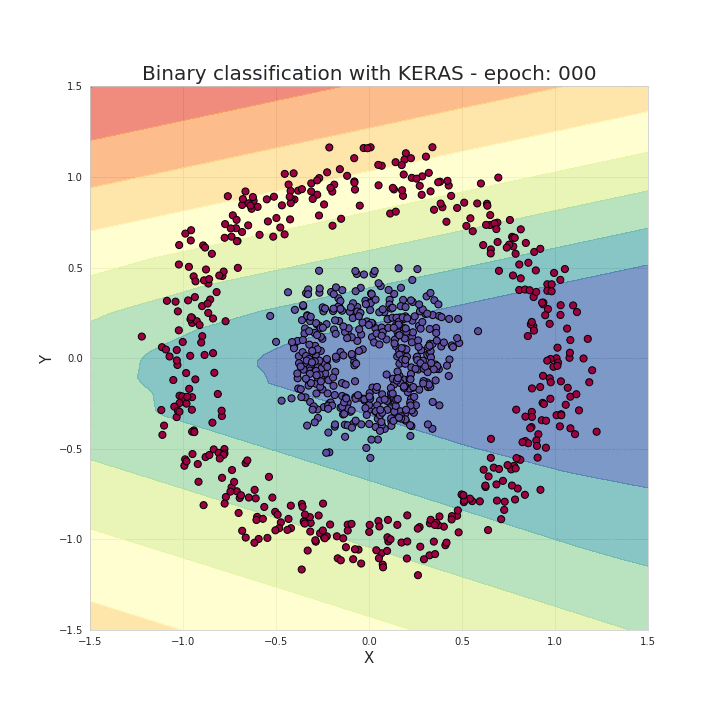
Matplotlib Animation API is great, but I often choose to render separate frames as png images and then combine them into a moving gif using ImageMagick — an incredibly useful tool available on Linux, Mac as well as Windows. I do so because creating a function updating the graph is not always as obvious and convenient— for example, when we want to visualize the learning process of our neural network, trained using Keras.


Thanks to the use of keras.callbacks.LambdaCallback (link) we can access our model after each iteration, collect all the necessary data and make visualizations. All we have to do is to pass on our rendering method as an argument of the .fit() method. The function that I created to accomplish this task looks like this.
Assuming that we have already defined the architecture of our model (see how to do it), we can now start training. Let’s not forget to add our callback. We can do this as follows.
As a result, in each epoch a single frame of our future animation is created. All the images obtained are shown next to each other in Figure 3. Now the only thing we have to do is to combine them with each other to create a smooth animation. Luckily for us, using ImageMagic, we only need one command.

Conclusions
I hope that my tips and examples have been helpful and you will use them at work, in college or in the next article on the Medium. All you need is a bit of creativity and some free time. If you like this article share it and follow me on Twitter and Medium and see other projects I’m working on, on GitHub and Kaggle. Stay curious!